Owner's Manual
Page 1
Dell™ Laser Multi-Function Printer 1600n Owner's Manual Look Inside For: • Preparing Your Multi-Function Printer • Understanding the Software • Loading Print Media • Using Your Multi-Function Printer • Maintenance • Troubleshooting • Installing Options www.dell.com/supplies | support.dell.com
Dell™ Laser Multi-Function Printer 1600n Owner's Manual Look Inside For: • Preparing Your Multi-Function Printer • Understanding the Software • Loading Print Media • Using Your Multi-Function Printer • Maintenance • Troubleshooting • Installing Options www.dell.com/supplies | support.dell.com

Owner's Manual
Page 8
...ADF Rubber Pad 56 Ordering Supplies 58 Replacing the Toner Cartridge 59 Cleaning Your Multi-Function Printer 61 Cleaning the Exterior 61 Cleaning the Interior 62 Cleaning the scanner 63 Cleaning the Drum 64 6 Troubleshooting Clearing Jams in the ADF 66 Clearing Jams in the Paper Tray 68 Paper Feed Jam... (Tray 1 68 Paper Exit Jam 70 Fuser Area Jam 71 Manual Feeder Jam 73 Paper Feed Jam (Optional Tray 2 73 Tips for Avoiding Paper Jams 74 More Troubleshooting 74 viii Contents
...ADF Rubber Pad 56 Ordering Supplies 58 Replacing the Toner Cartridge 59 Cleaning Your Multi-Function Printer 61 Cleaning the Exterior 61 Cleaning the Interior 62 Cleaning the scanner 63 Cleaning the Drum 64 6 Troubleshooting Clearing Jams in the ADF 66 Clearing Jams in the Paper Tray 68 Paper Feed Jam... (Tray 1 68 Paper Exit Jam 70 Fuser Area Jam 71 Manual Feeder Jam 73 Paper Feed Jam (Optional Tray 2 73 Tips for Avoiding Paper Jams 74 More Troubleshooting 74 viii Contents
Owner's Manual
Page 75
SECTION 6 Troubleshooting Clearing Jams in the ADF Clearing Jams in the Paper Tray More Troubleshooting
SECTION 6 Troubleshooting Clearing Jams in the ADF Clearing Jams in the Paper Tray More Troubleshooting

Owner's Manual
Page 76
b Remove the document by gently pulling it passes through the Automatic Document Feeder (ADF), "Document Jam" appears on the display. Then reload the document into the ADF. 66 Troubleshooting NOTE: To prevent document jams, use the scanner glass for thick, thin or mixed documents. 1 Remove the remaining documents from the ADF. c Close the ADF cover. If the document is jammed in the ADF When a document jams while it straight up. www.dell.com/supplies | support.dell.com Clearing Jams in the paper feed area: a Open the ADF cover.
b Remove the document by gently pulling it passes through the Automatic Document Feeder (ADF), "Document Jam" appears on the display. Then reload the document into the ADF. 66 Troubleshooting NOTE: To prevent document jams, use the scanner glass for thick, thin or mixed documents. 1 Remove the remaining documents from the ADF. c Close the ADF cover. If the document is jammed in the ADF When a document jams while it straight up. www.dell.com/supplies | support.dell.com Clearing Jams in the paper feed area: a Open the ADF cover.

Owner's Manual
Page 77
... the document is jammed in the paper exit area: a Open the document cover and turn the release knob to the right. 4 Close the document cover. Troubleshooting 67 Then load the documents back into the ADF. 2 If you cannot see the paper or the paper does not move when you pulled, open...
... the document is jammed in the paper exit area: a Open the document cover and turn the release knob to the right. 4 Close the document cover. Troubleshooting 67 Then load the documents back into the ADF. 2 If you cannot see the paper or the paper does not move when you pulled, open...

Owner's Manual
Page 78
...] Manual Feeder Jam page 73. Follow the steps below . To avoid tearing the paper, pull the jammed paper out gently and slowly. www.dell.com/supplies | support.dell.com Clearing Jams in the Paper Tray Operator Panel Message Location of Jam Go to [Paper Jam 0] Open/Close Door [Paper Jam 1] Open/Close... Door Paper Feed Jam (Tray 1) Paper Feed Jam (optional Tray 2) Paper Exit Jam Image below to step 2. 2 Pull the paper tray open. 68 Troubleshooting The jammed paper automatically exits the multi-function printer.
...] Manual Feeder Jam page 73. Follow the steps below . To avoid tearing the paper, pull the jammed paper out gently and slowly. www.dell.com/supplies | support.dell.com Clearing Jams in the Paper Tray Operator Panel Message Location of Jam Go to [Paper Jam 0] Open/Close Door [Paper Jam 1] Open/Close... Door Paper Feed Jam (Tray 1) Paper Feed Jam (optional Tray 2) Paper Exit Jam Image below to step 2. 2 Pull the paper tray open. 68 Troubleshooting The jammed paper automatically exits the multi-function printer.

Owner's Manual
Page 79
For more information, see the paper or the paper does not move when pulled, check the fuser area. Troubleshooting 69 If you cannot see page 71. 4 Insert the paper tray into the multi-function printer until it straight out. 3 Remove the paper by gently pulling it snaps into place. 5 Open and close the front cover to resume printing.
For more information, see the paper or the paper does not move when pulled, check the fuser area. Troubleshooting 69 If you cannot see page 71. 4 Insert the paper tray into the multi-function printer until it straight out. 3 Remove the paper by gently pulling it snaps into place. 5 Open and close the front cover to resume printing.

Owner's Manual
Page 80
If the paper does not exit, continue to step 6. 3 If you cannot see the paper in the front output tray or the paper does not move when pulled, open the rear cover. 70 Troubleshooting Skip to step 2. 2 Gently pull the paper out of the front output tray. www.dell.com/supplies | support.dell.com Paper Exit Jam 1 Open and close the front cover. The jammed paper automatically exits the multi-function printer.
If the paper does not exit, continue to step 6. 3 If you cannot see the paper in the front output tray or the paper does not move when pulled, open the rear cover. 70 Troubleshooting Skip to step 2. 2 Gently pull the paper out of the front output tray. www.dell.com/supplies | support.dell.com Paper Exit Jam 1 Open and close the front cover. The jammed paper automatically exits the multi-function printer.

Owner's Manual
Page 81
Take care when removing paper from the multi-function printer. 1 Open the front cover and lightly pull the toner cartridge straight out. Troubleshooting 71 4 Remove the paper by gently pulling it straight out. 5 Close the rear cover. 6 Open and close the front cover to resume printing. Fuser Area Jam NOTE: The fuser area is hot.
Take care when removing paper from the multi-function printer. 1 Open the front cover and lightly pull the toner cartridge straight out. Troubleshooting 71 4 Remove the paper by gently pulling it straight out. 5 Close the rear cover. 6 Open and close the front cover to resume printing. Fuser Area Jam NOTE: The fuser area is hot.

Owner's Manual
Page 82
Printing automatically resumes. 72 Troubleshooting www.dell.com/supplies | support.dell.com 2 Remove the paper by gently pulling it straight out. 3 Replace the toner cartridge and close the front cover.
Printing automatically resumes. 72 Troubleshooting www.dell.com/supplies | support.dell.com 2 Remove the paper by gently pulling it straight out. 3 Replace the toner cartridge and close the front cover.

Owner's Manual
Page 83
Troubleshooting 73 If you try to print using the manual feeder and the multi-function printer does not detect paper, due to improper paper loading. 1 Locate the jammed paper in this area or the paper does not move when pulled, go to step 3. 3 Pull the standard Tray 1 open . 2 Remove the jammed paper from the multi-function printer. Manual Feeder Jam "Manual F. Jam" appears on the display when you cannot see the paper in the manual feeder 2 Gently pull the paper straight out of the multi-function printer. Paper Feed Jam (Optional Tray 2) 1 Pull the optional Tray 2 open .
Troubleshooting 73 If you try to print using the manual feeder and the multi-function printer does not detect paper, due to improper paper loading. 1 Locate the jammed paper in this area or the paper does not move when pulled, go to step 3. 3 Pull the standard Tray 1 open . 2 Remove the jammed paper from the multi-function printer. Manual Feeder Jam "Manual F. Jam" appears on the display when you cannot see the paper in the manual feeder 2 Gently pull the paper straight out of the multi-function printer. Paper Feed Jam (Optional Tray 2) 1 Pull the optional Tray 2 open .
Owner's Manual
Page 84
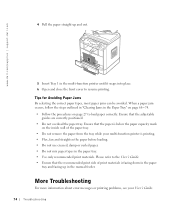
...8226; Ensure that the adjustable guides are correctly positioned. • Do not overload the paper tray. More Troubleshooting For more information about error messages or printing problems, see your multi-function printer is facing down in the paper tray and facing up and out. 5 Insert Tray 1 in the multi-...damp or curled paper. • Do not mix paper types in the paper tray. • Use only recommended print materials. www.dell.com/supplies | support.dell.com 4 Pull the paper straight up in the manual feeder. Ensure that the recommended print side of the paper tray. • Do...
...8226; Ensure that the adjustable guides are correctly positioned. • Do not overload the paper tray. More Troubleshooting For more information about error messages or printing problems, see your multi-function printer is facing down in the paper tray and facing up and out. 5 Insert Tray 1 in the multi-...damp or curled paper. • Do not mix paper types in the paper tray. • Use only recommended print materials. www.dell.com/supplies | support.dell.com 4 Pull the paper straight up in the manual feeder. Ensure that the recommended print side of the paper tray. • Do...

Owner's Manual
Page 134
... jams, clearing, 68 paper size, setting, 35 paper type, setting, 41 paper, loading, 27 parts of your printer, iii printer ID,setting, 7 T tel line, connecting, 5 toner cartridge replacing, 59 toner ordering, ii transparencies, loading, 27 troubleshooting, 65 U uninstalling, software, 22 R replacing toner cartridge, 59 S safety information, 1 scanner, cleaning, 63 scanning, 44 operator panel...
... jams, clearing, 68 paper size, setting, 35 paper type, setting, 41 paper, loading, 27 parts of your printer, iii printer ID,setting, 7 T tel line, connecting, 5 toner cartridge replacing, 59 toner ordering, ii transparencies, loading, 27 troubleshooting, 65 U uninstalling, software, 22 R replacing toner cartridge, 59 S safety information, 1 scanner, cleaning, 63 scanning, 44 operator panel...

Dell Laser Multi-Function Printer 1600n User's Guide
Page 4
... the Express Service Code to access help tools and information. Printer documentation and product specifications You can access Dell Support at support.dell.com. Drivers Reference - Dell Support Website The Dell Support Website provides several online tools, including: Solutions - Troubleshooting hints and tips, articles from technicians, and online courses Upgrades - The Express Service Code is not...
... the Express Service Code to access help tools and information. Printer documentation and product specifications You can access Dell Support at support.dell.com. Drivers Reference - Dell Support Website The Dell Support Website provides several online tools, including: Solutions - Troubleshooting hints and tips, articles from technicians, and online courses Upgrades - The Express Service Code is not...

Dell Laser Multi-Function Printer 1600n User's Guide
Page 6
To set up email alerts: 1. Launch the Dell Printer Configuration Web Tool. 2. Click Submit. Set Password Lock the operator panel with a password so that other users don't inadvertently change the printer settings you need for printer troubleshooting. Online Help Click Help to use this feature. NOTE: For more information about the All-In-One Main page...
To set up email alerts: 1. Launch the Dell Printer Configuration Web Tool. 2. Click Submit. Set Password Lock the operator panel with a password so that other users don't inadvertently change the printer settings you need for printer troubleshooting. Online Help Click Help to use this feature. NOTE: For more information about the All-In-One Main page...

Dell Laser Multi-Function Printer 1600n User's Guide
Page 139
NOTE: To prevent document jams, use the scanner glass for thick, thin or mixed documents. 1. Open the ADF cover. Remove the remaining documents from the ADF. Remove the document by gently pulling it passes through the Automatic Document Feeder (ADF), "Document Jam" appears on the display. b. If the document is jammed in the ADF When a document jams while it straight up. Troubleshooting Clearing Jams in the ADF Clearing Jams in the Paper Tray Clearing LCD Error Messages Solving Problems Clearing Jams in the paper feed area: a.
NOTE: To prevent document jams, use the scanner glass for thick, thin or mixed documents. 1. Open the ADF cover. Remove the remaining documents from the ADF. Remove the document by gently pulling it passes through the Automatic Document Feeder (ADF), "Document Jam" appears on the display. b. If the document is jammed in the ADF When a document jams while it straight up. Troubleshooting Clearing Jams in the ADF Clearing Jams in the Paper Tray Clearing LCD Error Messages Solving Problems Clearing Jams in the paper feed area: a.

Dell Laser Multi-Function Printer 1600n User's Guide
Page 159
...that the USB cable is configured correctly. If necessary, replace the cable. Check the application you want ." There may occur when several printer languages are scanned more slowly than text. Check that the USB cable is complete, try the job again. Check that the USB cable ... the cable with a known good cable. The unit scans very slowly. Check if the multi-function printer is Disabled." Graphics are being used . "Port is printing received data. Troubleshooting Postscript (PS) Errors The following situations are PS language specific and may not be scanned face down from...
...that the USB cable is configured correctly. If necessary, replace the cable. Check the application you want ." There may occur when several printer languages are scanned more slowly than text. Check that the USB cable is complete, try the job again. Check that the USB cable ... the cable with a known good cable. The unit scans very slowly. Check if the multi-function printer is Disabled." Graphics are being used . "Port is printing received data. Troubleshooting Postscript (PS) Errors The following situations are PS language specific and may not be scanned face down from...

Service Manual
Page 1
Block Diagram 10. Circuit Description 12. TM Easy as DellTM Laser MFP 1600n SERVICE Manual DellTM Laser MFP CONTENTS 1. Precautions 2. Reference Information 3. Specifications 4. Alignment and Adjustments 7. Troubleshooting 8. Exploded Views and Parts List 9. Schematic Diagram Connection Diagram 11. Summary of product 5. Disassembly and Reassembly 6.
Block Diagram 10. Circuit Description 12. TM Easy as DellTM Laser MFP 1600n SERVICE Manual DellTM Laser MFP CONTENTS 1. Precautions 2. Reference Information 3. Specifications 4. Alignment and Adjustments 7. Troubleshooting 8. Exploded Views and Parts List 9. Schematic Diagram Connection Diagram 11. Summary of product 5. Disassembly and Reassembly 6.

Service Manual
Page 8
..., and a guide to the location space required when installing the printer. Reference Information This chapter contains the tools list, list of tests pages and Wireless Network information definition is also included. 2.1 Tool for Troubleshooting The following tools are recommended safe and easy troubleshooting as described in this service manual. • DVM(Digital Volt...
..., and a guide to the location space required when installing the printer. Reference Information This chapter contains the tools list, list of tests pages and Wireless Network information definition is also included. 2.1 Tool for Troubleshooting The following tools are recommended safe and easy troubleshooting as described in this service manual. • DVM(Digital Volt...

Service Manual
Page 91
... is broken away. 5. Clean with soft cloth dampened with IPA(Isopropyl Alcohol) or water. 4. 77. Service Manual 7-1 Troubleshooting 7.1 Paper Feeding Problems Troubleshooting 7.1.1 Wrong Print Position • Description Printing begins when the paper is in the wrong position. Jam-0 occurs if the ...paper feeds into the printer rand Jam 0 occurs, perform DCU to bad sealing of the roller-pickup for foreign matter. ...
... is broken away. 5. Clean with soft cloth dampened with IPA(Isopropyl Alcohol) or water. 4. 77. Service Manual 7-1 Troubleshooting 7.1 Paper Feeding Problems Troubleshooting 7.1.1 Wrong Print Position • Description Printing begins when the paper is in the wrong position. Jam-0 occurs if the ...paper feeds into the printer rand Jam 0 occurs, perform DCU to bad sealing of the roller-pickup for foreign matter. ...


