
Owner's Manual
Page 4
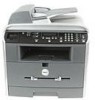
... printer. # Use the: When you want to: 13 Document Input Tray Load the document for copying, scanning and sending faxes. 14 Document Guides Ensure proper document feeding. 15 23 22 16 21 17 20 19 18 # Use the: When you want to: 15 Rear Cover Open to remove the paper jams... and use the rear output slot when you print the documents from the Phone connector ( ) and insert the supplied terminator. 19 Wall Jack Connector Connect the telephone line to your multi-function printer. 20 Optional Tray 2 Cable Connect the optional Tray 2 ...
... printer. # Use the: When you want to: 13 Document Input Tray Load the document for copying, scanning and sending faxes. 14 Document Guides Ensure proper document feeding. 15 23 22 16 21 17 20 19 18 # Use the: When you want to: 15 Rear Cover Open to remove the paper jams... and use the rear output slot when you print the documents from the Phone connector ( ) and insert the supplied terminator. 19 Wall Jack Connector Connect the telephone line to your multi-function printer. 20 Optional Tray 2 Cable Connect the optional Tray 2 ...

Owner's Manual
Page 8
...Function Printer 61 Cleaning the Exterior 61 Cleaning the Interior 62 Cleaning the scanner 63 Cleaning the Drum 64 6 Troubleshooting Clearing Jams in the ADF 66 Clearing Jams in the Paper Tray 68 Paper Feed Jam (Tray 1 68 Paper Exit Jam 70 Fuser Area Jam 71 Manual Feeder Jam 73 Paper Feed Jam ...(Optional Tray 2 73 Tips for Avoiding Paper Jams 74 More Troubleshooting 74 viii Contents
...Function Printer 61 Cleaning the Exterior 61 Cleaning the Interior 62 Cleaning the scanner 63 Cleaning the Drum 64 6 Troubleshooting Clearing Jams in the ADF 66 Clearing Jams in the Paper Tray 68 Paper Feed Jam (Tray 1 68 Paper Exit Jam 70 Fuser Area Jam 71 Manual Feeder Jam 73 Paper Feed Jam ...(Optional Tray 2 73 Tips for Avoiding Paper Jams 74 More Troubleshooting 74 viii Contents

Owner's Manual
Page 39
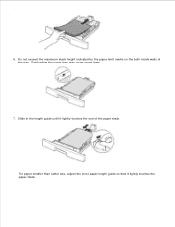
For paper smaller than Letter size, adjust the inner paper length guide so that lightly touches the paper stack. Loading Print Media 29 Overloading the paper tray may cause paper jams. 7 Slide in the length guide until it lightly touches the end of tray. 6 Do not exceed the maximum stack height indicated by the paper limit marks on both inside walls of the paper stack.
For paper smaller than Letter size, adjust the inner paper length guide so that lightly touches the paper stack. Loading Print Media 29 Overloading the paper tray may cause paper jams. 7 Slide in the length guide until it lightly touches the end of tray. 6 Do not exceed the maximum stack height indicated by the paper limit marks on both inside walls of the paper stack.

Owner's Manual
Page 40
NOTE: Improper adjustment of the stack. For details, see page 35. 30 Loading Print Media www.dell.com/supplies | support.dell.com 8 Pinch the paper width guide, as shown and move it towards the stack of paper until it lightly touches the side of paper guides can result in paper jams. 9 Insert and slide the paper tray back into the multi-function printer. 10 Set the paper type and size.
NOTE: Improper adjustment of the stack. For details, see page 35. 30 Loading Print Media www.dell.com/supplies | support.dell.com 8 Pinch the paper width guide, as shown and move it towards the stack of paper until it lightly touches the side of paper guides can result in paper jams. 9 Insert and slide the paper tray back into the multi-function printer. 10 Set the paper type and size.
Owner's Manual
Page 41
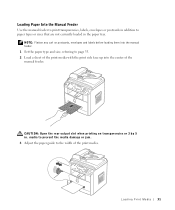
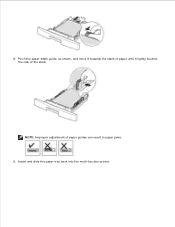
... manual feeder. NOTE: Flatten any curl on transparencies or 3 by 5 in the paper tray. Loading Print Media 31 media to prevent the media damage or jam. 3 Adjust the paper guide to paper types or sizes that are not currently loaded in .
... manual feeder. NOTE: Flatten any curl on transparencies or 3 by 5 in the paper tray. Loading Print Media 31 media to prevent the media damage or jam. 3 Adjust the paper guide to paper types or sizes that are not currently loaded in .
Owner's Manual
Page 75
SECTION 6 Troubleshooting Clearing Jams in the ADF Clearing Jams in the Paper Tray More Troubleshooting
SECTION 6 Troubleshooting Clearing Jams in the ADF Clearing Jams in the Paper Tray More Troubleshooting

Owner's Manual
Page 76
If the document is jammed in the ADF When a document jams while it straight up. b Remove the document by gently pulling it passes through the Automatic Document Feeder (ADF), "Document Jam" appears on the display. Then reload the document into the ADF. 66 Troubleshooting www.dell.com/supplies | support.dell.com Clearing Jams in the paper feed area: a Open the ADF cover. NOTE: To prevent document jams, use the scanner glass for thick, thin or mixed documents. 1 Remove the remaining documents from the ADF. c Close the ADF cover.
If the document is jammed in the ADF When a document jams while it straight up. b Remove the document by gently pulling it passes through the Automatic Document Feeder (ADF), "Document Jam" appears on the display. Then reload the document into the ADF. 66 Troubleshooting www.dell.com/supplies | support.dell.com Clearing Jams in the paper feed area: a Open the ADF cover. NOTE: To prevent document jams, use the scanner glass for thick, thin or mixed documents. 1 Remove the remaining documents from the ADF. c Close the ADF cover.

Owner's Manual
Page 77
... the roller or the feed area by carefully pulling it gently to remove the misfed documents from the ADF output tray. If the document is jammed in the paper exit area: a Open the document cover and turn the release knob to the right. 4 Close the document cover. b Close the document cover...
... the roller or the feed area by carefully pulling it gently to remove the misfed documents from the ADF output tray. If the document is jammed in the paper exit area: a Open the document cover and turn the release knob to the right. 4 Close the document cover. b Close the document cover...

Owner's Manual
Page 78
... automatically exits the multi-function printer. page 70. [Paper Jam 2] Check Inside Fuser Area Jam page 71. [Manual F. Follow the steps below to [Paper Jam 0] Open/Close Door [Paper Jam 1] Open/Close Door Paper Feed Jam (Tray 1) Paper Feed Jam (optional Tray 2) Paper Exit Jam Image below. www.dell.com/supplies | support.dell.com Clearing Jams in the Paper Tray Operator...
... automatically exits the multi-function printer. page 70. [Paper Jam 2] Check Inside Fuser Area Jam page 71. [Manual F. Follow the steps below to [Paper Jam 0] Open/Close Door [Paper Jam 1] Open/Close Door Paper Feed Jam (Tray 1) Paper Feed Jam (optional Tray 2) Paper Exit Jam Image below. www.dell.com/supplies | support.dell.com Clearing Jams in the Paper Tray Operator...

Owner's Manual
Page 80
If the paper does not exit, continue to step 6. 3 If you cannot see the paper in the front output tray or the paper does not move when pulled, open the rear cover. 70 Troubleshooting www.dell.com/supplies | support.dell.com Paper Exit Jam 1 Open and close the front cover. Skip to step 2. 2 Gently pull the paper out of the front output tray. The jammed paper automatically exits the multi-function printer.
If the paper does not exit, continue to step 6. 3 If you cannot see the paper in the front output tray or the paper does not move when pulled, open the rear cover. 70 Troubleshooting www.dell.com/supplies | support.dell.com Paper Exit Jam 1 Open and close the front cover. Skip to step 2. 2 Gently pull the paper out of the front output tray. The jammed paper automatically exits the multi-function printer.

Owner's Manual
Page 81
Fuser Area Jam NOTE: The fuser area is hot. Take care when removing paper from the multi-function printer. 1 Open the front cover and lightly pull the toner cartridge straight out. Troubleshooting 71 4 Remove the paper by gently pulling it straight out. 5 Close the rear cover. 6 Open and close the front cover to resume printing.
Fuser Area Jam NOTE: The fuser area is hot. Take care when removing paper from the multi-function printer. 1 Open the front cover and lightly pull the toner cartridge straight out. Troubleshooting 71 4 Remove the paper by gently pulling it straight out. 5 Close the rear cover. 6 Open and close the front cover to resume printing.

Owner's Manual
Page 83
Paper Feed Jam (Optional Tray 2) 1 Pull the optional Tray 2 open . Manual Feeder Jam "Manual F. Troubleshooting 73 If you try to print using the manual feeder and the multi-function printer does not detect paper, due to step 3. 3 Pull the standard Tray 1 open . 2 Remove the jammed paper from the multi-function printer. Jam" appears on the display when you cannot see the paper in this area or the paper does not move when pulled, go to improper paper loading. 1 Locate the jammed paper in the manual feeder 2 Gently pull the paper straight out of the multi-function printer.
Paper Feed Jam (Optional Tray 2) 1 Pull the optional Tray 2 open . Manual Feeder Jam "Manual F. Troubleshooting 73 If you try to print using the manual feeder and the multi-function printer does not detect paper, due to step 3. 3 Pull the standard Tray 1 open . 2 Remove the jammed paper from the multi-function printer. Jam" appears on the display when you cannot see the paper in this area or the paper does not move when pulled, go to improper paper loading. 1 Locate the jammed paper in the manual feeder 2 Gently pull the paper straight out of the multi-function printer.
Owner's Manual
Page 84
... User's Guide. • Ensure that the adjustable guides are correctly positioned. • Do not overload the paper tray. www.dell.com/supplies | support.dell.com 4 Pull the paper straight up in the manual feeder. More Troubleshooting For more information about error messages or printing problems, ... not mix paper types in the paper tray. • Use only recommended print materials. When a paper jam occurs, follow the steps outlined in "Clearing Jams in the multi-function printer until it snaps into place. 6 Open and close the front cover to load paper correctly. Ensure that the...
... User's Guide. • Ensure that the adjustable guides are correctly positioned. • Do not overload the paper tray. www.dell.com/supplies | support.dell.com 4 Pull the paper straight up in the manual feeder. More Troubleshooting For more information about error messages or printing problems, ... not mix paper types in the paper tray. • Use only recommended print materials. When a paper jam occurs, follow the steps outlined in "Clearing Jams in the multi-function printer until it snaps into place. 6 Open and close the front cover to load paper correctly. Ensure that the...

Owner's Manual
Page 134
...size, 34 labels, 34 plain, 34 transparencies, 34 paper jams, clearing, 68 paper size, setting, 35 paper type, setting, 41 paper, loading, 27 parts of your printer, iii printer ID,setting, 7 T tel line, connecting, 5 toner ...cartridge replacing, 59 toner ordering, ii transparencies, loading, 27 troubleshooting, 65 U uninstalling, software, 22 R replacing toner cartridge, 59 S safety information, 1 scanner, cleaning, 63 scanning, 44 operator panel, 45 WIA driver, 46 setup, 5 supplies, ordering, 58 support contacting Dell...
...size, 34 labels, 34 plain, 34 transparencies, 34 paper jams, clearing, 68 paper size, setting, 35 paper type, setting, 41 paper, loading, 27 parts of your printer, iii printer ID,setting, 7 T tel line, connecting, 5 toner ...cartridge replacing, 59 toner ordering, ii transparencies, loading, 27 troubleshooting, 65 U uninstalling, software, 22 R replacing toner cartridge, 59 S safety information, 1 scanner, cleaning, 63 scanning, 44 operator panel, 45 WIA driver, 46 setup, 5 supplies, ordering, 58 support contacting Dell...
Dell Laser Multi-Function Printer 1600n User's Guide
Page 19
For paper smaller than Letter size, adjust the inner paper length guide so that it lightly touches the end of the tray. Do not exceed the maximum stack height indicated by the paper limit marks on the both inside walls of the paper stack. Slide in the length guide until it lightly touches the paper stack. 5. 6. Overloading the paper tray may cause paper jams. 7.
For paper smaller than Letter size, adjust the inner paper length guide so that it lightly touches the end of the tray. Do not exceed the maximum stack height indicated by the paper limit marks on the both inside walls of the paper stack. Slide in the length guide until it lightly touches the paper stack. 5. 6. Overloading the paper tray may cause paper jams. 7.
Dell Laser Multi-Function Printer 1600n User's Guide
Page 20
Insert and slide the paper tray back into the multi-function printer. NOTE: Improper adjustment of the stack. 8. Pinch the paper width guide, as shown, and move it towards the stack of paper until it lightly touches the side of paper guides can result in paper jams. 9.
Insert and slide the paper tray back into the multi-function printer. NOTE: Improper adjustment of the stack. 8. Pinch the paper width guide, as shown, and move it towards the stack of paper until it lightly touches the side of paper guides can result in paper jams. 9.

Dell Laser Multi-Function Printer 1600n User's Guide
Page 39
...Paper Type Setting the Paper Size Print Media Guidelines Print media is paper, card stock, transparencies, labels, and envelopes. Weight The multi-function printer can automatically feed paper weights from 60 to 105 g/m2 (16 to 28 lb bond) grain long in the ADF and from 60 ...accordingly. Paper For the best print quality, use 75 Selecting the appropriate print media for the print media, and how to feed properly, causing jams. For best performance, use 75 g/m2 (20 lb) xerographic, long grain paper. Paper Characteristics The following paper characteristics affect print quality and reliability...
...Paper Type Setting the Paper Size Print Media Guidelines Print media is paper, card stock, transparencies, labels, and envelopes. Weight The multi-function printer can automatically feed paper weights from 60 to 105 g/m2 (16 to 28 lb bond) grain long in the ADF and from 60 ...accordingly. Paper For the best print quality, use 75 Selecting the appropriate print media for the print media, and how to feed properly, causing jams. For best performance, use 75 g/m2 (20 lb) xerographic, long grain paper. Paper Characteristics The following paper characteristics affect print quality and reliability...

Dell Laser Multi-Function Printer 1600n User's Guide
Page 41
..., or releasing hazardous emissions. Do not mix print media sizes, weights, or types in jams. Do not use a source that you have cut or trimmed yourself. Check with the multi-function printer: Chemically treated papers used to determine whether the paper you have chosen is usually indicated on... To help avoid jams or poor print quality: Always use paper that does not support auto size sensing. Do not remove trays while a job is printing or Busy is properly loaded in the source. Remember to change the paper size setting when you are not recommended for laser printers.
..., or releasing hazardous emissions. Do not mix print media sizes, weights, or types in jams. Do not use a source that you have cut or trimmed yourself. Check with the multi-function printer: Chemically treated papers used to determine whether the paper you have chosen is usually indicated on... To help avoid jams or poor print quality: Always use paper that does not support auto size sensing. Do not remove trays while a job is printing or Busy is properly loaded in the source. Remember to change the paper size setting when you are not recommended for laser printers.

Dell Laser Multi-Function Printer 1600n User's Guide
Page 43
... into paper already packaged in manufacturing techniques. Your multi-function printer may require more paper dust than standard paper. Prepunched paper can cause jams when multiple sheets feed through the multi-function printer. Transparencies Try a sample of any transparencies you are considering...able to select and use prepunched paper: Test paper from several manufacturers before buying large quantities: Use transparencies designed specifically for laser printers. Print Media Source Tray 1 (standard tray) Optional Tray 2 Print Side Face down Top of Page Portrait Landscape Front of...
... into paper already packaged in manufacturing techniques. Your multi-function printer may require more paper dust than standard paper. Prepunched paper can cause jams when multiple sheets feed through the multi-function printer. Transparencies Try a sample of any transparencies you are considering...able to select and use prepunched paper: Test paper from several manufacturers before buying large quantities: Use transparencies designed specifically for laser printers. Print Media Source Tray 1 (standard tray) Optional Tray 2 Print Side Face down Top of Page Portrait Landscape Front of...

Dell Laser Multi-Function Printer 1600n User's Guide
Page 44
...176; C (401° F). Try a sample of any exposed adhesive when the flap is 25 percent or less. For best performance and to minimize jams, do not use up to prevent sheets from 75 g/m2 (20 lb bond) paper. Before loading transparencies, fan the stack to 90 g/m2 (... envelopes. See page 64 for instructions on transparencies designed for the manual feeder as long as the cotton content is in laser printers. Selecting Transparencies The multi-function printer can cause poor print quality. Use only transparencies that : Have excessive curl or twist Are stuck together or damaged in any...
...176; C (401° F). Try a sample of any exposed adhesive when the flap is 25 percent or less. For best performance and to minimize jams, do not use up to prevent sheets from 75 g/m2 (20 lb bond) paper. Before loading transparencies, fan the stack to 90 g/m2 (... envelopes. See page 64 for instructions on transparencies designed for the manual feeder as long as the cotton content is in laser printers. Selecting Transparencies The multi-function printer can cause poor print quality. Use only transparencies that : Have excessive curl or twist Are stuck together or damaged in any...


