Owner's Manual
Page 1
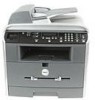
Dell™ Laser Multi-Function Printer 1600n Owner's Manual Look Inside For: • Preparing Your Multi-Function Printer • Understanding the Software • Loading Print Media • Using Your Multi-Function Printer • Maintenance • Troubleshooting • Installing Options www.dell.com/supplies | support.dell.com
Dell™ Laser Multi-Function Printer 1600n Owner's Manual Look Inside For: • Preparing Your Multi-Function Printer • Understanding the Software • Loading Print Media • Using Your Multi-Function Printer • Maintenance • Troubleshooting • Installing Options www.dell.com/supplies | support.dell.com

Owner's Manual
Page 3
... 14 13 2 3 4 11 10 56 9 8 7 # Use the: When you use support.dell.com or contact technical support. Feeder (ADF) 2 Operator Panel Operate the multi-function printer. 3 Paper Output Extension Keep print media from falling off the front output tray. 4 Express Service Code Identify your call ...Open to place a document on the scanner glass for copying, scanning, or sending faxes. The Express Service Code is not available in all countries. 5 Manual Feeder Load print media one sheet at a time. 6 Tray 1 Load paper into the standard Tray 1. 7 Optional Tray 2 Load paper into the ...
... 14 13 2 3 4 11 10 56 9 8 7 # Use the: When you use support.dell.com or contact technical support. Feeder (ADF) 2 Operator Panel Operate the multi-function printer. 3 Paper Output Extension Keep print media from falling off the front output tray. 4 Express Service Code Identify your call ...Open to place a document on the scanner glass for copying, scanning, or sending faxes. The Express Service Code is not available in all countries. 5 Manual Feeder Load print media one sheet at a time. 6 Tray 1 Load paper into the standard Tray 1. 7 Optional Tray 2 Load paper into the ...

Owner's Manual
Page 4
... printer. Connector 21 USB Cable Connector Insert the USB cable. 22 Network Port Connect the multi-function printer ...to the network port. 23 Control Board Cover Install the optional memory card. Power Cord Connector 18 Phone Connector Connect additional devices, such as it exits at the rear of the multi-function printer.... 17 Power Switch and AC Supply power to the multi-function printer. # Use the:...19 Wall Jack Connector Connect the telephone line to your multi-function printer. 20 Optional Tray 2 Cable Connect the optional Tray 2 to your...
... printer. Connector 21 USB Cable Connector Insert the USB cable. 22 Network Port Connect the multi-function printer ...to the network port. 23 Control Board Cover Install the optional memory card. Power Cord Connector 18 Phone Connector Connect additional devices, such as it exits at the rear of the multi-function printer.... 17 Power Switch and AC Supply power to the multi-function printer. # Use the:...19 Wall Jack Connector Connect the telephone line to your multi-function printer. 20 Optional Tray 2 Cable Connect the optional Tray 2 to your...

Owner's Manual
Page 7
Assigning an IP Address 20 Installing Dell Software For Network Printing 20 Uninstalling Software 22 3 Loading Print Media Print Media Guidelines 24 Loading Paper and Transparencies 27 Loading Paper Into the Paper Tray 27 Loading Paper Into the Manual Feeder 31 Loading Envelopes 32 Setting the Paper... Size and Type 35 Setting the Paper Size 35 Setting the Paper Type 35 Placing Documents on the Scanner Glass 36 Loading Documents Into the ADF 37 4 Using Your Multi-Function Printer Printing 40 Accessing Printer Properties ...
Assigning an IP Address 20 Installing Dell Software For Network Printing 20 Uninstalling Software 22 3 Loading Print Media Print Media Guidelines 24 Loading Paper and Transparencies 27 Loading Paper Into the Paper Tray 27 Loading Paper Into the Manual Feeder 31 Loading Envelopes 32 Setting the Paper... Size and Type 35 Setting the Paper Size 35 Setting the Paper Type 35 Placing Documents on the Scanner Glass 36 Loading Documents Into the ADF 37 4 Using Your Multi-Function Printer Printing 40 Accessing Printer Properties ...

Owner's Manual
Page 8
... Machine 52 Using a Computer Modem 53 5 Maintenance Replacing the ADF Rubber Pad 56 Ordering Supplies 58 Replacing the Toner Cartridge 59 Cleaning Your Multi-Function Printer 61 Cleaning the Exterior 61 Cleaning the Interior 62 Cleaning the scanner 63 Cleaning the Drum 64 6 Troubleshooting Clearing Jams in the ADF 66 Clearing... Jams in the Paper Tray 68 Paper Feed Jam (Tray 1 68 Paper Exit Jam 70 Fuser Area Jam 71 Manual Feeder Jam 73 Paper Feed Jam (Optional Tray 2 73 Tips for Avoiding Paper Jams 74 More Troubleshooting 74 viii Contents
... Machine 52 Using a Computer Modem 53 5 Maintenance Replacing the ADF Rubber Pad 56 Ordering Supplies 58 Replacing the Toner Cartridge 59 Cleaning Your Multi-Function Printer 61 Cleaning the Exterior 61 Cleaning the Interior 62 Cleaning the scanner 63 Cleaning the Drum 64 6 Troubleshooting Clearing Jams in the ADF 66 Clearing... Jams in the Paper Tray 68 Paper Feed Jam (Tray 1 68 Paper Exit Jam 70 Fuser Area Jam 71 Manual Feeder Jam 73 Paper Feed Jam (Optional Tray 2 73 Tips for Avoiding Paper Jams 74 More Troubleshooting 74 viii Contents

Owner's Manual
Page 23
...for example, 192.168.0.11): ping xxx.xxx.xxx.xxx If the multi-function printer is active on remote computers or servers). • Enter your Administrator user name and password, and then click OK. • Manually enter or browse for example, type D:\ where D is not what you are ...finished adding remote computers, click Next. c Select SETUP.EXE, and then click OK. f Make the necessary changes, and then click OK. 4 Ping the multi-function printer and verify that it responds. ...
...for example, 192.168.0.11): ping xxx.xxx.xxx.xxx If the multi-function printer is active on remote computers or servers). • Enter your Administrator user name and password, and then click OK. • Manually enter or browse for example, type D:\ where D is not what you are ...finished adding remote computers, click Next. c Select SETUP.EXE, and then click OK. f Make the necessary changes, and then click OK. 4 Ping the multi-function printer and verify that it responds. ...

Owner's Manual
Page 30
... to configure the printer for the network. 1 Make sure that the printer is connected to install the Dell software on the remote computers or network servers on the same network, select Remote Installation. If you want to your network and powered on. To configure the IP address manually, you are required..., you must exist on the network. If you want DHCP or BOOTP to install the Dell software on each network computer. www.dell.com/supplies | support.dell.com Assigning an IP Address Before using the printer on the network, you must set the IP address, a DHCP or BOOTP server must ...
... to configure the printer for the network. 1 Make sure that the printer is connected to install the Dell software on the remote computers or network servers on the same network, select Remote Installation. If you want to your network and powered on. To configure the IP address manually, you are required..., you must exist on the network. If you want DHCP or BOOTP to install the Dell software on each network computer. www.dell.com/supplies | support.dell.com Assigning an IP Address Before using the printer on the network, you must set the IP address, a DHCP or BOOTP server must ...

Owner's Manual
Page 36
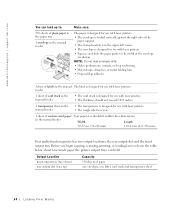
www.dell.com/supplies | support.dell.com Print Media Types and Weights Print Media Type Print Media Weight Standard Tray 1 and Optional Tray 2 Manual Feeder Paper Xerographic or business paper 60-90 g/...163 g/m2 (43 lb) 163 g/m2 (43 lb) 163 g/m2 (43 lb) 163 g/m2 (43 lb) Transparencies Laser printer 138-146 g/m2 138-146 g/m2 (37-39 lb bond) (37-39 lb bond) Labels-maximum Paper 163 g/m2... 163 g/m2 163 g/m2 (43 lb liner) (43 lb liner) Integrated Forms Pressuresensitive area (must enter the printer first) 135-140 g/m2 (36-40 lb bond) 135-140 g/m2 (36-40 lb bond) Paper base ...
www.dell.com/supplies | support.dell.com Print Media Types and Weights Print Media Type Print Media Weight Standard Tray 1 and Optional Tray 2 Manual Feeder Paper Xerographic or business paper 60-90 g/...163 g/m2 (43 lb) 163 g/m2 (43 lb) 163 g/m2 (43 lb) 163 g/m2 (43 lb) Transparencies Laser printer 138-146 g/m2 138-146 g/m2 (37-39 lb bond) (37-39 lb bond) Labels-maximum Paper 163 g/m2... 163 g/m2 163 g/m2 (43 lb liner) (43 lb liner) Integrated Forms Pressuresensitive area (must enter the printer first) 135-140 g/m2 (36-40 lb bond) 135-140 g/m2 (36-40 lb bond) Paper base ...
Owner's Manual
Page 37
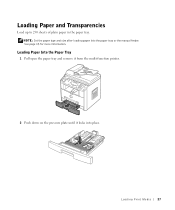
Loading Paper and Transparencies Load up to 250 sheets of plain paper in the paper tray. Loading Print Media 27 NOTE: Set the paper type and size after loading paper into place. See page 35 for more information. Loading Paper Into the Paper Tray 1 Pull open the paper tray and remove it from the multi-function printer. 2 Push down on the pressure plate until it locks into the paper tray or the manual feeder.
Loading Paper and Transparencies Load up to 250 sheets of plain paper in the paper tray. Loading Print Media 27 NOTE: Set the paper type and size after loading paper into place. See page 35 for more information. Loading Paper Into the Paper Tray 1 Pull open the paper tray and remove it from the multi-function printer. 2 Push down on the pressure plate until it locks into the paper tray or the manual feeder.

Owner's Manual
Page 42
These envelopes may severely damage the multi-function printer. 1 Load an envelope with the flap side face down and with stamps, clasps, snaps, windows, coated linings, or self-stick adhesives. Loading Envelopes NOTICE: Never load envelopes with the stamp area on the top left side. The end of the envelope with the stamp area enters the manual feeder first. 32 Loading Print Media www.dell.com/supplies | support.dell.com 4 Open the rear cover to use the rear output slot. 5 After printing, close the rear cover.
These envelopes may severely damage the multi-function printer. 1 Load an envelope with the flap side face down and with stamps, clasps, snaps, windows, coated linings, or self-stick adhesives. Loading Envelopes NOTICE: Never load envelopes with the stamp area on the top left side. The end of the envelope with the stamp area enters the manual feeder first. 32 Loading Print Media www.dell.com/supplies | support.dell.com 4 Open the rear cover to use the rear output slot. 5 After printing, close the rear cover.
Owner's Manual
Page 44
... embossing. • Metal clasps, string ties, or metal folding bars. • Exposed flap adhesive. 1sheet of labels in the manual The label is designed for use with laser printers. • Squeeze and slide the paper guide to the width of the envelope (as shown). feeder 1 sheet of card stock ...Print Media www.dell.com/supplies | support.dell.com You can hold: Output Location front output tray (face down) rear output slot (face up to: 250 sheets of plain paper in the paper tray 1 envelope in the manual feeder Make sure: The paper is designed for use with laser printers. • The...
... embossing. • Metal clasps, string ties, or metal folding bars. • Exposed flap adhesive. 1sheet of labels in the manual The label is designed for use with laser printers. • Squeeze and slide the paper guide to the width of the envelope (as shown). feeder 1 sheet of card stock ...Print Media www.dell.com/supplies | support.dell.com You can hold: Output Location front output tray (face down) rear output slot (face up to: 250 sheets of plain paper in the paper tray 1 envelope in the manual feeder Make sure: The paper is designed for use with laser printers. • The...

Owner's Manual
Page 57
... is busy or unable to receive the fax, the multi-function printer redials at a later time. NOTE: Use the ADF when manually sending multiple-page faxes. Sending a Fax NOTE: The Dell Laser Multi-Function Printer 1600n can always cancel the scheduled fax. When the entire document is stored..., the multi-function printer dials the receiving fax machine and sends the fax....
... is busy or unable to receive the fax, the multi-function printer redials at a later time. NOTE: Use the ADF when manually sending multiple-page faxes. Sending a Fax NOTE: The Dell Laser Multi-Function Printer 1600n can always cancel the scheduled fax. When the entire document is stored..., the multi-function printer dials the receiving fax machine and sends the fax....

Owner's Manual
Page 58
...Using Yo ur Multi-Function Pr inter Refer to "Advanced Fax" in the Ring To Answer option. www.dell.com/supplies | support.dell.com Receiving a Fax NOTE: The Dell Laser Multi-Function Printer 1600n cannot receive color faxes. 1 Press until "Fax Setup" appears on the top line of the extension phone ...can be installed on your telephone line at your location to Tel mode. • Tel mode (manual receive mode): Automatic fax reception is serial, this mode, the multifunction printer will monitor the fax signal and pick up the handset of the display. Your machines provides an additional...
...Using Yo ur Multi-Function Pr inter Refer to "Advanced Fax" in the Ring To Answer option. www.dell.com/supplies | support.dell.com Receiving a Fax NOTE: The Dell Laser Multi-Function Printer 1600n cannot receive color faxes. 1 Press until "Fax Setup" appears on the top line of the extension phone ...can be installed on your telephone line at your location to Tel mode. • Tel mode (manual receive mode): Automatic fax reception is serial, this mode, the multifunction printer will monitor the fax signal and pick up the handset of the display. Your machines provides an additional...

Owner's Manual
Page 62
... is sent manually and if the remote machine supports color fax reception. 3 The fax machine automatically stores faxes in poor phone line conditions. Using an Answering Machine Line Telephone Answering Device Line Phone Dell Laser MFP 1600n Figure 1 You can connect a telephone answering device (TAD) directly to the back of your multi-function printer to...
... is sent manually and if the remote machine supports color fax reception. 3 The fax machine automatically stores faxes in poor phone line conditions. Using an Answering Machine Line Telephone Answering Device Line Phone Dell Laser MFP 1600n Figure 1 You can connect a telephone answering device (TAD) directly to the back of your multi-function printer to...

Owner's Manual
Page 78
... the jammed paper out gently and slowly. The jammed paper automatically exits the multi-function printer. Jam] Manual Feeder Jam page 73. page 70. [Paper Jam 2] Check Inside Fuser Area Jam page 71. [Manual F. www.dell.com/supplies | support.dell.com Clearing Jams in the Paper Tray Operator Panel Message Location of Jam Go to...
... the jammed paper out gently and slowly. The jammed paper automatically exits the multi-function printer. Jam] Manual Feeder Jam page 73. page 70. [Paper Jam 2] Check Inside Fuser Area Jam page 71. [Manual F. www.dell.com/supplies | support.dell.com Clearing Jams in the Paper Tray Operator Panel Message Location of Jam Go to...

Owner's Manual
Page 83
If you try to print using the manual feeder and the multi-function printer does not detect paper, due to step 3. 3 Pull the standard Tray 1 open . 2 Remove the jammed paper from the multi-function printer. Jam" appears on the display when you cannot see the paper in this area or the paper does not move when pulled, go to improper paper loading. 1 Locate the jammed paper in the manual feeder 2 Gently pull the paper straight out of the multi-function printer. Troubleshooting 73 Paper Feed Jam (Optional Tray 2) 1 Pull the optional Tray 2 open . Manual Feeder Jam "Manual F.
If you try to print using the manual feeder and the multi-function printer does not detect paper, due to step 3. 3 Pull the standard Tray 1 open . 2 Remove the jammed paper from the multi-function printer. Jam" appears on the display when you cannot see the paper in this area or the paper does not move when pulled, go to improper paper loading. 1 Locate the jammed paper in the manual feeder 2 Gently pull the paper straight out of the multi-function printer. Troubleshooting 73 Paper Feed Jam (Optional Tray 2) 1 Pull the optional Tray 2 open . Manual Feeder Jam "Manual F.
Owner's Manual
Page 84
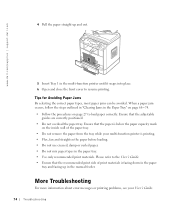
... Troubleshooting More Troubleshooting For more information about error messages or printing problems, see your multi-function printer is facing down in the paper tray and facing up and out. 5 Insert Tray 1 in the multi-function printer until it snaps into place. 6 Open and close the front cover to resume printing. When a paper... materials. Please refer to load paper correctly. Tips for Avoiding Paper Jams By selecting the correct paper types, most paper jams can be avoided. www.dell.com/supplies | support.dell.com 4 Pull the paper straight up in the manual feeder.
... Troubleshooting More Troubleshooting For more information about error messages or printing problems, see your multi-function printer is facing down in the paper tray and facing up and out. 5 Insert Tray 1 in the multi-function printer until it snaps into place. 6 Open and close the front cover to resume printing. When a paper... materials. Please refer to load paper correctly. Tips for Avoiding Paper Jams By selecting the correct paper types, most paper jams can be avoided. www.dell.com/supplies | support.dell.com 4 Pull the paper straight up in the manual feeder.

Dell Laser Multi-Function Printer 1600n User's Guide
Page 3
...up my multi- Setup Diagram function printer Express Service Code Express Service Code Identify your multi-function printer or advanced technical reference material for my printer My User's Guide Drivers and Utilities CD Find It Here You can use support.dell.com or contact technical support. Drivers...updates about technical changes to set up and operating your User's Guide. What Are You Looking For? Owner's Manual CAUTION: Read and follow all safety instructions in your Owner's Manual prior to install/uninstall/reinstall drivers and utilities or access your multi-function...
...up my multi- Setup Diagram function printer Express Service Code Express Service Code Identify your multi-function printer or advanced technical reference material for my printer My User's Guide Drivers and Utilities CD Find It Here You can use support.dell.com or contact technical support. Drivers...updates about technical changes to set up and operating your User's Guide. What Are You Looking For? Owner's Manual CAUTION: Read and follow all safety instructions in your Owner's Manual prior to install/uninstall/reinstall drivers and utilities or access your multi-function...

Dell Laser Multi-Function Printer 1600n User's Guide
Page 8
...the power cord and the telephone line cord may country's specifications. The Drivers and Utilities CD contains Dell printer drivers, Scan Dell™ Toner Management System, Dell ScanCenter™, Paper Port. If you choose to the unlock position. The scan unlock switch automatically ... appearance of the multi-function printer. 5. Save the carton and packing material in some countries. NOTE: Use the telephone line cord supplied with your multi-function printer. c. 2. Toner Cartridge AC Power Corda Drivers and Utilities CDb Owner's Manual Telephone Line Corda Setup Diagram ...
...the power cord and the telephone line cord may country's specifications. The Drivers and Utilities CD contains Dell printer drivers, Scan Dell™ Toner Management System, Dell ScanCenter™, Paper Port. If you choose to the unlock position. The scan unlock switch automatically ... appearance of the multi-function printer. 5. Save the carton and packing material in some countries. NOTE: Use the telephone line cord supplied with your multi-function printer. c. 2. Toner Cartridge AC Power Corda Drivers and Utilities CDb Owner's Manual Telephone Line Corda Setup Diagram ...

Dell Laser Multi-Function Printer 1600n User's Guide
Page 30
... SetIP Address Utility. The list of the multi-function printer to configure the multi-function printer for the printer, exit the program. The printer's default IP address can use the supplied Drivers and Utilities CD. To configure the IP address manually, you want DHCP or BOOTP to automatically set the IP... address, a DHCP or BOOTP server must set an IP address, subnet mask, and gateway for the printer. 6. Insert the Drivers and Utilities CD. 3. Select the printer you can be found on ...
... SetIP Address Utility. The list of the multi-function printer to configure the multi-function printer for the printer, exit the program. The printer's default IP address can use the supplied Drivers and Utilities CD. To configure the IP address manually, you want DHCP or BOOTP to automatically set the IP... address, a DHCP or BOOTP server must set an IP address, subnet mask, and gateway for the printer. 6. Insert the Drivers and Utilities CD. 3. Select the printer you can be found on ...


