
Setup Guide
Page 49
... call AutoTech, use your e-mail address as missing parts, wrong parts, or incorrect billing, contact Dell for customer assistance. Have your invoice or packing slip handy when you call . Getting Help Dell Support e-mail addresses • mobile_support@us.dell.com • support@us.dell.com • la-techsupport@dell.com (Latin America and Caribbean countries only) •...
... call AutoTech, use your e-mail address as missing parts, wrong parts, or incorrect billing, contact Dell for customer assistance. Have your invoice or packing slip handy when you call . Getting Help Dell Support e-mail addresses • mobile_support@us.dell.com • support@us.dell.com • la-techsupport@dell.com (Latin America and Caribbean countries only) •...
Setup Guide
Page 54
... a new hard drive. the Drivers and Utilities disc. the Dell Technology Guide installed on the Dell Support website at support.dell.com. See: your hard drive. NOTE: In some countries, opening and replacing parts of your computer may void your operating system, maintaining peripherals,...learn more about your warranty. reinstall or replace a worn or defective part. run a diagnostic program for your computer, reinstall Notebook System Software (NSS), or update drivers for your operating system. INSPIRON Finding More Information and Resources If you need to: reinstall your ...
... a new hard drive. the Drivers and Utilities disc. the Dell Technology Guide installed on the Dell Support website at support.dell.com. See: your hard drive. NOTE: In some countries, opening and replacing parts of your computer may void your operating system, maintaining peripherals,...learn more about your warranty. reinstall or replace a worn or defective part. run a diagnostic program for your computer, reinstall Notebook System Software (NSS), or update drivers for your operating system. INSPIRON Finding More Information and Resources If you need to: reinstall your ...
Owner's Manual
Page 9
...or Mouse Problems 121 Video and Display Problems 122 If the display is blank 122 If the display is difficult to read 123 If only part of the display is readable 124 Drivers 124 What Is a Driver 124 Identifying Drivers 125 Reinstalling Drivers and Utilities 125 Troubleshooting Software and Hardware... in the Windows Vista® Operating System 127 Restoring Your Operating System 128 Using Windows Vista System Restore 128 12 Adding and Replacing Parts 133 Before You Begin 133 Recommended Tools 133 Turning Off Your Computer 133 Before Working Inside Your Computer 134 Contents 9
...or Mouse Problems 121 Video and Display Problems 122 If the display is blank 122 If the display is difficult to read 123 If only part of the display is readable 124 Drivers 124 What Is a Driver 124 Identifying Drivers 125 Reinstalling Drivers and Utilities 125 Troubleshooting Software and Hardware... in the Windows Vista® Operating System 127 Restoring Your Operating System 128 Using Windows Vista System Restore 128 12 Adding and Replacing Parts 133 Before You Begin 133 Recommended Tools 133 Turning Off Your Computer 133 Before Working Inside Your Computer 134 Contents 9
Owner's Manual
Page 100
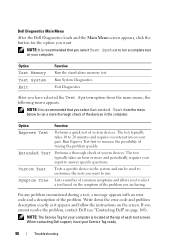
The test typically takes 10 to run. If you want to 20 minutes and requires no interaction on your part. Option Function Express Test Performs a quick test of system devices. Extended Test Performs a thorough check of system devices. Custom Test Tests a specific device ...in the computer. NOTE: The Service Tag for the option you cannot resolve the problem, contact Dell (see "Contacting Dell" on page 160). NOTE: It is recommended that you to run a complete test on your computer is located at the top of the ...
The test typically takes 10 to run. If you want to 20 minutes and requires no interaction on your part. Option Function Express Test Performs a quick test of system devices. Extended Test Performs a thorough check of system devices. Custom Test Tests a specific device ...in the computer. NOTE: The Service Tag for the option you cannot resolve the problem, contact Dell (see "Contacting Dell" on page 160). NOTE: It is recommended that you to run a complete test on your computer is located at the top of the ...
Owner's Manual
Page 126
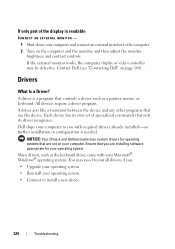
...Turn on the computer and the monitor, and then adjust the monitor brightness and contrast controls. You may be defective. Contact Dell (see "Contacting Dell" on your Microsoft® Windows® operating system. A driver is a program that only its own set of the display... system. • Connect or install a new device. 124 Troubleshooting Many drivers, such as a printer, mouse, or keyboard. If only part of specialized commands that controls a device such as the keyboard driver, come with required drivers already installed-no further installation or configuration is needed...
...Turn on the computer and the monitor, and then adjust the monitor brightness and contrast controls. You may be defective. Contact Dell (see "Contacting Dell" on your Microsoft® Windows® operating system. A driver is a program that only its own set of the display... system. • Connect or install a new device. 124 Troubleshooting Many drivers, such as a printer, mouse, or keyboard. If only part of specialized commands that controls a device such as the keyboard driver, come with required drivers already installed-no further installation or configuration is needed...
Owner's Manual
Page 135
... Your Computer" on page 133 and "Before Working Inside Your Computer" on page 134. • You have read the safety information in your Dell Product Information Guide. • A component can be replaced-or if purchased separately-installed by performing the removal procedure in this document may require the... and exit any open programs. 2 Click Start , click the arrow , and then click Shut Down. If your computer. Adding and Replacing Parts 133 Adding and Replacing Parts Before You Begin This chapter provides procedures for at least 8 to 10 seconds until the computer turns off.
... Your Computer" on page 133 and "Before Working Inside Your Computer" on page 134. • You have read the safety information in your Dell Product Information Guide. • A component can be replaced-or if purchased separately-installed by performing the removal procedure in this document may require the... and exit any open programs. 2 Click Start , click the arrow , and then click Shut Down. If your computer. Adding and Replacing Parts 133 Adding and Replacing Parts Before You Begin This chapter provides procedures for at least 8 to 10 seconds until the computer turns off.
Owner's Manual
Page 136
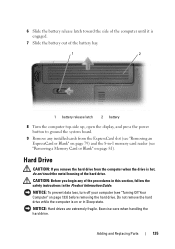
... to servicing that both connectors are disconnecting this type of the computer). Do not use only the battery designed for other Dell computers. 5 Turn the computer over. 134 Adding and Replacing Parts Hold a card by its edges or by its metal mounting bracket. if you are correctly oriented and aligned. NOTICE: Only...
... to servicing that both connectors are disconnecting this type of the computer). Do not use only the battery designed for other Dell computers. 5 Turn the computer over. 134 Adding and Replacing Parts Hold a card by its edges or by its metal mounting bracket. if you are correctly oriented and aligned. NOTICE: Only...
Owner's Manual
Page 137
NOTICE: Hard drives are extremely fragile. Exercise care when handling the hard drive. Adding and Replacing Parts 135 Do not remove the hard drive while the computer is on or in -1 memory card reader (see "Removing a Memory Card or Blank" on page ...
NOTICE: Hard drives are extremely fragile. Exercise care when handling the hard drive. Adding and Replacing Parts 135 Do not remove the hard drive while the computer is on or in -1 memory card reader (see "Removing a Memory Card or Blank" on page ...
Owner's Manual
Page 138
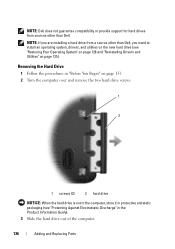
... not guarantee compatibility or provide support for hard drives from sources other than Dell, you are installing a hard drive from a source other than Dell. Removing the Hard Drive 1 Follow the procedures in "Before You Begin" on page 125). NOTE: If you need to install an operating system, drivers, and ... protective antistatic packaging (see "Protecting Against Electrostatic Discharge" in the Product Information Guide). 3 Slide the hard drive out of the computer. 136 Adding and Replacing Parts
... not guarantee compatibility or provide support for hard drives from sources other than Dell, you are installing a hard drive from a source other than Dell. Removing the Hard Drive 1 Follow the procedures in "Before You Begin" on page 125). NOTE: If you need to install an operating system, drivers, and ... protective antistatic packaging (see "Protecting Against Electrostatic Discharge" in the Product Information Guide). 3 Slide the hard drive out of the computer. 136 Adding and Replacing Parts
Owner's Manual
Page 139
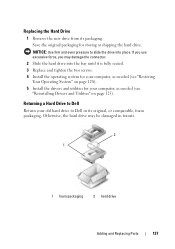
... transit. 2 1 1 foam packaging 2 hard drive Adding and Replacing Parts 137 Save the original packaging for your old hard drive to Dell Return your computer, as needed (see "Restoring Your Operating System" on page 125). NOTICE: Use firm and even pressure to slide the drive into the ...
... transit. 2 1 1 foam packaging 2 hard drive Adding and Replacing Parts 137 Save the original packaging for your old hard drive to Dell Return your computer, as needed (see "Restoring Your Operating System" on page 125). NOTICE: Use firm and even pressure to slide the drive into the ...
Owner's Manual
Page 140
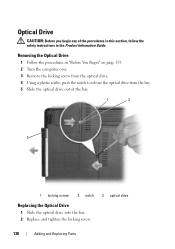
... screw 2 notch Replacing the Optical Drive 1 Slide the optical drive into the bay. 2 Replace and tighten the locking screw. 3 optical drive 138 Adding and Replacing Parts Removing the Optical Drive 1 Follow the procedures in the Product Information Guide.
... screw 2 notch Replacing the Optical Drive 1 Slide the optical drive into the bay. 2 Replace and tighten the locking screw. 3 optical drive 138 Adding and Replacing Parts Removing the Optical Drive 1 Follow the procedures in the Product Information Guide.
Owner's Manual
Page 141
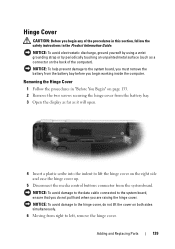
NOTICE: To avoid damage to the data cable connected to left, remove the hinge cover. Adding and Replacing Parts 139 NOTICE: To help prevent damage to the system board, you must remove the battery from right to the system board, ensure that you do ...
NOTICE: To avoid damage to the data cable connected to left, remove the hinge cover. Adding and Replacing Parts 139 NOTICE: To help prevent damage to the system board, you must remove the battery from right to the system board, ensure that you do ...
Owner's Manual
Page 142
... damage to the system board, you must remove the battery from the battery bay before you begin working inside the computer. 140 Adding and Replacing Parts
... damage to the system board, you must remove the battery from the battery bay before you begin working inside the computer. 140 Adding and Replacing Parts

Owner's Manual
Page 143
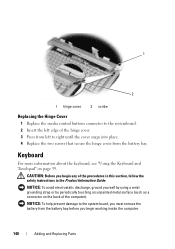
... page 139). 3 Remove the two screws at the top of the keyboard connector. 1 2 3 4 5 1 screws (2) 3 keyboard tabs (5) 5 keyboard connector latch 2 keyboard 4 keyboard cable Adding and Replacing Parts 141
... page 139). 3 Remove the two screws at the top of the keyboard connector. 1 2 3 4 5 1 screws (2) 3 keyboard tabs (5) 5 keyboard connector latch 2 keyboard 4 keyboard cable Adding and Replacing Parts 141
Owner's Manual
Page 144
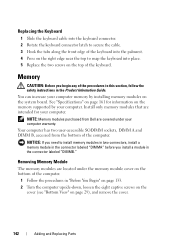
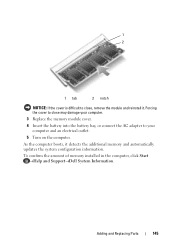
... on the cover (see "Bottom View" on the bottom of the computer. Your computer has two user-accessible SODIMM sockets, DIMM A and DIMM B, accessed from Dell are intended for information on the memory supported by installing memory modules on page 161 for your computer. Removing Memory Module The memory modules are... computer warranty. Install only memory modules that are covered under the memory module cover on page 29), and remove the cover. 142 Adding and Replacing Parts
... on the cover (see "Bottom View" on the bottom of the computer. Your computer has two user-accessible SODIMM sockets, DIMM A and DIMM B, accessed from Dell are intended for information on the memory supported by installing memory modules on page 161 for your computer. Removing Memory Module The memory modules are... computer warranty. Install only memory modules that are covered under the memory module cover on page 29), and remove the cover. 142 Adding and Replacing Parts
Owner's Manual
Page 145
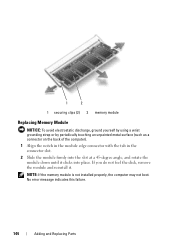
Adding and Replacing Parts 143 1 2 1 cover 2 captive screws (5) NOTICE: To prevent damage to the memory module connector, do not use tools to carefully spread apart the securing clips on each end of the memory module connector until the module pops up. 4 Remove the module from the connector. NOTICE: To avoid electrostatic discharge, ground yourself by using a wrist grounding strap or by periodically touching an unpainted metal surface (such as a connector on the back of the computer). 3 Use your fingertips to spread the memory module securing clips.
Adding and Replacing Parts 143 1 2 1 cover 2 captive screws (5) NOTICE: To prevent damage to the memory module connector, do not use tools to carefully spread apart the securing clips on each end of the memory module connector until the module pops up. 4 Remove the module from the connector. NOTICE: To avoid electrostatic discharge, ground yourself by using a wrist grounding strap or by periodically touching an unpainted metal surface (such as a connector on the back of the computer). 3 Use your fingertips to spread the memory module securing clips.
Owner's Manual
Page 146
... place. NOTE: If the memory module is not installed properly, the computer may not boot. No error message indicates this failure. 144 Adding and Replacing Parts If you do not feel the click, remove the module and reinstall it clicks into the slot at a 45-degree angle, and rotate the module...
... place. NOTE: If the memory module is not installed properly, the computer may not boot. No error message indicates this failure. 144 Adding and Replacing Parts If you do not feel the click, remove the module and reinstall it clicks into the slot at a 45-degree angle, and rotate the module...
Owner's Manual
Page 147
Adding and Replacing Parts 145 Forcing the cover to your computer and an electrical outlet. 5 Turn on the computer. To confirm the amount of memory installed in the computer, click Start →Help and Support→Dell System Information. As the computer boots, it . 1 2 1 tab 2 notch NOTICE: If the cover is difficult to...
Adding and Replacing Parts 145 Forcing the cover to your computer and an electrical outlet. 5 Turn on the computer. To confirm the amount of memory installed in the computer, click Start →Help and Support→Dell System Information. As the computer boots, it . 1 2 1 tab 2 notch NOTICE: If the cover is difficult to...
Owner's Manual
Page 148
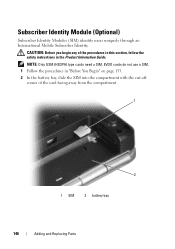
... in the Product Information Guide. CAUTION: Before you begin any of the card facing away from the compartment. 1 2 1 SIM 2 battery bay 146 Adding and Replacing Parts NOTE: Only GSM (HSDPA) type cards need a SIM.
... in the Product Information Guide. CAUTION: Before you begin any of the card facing away from the compartment. 1 2 1 SIM 2 battery bay 146 Adding and Replacing Parts NOTE: Only GSM (HSDPA) type cards need a SIM.
Owner's Manual
Page 149
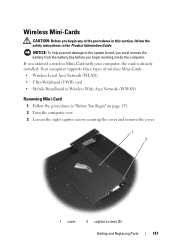
..." on page 133. 2 Turn the computer over. 3 Loosen the eight captive screws securing the cover and remove the cover. 1 2 1 cover 2 captive screws (5) Adding and Replacing Parts 147 NOTICE: To help prevent damage to the system board, you must remove the battery from the battery bay before you ordered a wireless Mini-Card...
..." on page 133. 2 Turn the computer over. 3 Loosen the eight captive screws securing the cover and remove the cover. 1 2 1 cover 2 captive screws (5) Adding and Replacing Parts 147 NOTICE: To help prevent damage to the system board, you must remove the battery from the battery bay before you ordered a wireless Mini-Card...


