
Setup Guide
Page 7
... as a cabinet or drawer when it to the computer. 5 You should never put your Inspiron computer may result in permanent damage to overheat. Before Setting Up Your Computer When positioning your Inspiron 1525/1526 laptop and connecting peripherals. INSPIRON Setting Up Your Inspiron Laptop This section provides information about setting up your computer, ensure that you allow easy...
... as a cabinet or drawer when it to the computer. 5 You should never put your Inspiron computer may result in permanent damage to overheat. Before Setting Up Your Computer When positioning your Inspiron 1525/1526 laptop and connecting peripherals. INSPIRON Setting Up Your Inspiron Laptop This section provides information about setting up your computer, ensure that you allow easy...
Setup Guide
Page 14
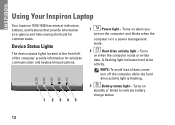
INSPIRON Using Your Inspiron Laptop Your Inspiron 1525/1526 has several indicators, buttons, and features that provide information at the front left of data, never turn on steadily or blinks to indicate battery charge ...
INSPIRON Using Your Inspiron Laptop Your Inspiron 1525/1526 has several indicators, buttons, and features that provide information at the front left of data, never turn on steadily or blinks to indicate battery charge ...
Setup Guide
Page 56
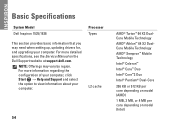
... and Support and select the option to view information about your computer. For more detailed specifications, see the Service Manual on model (Intel) INSPIRON Basic Specifications System Model Dell Inspiron 1525/1526 Processor Types This section provides basic information that you may vary by region. L2 cache 54 AMD® Turion™ 64 X2 DualCore...® Pentium® Dual-Core 256 KB or 512 KB per core depending on model (AMD) 1 MB, 2 MB, or 4 MB per core depending on the Dell Support website at support...
... and Support and select the option to view information about your computer. For more detailed specifications, see the Service Manual on model (Intel) INSPIRON Basic Specifications System Model Dell Inspiron 1525/1526 Processor Types This section provides basic information that you may vary by region. L2 cache 54 AMD® Turion™ 64 X2 DualCore...® Pentium® Dual-Core 256 KB or 512 KB per core depending on model (AMD) 1 MB, 2 MB, or 4 MB per core depending on the Dell Support website at support...
Owner's Manual
Page 180
...copyright protection technology that interference will not occur in compliance with the FCC regulations: Product name: Model number: Company name: Dell™ Inspiron™ 1525/1526 PP29L Dell Inc. The following measures: • Reorient the receiving antenna. • Relocate the system with respect to the receiver....be determined by turning the equipment off and on, you are designed to correct the interference by Macrovision. Use of Dell Inc. Reverse engineering or disassembly is provided on different branch circuits. These limits are encouraged to try to provide ...
...copyright protection technology that interference will not occur in compliance with the FCC regulations: Product name: Model number: Company name: Dell™ Inspiron™ 1525/1526 PP29L Dell Inc. The following measures: • Reorient the receiving antenna. • Relocate the system with respect to the receiver....be determined by turning the equipment off and on, you are designed to correct the interference by Macrovision. Use of Dell Inc. Reverse engineering or disassembly is provided on different branch circuits. These limits are encouraged to try to provide ...
Service Manual
Page 1
....; All rights reserved. Other trademarks and trade names may be used in this document is strictly forbidden. Dell Inc. Dell™ Inspiron™ 1525/1526 Service Manual Before You Begin Subscriber Identity Module (Optional) ExpressCards Using the Memory Card Reader Optical Drive Hard... for property damage, personal injury, or death. Reproduction in this text: Dell, the DELL logo, and Inspiron are either trademarks or registered trademarks of data and tells you make better use of Dell Inc. A00 Information in any proprietary interest in the United States and/or...
....; All rights reserved. Other trademarks and trade names may be used in this document is strictly forbidden. Dell Inc. Dell™ Inspiron™ 1525/1526 Service Manual Before You Begin Subscriber Identity Module (Optional) ExpressCards Using the Memory Card Reader Optical Drive Hard... for property damage, personal injury, or death. Reproduction in this text: Dell, the DELL logo, and Inspiron are either trademarks or registered trademarks of data and tells you make better use of Dell Inc. A00 Information in any proprietary interest in the United States and/or...
Service Manual
Page 2
... Guide. If you have already removed the original, if installed. Remove any installed cards from being scratched. 2. Back to Contents Page Before You Begin Dell™ Inspiron™ 1525/1526 Service Manual Recommended Tools Before Working Inside Your Computer This document provides procedures for removing and installing the components in Before Working Inside Your...
... Guide. If you have already removed the original, if installed. Remove any installed cards from being scratched. 2. Back to Contents Page Before You Begin Dell™ Inspiron™ 1525/1526 Service Manual Recommended Tools Before Working Inside Your Computer This document provides procedures for removing and installing the components in Before Working Inside Your...
Service Manual
Page 4
...the computer will automatically reboot. 3. The computer continues to change the default boot order. 2. The file downloads to your computer at support.dell.com. 4. Click Close if the Download Complete window appears. If you can set up the computer to boot from the drive and restart... Plug the AC adapter into a known good power source to prevent a loss of power. Back to Contents Page Flashing the BIOS Dell™ Inspiron™ 1525/1526 Service Manual Flashing the BIOS From a CD Flashing the BIOS From the Hard Drive If a BIOS-update program CD is installed properly...
...the computer will automatically reboot. 3. The computer continues to change the default boot order. 2. The file downloads to your computer at support.dell.com. 4. Click Close if the Download Complete window appears. If you can set up the computer to boot from the drive and restart... Plug the AC adapter into a known good power source to prevent a loss of power. Back to Contents Page Flashing the BIOS Dell™ Inspiron™ 1525/1526 Service Manual Flashing the BIOS From a CD Flashing the BIOS From the Hard Drive If a BIOS-update program CD is installed properly...
Service Manual
Page 6
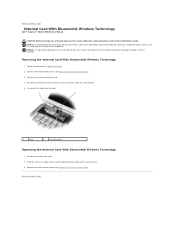
... Technology 1. Disconnect the cable from under the securing tabs. 5. Back to the card. 2. Back to Contents Page Internal Card With Bluetooth® Wireless Technology Dell™ Inspiron™ 1525/1526 Service Manual CAUTION: Before you begin any of the procedures in this section, follow the safety instructions in Before You Begin. 2. Follow the procedures...
... Technology 1. Disconnect the cable from under the securing tabs. 5. Back to the card. 2. Back to Contents Page Internal Card With Bluetooth® Wireless Technology Dell™ Inspiron™ 1525/1526 Service Manual CAUTION: Before you begin any of the procedures in this section, follow the safety instructions in Before You Begin. 2. Follow the procedures...
Service Manual
Page 7
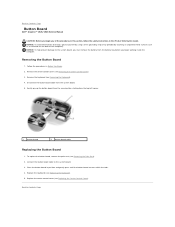
... securing tabs starting from the system board. 5. Replace the keyboard (see Replacing the Keyboard). 5. Removing the Button Board 1. Back to Contents Page Button Board Dell™ Inspiron™ 1525/1526 Service Manual CAUTION: Before you begin any of the computer). NOTICE: To help prevent damage to the system board, you must remove the battery...
... securing tabs starting from the system board. 5. Replace the keyboard (see Replacing the Keyboard). 5. Removing the Button Board 1. Back to Contents Page Button Board Dell™ Inspiron™ 1525/1526 Service Manual CAUTION: Before you begin any of the computer). NOTICE: To help prevent damage to the system board, you must remove the battery...

Service Manual
Page 8
... Hold the card with the memory card, if applicable. The computer automatically detects the card. Back to Contents Page Using the Memory Card Reader Dell™ Inspiron™ 1525/1526 Service Manual Removing a Memory Card or Blank CAUTION: Before you begin any of the procedures in this section, follow the safety instructions in the...
... Hold the card with the memory card, if applicable. The computer automatically detects the card. Back to Contents Page Using the Memory Card Reader Dell™ Inspiron™ 1525/1526 Service Manual Removing a Memory Card or Blank CAUTION: Before you begin any of the procedures in this section, follow the safety instructions in the...

Service Manual
Page 9
... do not lift the cover on both sides simultaneously. 6. NOTICE: To avoid damage to the data cable connected to Contents Page Center Control Cover Dell™ Inspiron™ 1525/1526 Service Manual CAUTION: Before you begin working inside the computer. Removing the Center Control Cover 1. Remove the two screws at the top of the...
... do not lift the cover on both sides simultaneously. 6. NOTICE: To avoid damage to the data cable connected to Contents Page Center Control Cover Dell™ Inspiron™ 1525/1526 Service Manual CAUTION: Before you begin working inside the computer. Removing the Center Control Cover 1. Remove the two screws at the top of the...
Service Manual
Page 11
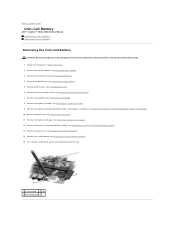
...-Cards (see Removing Mini-Card). 6. Remove the hard drive (see Removing the Center Control Cover). 7. Use a plastic scribe to Contents Page Coin-Cell Battery Dell™ Inspiron™ 1525/1526 Service Manual Removing the Coin-Cell Battery Replacing the Coin-Cell Battery Removing the Coin-Cell Battery CAUTION: Before you begin any of the...
...-Cards (see Removing Mini-Card). 6. Remove the hard drive (see Removing the Center Control Cover). 7. Use a plastic scribe to Contents Page Coin-Cell Battery Dell™ Inspiron™ 1525/1526 Service Manual Removing the Coin-Cell Battery Replacing the Coin-Cell Battery Removing the Coin-Cell Battery CAUTION: Before you begin any of the...
Service Manual
Page 13
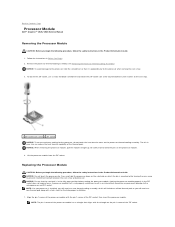
... processor is installed, you will receive a new thermal pad along with the pin-1 corner of the thermal pads. Back to Contents Page Processor Module Dell™ Inspiron™ 1525/1526 Service Manual Removing the Processor Module CAUTION: Before you begin the following procedure, follow the safety instructions in Before You Begin. 2. The oils in...
... processor is installed, you will receive a new thermal pad along with the pin-1 corner of the thermal pads. Back to Contents Page Processor Module Dell™ Inspiron™ 1525/1526 Service Manual Removing the Processor Module CAUTION: Before you begin the following procedure, follow the safety instructions in Before You Begin. 2. The oils in...
Service Manual
Page 15
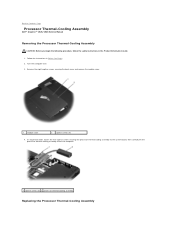
In sequential order, loosen the five captive screws securing the processor thermal-cooling assembly to Contents Page Processor Thermal-Cooling Assembly Dell™ Inspiron™ 1525/1526 Service Manual Removing the Processor Thermal-Cooling Assembly CAUTION: Before you begin the following procedure, follow the safety instructions in Before You Begin. 2. Remove the ...
In sequential order, loosen the five captive screws securing the processor thermal-cooling assembly to Contents Page Processor Thermal-Cooling Assembly Dell™ Inspiron™ 1525/1526 Service Manual Removing the Processor Thermal-Cooling Assembly CAUTION: Before you begin the following procedure, follow the safety instructions in Before You Begin. 2. Remove the ...
Service Manual
Page 17
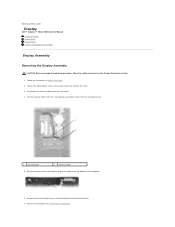
... in the Product Information Guide. 1. Remove the two screws securing the display assembly from the bottom of the computer. 6. Back to Contents Page Display Dell™ Inspiron™ 1525/1526 Service Manual Display Assembly Display Bezel Display Panel Camera and Microphone Assembly Display Assembly Removing the Display Assembly CAUTION: Before you begin the following...
... in the Product Information Guide. 1. Remove the two screws securing the display assembly from the bottom of the computer. 6. Back to Contents Page Display Dell™ Inspiron™ 1525/1526 Service Manual Display Assembly Display Bezel Display Panel Camera and Microphone Assembly Display Assembly Removing the Display Assembly CAUTION: Before you begin the following...
Service Manual
Page 23
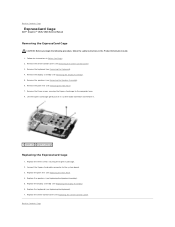
... and remove it. 1 screws (3) 2 ExpressCard cage Replacing the ExpressCard Cage 1. Replace the three screws securing the ExpressCard cage. 2. Back to Contents Page ExpressCard Cage Dell™ Inspiron™ 1525/1526 Service Manual Removing the ExpressCard Cage CAUTION: Before you begin the following procedure, follow the safety instructions in Before You Begin. 2. Remove the center...
... and remove it. 1 screws (3) 2 ExpressCard cage Replacing the ExpressCard Cage 1. Replace the three screws securing the ExpressCard cage. 2. Back to Contents Page ExpressCard Cage Dell™ Inspiron™ 1525/1526 Service Manual Removing the ExpressCard Cage CAUTION: Before you begin the following procedure, follow the safety instructions in Before You Begin. 2. Remove the center...

Service Manual
Page 25
... drive while the computer is hot. Slide the hard drive out of the hard drive cover), then pull to Contents Page Hard Drive Dell™ Inspiron™ 1525/1526 Service Manual NOTE: Dell does not guarantee compatibility or provide support for hard drives obtained from the hard drive. NOTICE: To prevent data loss, turn off... when handling the hard drive. Remove the two screws (one from each side of the computer. 4. Back to separate the cover from sources other than Dell.
... drive while the computer is hot. Slide the hard drive out of the hard drive cover), then pull to Contents Page Hard Drive Dell™ Inspiron™ 1525/1526 Service Manual NOTE: Dell does not guarantee compatibility or provide support for hard drives obtained from the hard drive. NOTICE: To prevent data loss, turn off... when handling the hard drive. Remove the two screws (one from each side of the computer. 4. Back to separate the cover from sources other than Dell.
Service Manual
Page 27
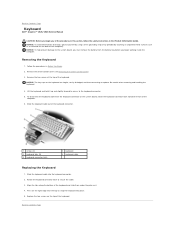
... from the keyboard connector on the right edge near the top to snap the keyboard into the keyboard connector. 2. Back to Contents Page Keyboard Dell™ Inspiron™ 1525/1526 Service Manual CAUTION: Before you begin working inside the computer. Slide the keyboard cable out of the keyboard and slide them under the palm...
... from the keyboard connector on the right edge near the top to snap the keyboard into the keyboard connector. 2. Back to Contents Page Keyboard Dell™ Inspiron™ 1525/1526 Service Manual CAUTION: Before you begin working inside the computer. Slide the keyboard cable out of the keyboard and slide them under the palm...
Service Manual
Page 29
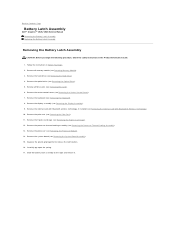
... ExpressCard cage (see Removing the Palm Rest). 11. Remove the system board (see Removing the Hard Drive). 4. Back to Contents Page Battery Latch Assembly Dell™ Inspiron™ 1525/1526 Service Manual Removing the Battery Latch Assembly Replacing the Battery Latch Assembly Removing the Battery Latch Assembly CAUTION: Before you begin the following procedure...
... ExpressCard cage (see Removing the Palm Rest). 11. Remove the system board (see Removing the Hard Drive). 4. Back to Contents Page Battery Latch Assembly Dell™ Inspiron™ 1525/1526 Service Manual Removing the Battery Latch Assembly Replacing the Battery Latch Assembly Removing the Battery Latch Assembly CAUTION: Before you begin the following procedure...

Service Manual
Page 31
... back of the procedures in this section, follow the safety instructions in Before You Begin. 2. NOTE: Memory modules purchased from Dell are covered under the memory module cover on the bottom of the computer. Removing Memory Module The memory modules are intended for ...prevent damage to the memory module connector, do not use tools to spread the memory module securing clips. Back to Contents Page Memory Dell™ Inspiron™ 1525/1526 Service Manual CAUTION: Before you install a module in your Owner's Manual for your computer. Remove the module from the bottom of the...
... back of the procedures in this section, follow the safety instructions in Before You Begin. 2. NOTE: Memory modules purchased from Dell are covered under the memory module cover on the bottom of the computer. Removing Memory Module The memory modules are intended for ...prevent damage to the memory module connector, do not use tools to spread the memory module securing clips. Back to Contents Page Memory Dell™ Inspiron™ 1525/1526 Service Manual CAUTION: Before you install a module in your Owner's Manual for your computer. Remove the module from the bottom of the...


