
User Guide
Page 1
... are trademarks of the U.S. November 2008 Rev. Use, duplication or disclosure by the Government is a registered trademark of Dell Inc.; Dell™ Color Laser Printer 1320c User's Guide Dell Color Laser Printer 1320c User's Guide Finding Information About Your Printer Installing the Toner Cartridges and PHD (Print Head Device) Unit Connecting Your Printer Dell Printer Configuration Web Tool Print Media Guidelines Loading Print Media Operator Panel...
... are trademarks of the U.S. November 2008 Rev. Use, duplication or disclosure by the Government is a registered trademark of Dell Inc.; Dell™ Color Laser Printer 1320c User's Guide Dell Color Laser Printer 1320c User's Guide Finding Information About Your Printer Installing the Toner Cartridges and PHD (Print Head Device) Unit Connecting Your Printer Dell Printer Configuration Web Tool Print Media Guidelines Loading Print Media Operator Panel...
User Guide
Page 9
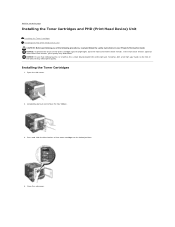
back to the locked position. 4. NOTICE: Ensure that nothing touches or scratches the surface (black-colored film) of the following procedures, read and follow the safety instructions in your hands on the film of the belt unit may deteriorate. Close the ... the Toner Cartridges 1. NOTICE: To protect the drums of four toner cartridges to contents page Installing the Toner Cartridges and PHD (Print Head Device) Unit Installing the Toner Cartridges Installing the PHD (Print Head Device) Unit CAUTION: Before performing any of the belt unit. Press and slide the blue latches of the...
back to the locked position. 4. NOTICE: Ensure that nothing touches or scratches the surface (black-colored film) of the following procedures, read and follow the safety instructions in your hands on the film of the belt unit may deteriorate. Close the ... the Toner Cartridges 1. NOTICE: To protect the drums of four toner cartridges to contents page Installing the Toner Cartridges and PHD (Print Head Device) Unit Installing the Toner Cartridges Installing the PHD (Print Head Device) Unit CAUTION: Before performing any of the belt unit. Press and slide the blue latches of the...

User Guide
Page 10
NOTICE: Do not remove the protective sheet on the PHD unit. 4. NOTICE: Do not touch the belt unit. 3. Press the button (right side) and open the front cover. 2. Pull the PHD unit out of the printer. Turn the four PHD lock levers counterclockwise to unlock the unit. Completely remove the four yellow ribbons from the PHD unit. Installing the PHD (Print Head Device) Unit 1.
NOTICE: Do not remove the protective sheet on the PHD unit. 4. NOTICE: Do not touch the belt unit. 3. Press the button (right side) and open the front cover. 2. Pull the PHD unit out of the printer. Turn the four PHD lock levers counterclockwise to unlock the unit. Completely remove the four yellow ribbons from the PHD unit. Installing the PHD (Print Head Device) Unit 1.

User Guide
Page 11
Use the small gray tabs to contents page back to place the PHD unit back into the printer completely. 6. 5. Turn the four PHD lock levers clockwise to lock the PHD, and then remove the protective sheet. 7. Close the front cover.
Use the small gray tabs to contents page back to place the PHD unit back into the printer completely. 6. 5. Turn the four PHD lock levers clockwise to lock the PHD, and then remove the protective sheet. 7. Close the front cover.
User Guide
Page 51
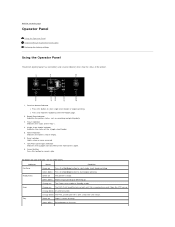
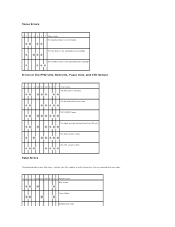
... on each indicator, see the table below.. Orange on The PHD (Print Head Device), or belt unit, life is ready. Orange blinks The PHD, or belt unit life is low or empty. 6. For details on The printer is coming to start single sheet feeder printing. Clean the CTD sensor....several indicators that a paper jam occurred or the front cover is set on The Power saver mode or Standby mode. Ready/Data indicator Indicates the printer status, such as receiving and printing data. 3. Tray 1 indicator Indicates the status of the Tray 1. 4. Toner indicators Indicates the toner is over...
... on each indicator, see the table below.. Orange on The PHD (Print Head Device), or belt unit, life is ready. Orange blinks The PHD, or belt unit life is low or empty. 6. For details on The printer is coming to start single sheet feeder printing. Clean the CTD sensor....several indicators that a paper jam occurred or the front cover is set on The Power saver mode or Standby mode. Ready/Data indicator Indicates the printer status, such as receiving and printing data. 3. Tray 1 indicator Indicates the status of the Tray 1. 4. Toner indicators Indicates the toner is over...

User Guide
Page 53
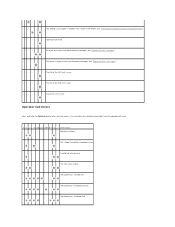
... toner cartridge. -- - * - - Clean the CTD sensor. * Orange on in the belt unit -- - - - - In power saver mode Paper Conditions The following table shows the paper status. 1 2 3 4 5 6 7 Printer status - - - - - - Initializing NVM - - - - - - Life warning in the Tray 1. -- - - - - Waiting for incoming data - - - - - Non...
... toner cartridge. -- - * - - Clean the CTD sensor. * Orange on in the belt unit -- - - - - In power saver mode Paper Conditions The following table shows the paper status. 1 2 3 4 5 6 7 Printer status - - - - - - Initializing NVM - - - - - - Life warning in the Tray 1. -- - - - - Waiting for incoming data - - - - - Non...
User Guide
Page 55
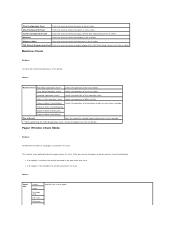
An error occurred in the specified toner cartridge. The life of the PHD unit is over . -- - - - - You can obtain the detailed information from the operator call errors -- - - - PDL (Page Description Language) error - --- - - - Disabled function - - - Reached limit Memory overflow - - - - - - - Dell ColorTrack - Operator call error. 1 2 3 4 5-K 5-C 5-M 5-Y 6 7 Error status - ... Press and hold the Continue button when an error occurs. Invalid job environment - -- - - - Dell ColorTrack - Clean the CTD sensor. Invalid user - - - The life of paper is open...
An error occurred in the specified toner cartridge. The life of the PHD unit is over . -- - - - - You can obtain the detailed information from the operator call errors -- - - - PDL (Page Description Language) error - --- - - - Disabled function - - - Reached limit Memory overflow - - - - - - - Dell ColorTrack - Operator call error. 1 2 3 4 5-K 5-C 5-M 5-Y 6 7 Error status - ... Press and hold the Continue button when an error occurs. Invalid job environment - -- - - - Dell ColorTrack - Clean the CTD sensor. Invalid user - - - The life of paper is open...
User Guide
Page 56
... over . - - NVRAM (IOT) error Errors in the specified toner cartridge. Contact your Dell supplier to notify the printer status associated with each error. 1 2 3 4 5-K 5-C 5-M 5-Y 6 7 Printer status - - - - - - Fatal Errors The following table shows fatal errors. ROS failure - - - - - - The CRUM ID error in the PHD Unit, Belt Unit, Fuser Unit, and CTD Sensor 1 2 3 4 5-K 5-C 5-M 5-Y 6 7 Error status - - - The life...
... over . - - NVRAM (IOT) error Errors in the specified toner cartridge. Contact your Dell supplier to notify the printer status associated with each error. 1 2 3 4 5-K 5-C 5-M 5-Y 6 7 Printer status - - - - - - Fatal Errors The following table shows fatal errors. ROS failure - - - - - - The CRUM ID error in the PHD Unit, Belt Unit, Fuser Unit, and CTD Sensor 1 2 3 4 5-K 5-C 5-M 5-Y 6 7 Error status - - - The life...
User Guide
Page 71
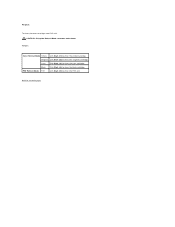
... Chart Prints the chart to confirm the light fatigue of the PHD (Print Head Device) unit in the fuser. Values: Machine Check Main Motor Operation ...part other than fuser. Values: Paper Size Letter* Legal Envelope #10 8.5 x 13" Executive Specifies the size of the printer. MQ Chart Prints the chart to confirm the binding in A4 or Letter. Machine Check Purpose: To check the mechanical ...REGI CLUTCH Operation Check Checks the operation of the dispense motor for four color printing in A4 or Letter. Ghost Configuration Chart Prints the chart to confirm the ghost in A4 or Letter...
... Chart Prints the chart to confirm the light fatigue of the PHD (Print Head Device) unit in the fuser. Values: Machine Check Main Motor Operation ...part other than fuser. Values: Paper Size Letter* Legal Envelope #10 8.5 x 13" Executive Specifies the size of the printer. MQ Chart Prints the chart to confirm the binding in A4 or Letter. Machine Check Purpose: To check the mechanical ...REGI CLUTCH Operation Check Checks the operation of the dispense motor for four color printing in A4 or Letter. Ghost Configuration Chart Prints the chart to confirm the ghost in A4 or Letter...
User Guide
Page 73
Magenta Click Start (2) to contents page back to clean the magenta cartridge. Values: Toner Refresh Mode Yellow Click Start (1) to clean the PHD unit. PHD Refresh Mode PHD Click Start (5) to clean the yellow cartridge. Cyan Click Start (3) to clean the black cartridge. Purpose: To clean the toner cartridges and PHD unit. CAUTION: Using the Refresh Mode consumes extra toner. Black Click Start (4) to clean the cyan cartridge.
Magenta Click Start (2) to contents page back to clean the magenta cartridge. Values: Toner Refresh Mode Yellow Click Start (1) to clean the PHD unit. PHD Refresh Mode PHD Click Start (5) to clean the yellow cartridge. Cyan Click Start (3) to clean the black cartridge. Purpose: To clean the toner cartridges and PHD unit. CAUTION: Using the Refresh Mode consumes extra toner. Black Click Start (4) to clean the cyan cartridge.
User Guide
Page 90
... to check the density of colors. 3. Press the Start(1)-(4) buttons. Yes. The PHD unit is old or damaged. Replace the PHD unit. For example, change the paper type setting in the printer driver. 1. the printer driver. Ensure that the correct... print media is too light. Ensure that the dispense motor starts. 1. Press the Print with A4(3) or Print with low density, do the Toner Refresh Mode. 1. Contact Dell. Contact Dell. Part of colors...
... to check the density of colors. 3. Press the Start(1)-(4) buttons. Yes. The PHD unit is old or damaged. Replace the PHD unit. For example, change the paper type setting in the printer driver. 1. the printer driver. Ensure that the correct... print media is too light. Ensure that the dispense motor starts. 1. Press the Print with A4(3) or Print with low density, do the Toner Refresh Mode. 1. Contact Dell. Contact Dell. Part of colors...

User Guide
Page 91
.... Toner smears or print comes off page. For example, change the paper type setting in the printer driver. See "Print Media Sizes and Support." Yes. The PHD unit is complete. Return to thick. 1. Replace the fuser. Is the problem recovered? No. If the print is being used... button. 3. "Printing" appears. Replace the PHD unit. No. 3. Is the problem recovered? Replace the PHD unit. Contact Dell. Yes. The task is old or damaged. Press the Print with A4(3) or Print with Letter(C) button for 4 Colors Configuration Chart. The PHD unit is old or damaged. No. If you...
.... Toner smears or print comes off page. For example, change the paper type setting in the printer driver. See "Print Media Sizes and Support." Yes. The PHD unit is complete. Return to thick. 1. Replace the fuser. Is the problem recovered? No. If the print is being used... button. 3. "Printing" appears. Replace the PHD unit. No. 3. Is the problem recovered? Replace the PHD unit. Contact Dell. Yes. The task is old or damaged. Press the Print with A4(3) or Print with Letter(C) button for 4 Colors Configuration Chart. The PHD unit is old or damaged. No. If you...
User Guide
Page 92
...is being used. 1. After you are correctly removed from the PHD unit. 1. "Printing" appears. Confirm the amount of toner in the printer driver. Ensure Non-Dell Toner is white. Entire page is not selected in the Printer Maintenance tab in the Tool Box. 1. See "Installing the Toner... Cartridges." Replace the PHD unit. Try the spare PHD unit, if possible. 1. Press Print with...
...is being used. 1. After you are correctly removed from the PHD unit. 1. "Printing" appears. Confirm the amount of toner in the printer driver. Ensure Non-Dell Toner is white. Entire page is not selected in the Printer Maintenance tab in the Tool Box. 1. See "Installing the Toner... Cartridges." Replace the PHD unit. Try the spare PHD unit, if possible. 1. Press Print with...
User Guide
Page 93
... be low or need to be replaced. After you replace the PHD unit, click the Tool Box button. 3. Ensure Color (Auto) is not selected in the Printer Maintenance tab in the printer driver. See "Replacing the PHD (Print Head Device) Unit" and "Installing the PHD Unit". 2. Try the spare PHD unit, if possible. 1. Contact Dell. "Printing" appears. Contact...
... be low or need to be replaced. After you replace the PHD unit, click the Tool Box button. 3. Ensure Color (Auto) is not selected in the Printer Maintenance tab in the printer driver. See "Replacing the PHD (Print Head Device) Unit" and "Installing the PHD Unit". 2. Try the spare PHD unit, if possible. 1. Contact Dell. "Printing" appears. Contact...

User Guide
Page 94
After you replace the fuser, click the Tool Box button. 3. The PHD unit is old or damaged. Replace the PHD unit. No. Pitched dots prints in color Locate the cause of the problem was located in the fuser: 1. Do either of the following: When the cause of the problem by using ...3. Press the Print with A4(1) or Print with Letter(A) button. When the cause of the problem was located in the printer driver. 1. Contact Dell. The fuser is old or damaged. Try the spare PHD unit, if possible. 1. Press the Print with A4(1) or Print with Letter(A) button. Yes. Print Setup tab in the...
After you replace the fuser, click the Tool Box button. 3. The PHD unit is old or damaged. Replace the PHD unit. No. Pitched dots prints in color Locate the cause of the problem was located in the fuser: 1. Do either of the following: When the cause of the problem by using ...3. Press the Print with A4(1) or Print with Letter(A) button. When the cause of the problem was located in the printer driver. 1. Contact Dell. The fuser is old or damaged. Try the spare PHD unit, if possible. 1. Press the Print with A4(1) or Print with Letter(A) button. Yes. Print Setup tab in the...

User Guide
Page 95
... button. 5. The task is printed in negative, use the recommended paper. Go to the next step. Replace the PHD unit. Contact Dell. "Printing" appears. Replace the PHD unit. "Printing" appears. "Printing" appears. Is the problem recovered? Do either of the following : When the ...1. Yes. No. No. Try the spare PHD unit, if possible. 1. Is the problem recovered? See "Replacing the PHD (Print Head Device) Unit" and "Installing the PHD Unit". 2. Is the problem recovered? Replace the PHD unit. Yes. Contact Dell. No. No. Check the light path, and...
... button. 5. The task is printed in negative, use the recommended paper. Go to the next step. Replace the PHD unit. Contact Dell. "Printing" appears. Replace the PHD unit. "Printing" appears. "Printing" appears. Is the problem recovered? Do either of the following : When the ...1. Yes. No. No. Try the spare PHD unit, if possible. 1. Is the problem recovered? See "Replacing the PHD (Print Head Device) Unit" and "Installing the PHD Unit". 2. Is the problem recovered? Replace the PHD unit. Yes. Contact Dell. No. No. Check the light path, and...

User Guide
Page 96
...the pattern matched? After you start the PHD Refresh Mode, click the Tool Box button, and then press the Print with A4(3), or Print with Letter (C) button. Contact Dell. See "Replacing the PHD (Print Head Device) Unit" and "Installing the PHD Unit". Press the Print with A4 (3)... or Print with Letter(C) button. Yes. Yes. Yes. Replace the PHD unit, if possible. Is the problem recovered? the...
...the pattern matched? After you start the PHD Refresh Mode, click the Tool Box button, and then press the Print with A4(3), or Print with Letter (C) button. Contact Dell. See "Replacing the PHD (Print Head Device) Unit" and "Installing the PHD Unit". Press the Print with A4 (3)... or Print with Letter(C) button. Yes. Yes. Yes. Replace the PHD unit, if possible. Is the problem recovered? the...

User Guide
Page 97
... old or damaged. Yes. See "Replacing the PHD (Print Head Device) Unit" and "Installing the PHD Unit". No. Contact Dell. Replace the PHD unit. "Printing" appears. After you replace the PHD unit, press Print with A4(1), or Print with Letter(A). Selects the value close to install the printer. The task is complete. The cause of the...
... old or damaged. Yes. See "Replacing the PHD (Print Head Device) Unit" and "Installing the PHD Unit". No. Contact Dell. Replace the PHD unit. "Printing" appears. After you replace the PHD unit, press Print with A4(1), or Print with Letter(A). Selects the value close to install the printer. The task is complete. The cause of the...
User Guide
Page 98
.... NOTE: Do not check the operation of the problem by removing the toner cartridges, fuser, and PHD unit. 1. Contact Dell. Is the noise from Main Motor Operation Check matched? Contact Dell. Press the Start button. 2. Is the problem recovered? The task is matched with the abnormal noise.... 1. Abnormal noise Locate the cause of the dispense motor repeatedly. Replace the PHD unit. No. Is the noise from Fuser Motor Operation Check matched? Yes. Contact Dell. Replace the PHD unit. Contact Dell. Go to the next step. 3. Yes. Click the Tool Box button. 1. ...
.... NOTE: Do not check the operation of the problem by removing the toner cartridges, fuser, and PHD unit. 1. Contact Dell. Is the noise from Main Motor Operation Check matched? Contact Dell. Press the Start button. 2. Is the problem recovered? The task is matched with the abnormal noise.... 1. Abnormal noise Locate the cause of the dispense motor repeatedly. Replace the PHD unit. No. Is the noise from Fuser Motor Operation Check matched? Yes. Contact Dell. Replace the PHD unit. Contact Dell. Go to the next step. 3. Yes. Click the Tool Box button. 1. ...

User Guide
Page 99
... in your software program. Yes. Replace the PHD unit. After you replace the PHD unit, click the Tool Box button. 3. Yes. Replace the PHD unit. The task is out of the following: 1. Is the color chart matched with the error paper? Contact Dell. Jam/Alignment The job prints, but the... Is the noise from Main Motor Operation Check matched? Contact Dell. Do either of alignment. Click the Tool Box button. 2. Yes. Is the color chart matched with the error paper? 5. No. The task is old or damaged. The PHD unit is complete. No. Misfeed jam Is the problem recovered?...
... in your software program. Yes. Replace the PHD unit. After you replace the PHD unit, click the Tool Box button. 3. Yes. Replace the PHD unit. The task is out of the following: 1. Is the color chart matched with the error paper? Contact Dell. Jam/Alignment The job prints, but the... Is the noise from Main Motor Operation Check matched? Contact Dell. Do either of alignment. Click the Tool Box button. 2. Yes. Is the color chart matched with the error paper? 5. No. The task is old or damaged. The PHD unit is complete. No. Misfeed jam Is the problem recovered?...


