
User Guide
Page 26
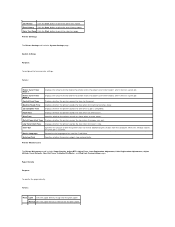
...ready. Fault Tone Displays whether the printer sounds the tone when an error occurs. Printer Maintenance The Printer Maintenance tab includes Paper Density, Adjust BTR, Adjust Fuser, Auto Registration Adjustment, Color Registration Adjustments, Adjust Altitude, Reset Defaults, Non-Dell Toner, Initialize PrintMeter, and Web ...Toner Alert Tone Displays whether the printer sounds the tone when the toner is low. Device Language Determine the language to print the error history report. Paper Density Purpose: To specify the paper density. Values: Plain Light Sets the paper density in Normal ...
...ready. Fault Tone Displays whether the printer sounds the tone when an error occurs. Printer Maintenance The Printer Maintenance tab includes Paper Density, Adjust BTR, Adjust Fuser, Auto Registration Adjustment, Color Registration Adjustments, Adjust Altitude, Reset Defaults, Non-Dell Toner, Initialize PrintMeter, and Web ...Toner Alert Tone Displays whether the printer sounds the tone when the toner is low. Device Language Determine the language to print the error history report. Paper Density Purpose: To specify the paper density. Values: Plain Light Sets the paper density in Normal ...
User Guide
Page 51
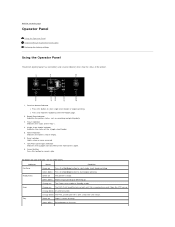
...Processing or printing or Warming up. Orange blinks The PHD, or belt unit life is low or empty. 6. Error indicator Lights when an error occurred. 7. Indicator Continue Ready/Data Error Tray Status Condition Green on The PHD (Print Head Device), or belt unit, life is coming to an ...end. Orange on Press the Continue button to start duplex printing. Ready/Data indicator Indicates the printer status, such as receiving...
...Processing or printing or Warming up. Orange blinks The PHD, or belt unit life is low or empty. 6. Error indicator Lights when an error occurred. 7. Indicator Continue Ready/Data Error Tray Status Condition Green on The PHD (Print Head Device), or belt unit, life is coming to an ...end. Orange on Press the Continue button to start duplex printing. Ready/Data indicator Indicates the printer status, such as receiving...
User Guide
Page 52
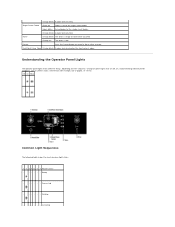
... a job or clear an error. Processing - - - - - - Single Sheet Feeder Green on their sequence. Understanding the Operator Panel Lights The operator panel lights mean different things, depending on Paper is low. Cancel - Ready - - - - - - Toner Orange blinks The toner is open. Common Light Sequences The following table shows the most common light status. 1 2 3 4 5 6 7 Printer status - - - - - - Canceling Press the...
... a job or clear an error. Processing - - - - - - Single Sheet Feeder Green on their sequence. Understanding the Operator Panel Lights The operator panel lights mean different things, depending on Paper is low. Cancel - Ready - - - - - - Toner Orange blinks The toner is open. Common Light Sequences The following table shows the most common light status. 1 2 3 4 5 6 7 Printer status - - - - - - Canceling Press the...

User Guide
Page 65
... mode five minutes after a print job is complete. On Sounds an alert when you notice lights flickering. On Sounds an alert when the printer is ready. When this keeps the printer ready to receive additional bytes of Job History items reaches the maximum. French Italian German Spanish ...Job Complete Tone Off* Does not sound an alert when a job is completed. On Sounds an alert when an error occurs. Restart printer to apply new settings Press the Restart printer to apply the new settings button to apply the changes. *1 Enter 3 to apply the changes. You can also...
... mode five minutes after a print job is complete. On Sounds an alert when you notice lights flickering. On Sounds an alert when the printer is ready. When this keeps the printer ready to receive additional bytes of Job History items reaches the maximum. French Italian German Spanish ...Job Complete Tone Off* Does not sound an alert when a job is completed. On Sounds an alert when an error occurs. Restart printer to apply new settings Press the Restart printer to apply the new settings button to apply the changes. *1 Enter 3 to apply the changes. You can also...
User Guide
Page 84
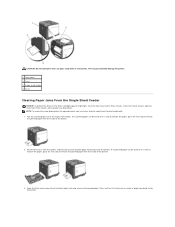
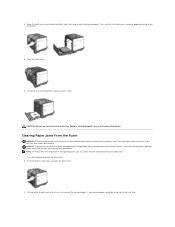
...go to the next step to clear any jams using tools or instruments. NOTE: To resolve the error displayed on the operator panel, you must clear all print media from the printer, and then pull out the jammed paper remaining inside of the single sheet feeder. Pull the jammed ... more than three minutes, print quality may permanently damage the printer. 1 Front cover 2 Tray 1 3 Single sheet feeder 4 Fuser Clearing Paper Jams From the Single Sheet Feeder NOTICE: To protect the drums of the toner cartridges against bright light, close the front cover within three minutes. Open the front...
...go to the next step to clear any jams using tools or instruments. NOTE: To resolve the error displayed on the operator panel, you must clear all print media from the printer, and then pull out the jammed paper remaining inside of the single sheet feeder. Pull the jammed ... more than three minutes, print quality may permanently damage the printer. 1 Front cover 2 Tray 1 3 Single sheet feeder 4 Fuser Clearing Paper Jams From the Single Sheet Feeder NOTICE: To protect the drums of the toner cartridges against bright light, close the front cover within three minutes. Open the front...

User Guide
Page 85
...more than three minutes, print quality may deteriorate. Pull the tray out of the toner cartridges against bright light, close the front cover within three minutes. NOTE: To resolve the error displayed on the operator panel, you must clear all the jammed and/or creased paper from the print ... Paper Jams From the Tray 1 NOTICE: To protect the drums of the printer carefully. Pull the jammed paper out carefully to remove the jammed paper from the printer. 2. Close the front cover. 5. 4. Insert the tray back into the printer, and push until it . Remove all print media from the tray. 3....
...more than three minutes, print quality may deteriorate. Pull the tray out of the toner cartridges against bright light, close the front cover within three minutes. NOTE: To resolve the error displayed on the operator panel, you must clear all the jammed and/or creased paper from the print ... Paper Jams From the Tray 1 NOTICE: To protect the drums of the printer carefully. Pull the jammed paper out carefully to remove the jammed paper from the printer. 2. Close the front cover. 5. 4. Insert the tray back into the printer, and push until it . Remove all print media from the tray. 3....
User Guide
Page 86
... printer and wait for more than three minutes, print quality may reduce print quality. Lift the levers at both ends of paper remaining inside of the toner cartridges against bright light,...surface (black-colored film) of the belt unit may deteriorate. Open the front cover by pushing the button (right side) and remove the jammed paper. Insert the tray into the printer, and ...push until it stops. Push the button (right side) and open for 30 minutes. 2. Close the front cover. 6. Scratches, dirt, or oil from the print media path. 1. NOTE: To resolve the error...
... printer and wait for more than three minutes, print quality may reduce print quality. Lift the levers at both ends of paper remaining inside of the toner cartridges against bright light,...surface (black-colored film) of the belt unit may deteriorate. Open the front cover by pushing the button (right side) and remove the jammed paper. Insert the tray into the printer, and ...push until it stops. Push the button (right side) and open for 30 minutes. 2. Close the front cover. 6. Scratches, dirt, or oil from the print media path. 1. NOTE: To resolve the error...


