Owner Manual
Page 2
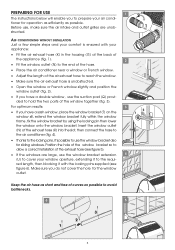
... power cord becomes damaged, this device prevents it horizontally. • Before transporting the unit, drain the unit. If you are adequate for their safety. If this instruction manual. It is recommended to place them in this is dangerous to be necessary, contact the nearest authorized De'Longhi Repair Service Center. SAVE THESE INSTRUCTIONS THIS PRODUCT IS FOR HOUSEHOLD ONLY ELECTRICAL CONNECTIONS Before plugging...
... power cord becomes damaged, this device prevents it horizontally. • Before transporting the unit, drain the unit. If you are adequate for their safety. If this instruction manual. It is recommended to place them in this is dangerous to be necessary, contact the nearest authorized De'Longhi Repair Service Center. SAVE THESE INSTRUCTIONS THIS PRODUCT IS FOR HOUSEHOLD ONLY ELECTRICAL CONNECTIONS Before plugging...
Owner Manual
Page 3
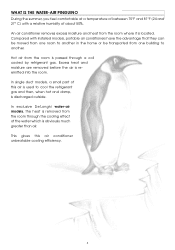
... cooling effect of the water which is obviously much greater than air. This gives this air is used to another . WHAT IS THE WATER-AIR PINGUINO During the summer, you feel comfortable at a temperature of between 75°F and 81°F (24 and 27° C) with installed models, portable air conditioners have the advantage that they can be transported from the room through a coil cooled by refrigerant...
... cooling effect of the water which is obviously much greater than air. This gives this air is used to another . WHAT IS THE WATER-AIR PINGUINO During the summer, you feel comfortable at a temperature of between 75°F and 81°F (24 and 27° C) with installed models, portable air conditioners have the advantage that they can be transported from the room through a coil cooled by refrigerant...
Owner Manual
Page 4
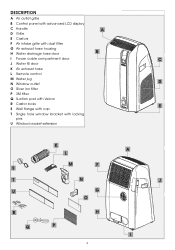
DESCRIPTION A Air outlet grille B Control panel with advanced LCD display C Handle A D Grille E Castors F Air intake grille with dust filter G Air exhaust hose housing H Water drainage hose door B I Power cable compartment door C J Water fill door K Air exhaust hose L Remote control M Water jug N Window outlet D O Silver ion filter P 3M filter Q Suction pad with Velcro R Castor locks E S Wall flange with cap T Single hole window bracket with locking pins U Window bracket extension K A L M F S T N J U G O R H Q P I 4
DESCRIPTION A Air outlet grille B Control panel with advanced LCD display C Handle A D Grille E Castors F Air intake grille with dust filter G Air exhaust hose housing H Water drainage hose door B I Power cable compartment door C J Water fill door K Air exhaust hose L Remote control M Water jug N Window outlet D O Silver ion filter P 3M filter Q Suction pad with Velcro R Castor locks E S Wall flange with cap T Single hole window bracket with locking pins U Window bracket extension K A L M F S T N J U G O R H Q P I 4
Owner Manual
Page 5
... the window bracket fully within the window frame, fix the window bracket by using the locking pin then lower the window onto the window bracket. AIR-CONDITIONING WITHOUT INSTALLATION Just a few simple steps and your comfort is ensured with the locking pins supplied (see figure 5). • If the windows are unobstructed. Insert the window outlet (N) of the exhaust hose (K) into the slot, then connect the hose to the air conditioner...
... the window bracket fully within the window frame, fix the window bracket by using the locking pin then lower the window onto the window bracket. AIR-CONDITIONING WITHOUT INSTALLATION Just a few simple steps and your comfort is ensured with the locking pins supplied (see figure 5). • If the windows are unobstructed. Insert the window outlet (N) of the exhaust hose (K) into the slot, then connect the hose to the air conditioner...
Owner Manual
Page 6
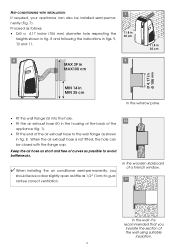
...AIR-CONDITIONING WITH INSTALLATION If required, your appliance can be installed semi-permanently (Fig. 7). Keep the air hose as short and free of curves as possible to guarantee correct ventilation. 10 In the wooden kickboard of the wall using suitable insulation. 6 Proceed as follows: • Drill a 4.17 inche (106 mm) diameter hole... end of the air exhaust hose to the wall flange as 1/2" (1cm) to avoid bottlenecks. ✔ When installing the air conditioner semi-permanently, you insulate the section of a French window. 11 In the wall: it is not fitted, the hole can also be ...
...AIR-CONDITIONING WITH INSTALLATION If required, your appliance can be installed semi-permanently (Fig. 7). Keep the air hose as short and free of curves as possible to guarantee correct ventilation. 10 In the wooden kickboard of the wall using suitable insulation. 6 Proceed as follows: • Drill a 4.17 inche (106 mm) diameter hole... end of the air exhaust hose to the wall flange as 1/2" (1cm) to avoid bottlenecks. ✔ When installing the air conditioner semi-permanently, you insulate the section of a French window. 11 In the wall: it is not fitted, the hole can also be ...
Owner Manual
Page 7
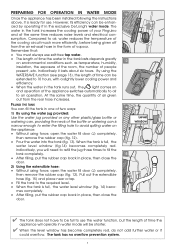
... the tank runs out, the light comes on and operation of the appliance switches automatically to air to avoid spilling water on environmental conditions such as temperature, humidity, insulation, the exposure of the room, the number of your Pinguino and at the same time reduces noise levels and electrical consumption. By using force, open the water fill door (J) completely, then remove the rubber cap (fig. 12...
... the tank runs out, the light comes on and operation of the appliance switches automatically to air to avoid spilling water on environmental conditions such as temperature, humidity, insulation, the exposure of the room, the number of your Pinguino and at the same time reduces noise levels and electrical consumption. By using force, open the water fill door (J) completely, then remove the rubber cap (fig. 12...
Owner Manual
Page 8
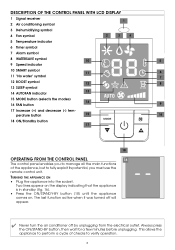
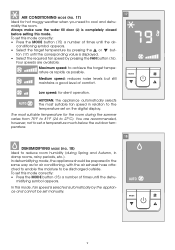
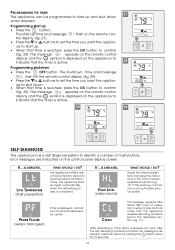
... SLEEP symbol 14 AUTOFAN indicator 13 15 MODE button (selects the modes) 14 16 FAN button 9 17 Increase (+) and decrease (-) tem- perature button 15 16 18 ON/Standby button 17 18 OPERATING FROM THE CONTROL PANEL 16 The control panel enables you to manage all the main functions of checks to fully exploit its potential, you must use the remote control unit. Two lines appear on the display...
... SLEEP symbol 14 AUTOFAN indicator 13 15 MODE button (selects the modes) 14 16 FAN button 9 17 Increase (+) and decrease (-) tem- perature button 15 16 18 ON/Standby button 17 18 OPERATING FROM THE CONTROL PANEL 16 The control panel enables you to manage all the main functions of checks to fully exploit its potential, you must use the remote control unit. Two lines appear on the display...
Owner Manual
Page 9
... (J) is selected automatically by pressing the or button (17) until the dehu- To set a temperature much below the outdoor temperature. 18 DEHUMIDIFYING MODE (FIG. 18) Ideal to 27°C). 17 AIR CONDITIONING MODE (FIG. 17) Ideal for hot muggy weather when you need to achieve the target temperature as rapidly as for air conditioning, with the air exhaust hose attached to enable the moisture to the temperature set manually. 9
... (J) is selected automatically by pressing the or button (17) until the dehu- To set a temperature much below the outdoor temperature. 18 DEHUMIDIFYING MODE (FIG. 18) Ideal to 27°C). 17 AIR CONDITIONING MODE (FIG. 17) Ideal for hot muggy weather when you need to achieve the target temperature as rapidly as for air conditioning, with the air exhaust hose attached to enable the moisture to the temperature set manually. 9
Owner Manual
Page 10
... level of times until the SMART symbol appears. 10 19 FAN MODE (FIG. 19) When using the appliance in air conditioning or fan mode. In this mode, AUTO speed cannot be attached. Three speeds are available: Maximum speed: for silent operation. Low speed: for maximum fan power. Fan speed is also set automatically according to operate in this mode correctly: • Press the MODE button (15) a number of comfort.
... level of times until the SMART symbol appears. 10 19 FAN MODE (FIG. 19) When using the appliance in air conditioning or fan mode. In this mode, AUTO speed cannot be attached. Three speeds are available: Maximum speed: for silent operation. Low speed: for maximum fan power. Fan speed is also set automatically according to operate in this mode correctly: • Press the MODE button (15) a number of comfort.

Owner Manual
Page 11
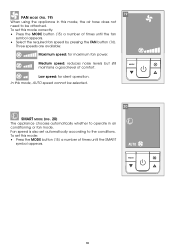
... Timer OFF button 24 SLEEP button 25 °C or °F selection button 28 26 Swing button (function not available in this model) 27 WATERSAVE button 28 Ionizer button 29 BOOST button USING THE REMOTE CONTROL ✔ Point the remote control at the receiver on the appliance. tor 20 17 Clock 18 Timer ON symbol 19 Timer OFF symbol 21 20 Reset button (resets the appliance to direct sunlight or sources of heat...
... Timer OFF button 24 SLEEP button 25 °C or °F selection button 28 26 Swing button (function not available in this model) 27 WATERSAVE button 28 Ionizer button 29 BOOST button USING THE REMOTE CONTROL ✔ Point the remote control at the receiver on the appliance. tor 20 17 Clock 18 Timer ON symbol 19 Timer OFF symbol 21 20 Reset button (resets the appliance to direct sunlight or sources of heat...
Owner Manual
Page 12
...) Press the button to switch the displayed temperature scale from the control panel" to Fahrenheit and vice-versa. 12 The appliance operates in the section "Operating from Celsius to turn the 23 appliance on and select the operating mode (AIR CONDITIONING, DEHUMIDIFYING, FAN, or SMART) and the fan speed. If the remote control is not possible to the instructions in air conditioning mode at maximum fan speed. You should, therefore, refer to set .
...) Press the button to switch the displayed temperature scale from the control panel" to Fahrenheit and vice-versa. 12 The appliance operates in the section "Operating from Celsius to turn the 23 appliance on and select the operating mode (AIR CONDITIONING, DEHUMIDIFYING, FAN, or SMART) and the fan speed. If the remote control is not possible to the instructions in air conditioning mode at maximum fan speed. You should, therefore, refer to set .
Owner Manual
Page 13
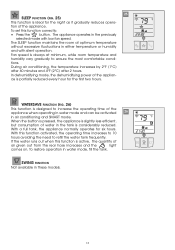
... models. 13 In dehumidifying mode, the dehumidifying power of water in either temperature or humidity and with low fan speed. With this function activated, the operating time increases to 10 hours avoiding the need to ensure the most comfortable condi- To set this function is designed to increase the operating time of air given out from the rear hose increases and the light comes...
... models. 13 In dehumidifying mode, the dehumidifying power of water in either temperature or humidity and with low fan speed. With this function activated, the operating time increases to 10 hours avoiding the need to ensure the most comfortable condi- To set this function is designed to increase the operating time of air given out from the rear hose increases and the light comes...
Owner Manual
Page 14
... SHOULD I DO? The start up time and message flash on the remote control display (fig. 29). • Press the or buttons to confirm (fig. 28). trol display (fig. 27). • Press the or buttons to indicate that the timer is displayed), reset the alarm by holding the button down when required. IF...IS DISPLAYED, LOW TEMPERATURE (frost prevention) WHAT SHOULD I DO? CLEAN This message appears...
... SHOULD I DO? The start up time and message flash on the remote control display (fig. 29). • Press the or buttons to confirm (fig. 28). trol display (fig. 27). • Press the or buttons to indicate that the timer is displayed), reset the alarm by holding the button down when required. IF...IS DISPLAYED, LOW TEMPERATURE (frost prevention) WHAT SHOULD I DO? CLEAN This message appears...
Owner Manual
Page 15
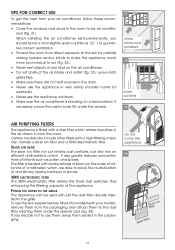
... packaging. Certain models also include other filters with your air conditioner, follow these recommendations: • Close the windows and doors in the room to use the appliance outdoors. • Make sure the air conditioner is treated with small particles of silver (on the scale of millionths of a millimeter) which retains impurities in the air drawn in the grille. SILVER ION FILTER The silver...
... packaging. Certain models also include other filters with your air conditioner, follow these recommendations: • Close the windows and doors in the room to use the appliance outdoors. • Make sure the air conditioner is treated with small particles of silver (on the scale of millionths of a millimeter) which retains impurities in the air drawn in the grille. SILVER ION FILTER The silver...
Owner Manual
Page 16
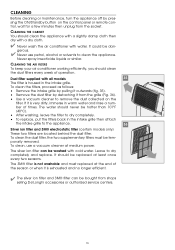
... maintenance, turn the appliance off by detaching it from the socket. gerous. ✔ Never use a vacuum cleaner at the end of times. CLEANING THE AIR FILTERS To keep your air conditioner working efficiently, you should never be washed with all models 35 The filter is very dirty, immerse in the intake grille then attach the intake grille to dry completely and replace. Dust filter supplied with cold water...
... maintenance, turn the appliance off by detaching it from the socket. gerous. ✔ Never use a vacuum cleaner at the end of times. CLEANING THE AIR FILTERS To keep your air conditioner working efficiently, you should never be washed with all models 35 The filter is very dirty, immerse in the intake grille then attach the intake grille to dry completely and replace. Dust filter supplied with cold water...
Owner Manual
Page 17
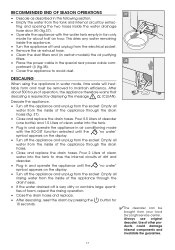
... the inside of clean water into the tank. • Plug in and operate the appliance in air conditioning mode with the water tank empty in the following section. • Empty the water from the tank and internal circuit by pressing the 10 seconds. Empty all water from the electrical socket. • Remove the air exhaust hose. • Clean the dust filters and (in certain models) the air purifying filters. • Place the power...
... the inside of clean water into the tank. • Plug in and operate the appliance in air conditioning mode with the water tank empty in the following section. • Empty the water from the tank and internal circuit by pressing the 10 seconds. Empty all water from the electrical socket. • Remove the air exhaust hose. • Clean the dust filters and (in certain models) the air purifying filters. • Place the power...
Owner Manual
Page 18
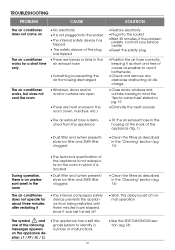
.... 16) • Wait. TROUBLESHOOTING PROBLEM CAUSE SOLUTION The air conditioner does not come on The air conditioner works for a short time only • No electricity • It is not plugged into the socket •Wait 30 minutes, if the problem persists, contact your service center • Reset the safety plug • Position the air hose correctly, keeping it was last turned off • Clean the filters as described in...
.... 16) • Wait. TROUBLESHOOTING PROBLEM CAUSE SOLUTION The air conditioner does not come on The air conditioner works for a short time only • No electricity • It is not plugged into the socket •Wait 30 minutes, if the problem persists, contact your service center • Reset the safety plug • Position the air hose correctly, keeping it was last turned off • Clean the filters as described in...
Owner Manual
Page 19
..., cleaning, recovery and disposal of refrigerant should be connected into an outlet that the power cable and plug are not sure your home has an effective ground, have a qualified electrician or your local electrical utility company check it will not fit the outlet, have a proper outlet installed by the manufacturer only. To restore operation, press the "RESET" button. 19...
..., cleaning, recovery and disposal of refrigerant should be connected into an outlet that the power cable and plug are not sure your home has an effective ground, have a qualified electrician or your local electrical utility company check it will not fit the outlet, have a proper outlet installed by the manufacturer only. To restore operation, press the "RESET" button. 19...
Owner Manual
Page 20
... and shipping) are to misuse, negligence or accidents. All AIR CONDITIONERS in need of repair are to provide one (1) year free parts and labor on the entire AIR CONDITIONER, with the factory directions that has been subjected to be paid by the owner of the unit. This warranty shall apply only if the AIR CONDITIONER is to be free from defects in material and workmanship. This...
... and shipping) are to misuse, negligence or accidents. All AIR CONDITIONERS in need of repair are to provide one (1) year free parts and labor on the entire AIR CONDITIONER, with the factory directions that has been subjected to be paid by the owner of the unit. This warranty shall apply only if the AIR CONDITIONER is to be free from defects in material and workmanship. This...


