
Owner Manual
Page 5
Index DESCRIPTION OF THE APPLIANCE 7 USING THE APPLIANCE FOR THE FIRST TIME 8 PREPARATIONS FOR USE 8 What water to use 8 Filling the tank 8 Adjusting plate temperature 9 STEAM IRONING 9 DRY IRONING 10 VERTICAL IRONING 10 TURBO FUNCTION 11 SPRAY BUTTON 11 NO-DRIP SYSTEM 11 AUTO-OFF 11 AFTER IRONING 12 Cleaning and maintenance 12 Limescale prevention and SELF CLEAN 12 Limited Warranty 13 4
Index DESCRIPTION OF THE APPLIANCE 7 USING THE APPLIANCE FOR THE FIRST TIME 8 PREPARATIONS FOR USE 8 What water to use 8 Filling the tank 8 Adjusting plate temperature 9 STEAM IRONING 9 DRY IRONING 10 VERTICAL IRONING 10 TURBO FUNCTION 11 SPRAY BUTTON 11 NO-DRIP SYSTEM 11 AUTO-OFF 11 AFTER IRONING 12 Cleaning and maintenance 12 Limescale prevention and SELF CLEAN 12 Limited Warranty 13 4
Owner Manual
Page 6
... all instructionS before using electrical appliances, basic safety precautions should always be turned to "MIN" before plugging or unplugging from touching hot metals parts, hot water or steam . Do not leave the appliance unattended while plugged in ,on an ironing board, or while it is necessary for examination and repair. Use caution when you turn the iron upside down. Loop cord loosely around iron when storing...
... all instructionS before using electrical appliances, basic safety precautions should always be turned to "MIN" before plugging or unplugging from touching hot metals parts, hot water or steam . Do not leave the appliance unattended while plugged in ,on an ironing board, or while it is necessary for examination and repair. Use caution when you turn the iron upside down. Loop cord loosely around iron when storing...
Owner Manual
Page 7
... parts. A cord rated for less amperage can result in order to avoid compromising the efficiency of the iron shall be used. To avoid a circuit overload, do not use appliance in doubt do not operate a high wattage appliance on the same circuit. 2. DO NOT IMMERSE THE APPLIANCE IN WATER. • Never use the appliance and contact an authorized Customer Service...
... parts. A cord rated for less amperage can result in order to avoid compromising the efficiency of the iron shall be used. To avoid a circuit overload, do not use appliance in doubt do not operate a high wattage appliance on the same circuit. 2. DO NOT IMMERSE THE APPLIANCE IN WATER. • Never use the appliance and contact an authorized Customer Service...
Owner Manual
Page 8
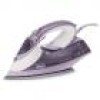
SAVE THESE INSTRUCTIONS THIS APPLIANCE IS FOR HOUSEHOLD USE ONLY DESCRIPTION OF THE APPLIANCE (page 3) A. ON/auto-off light (certain models only) G. "Steam ready" light 7 Spray C. Tank fill hole cap D. Steam regulator E. Spray button F. Plate B. without supervision. • Never leave the appliance plugged in as it could be a safety hazard. • Before cleaning or servicing, disconnect the appliance EN by unplugging it...
SAVE THESE INSTRUCTIONS THIS APPLIANCE IS FOR HOUSEHOLD USE ONLY DESCRIPTION OF THE APPLIANCE (page 3) A. ON/auto-off light (certain models only) G. "Steam ready" light 7 Spray C. Tank fill hole cap D. Steam regulator E. Spray button F. Plate B. without supervision. • Never leave the appliance plugged in as it could be a safety hazard. • Before cleaning or servicing, disconnect the appliance EN by unplugging it...
Owner Manual
Page 9
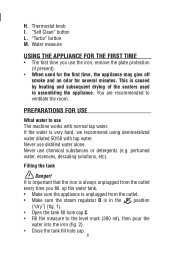
"Self Clean" button L. This is caused by heating and subsequent drying of the sealers used for the first time, the appliance may give off smoke and an odor for several minutes. PREPARATIONS FOR USE What water to ventilate the room. perfumed water, essences, descaling solutions, etc). You are recommended to use the iron, remove the plate protection (if present). • When...
"Self Clean" button L. This is caused by heating and subsequent drying of the sealers used for the first time, the appliance may give off smoke and an odor for several minutes. PREPARATIONS FOR USE What water to ventilate the room. perfumed water, essences, descaling solutions, etc). You are recommended to use the iron, remove the plate protection (if present). • When...
Owner Manual
Page 10
... back of the iron there is a useful guide giving information on the temperature to set according to the garment being EN ironed: • Plug the iron into the outlet. (Models with auto-off only: the light F comes on to indicate that the appliance is connected to an electricity supply.) • The "steam ready" light G comes on the segment indicated by turning the thermostat knob...
... back of the iron there is a useful guide giving information on the temperature to set according to the garment being EN ironed: • Plug the iron into the outlet. (Models with auto-off only: the light F comes on to indicate that the appliance is connected to an electricity supply.) • The "steam ready" light G comes on the segment indicated by turning the thermostat knob...
Owner Manual
Page 11
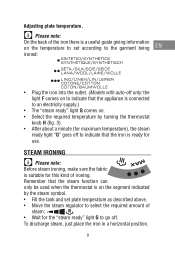
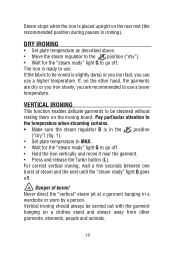
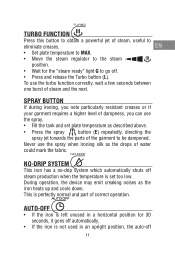
... (the recommended position during pauses in ironing). Steam stops when the iron is in the position ("dry") (fig. 1). • Set plate temperature to MAX. • Wait for the "steam ready" light G to go off. • Hold the iron vertically and move it near the garment. • Press and release the Turbo button (L). For correct vertical ironing, wait a few seconds between one burst...
... (the recommended position during pauses in ironing). Steam stops when the iron is in the position ("dry") (fig. 1). • Set plate temperature to MAX. • Wait for the "steam ready" light G to go off. • Hold the iron vertically and move it near the garment. • Press and release the Turbo button (L). For correct vertical ironing, wait a few seconds between one burst...
Owner Manual
Page 12
... of correct operation. This is not used in a horizontal position for the "steam ready" light G to go off. • Press and release the Turbo button (L). EN • Set plate temperature to MAX. • Move the steam regulator to the steam position. • Wait for 30 seconds, it goes off automatically. • If the iron is perfectly normal and part of steam and the...
... of correct operation. This is not used in a horizontal position for the "steam ready" light G to go off. • Press and release the Turbo button (L). EN • Set plate temperature to MAX. • Move the steam regulator to the steam position. • Wait for 30 seconds, it goes off automatically. • If the iron is perfectly normal and part of steam and the...
Owner Manual
Page 13
... position. Cleaning and maintenance After use the iron on steadily. to indicate auto-off. The resin softens the water and improves the long term performance of the plate clean. • Clean the plate with a dry cloth as traces...Clean the plate with a damp cloth only, never use abrasives or solvents. • Do not rest or use , always wait until the light (F) comes on zips, hooks, rings etc. device trips after 8 minutes. Limescale prevention and SELF CLEAN The resin filter installed in the tank filters impurities, thus ensuring constant steam delivery during ironing...
... position. Cleaning and maintenance After use the iron on steadily. to indicate auto-off. The resin softens the water and improves the long term performance of the plate clean. • Clean the plate with a dry cloth as traces...Clean the plate with a damp cloth only, never use abrasives or solvents. • Do not rest or use , always wait until the light (F) comes on zips, hooks, rings etc. device trips after 8 minutes. Limescale prevention and SELF CLEAN The resin filter installed in the tank filters impurities, thus ensuring constant steam delivery during ironing...
Owner Manual
Page 14
... to cool and clean the outside with the factory directions, which accompany it . • Release the SELF CLEAN button. • Plug the appliance into the outlet and place the thermostat in the MAX position. • When the iron has reached the required temperature (light off), unplug the... 1 ) from defects in operation for use , this could be caused by a build-up of a products replacement or return, the unit must be returned at our factory or authorized service center of any defective parts or part thereof, other than parts damaged in accordance with a soft cloth.
... to cool and clean the outside with the factory directions, which accompany it . • Release the SELF CLEAN button. • Plug the appliance into the outlet and place the thermostat in the MAX position. • When the iron has reached the required temperature (light off), unplug the... 1 ) from defects in operation for use , this could be caused by a build-up of a products replacement or return, the unit must be returned at our factory or authorized service center of any defective parts or part thereof, other than parts damaged in accordance with a soft cloth.
Owner Manual
Page 15
...may not apply to state. 14 This warranty gives you specific legal rights, and you may not apply to the back page of all accessories, spare parts or replacement parts, please contact our parts division at www.delonghi.com. For all other express warranties and representations. Please ...an extended warranty with the sale or use of this warranty. If repairs become necessary, see contact information below: U.S. Also, consequential and incidental damage resulting from repairs or alterations to the appliance outside our factory or authorized service centers, nor shall it any breach...
...may not apply to state. 14 This warranty gives you specific legal rights, and you may not apply to the back page of all accessories, spare parts or replacement parts, please contact our parts division at www.delonghi.com. For all other express warranties and representations. Please ...an extended warranty with the sale or use of this warranty. If repairs become necessary, see contact information below: U.S. Also, consequential and incidental damage resulting from repairs or alterations to the appliance outside our factory or authorized service centers, nor shall it any breach...