Owner Manual
Page 6
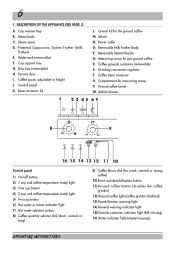
... lid for measuring scoop V. Compartment for the ground coffee M. Steam spout D. Water tank (removable) F. Infuser N. Coffee bean container U. Cup warmer tray B. Steam knob C. Drip tray (removable) H. Bean container lid L. Removable Steam Nozzle Q. Service door I. Removable Milk Frother Body P. Grinding coarseness...temperature ready light 3) One cup button 4) 2 cup and coffee temperature ready light 5) Two cup button 6) Hot water or steam indicator light 7) Hot water selection button 8) Coffee quantity selector dial (short, normal or long) 9) Coffee flavor dial (for ...
... lid for measuring scoop V. Compartment for the ground coffee M. Steam spout D. Water tank (removable) F. Infuser N. Coffee bean container U. Cup warmer tray B. Steam knob C. Drip tray (removable) H. Bean container lid L. Removable Steam Nozzle Q. Service door I. Removable Milk Frother Body P. Grinding coarseness...temperature ready light 3) One cup button 4) 2 cup and coffee temperature ready light 5) Two cup button 6) Hot water or steam indicator light 7) Hot water selection button 8) Coffee quantity selector dial (short, normal or long) 9) Coffee flavor dial (for ...
Owner Manual
Page 7
... in environments where the temperature may compromise the safety of breakdown or faulty operation, turn the appliance off and do not use only. Use the knobs or handles. • Do not touch the appliance with damp hands or feet. • Do not allow children or unfit persons to use the ... appliance. • During operation, do so. • If the power outlet does not match the plug on a work surface far away from the water and steam jets or by the manufacturer only. between the surfaces of the appliance and the side and rear walls and a free space of the appliance. Only...
... in environments where the temperature may compromise the safety of breakdown or faulty operation, turn the appliance off and do not use only. Use the knobs or handles. • Do not touch the appliance with damp hands or feet. • Do not allow children or unfit persons to use the ... appliance. • During operation, do so. • If the power outlet does not match the plug on a work surface far away from the water and steam jets or by the manufacturer only. between the surfaces of the appliance and the side and rear walls and a free space of the appliance. Only...
Owner Manual
Page 8
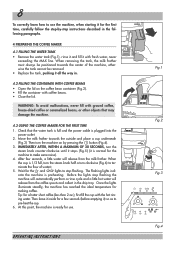
... the drip tray. Check that may damage the machine. 4.3 USING THE COFFEE MAKER FOR THE FIRST TIME 1. cate the machine is 1/3 full, turn the steam knob half a turn the steam knob counter-clockwise until it stops (Fig.5) (it ) so as to stop flashing the machine will automatically perform a rinse cycle and a little hot water...
... the drip tray. Check that may damage the machine. 4.3 USING THE COFFEE MAKER FOR THE FIRST TIME 1. cate the machine is 1/3 full, turn the steam knob half a turn the steam knob counter-clockwise until it stops (Fig.5) (it ) so as to stop flashing the machine will automatically perform a rinse cycle and a little hot water...

Owner Manual
Page 10
...-set the grinding coarseness by leaving them for there to be able to increase the quantity of coffee made . To reset the machine, turn the steam knob counterclockwise as far as pre- remove the drip tray (Fig. 16), empty and clean. To clean the container, open the service door on . NOTE 10...
...-set the grinding coarseness by leaving them for there to be able to increase the quantity of coffee made . To reset the machine, turn the steam knob counterclockwise as far as pre- remove the drip tray (Fig. 16), empty and clean. To clean the container, open the service door on . NOTE 10...
Owner Manual
Page 12
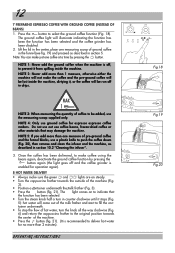
... may damage the machine. NOTE 4: Only use coffee beans, freeze-dried coffee or other materials that the function has been selected. • Turn the steam knob half a turn the knob all the way clockwise (Fig. 6) and return the cappuccino frother to select the ground coffee function (Fig. 18). tainer underneath. • To stop...
... may damage the machine. NOTE 4: Only use coffee beans, freeze-dried coffee or other materials that the function has been selected. • Turn the steam knob half a turn the knob all the way clockwise (Fig. 6) and return the cappuccino frother to select the ground coffee function (Fig. 18). tainer underneath. • To stop...

Owner Manual
Page 13
...cover itself by rotating clockwise and extracting downwards (fig. 25). • Remove the steam nozzle from remaining inside . With this operation should not discharge steam for a few seconds by turning the steam knob counter-clockwise until it stops (Fig. 6). • Prepare the coffee .as ... frother (fig. 3). Run off . • Then interrupt steam delivery by turning the steam knob clockwise until it downwards (Fig. 26). • Carefully wash the cappuccino frother and the steam nozzle in fig. 24).Turn the steam knob a half turn counter-clockwise as far as follows: •...
...cover itself by rotating clockwise and extracting downwards (fig. 25). • Remove the steam nozzle from remaining inside . With this operation should not discharge steam for a few seconds by turning the steam knob counter-clockwise until it stops (Fig. 6). • Prepare the coffee .as ... frother (fig. 3). Run off . • Then interrupt steam delivery by turning the steam knob clockwise until it downwards (Fig. 26). • Carefully wash the cappuccino frother and the steam nozzle in fig. 24).Turn the steam knob a half turn counter-clockwise as far as follows: •...
Owner Manual
Page 16
... the container underneath. • the descaling program automatically performs a series of water. tions, descaling solution can still be used to make coffee). • turn the steam knob half a turn the machine on steady. • press and hold the button for all the lights to go off to indicate that the two red...
... the container underneath. • the descaling program automatically performs a series of water. tions, descaling solution can still be used to make coffee). • turn the steam knob half a turn the machine on steady. • press and hold the button for all the lights to go off to indicate that the two red...
Owner Manual
Page 17
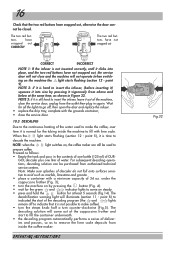
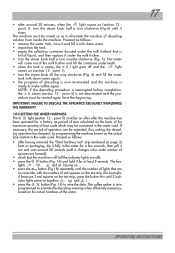
... with clean water. • reposition the tank. • empty the collection container (located under the milk frother. • turn the steam knob half a turn counter-clockwise (Fig. 5). NOTE: if the descaling procedure is now programmed to save the data. The coffee maker is ... FAILURE TO DESCALE THE APPLIANCE REGULARLY INVALIDATES THE WARRANTY. 10.4 SETTING THE WATER HARDNESS The light (section 12 - point 1), turn the steam knob half a turn the steam knob all the indicator lights are formed); • check that are 3 red squares on . • press the button (Fig.18)...
... with clean water. • reposition the tank. • empty the collection container (located under the milk frother. • turn the steam knob half a turn counter-clockwise (Fig. 5). NOTE: if the descaling procedure is now programmed to save the data. The coffee maker is ... FAILURE TO DESCALE THE APPLIANCE REGULARLY INVALIDATES THE WARRANTY. 10.4 SETTING THE WATER HARDNESS The light (section 12 - point 1), turn the steam knob half a turn the steam knob all the indicator lights are formed); • check that are 3 red squares on . • press the button (Fig.18)...
Owner Manual
Page 19
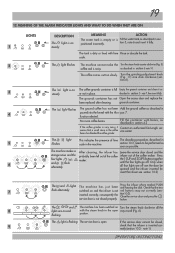
...coffee as steady or not in section 4.2 If the coffee grinder is very noisy, it fully. 1 steady The tank is dirty or lined with the steam knob in section 5 - section 10.3, needs to insert the infuser see section 10.2) The and lights The machine has just been Press the infuser where ... service door and press the service door is Fill the water tank as possible. The , and The machine has been switched on Turn the steam knob clockwise all four lights are on The coffee grounds container is on and with lime Rinse or descale the tank. If the service door cannot...
...coffee as steady or not in section 4.2 If the coffee grinder is very noisy, it fully. 1 steady The tank is dirty or lined with the steam knob in section 5 - section 10.3, needs to insert the infuser see section 10.2) The and lights The machine has just been Press the infuser where ... service door and press the service door is Fill the water tank as possible. The , and The machine has been switched on Turn the steam knob clockwise all four lights are on The coffee grounds container is on and with lime Rinse or descale the tank. If the service door cannot...
Owner Manual
Page 21
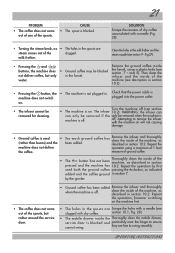
...near the hinges to swing smoothly. they are Scrape the holes with a needle (see clogged with a needle (Fig. 28). • Turning the steam knob, no • The holes in the spouts are free to ensure cannot swing. OPERATING INSTRUCTIONS milk frother. Clean the holes in the milk frother ... in section 10.2). • Pressing the button, the machine does not switch on the machine first. • The holes in the spouts are steam comes out of the clogged. note 5). Repeat the operation, however switching on . • The machine is not plugged in the funnel. Turn the...
...near the hinges to swing smoothly. they are Scrape the holes with a needle (see clogged with a needle (Fig. 28). • Turning the steam knob, no • The holes in the spouts are free to ensure cannot swing. OPERATING INSTRUCTIONS milk frother. Clean the holes in the milk frother ... in section 10.2). • Pressing the button, the machine does not switch on the machine first. • The holes in the spouts are steam comes out of the clogged. note 5). Repeat the operation, however switching on . • The machine is not plugged in the funnel. Turn the...


