Owner Manual
Page 2
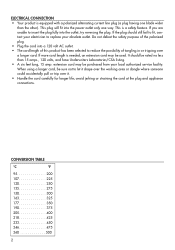
...this product has been selected to reduce the possibility of the polarized plug. • Plug the cord into the outlet, try reversing the plug. Do not defeat the safety purpose of tangling in or tripping over it. • Handle the...rated no less than the other). When using a longer cord, be used. This plug will fit into the power outlet only one blade wider than 15 amps., 120 volts, and have Underwriters Laboratories/CSA listing. • A six feet long, 15 amp. It should still fail to fit, contact your local authorized service facility. ELECTRICAL CONNECTION • Your product...
...this product has been selected to reduce the possibility of the polarized plug. • Plug the cord into the outlet, try reversing the plug. Do not defeat the safety purpose of tangling in or tripping over it. • Handle the...rated no less than the other). When using a longer cord, be used. This plug will fit into the power outlet only one blade wider than 15 amps., 120 volts, and have Underwriters Laboratories/CSA listing. • A six feet long, 15 amp. It should still fail to fit, contact your local authorized service facility. ELECTRICAL CONNECTION • Your product...
Owner Manual
Page 3
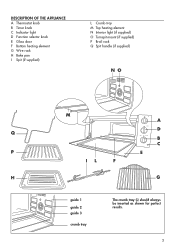
DESCRIPTION OF THE APPLIANCE A Thermostat knob B Timer knob C Indicator light D Function selector knob E Glass door F Bottom heating element G Wire rack H Bake pan I Spit (if supplied) L Crumb tray M Top heating element N Interior light (if supplied) O Turnspit mount (if supplied) P Broil rack Q Spit handle (if supplied) NO M A D Q B C P E IL F H G guide 1 guide 2 guide 3 crumb tray The crumb tray (L) should always be inserted as shown for perfect results. 3
DESCRIPTION OF THE APPLIANCE A Thermostat knob B Timer knob C Indicator light D Function selector knob E Glass door F Bottom heating element G Wire rack H Bake pan I Spit (if supplied) L Crumb tray M Top heating element N Interior light (if supplied) O Turnspit mount (if supplied) P Broil rack Q Spit handle (if supplied) NO M A D Q B C P E IL F H G guide 1 guide 2 guide 3 crumb tray The crumb tray (L) should always be inserted as shown for perfect results. 3
Owner Manual
Page 4
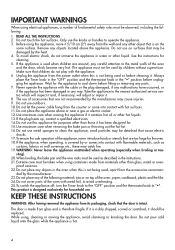
..., will adjust or repair it has been designed for. 15. IMPORTANT WARNINGS When using electrical appliances, a number of the appliance, never introduce foods or utensils that are too large for the oven. 18. Do not place the appliance above the appliance. To switch the appliance off, turn the Timer knob to the "OFF" position and the thermostat knob to operate the appliance. 3. While...
..., will adjust or repair it has been designed for. 15. IMPORTANT WARNINGS When using electrical appliances, a number of the appliance, never introduce foods or utensils that are too large for the oven. 18. Do not place the appliance above the appliance. To switch the appliance off, turn the Timer knob to the "OFF" position and the thermostat knob to operate the appliance. 3. While...
Owner Manual
Page 5
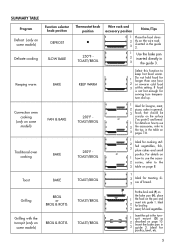
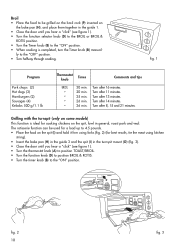
SUMMARY TABLE Program Function selector knob position Defrost (only on some models) DEFROST Delicate cooking SLOW BAKE Keeping warm BAKE Convection oven cooking (only on the wire rack 3 inserted in the guide 2. 1 Use the bake pan 2 inserted directly in 3 the guide 3. Thermostat knob position • 250°F TOAST/BROIL Wire rack and accessory position Notes/Tips 1 Place the food direc- 2 tly on some models) BROIL & ROTIS. Insert the spit in general, 3 foods that should be crunchy on the surface...
SUMMARY TABLE Program Function selector knob position Defrost (only on some models) DEFROST Delicate cooking SLOW BAKE Keeping warm BAKE Convection oven cooking (only on the wire rack 3 inserted in the guide 2. 1 Use the bake pan 2 inserted directly in 3 the guide 3. Thermostat knob position • 250°F TOAST/BROIL Wire rack and accessory position Notes/Tips 1 Place the food direc- 2 tly on some models) BROIL & ROTIS. Insert the spit in general, 3 foods that should be crunchy on the surface...
Owner Manual
Page 6
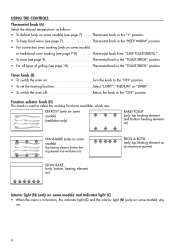
..." position • To set the toasting function Select "LIGHT", "MEDIUM" or "DARK" • To switch the oven off Return the knob to select the cooking functions available, which are: DEFROST (only on some models) (ventilation only) BAKE/TOAST (only top heating element and bottom heating element on) FAN & BAKE (only on some models) (top heating element, bottom heating element and ventilation on) SLOW BAKE (only bottom heating element on) BROIL & ROTIS. (only top heating element on at maximum power) Interior light (N) (only...
..." position • To set the toasting function Select "LIGHT", "MEDIUM" or "DARK" • To switch the oven off Return the knob to select the cooking functions available, which are: DEFROST (only on some models) (ventilation only) BAKE/TOAST (only top heating element and bottom heating element on) FAN & BAKE (only on some models) (top heating element, bottom heating element and ventilation on) SLOW BAKE (only bottom heating element on) BROIL & ROTIS. (only top heating element on at maximum power) Interior light (N) (only...
Owner Manual
Page 7
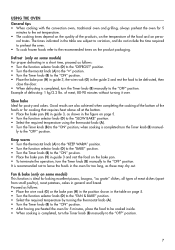
... the bake pan (H) in guide 3, as follows: • Turn the function selector knob (D) to the "DEFROST" position. • Turn the thermostat knob (A) to the "•" position. • Turn the Timer knob (B) to the "ON" position. • Place the bake pan (H) in guide 3, the wire rack (G) in the guide 2 and rest the food to be cooked inside. • When cooking is completed, turn the Timer knob (B) manual- of defrosting: 1 kg/2.2 lbs. Slow bake Ideal for cooking that requires heat above all...
... the bake pan (H) in guide 3, as follows: • Turn the function selector knob (D) to the "DEFROST" position. • Turn the thermostat knob (A) to the "•" position. • Turn the Timer knob (B) to the "ON" position. • Place the bake pan (H) in guide 3, the wire rack (G) in the guide 2 and rest the food to be cooked inside. • When cooking is completed, turn the Timer knob (B) manual- of defrosting: 1 kg/2.2 lbs. Slow bake Ideal for cooking that requires heat above all...
Owner Manual
Page 8
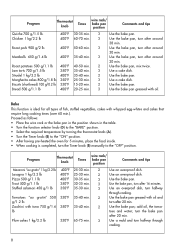
Use the bake pan, mix twice. Use a cake dish. Bake This function is completed, turn the Timer knob (B) manually to the "ON" position. • After having pre-heated the oven for 5 minutes, place the food inside. • When cooking is ideal for all types of fish, stuffed vegetables, cakes with oil and turn the bake pan after 20 min. Use the bake pan, turn halfway through cooking. 8 Use an ovenproof dish, turn after around 30 min...
Use the bake pan, mix twice. Use a cake dish. Bake This function is completed, turn the Timer knob (B) manually to the "ON" position. • After having pre-heated the oven for 5 minutes, place the food inside. • When cooking is ideal for all types of fish, stuffed vegetables, cakes with oil and turn the bake pan after 20 min. Use the bake pan, turn halfway through cooking. 8 Use an ovenproof dish, turn after around 30 min...
Owner Manual
Page 9
... use the wire rack. 1. When toasting bread, both sides at a time. • To toast the bread, place the slices as shown below: Toasting one slice of damaging it. A little condensation may form on to be turned clockwise. The toasting is normal. This is complete and the heating elements automatically switch off. Place the wire rack in the center of the set toasting time. The Timer knob (B) should be toasted in the guide 2. 2. Then manually turn...
... use the wire rack. 1. When toasting bread, both sides at a time. • To toast the bread, place the slices as shown below: Toasting one slice of damaging it. A little condensation may form on to be turned clockwise. The toasting is normal. This is complete and the heating elements automatically switch off. Place the wire rack in the center of the set toasting time. The Timer knob (B) should be toasted in the guide 2. 2. Then manually turn...
Owner Manual
Page 10
.... The rotisserie function can be grilled on the broil rack (P) inserted on the bake pan (H), and place them together in the guide 1. • Close the door until you hear a "click" (see figure 1). • Turn the function selector knob (D) to the BROIL or BROIL & ROTIS position. • Turn the Timer knob (B) to the "ON" position. • When cooking is ideal for best results, tie the meat using kitchen string). • Insert the bake pan...
.... The rotisserie function can be grilled on the broil rack (P) inserted on the bake pan (H), and place them together in the guide 1. • Close the door until you hear a "click" (see figure 1). • Turn the function selector knob (D) to the BROIL or BROIL & ROTIS position. • Turn the Timer knob (B) to the "ON" position. • When cooking is ideal for best results, tie the meat using kitchen string). • Insert the bake pan...
Owner Manual
Page 11
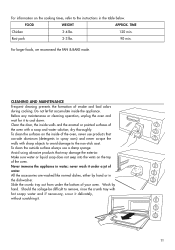
... surfaces on the inside of your oven. For information on the cooking times, refer to cool down. Before any maintenance or cleaning operation, unplug the oven and wait for it under the bottom of the oven, never use a damp sponge. All the accessories are washed like normal dishes, either by hand. Clean the door, the inside the appliance. Avoid using abrasive products that corrode...
... surfaces on the inside of your oven. For information on the cooking times, refer to cool down. Before any maintenance or cleaning operation, unplug the oven and wait for it under the bottom of the oven, never use a damp sponge. All the accessories are washed like normal dishes, either by hand. Clean the door, the inside the appliance. Avoid using abrasive products that corrode...
Owner Manual
Page 12
...resulting from the use of this warranty are limited to the applicable warranty period set forth above limitation may also have other than parts damaged in accordance with the sale or use . Some states do you get service? Our obligation under this warranty is used in transit.... to the original purchaser for De'Longhi addresses. The repaired or new model will be free from state to state. 12 LIMITED WARRANTY This warranty applies to all accessories, spare parts or replacement parts, please contact our parts division at the company expense. How long does the coverage...
...resulting from the use of this warranty are limited to the applicable warranty period set forth above limitation may also have other than parts damaged in accordance with the sale or use . Some states do you get service? Our obligation under this warranty is used in transit.... to the original purchaser for De'Longhi addresses. The repaired or new model will be free from state to state. 12 LIMITED WARRANTY This warranty applies to all accessories, spare parts or replacement parts, please contact our parts division at the company expense. How long does the coverage...


