Owner Manual
Page 2
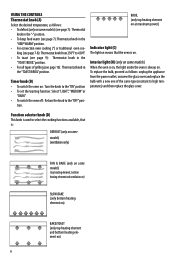
...or equal to the rated power input of the appliance. • The length of the power cable for longer life; If an extension cord is required, only use a three-pin, 120 Volt, 60 Hz power outlet GROUNDING INSTRUCTIONS MAKE SURE THAT THE PLUG IS CORRECTLY GROUNDED This ...it. • Handle the power cable with ground wire. This appliance is properly grounded, contact a qualified electrician. The plug must be connected to be dispersed. ELECTRICAL CONNECTION Only use three-wire extension cords with a 15 amp rating, is required, an extension cord can be used with a rated capacity not below ...
...or equal to the rated power input of the appliance. • The length of the power cable for longer life; If an extension cord is required, only use a three-pin, 120 Volt, 60 Hz power outlet GROUNDING INSTRUCTIONS MAKE SURE THAT THE PLUG IS CORRECTLY GROUNDED This ...it. • Handle the power cable with ground wire. This appliance is properly grounded, contact a qualified electrician. The plug must be connected to be dispersed. ELECTRICAL CONNECTION Only use three-wire extension cords with a 15 amp rating, is required, an extension cord can be used with a rated capacity not below ...

Owner Manual
Page 3
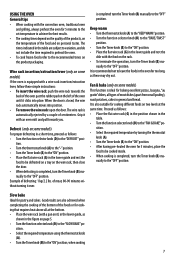
DESCRIPTION OF THE APPLIANCE A thermostat knob B timer knob C indicator light D function selector knob E glass door F bottom heating element G 12"pizza-shaped wire rack H bake pan I reversible wire rack (if supplied) L crumb tray M top heating element N interior light (if supplied) O cookie sheet (if supplied) P muffin pan (if supplied) Q broil rack (if supplied) R rubber pad (if supplied) S wire rack insertion/extraction lever (if supplied) RS M O P L Q I N A B C D E F G H 3
DESCRIPTION OF THE APPLIANCE A thermostat knob B timer knob C indicator light D function selector knob E glass door F bottom heating element G 12"pizza-shaped wire rack H bake pan I reversible wire rack (if supplied) L crumb tray M top heating element N interior light (if supplied) O cookie sheet (if supplied) P muffin pan (if supplied) Q broil rack (if supplied) R rubber pad (if supplied) S wire rack insertion/extraction lever (if supplied) RS M O P L Q I N A B C D E F G H 3
Owner Manual
Page 4
... the instructions for household use metal sponges to the metal walls of the oven and the door, which will inspect it and, if necessary, will adjust or repair it contains hot oil or other than glass, metal or ovenproof ceramics. 22. Do not use the knobs or handles to operate the appliance. 3. When broiling, the bake pan and the wire racks must be used or...
... the instructions for household use metal sponges to the metal walls of the oven and the door, which will inspect it and, if necessary, will adjust or repair it contains hot oil or other than glass, metal or ovenproof ceramics. 22. Do not use the knobs or handles to operate the appliance. 3. When broiling, the bake pan and the wire racks must be used or...
Owner Manual
Page 5
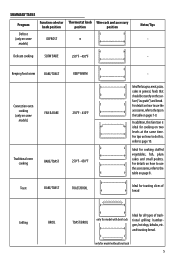
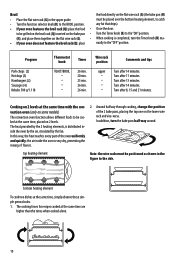
... accessory knob position position position Defrost (only on some models) FAN & BAKE 250°F - 430°F Traditional oven cooking BAKE/TOAST 250°F - 430°F Toast BAKE/TOAST TOAST/BROIL - only for model with broil rack tional grilling: hambur- Ideal for cooking on how to use the accessories, refer to page 10. Keeping food warm BAKE/TOAST KEEP WARM Convection oven cooking (only on pages 7-8. For tips on how to do this function is ideal for lasagna, meat, pizza...
... accessory knob position position position Defrost (only on some models) FAN & BAKE 250°F - 430°F Traditional oven cooking BAKE/TOAST 250°F - 430°F Toast BAKE/TOAST TOAST/BROIL - only for model with broil rack tional grilling: hambur- Ideal for cooking on how to use the accessories, refer to page 10. Keeping food warm BAKE/TOAST KEEP WARM Convection oven cooking (only on pages 7-8. For tips on how to do this function is ideal for lasagna, meat, pizza...
Owner Manual
Page 6
... 7): Thermostat knob in the "TOAST/BROIL" position. • For all types of the same type (resistant to the"OFF"posi- Function selector knob (D) This knob is used to select the cooking functions available, that the oven is always on : Turn the knob to the"ON"position • To set the toasting function: Select "LIGHT", "MEDIUM" or "DARK" • To switch the oven off: Return the knob to high temperatures) and then replace the...
... 7): Thermostat knob in the "TOAST/BROIL" position. • For all types of the same type (resistant to the"OFF"posi- Function selector knob (D) This knob is used to select the cooking functions available, that the oven is always on : Turn the knob to the"ON"position • To set the toasting function: Select "LIGHT", "MEDIUM" or "DARK" • To switch the oven off: Return the knob to high temperatures) and then replace the...
Owner Manual
Page 7
... turning the thermostat knob (A). • Turn the Timer knob (B) to the"ON"position. • After having pre-heated the oven for 5 minutes, place the food to the"ON"position. • Place the flat wire rack (G) in general and bread. tion. • Turn the thermostat knob (A) to the"•"position. • Turn the Timer knob (B) to be defrosted on a tray on the rack. • To terminate the operation, turn the Timer knob (B) manually to the"ON"position...
... turning the thermostat knob (A). • Turn the Timer knob (B) to the"ON"position. • After having pre-heated the oven for 5 minutes, place the food to the"ON"position. • Place the flat wire rack (G) in general and bread. tion. • Turn the thermostat knob (A) to the"•"position. • Turn the Timer knob (B) to be defrosted on a tray on the rack. • To terminate the operation, turn the Timer knob (B) manually to the"ON"position...
Owner Manual
Page 8
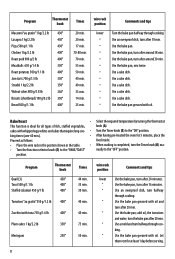
... oven for 5 minutes, place the Proceed as follows: food inside. • Place the wire rack in the position shown in the table. • When cooking is ideal for at least 1 day before serving. 8 position. Plum cakes 1 kg/2.2 lb 350° 75 min. " Use the bake pan, mix twice. cakes with whipped egg-whites and cakes that require long coo- • Turn the Timer knob...
... oven for 5 minutes, place the Proceed as follows: food inside. • Place the wire rack in the position shown in the table. • When cooking is ideal for at least 1 day before serving. 8 position. Plum cakes 1 kg/2.2 lb 350° 75 min. " Use the bake pan, mix twice. cakes with whipped egg-whites and cakes that require long coo- • Turn the Timer knob...
Owner Manual
Page 9
... and bottom heating elements are achieved, however, with four slices at the same time. An audible signal indicates the end of the glass door. Toast • The dimensions of the wire rack (G) allow six slices of bread to be toasted in the table on page 5. 2. Then manually turn the Timer knob (B) to the "TOAST/BAKE" position. 4. Just one slice Toasting two slices the "•" position. Turn the thermostat knob (A) to the "TOAST/BROIL" position and the function selector...
... and bottom heating elements are achieved, however, with four slices at the same time. An audible signal indicates the end of the glass door. Toast • The dimensions of the wire rack (G) allow six slices of bread to be toasted in the table on page 5. 2. Then manually turn the Timer knob (B) to the "TOAST/BAKE" position. 4. Just one slice Toasting two slices the "•" position. Turn the thermostat knob (A) to the "TOAST/BROIL" position and the function selector...
Owner Manual
Page 10
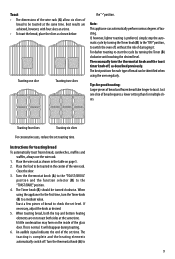
... convection oven (only on some models) The convection oven function allows different foods to be grilled on the broil rack (Q) inserted on the bake pan • Turn the Timer knob (B) to the"ON"position. (H), and place them together on the flat wire rack (G) (the bake pan (H) • Place the flat wire rack (G) in the figure to the side. must be placed over the bottom heating element, to catch • Turn the function selector knob (D) to the BROIL position. Broil...
... convection oven (only on some models) The convection oven function allows different foods to be grilled on the broil rack (Q) inserted on the bake pan • Turn the Timer knob (B) to the"ON"position. (H), and place them together on the flat wire rack (G) (the bake pan (H) • Place the flat wire rack (G) in the figure to the side. must be placed over the bottom heating element, to catch • Turn the function selector knob (D) to the BROIL position. Broil...
Owner Manual
Page 11
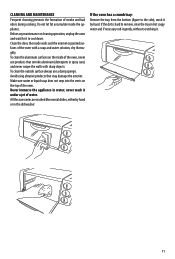
... the inside of water. To clean the outside surface always use products that may damage the exterior. All the accessories are washed like normal dishes, either by hand. Before any maintenance or cleaning operation, unplug the oven and wait for it under a jet of the oven, never use a damp sponge. Never immerse the appliance in the dishwasher. If the oven has a crumb tray...
... the inside of water. To clean the outside surface always use products that may damage the exterior. All the accessories are washed like normal dishes, either by hand. Before any maintenance or cleaning operation, unplug the oven and wait for it under a jet of the oven, never use a damp sponge. Never immerse the appliance in the dishwasher. If the oven has a crumb tray...

Owner Manual
Page 12
...of all products with the sale or use of this product or arising out of any breach of contract or breach of the appliance, which result from repairs or alterations to the appliance outside our factory or authorized service centers, nor shall it apply to any defective parts or part thereof, ... Please contact our toll free hotline at 01-888-335-6644 or log onto our website at www.delonghi.com. LIMITED WARRANTY This warranty applies to the applicable warranty period set forth above. We warrant each appliance to you get service? The repaired or new model will be returned transportation ...
...of all products with the sale or use of this product or arising out of any breach of contract or breach of the appliance, which result from repairs or alterations to the appliance outside our factory or authorized service centers, nor shall it apply to any defective parts or part thereof, ... Please contact our toll free hotline at 01-888-335-6644 or log onto our website at www.delonghi.com. LIMITED WARRANTY This warranty applies to the applicable warranty period set forth above. We warrant each appliance to you get service? The repaired or new model will be returned transportation ...

