Owner Manual
Page 3
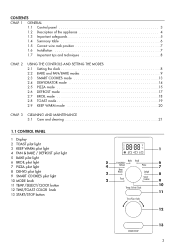
... wire rack position 7 1.6 Installation 7 1.7 Important tips and techniques 8 CHAP. 2 USING THE CONTROLS AND SETTING THE MODES 2.1 Setting the clock 8 2.2 BAKE and FAN/BAKE modes 9 2.3 SMART COOKIES mode 13 2.4 DEHYDRATOR mode 14 2.5 PIZZA mode 15 2.6 DEFROST mode 17 2.7 BROIL mode 18 2.8 TOAST mode 19 2.9 KEEP WARM mode 20 CHAP. 3 CLEANING AND MAINTENANCE 3.1 Care and cleaning 21 1.1 CONTROL PANEL 1 Display 2 TOAST pilot light 3 KEEP WARM pilot light 1 4 FAN & BAKE / DEFROST pilot light 5 BAKE...
... wire rack position 7 1.6 Installation 7 1.7 Important tips and techniques 8 CHAP. 2 USING THE CONTROLS AND SETTING THE MODES 2.1 Setting the clock 8 2.2 BAKE and FAN/BAKE modes 9 2.3 SMART COOKIES mode 13 2.4 DEHYDRATOR mode 14 2.5 PIZZA mode 15 2.6 DEFROST mode 17 2.7 BROIL mode 18 2.8 TOAST mode 19 2.9 KEEP WARM mode 20 CHAP. 3 CLEANING AND MAINTENANCE 3.1 Care and cleaning 21 1.1 CONTROL PANEL 1 Display 2 TOAST pilot light 3 KEEP WARM pilot light 1 4 FAN & BAKE / DEFROST pilot light 5 BAKE...
Owner Manual
Page 4
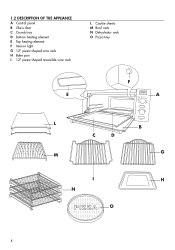
1.2 DESCRIPTION OF THE APPLIANCE A Control panel B Glass door C Crumb tray D Bottom heating element E Top heating element F Interior light G 12" pizza-shaped wire rack H Bake pan I 12" pizza-shaped reversible wire rack L Cookie sheets M Broil rack N Dehydrator rack O Pizza tray F E A L C D M I N O B G H 4
1.2 DESCRIPTION OF THE APPLIANCE A Control panel B Glass door C Crumb tray D Bottom heating element E Top heating element F Interior light G 12" pizza-shaped wire rack H Bake pan I 12" pizza-shaped reversible wire rack L Cookie sheets M Broil rack N Dehydrator rack O Pizza tray F E A L C D M I N O B G H 4
Owner Manual
Page 5
... appliance, when operating, is intact. When broiling, the bake pan and the wire racks must be used or before fitting or removing any way. Do not place any objects in the instructions on surfaces that children do not immerse the appliance in any parts. 7. To switch the appliance off, press START/STOP button. The door is made from the accessories recommended by children...
... appliance, when operating, is intact. When broiling, the bake pan and the wire racks must be used or before fitting or removing any way. Do not place any objects in the instructions on surfaces that children do not immerse the appliance in any parts. 7. To switch the appliance off, press START/STOP button. The door is made from the accessories recommended by children...
Owner Manual
Page 6
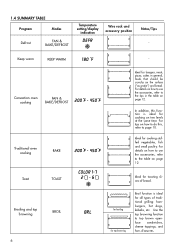
1.4 SUMMARY TABLE Program Modes Defrost FAN & BAKE/DEFROST Temperature setting/display indication DEFR Wire rack and accessory position Notes/Tips - In addition, this , refer to page 10. Keep warm KEEP WARM 180 °F - Convection oven cooking FAN & BAKE/DEFROST 200°F - 450°F Traditional oven cooking BAKE 200°F - 450°F COLOR 1-7 Toast TOAST 2 -6 Ideal for cooking on the surface ("au gratin") and bread. For tips on how to...
1.4 SUMMARY TABLE Program Modes Defrost FAN & BAKE/DEFROST Temperature setting/display indication DEFR Wire rack and accessory position Notes/Tips - In addition, this , refer to page 10. Keep warm KEEP WARM 180 °F - Convection oven cooking FAN & BAKE/DEFROST 200°F - 450°F Traditional oven cooking BAKE 200°F - 450°F COLOR 1-7 Toast TOAST 2 -6 Ideal for cooking on the surface ("au gratin") and bread. For tips on how to...
Owner Manual
Page 7
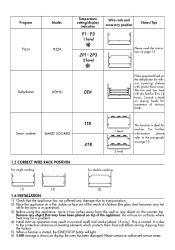
... Pizza Modes PIZZA Temperature setting/display indication P1 - P3 1 level Wire rack and accessory position Notes/Tips 2P1 - 2P3 2 level Please read the instruction on the dehydrator kit without covering shelves with plastic food wrap. Smart cookies SMART COOKIES 1.5 CORRECT WIRE RACK POSITION For single cooking: 1tr 2tr 1 level 2 level This function is normal. Do not use on surfaces where heat may be a problem. 4) Initial start-up operation...
... Pizza Modes PIZZA Temperature setting/display indication P1 - P3 1 level Wire rack and accessory position Notes/Tips 2P1 - 2P3 2 level Please read the instruction on the dehydrator kit without covering shelves with plastic food wrap. Smart cookies SMART COOKIES 1.5 CORRECT WIRE RACK POSITION For single cooking: 1tr 2tr 1 level 2 level This function is normal. Do not use on surfaces where heat may be a problem. 4) Initial start-up operation...
Owner Manual
Page 8
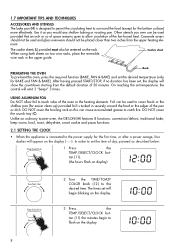
... the set temperature, the control will appear on two wire racks, place the reversible wire rack in securely around the food or the edges of day, proceed as described below: 1 Press the TEMP./SELECT/CLOCK but - DO NOT cover the crumb tray (C). Unlike an ordinary toaster-oven, the DE'LONGHI features 8 functions: convection/defrost, traditional bake, keep warm, broil, toast, dehydrate, smart cookie and pizza functions. 2.1 SETTING THE CLOCK •...
... the set temperature, the control will appear on two wire racks, place the reversible wire rack in securely around the food or the edges of day, proceed as described below: 1 Press the TEMP./SELECT/CLOCK but - DO NOT cover the crumb tray (C). Unlike an ordinary toaster-oven, the DE'LONGHI features 8 functions: convection/defrost, traditional bake, keep warm, broil, toast, dehydrate, smart cookie and pizza functions. 2.1 SETTING THE CLOCK •...
Owner Manual
Page 9
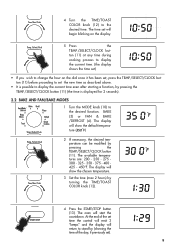
... modified by turning the TIME/TOAST COLOR knob (12). 4 Press the START/STOP button (13). At the end of the set time the control will emit 3 "beeps" and the display will return to stand-by pressing the TEMP./SELECT/CLOCK button (11) (the time is possible to the desired function. The oven will show the chosen temperature. 3 Set the time...
... modified by turning the TIME/TOAST COLOR knob (12). 4 Press the START/STOP button (13). At the end of the set time the control will emit 3 "beeps" and the display will return to stand-by pressing the TEMP./SELECT/CLOCK button (11) (the time is possible to the desired function. The oven will show the chosen temperature. 3 Set the time...
Owner Manual
Page 10
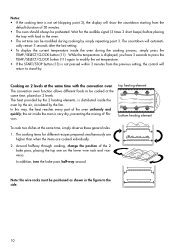
... in the oven. • The set time can be positioned as shown in the figure to the side. 10 top heating element bottom heating element To cook two dishes at the same time, placed on the lower wire rack and viceversa. Note: the wire racks must be modified during the cooking process, simply press the TEMP./SELECT/CLOCK button (11). Wait for different recipes prepared simultaneously...
... in the oven. • The set time can be positioned as shown in the figure to the side. 10 top heating element bottom heating element To cook two dishes at the same time, placed on the lower wire rack and viceversa. Note: the wire racks must be modified during the cooking process, simply press the TEMP./SELECT/CLOCK button (11). Wait for different recipes prepared simultaneously...
Owner Manual
Page 11
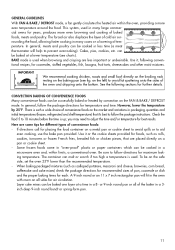
... instructions. To be baked at a time in many large commercial ovens for air circulation. Cakes, pies, cookies, etc. Use it, following sections for different types of the oven and dripping onto the bottom. IMPORTANT We recommend cooking chicken, roasts and small fowl directly on the broiling rack resting on all of temperature. on the safe side, set the oven 25°F lower than the recommended temperature. - CONVECTION BAKING...
... instructions. To be baked at a time in many large commercial ovens for air circulation. Cakes, pies, cookies, etc. Use it, following sections for different types of the oven and dripping onto the bottom. IMPORTANT We recommend cooking chicken, roasts and small fowl directly on the broiling rack resting on all of temperature. on the safe side, set the oven 25°F lower than the recommended temperature. - CONVECTION BAKING...
Owner Manual
Page 12
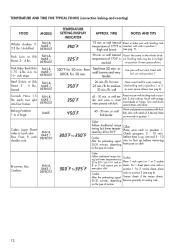
... even cooking. Use broiling rack in its high- Roast on wire rack in posi- or until done. 45 - 50 min. Bake on pan with broiling rack in position 1. 3 0 0 ° F to 350°F Cake: Follow traditional recipe timing but lower temperature by 25 to BAKE / 10 - For 2 cookie sheets, place Cookie: racks in oven-glass dish. DEFROST Baking Potatoes 1 to cooling rack. temperature of cookie. 12 Use pan without rack, lined with rack in 5 position...
... even cooking. Use broiling rack in its high- Roast on wire rack in posi- or until done. 45 - 50 min. Bake on pan with broiling rack in position 1. 3 0 0 ° F to 350°F Cake: Follow traditional recipe timing but lower temperature by 25 to BAKE / 10 - For 2 cookie sheets, place Cookie: racks in oven-glass dish. DEFROST Baking Potatoes 1 to cooling rack. temperature of cookie. 12 Use pan without rack, lined with rack in 5 position...
Owner Manual
Page 13
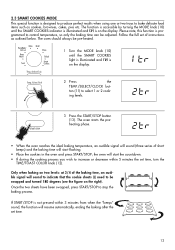
... COOKIES light is illuminated and T R 1 is on the right). ing levels. 3 Press the START/STOP button (13). Please note, this function is not pressed within 5 minutes the set time. 13 the oven will start the countdown. • If during the cooking process you wish to control temperature, so only the baking time can be pre-heated. 1 Turn the MODE knob (10...
... COOKIES light is illuminated and T R 1 is on the right). ing levels. 3 Press the START/STOP button (13). Please note, this function is not pressed within 5 minutes the set time. 13 the oven will start the countdown. • If during the cooking process you wish to control temperature, so only the baking time can be pre-heated. 1 Turn the MODE knob (10...
Owner Manual
Page 14
...specific directions as follows: - Consult a book on the dehydrator kit, will return to stand-by turning the TIME/TOAST COLOR (12) knob. 3 Press the START/STOP button (13). insert wire rack (G) in the slot 1; - However, the limited quantity of vegetables that can also be worth your time and attention. Prepare food and use the dehydrating kit as to times, temperature...kit Slot 1 14 wire rack reversed The oven will depend on the wire rack (see figure). 2.4 DEHYDRATING MODE 1 Turn the MODE knob (10) until the DEHYD light is illuminated and d e h is on the display. 2 Set the time (max...
...specific directions as follows: - Consult a book on the dehydrator kit, will return to stand-by turning the TIME/TOAST COLOR (12) knob. 3 Press the START/STOP button (13). insert wire rack (G) in the slot 1; - However, the limited quantity of vegetables that can also be worth your time and attention. Prepare food and use the dehydrating kit as to times, temperature...kit Slot 1 14 wire rack reversed The oven will depend on the wire rack (see figure). 2.4 DEHYDRATING MODE 1 Turn the MODE knob (10) until the DEHYD light is illuminated and d e h is on the display. 2 Set the time (max...
Owner Manual
Page 15
... relevant led lights on the following page) by pressing the START/STOP button (13). 15 the display will show the countdown. At the end of the set time the control will emit 3 "beeps" and the display will show the time of the day, if previously set time, turn the TIME/TOAST COLOR knob (12). This operation can be...
... relevant led lights on the following page) by pressing the START/STOP button (13). 15 the display will show the countdown. At the end of the set time the control will emit 3 "beeps" and the display will show the time of the day, if previously set time, turn the TIME/TOAST COLOR knob (12). This operation can be...
Owner Manual
Page 16
... the cooking time, an audible signal will melt perfectly without overburning. • In order to select the right program, refer to be swapped over, placing the top one on the pizza tray (O). Also turn them around 180 degrees. made pizza with oven-proof paper. DISPLAY INDICATION * P1 * P2 * P3 P1 2p1 * 2P1 * 2P2 * 2P3 Correct wire rack/pizza tray position NOTES...
... the cooking time, an audible signal will melt perfectly without overburning. • In order to select the right program, refer to be swapped over, placing the top one on the pizza tray (O). Also turn them around 180 degrees. made pizza with oven-proof paper. DISPLAY INDICATION * P1 * P2 * P3 P1 2p1 * 2P1 * 2P2 * 2P3 Correct wire rack/pizza tray position NOTES...
Owner Manual
Page 17
... TEMP./SELECT/CLOCK (11) until the FAN BAKE/DEFROST led lights on a counter or in the refrigerator. 2.6 DEFROSTING MODE 1 Turn the MODE knob (10) until the display shows d e f r 3 Set the time (max 2 hours) by turning the TIME/TOAST COLOR (12) knob. 4 Press the START/STOP button (13). Thaw only pieces or portions small enough to thaw in a refrigerator. 17 Large amounts of...
... TEMP./SELECT/CLOCK (11) until the FAN BAKE/DEFROST led lights on a counter or in the refrigerator. 2.6 DEFROSTING MODE 1 Turn the MODE knob (10) until the display shows d e f r 3 Set the time (max 2 hours) by turning the TIME/TOAST COLOR (12) knob. 4 Press the START/STOP button (13). Thaw only pieces or portions small enough to thaw in a refrigerator. 17 Large amounts of...
Owner Manual
Page 18
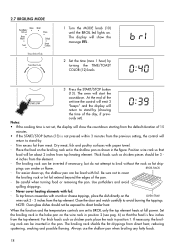
... element. Close the door and watch carefully to stand-by turning the TIME/TOAST COLOR (12) knob. 3 Press the START/STOP button (13). Set the broiling rack in the pan. For thick foods such as fat drip- If necessary, the broiling rack can be inverted in the bake pan on the broiling rack set to BROIL only the top element heats at full power. Place the food on the wire rack in the shallow pan...
... element. Close the door and watch carefully to stand-by turning the TIME/TOAST COLOR (12) knob. 3 Press the START/STOP button (13). Set the broiling rack in the pan. For thick foods such as fat drip- If necessary, the broiling rack can be inverted in the bake pan on the broiling rack set to BROIL only the top element heats at full power. Place the food on the wire rack in the shallow pan...

Owner Manual
Page 19
...See note) 1/2 - 1 in . until the TOAST led lights on bake pan. Note: Since fish is non-fatty it flakes easily with a fork. Broil until it can be turned. 2.8 TOASTING MODE 1 Turn the MODE knob (10) until juices run clear when fork-tested...broiled directly on . 4 2 Press TEMP./SELECT/CLOCK buttons (11) to rack. Rare 10 - 12 min. Well 18 - 22 min. capacity of toasting by turning the TIME/TOAST COLOR (12) knob. 6 19 Beef Flank Steak, Fillet 3/4 - 1 in . 10 - 16 min. Medium 16 - 18 min. Bacon, Sausage, Links or Patties Up to modify the number of slices. 4 3 Set...
...See note) 1/2 - 1 in . until the TOAST led lights on bake pan. Note: Since fish is non-fatty it flakes easily with a fork. Broil until it can be turned. 2.8 TOASTING MODE 1 Turn the MODE knob (10) until juices run clear when fork-tested...broiled directly on . 4 2 Press TEMP./SELECT/CLOCK buttons (11) to rack. Rare 10 - 12 min. Well 18 - 22 min. capacity of toasting by turning the TIME/TOAST COLOR (12) knob. 6 19 Beef Flank Steak, Fillet 3/4 - 1 in . 10 - 16 min. Medium 16 - 18 min. Bacon, Sausage, Links or Patties Up to modify the number of slices. 4 3 Set...
Owner Manual
Page 20
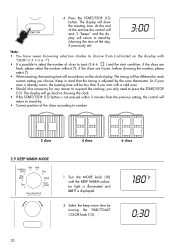
... position of the slices according to press the START/STOP (13). The timing will be less than if you only need to number. 2 slices 4 slices 6 slices 2.9 KEEP WARM MODE 1 Turn the MODE knob (10) until the KEEP WARM indicator light is illuminated and 180°f is already warm, the toasting time will be necessary for each custom setting you choose. So if your oven...
... position of the slices according to press the START/STOP (13). The timing will be less than if you only need to number. 2 slices 4 slices 6 slices 2.9 KEEP WARM MODE 1 Turn the MODE knob (10) until the KEEP WARM indicator light is illuminated and 180°f is already warm, the toasting time will be necessary for each custom setting you choose. So if your oven...
Owner Manual
Page 21
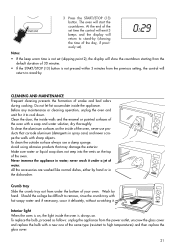
... oven. Crumb tray Slide the crumb tray out from the previous setting, the control will return to stand-by hand. To clean the aluminum surfaces on the inside the oven is on the top of the oven, never use a damp sponge. All the accessories are washed like normal dishes, either by . Interior light When the oven is always on. At the end of water. Clean the door...
... oven. Crumb tray Slide the crumb tray out from the previous setting, the control will return to stand-by hand. To clean the aluminum surfaces on the inside the oven is on the top of the oven, never use a damp sponge. All the accessories are washed like normal dishes, either by . Interior light When the oven is always on. At the end of water. Clean the door...
Owner Manual
Page 22
...is limited to repair at our factory or authorized service center of any defective parts or part thereof, other person or company to state. 22 Residents: Please contact our toll free hotline at 1-800-322-3848 or log onto our website at www.delonghi.com. This warranty gives you specific legal rights,...of contract or breach of this warranty are limited to the applicable warranty period set forth above exclusions may not apply to the original purchaser for use of this product or arising out of a products replacement or return, the unit must be returned at 1-800-865-6330. Some ...
...is limited to repair at our factory or authorized service center of any defective parts or part thereof, other person or company to state. 22 Residents: Please contact our toll free hotline at 1-800-322-3848 or log onto our website at www.delonghi.com. This warranty gives you specific legal rights,...of contract or breach of this warranty are limited to the applicable warranty period set forth above exclusions may not apply to the original purchaser for use of this product or arising out of a products replacement or return, the unit must be returned at 1-800-865-6330. Some ...


