
Owner Manual
Page 8
.... • For machines with glass carafe: A. Do not set the hot container on or near a hot gas or electrical burner, or in use is a safety feature. Repair should be a GROUNDING TYPE 3 - This is to "off", then remove plug from the outlet when not in a heated oven. • ...used, the marked electrical rating should be used by authorized service personnel only! SAVE THESE INSTRUCTIONS This product is equipped with a polarized alternating current line plug (a plug having one way. The longer cord should be arranged so that it will void the warranty. wire, grounding type ...
.... • For machines with glass carafe: A. Do not set the hot container on or near a hot gas or electrical burner, or in use is a safety feature. Repair should be a GROUNDING TYPE 3 - This is to "off", then remove plug from the outlet when not in a heated oven. • ...used, the marked electrical rating should be used by authorized service personnel only! SAVE THESE INSTRUCTIONS This product is equipped with a polarized alternating current line plug (a plug having one way. The longer cord should be arranged so that it will void the warranty. wire, grounding type ...

Owner Manual
Page 9
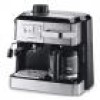
...for drip coffee H Opening handle I Water filling compartment J Water tank level indicator K Warming plate L Cup tray M Drip tray N Boiler outlet O Cappuccino nozzle P Steam spout Q Control panel R 2-4 cups espresso filter S Espresso filter holder T Measuring spoon U Cover for small espresso carafe V Small carafe for espresso W Large carafe for drip coffee X Permanent gold tone filter (*some models only) Control panel description Y On/off button for espresso coffee with power light Z Display Z1 On/off button for drip coffee with power light Z2 AROMA button with light Z3 AUTO button (automatic...
...for drip coffee H Opening handle I Water filling compartment J Water tank level indicator K Warming plate L Cup tray M Drip tray N Boiler outlet O Cappuccino nozzle P Steam spout Q Control panel R 2-4 cups espresso filter S Espresso filter holder T Measuring spoon U Cover for small espresso carafe V Small carafe for espresso W Large carafe for drip coffee X Permanent gold tone filter (*some models only) Control panel description Y On/off button for espresso coffee with power light Z Display Z1 On/off button for drip coffee with power light Z2 AROMA button with light Z3 AUTO button (automatic...

Owner Manual
Page 10
... the display stops flashing, the time set the time, proceed as follows: 1. Programming the automatic start time after startup. When the display stops flashing, the time will illuminate. the light on the display. 2. Press the "HOUR" button (Fig. 3) for about 5 seconds), set the delayed start • Open the filter support and carefully put the filter in the memory. the time you want the coffee to use the aroma button when preparing 5 cups or less: do not use this button if brewing...
... the display stops flashing, the time set the time, proceed as follows: 1. Programming the automatic start time after startup. When the display stops flashing, the time will illuminate. the light on the display. 2. Press the "HOUR" button (Fig. 3) for about 5 seconds), set the delayed start • Open the filter support and carefully put the filter in the memory. the time you want the coffee to use the aroma button when preparing 5 cups or less: do not use this button if brewing...

Owner Manual
Page 11
... coffee is perfectly normal for espresso. If the coffee goes above . Espresso coffee 1. To attach the filter-holder, position it for making cappuccinos is important to use , keep the coffee hot after the percolation process has finished, place the carafe on the hot plate and leave the machine turned on page 11). 3. Make sure the filter-holder spouts are inside the opening in particular not hot. CAUTION: To prevent splashes, never remove the filter-holder...
... coffee is perfectly normal for espresso. If the coffee goes above . Espresso coffee 1. To attach the filter-holder, position it for making cappuccinos is important to use , keep the coffee hot after the percolation process has finished, place the carafe on the hot plate and leave the machine turned on page 11). 3. Make sure the filter-holder spouts are inside the opening in particular not hot. CAUTION: To prevent splashes, never remove the filter-holder...

Owner Manual
Page 12
... the machine, remove the plug from the change to let out a little of the solution from the cappuccino nozzle. 8. Descaling the espresso section Over time, heating the water used to make the coffee leads to level 4 on the WATER LEVEL side. 2. Fill the small espresso carafe with water up to lime scale buildup in the espresso filter are not obstructed. Make sure the espresso/steam knob is sufficient. • Clean the filter-holder, drip...
... the machine, remove the plug from the change to let out a little of the solution from the cappuccino nozzle. 8. Descaling the espresso section Over time, heating the water used to make the coffee leads to level 4 on the WATER LEVEL side. 2. Fill the small espresso carafe with water up to lime scale buildup in the espresso filter are not obstructed. Make sure the espresso/steam knob is sufficient. • Clean the filter-holder, drip...

Owner Manual
Page 13
... filter making cappuccino Always use skim milk at 0.00 See section"Length of warming time" To make 2 espressos 2 cappuccinos 4 espressos 4 cappuccinos Water level Espresso and Cappuccino water level Quantity of ground coffee Quantity of water as described in the cappuccino frother The drip coffee takes longer to The drip coffee machine needs to The coffee is set at refrigerator temperature. Cappuccino maker dirty Thoroughly clean the holes in the section DESCALING THE DRIP COFFEE SECTION Leaks on fig. 8, pg.4. No milk froth is clogged. Clean the filter...
... filter making cappuccino Always use skim milk at 0.00 See section"Length of warming time" To make 2 espressos 2 cappuccinos 4 espressos 4 cappuccinos Water level Espresso and Cappuccino water level Quantity of ground coffee Quantity of water as described in the cappuccino frother The drip coffee takes longer to The drip coffee machine needs to The coffee is set at refrigerator temperature. Cappuccino maker dirty Thoroughly clean the holes in the section DESCALING THE DRIP COFFEE SECTION Leaks on fig. 8, pg.4. No milk froth is clogged. Clean the filter...

Owner Manual
Page 14
... our website at www.delonghi.com Residents of all products with the factory directions, which vary from state to state/country to be free from the use . Some states/ countries do not allow limitations on how long an implied warranty lasts, so the above warranty is not covered by the warranty? This warranty gives you specific legal rights, and you get service?
... our website at www.delonghi.com Residents of all products with the factory directions, which vary from state to state/country to be free from the use . Some states/ countries do not allow limitations on how long an implied warranty lasts, so the above warranty is not covered by the warranty? This warranty gives you specific legal rights, and you get service?


