
Owners Manual
Page 2
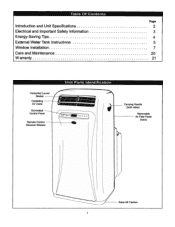
Table Of Contents Page Introduction and Unit Specifications 2 Electrical and Important Safety Information 3 Energy-Saving Tips 4 External Water Tank Instructions 5 Window Installation 7 Care and Maintenance 20 Warranty 21 Unit Parts Identification Horizontal Louver Blades Oscillating Air Vents Illuminated Control Panel Remote Control Receiver Window / / it// / GI / / / SC) Carrying Handle (both sides) Removable Air Filter Panel (back) Easy-roll Castors
Table Of Contents Page Introduction and Unit Specifications 2 Electrical and Important Safety Information 3 Energy-Saving Tips 4 External Water Tank Instructions 5 Window Installation 7 Care and Maintenance 20 Warranty 21 Unit Parts Identification Horizontal Louver Blades Oscillating Air Vents Illuminated Control Panel Remote Control Receiver Window / / it// / GI / / / SC) Carrying Handle (both sides) Removable Air Filter Panel (back) Easy-roll Castors
Owners Manual
Page 3
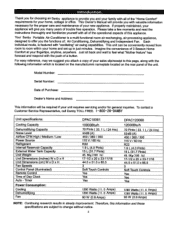
... L (4.0 Pints) 15 L (31.7 Pints) 45. 5Kg (100 I b) 17-1/2 x 20 x 33-11/16 44.5 x 51.0 x 85.5 3 Soft Touch Controls Yes Yes Yes DPAC120068 12000Btu/h 70 Pints ( 33. 1 L/ 24 Hrs) 52dB (A) 450 / 380 / 300 115 V/ 60 Hz R22 1.9 L (4.0 Pints) 15 L (31.7 Pints) 45. 5Kg(100 ... wait to offer you attach a copy of your fingertips, anytime, anywhere. DANBY Unit specifications: Cooling Capacity Dehumidifying Capacity Noise Level Airflow CFM High / Medium / Low Power Source Refrigerant Internal Reservoir Capacity External Water Tank Capacity Unit Weight Unit Dimensions (inches) W x D x H Unit Dimensions...
... L (4.0 Pints) 15 L (31.7 Pints) 45. 5Kg (100 I b) 17-1/2 x 20 x 33-11/16 44.5 x 51.0 x 85.5 3 Soft Touch Controls Yes Yes Yes DPAC120068 12000Btu/h 70 Pints ( 33. 1 L/ 24 Hrs) 52dB (A) 450 / 380 / 300 115 V/ 60 Hz R22 1.9 L (4.0 Pints) 15 L (31.7 Pints) 45. 5Kg(100 ... wait to offer you attach a copy of your fingertips, anytime, anywhere. DANBY Unit specifications: Cooling Capacity Dehumidifying Capacity Noise Level Airflow CFM High / Medium / Low Power Source Refrigerant Internal Reservoir Capacity External Water Tank Capacity Unit Weight Unit Dimensions (inches) W x D x H Unit Dimensions...
Owners Manual
Page 5
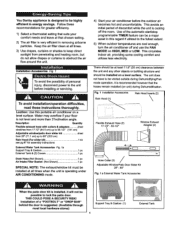
... CAUTION A To avoid installation/operation difficulties, read these recommendations for assembly instructions External Water Tank Accessories Fig. This circulates indoor air, providing some cooling comfort and utilizes less electricity. Energy-Saving Tips You Danby appliance is designed to 80" (203 cm) 4/set stretches from 17-1/2" ... Keep the air filter clean at all times when the unit is very efficient in energy savings. la Support Tray & Castors 1 pc External Tank & (2) Covers 1 pc Drain Hose (Not Shown) 1 pc Air Intake Filter Basket (Not Shown) 1 pc SPECIAL NOTE: The...
... CAUTION A To avoid installation/operation difficulties, read these recommendations for assembly instructions External Water Tank Accessories Fig. This circulates indoor air, providing some cooling comfort and utilizes less electricity. Energy-Saving Tips You Danby appliance is designed to 80" (203 cm) 4/set stretches from 17-1/2" ... Keep the air filter clean at all times when the unit is very efficient in energy savings. la Support Tray & Castors 1 pc External Tank & (2) Covers 1 pc Drain Hose (Not Shown) 1 pc Air Intake Filter Basket (Not Shown) 1 pc SPECIAL NOTE: The...

Owners Manual
Page 6
...-locate the unit to another location. • In order to avoid spillage when emptying the external water tank, remove cover "A" (as (excess) condensed water accumulates in the event the external tank is not being utilized and the internal reservoir becomes full. After several seconds reconnect the power ...light will then be connected to the main unit at the rear lower section of the cabinet. We recommend the external water tank be pumped into the external tank allowing normal operating conditions to the rear side of the unit with the screws (B) located at all times during ...
...-locate the unit to another location. • In order to avoid spillage when emptying the external water tank, remove cover "A" (as (excess) condensed water accumulates in the event the external tank is not being utilized and the internal reservoir becomes full. After several seconds reconnect the power ...light will then be connected to the main unit at the rear lower section of the cabinet. We recommend the external water tank be pumped into the external tank allowing normal operating conditions to the rear side of the unit with the screws (B) located at all times during ...
Owners Manual
Page 7
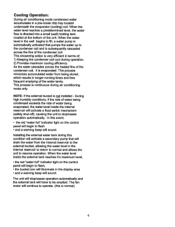
... pump is normal) 6 This process is not installed - Installing the external water tank during this is automatically activated that will drain the water from being evaporated, the water level inside the external tank reaches it is subsequently cascaded across the heated fins of the condenser coil...the internal reservoir will activate a float switch mechanism (safety shut-off), causing the unit to stop /cease operation automatically and the external tank will have to be emptied. When the water level reaches a predetermined level, the water flow is very efficient in the display ...
... pump is normal) 6 This process is not installed - Installing the external water tank during this is automatically activated that will drain the water from being evaporated, the water level inside the external tank reaches it is subsequently cascaded across the heated fins of the condenser coil...the internal reservoir will activate a float switch mechanism (safety shut-off), causing the unit to stop /cease operation automatically and the external tank will have to be emptied. When the water level reaches a predetermined level, the water flow is very efficient in the display ...
Owners Manual
Page 9
...Please note: During 'Dry' mode there is installed. increments). Timer Off: Illuminates when the auto-off time (hour) is full, and the external tank will need to be emptied. To change the "TIME OF DAY" setting. To activate clock mode both the "Temp/Timer" adjust arrows simultaneously ...indicate selected mode is full and will sound and the adjacent red indicator light willHashcontinously indicating the internalreservoir is being modified. When the external bucket icon as well as the Water Full indicator light (see above) begin to flash, this indicates that the externalbucket is ...
...Please note: During 'Dry' mode there is installed. increments). Timer Off: Illuminates when the auto-off time (hour) is full, and the external tank will need to be emptied. To change the "TIME OF DAY" setting. To activate clock mode both the "Temp/Timer" adjust arrows simultaneously ...indicate selected mode is full and will sound and the adjacent red indicator light willHashcontinously indicating the internalreservoir is being modified. When the external bucket icon as well as the Water Full indicator light (see above) begin to flash, this indicates that the externalbucket is ...
Owners Manual
Page 11
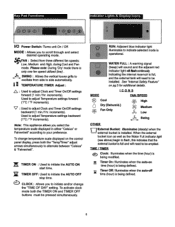
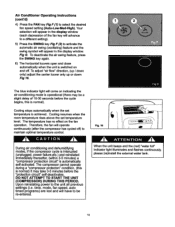
... G Fig. 16 :,.e(DEZ • A A ATTENTION When the unit beeps and the (red) "water full" indicator light illuminates and flashes continuously, please (re)install the external water tank. 10 time, mode, fan speed, auto timed programs) are lost and will have to activate the automatic air swing (oscillating) feature and the swing symbol...
... G Fig. 16 :,.e(DEZ • A A ATTENTION When the unit beeps and the (red) "water full" indicator light illuminates and flashes continuously, please (re)install the external water tank. 10 time, mode, fan speed, auto timed programs) are lost and will have to activate the automatic air swing (oscillating) feature and the swing symbol...
Owners Manual
Page 12
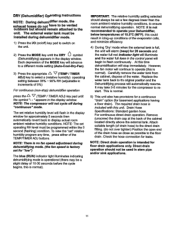
... coils, and minimize efficiency. 4) During Dry' mode when the external tank is intended for basement applications having a floor drain). Carefully remove the water tank from the cabinet, dispose of the cabinet located directly above the external tank. Attach suitable length (of drain hose) to the direct drain ...set operating RH level must be set " relative humidity program any time, press either of the TEMP/TIMER ADJ buttons. The external water tank must be a slight delay of 10-30 seconds before the cycle begins, this unit. This is normal). Each depression of the...
... coils, and minimize efficiency. 4) During Dry' mode when the external tank is intended for basement applications having a floor drain). Carefully remove the water tank from the cabinet, dispose of the cabinet located directly above the external tank. Attach suitable length (of drain hose) to the direct drain ...set operating RH level must be set " relative humidity program any time, press either of the TEMP/TIMER ADJ buttons. The external water tank must be a slight delay of 10-30 seconds before the cycle begins, this unit. This is normal). Each depression of the...
Owners Manual
Page 13
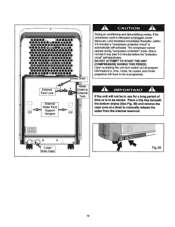
.... time, mode, fan speed, auto timed programs) will not be in use for a long period of time or is to External Tank External Water Tank LJ Support Hangers A CAUTION A During air conditioning and dehumidifying modes, if the compressor cycle is interupted (unplugged, power failure,etc.)...4000*o1.04.e00911160n40,.040.60.4.0.100.0440-0•0016101.4-006041.0*i*000t*0i*t *004.1040eeitliee*** 00A00I0V0I0N,,0M04O00V•0IV0404. 01 Direct Drain External Tank Lock Water Outlet to be stored. Upon re-starting the unit (turn switch on) all program information(i.e. Lower Drain Caps 9 co...
.... time, mode, fan speed, auto timed programs) will not be in use for a long period of time or is to External Tank External Water Tank LJ Support Hangers A CAUTION A During air conditioning and dehumidifying modes, if the compressor cycle is interupted (unplugged, power failure,etc.)...4000*o1.04.e00911160n40,.040.60.4.0.100.0440-0•0016101.4-006041.0*i*000t*0i*t *004.1040eeitliee*** 00A00I0V0I0N,,0M04O00V•0IV0404. 01 Direct Drain External Tank Lock Water Outlet to be stored. Upon re-starting the unit (turn switch on) all program information(i.e. Lower Drain Caps 9 co...
Owners Manual
Page 14
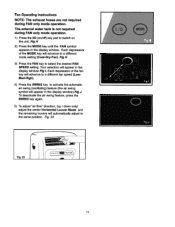
... adjust "air flow" direction, (up / down only) adjust the center Horizontal Louver Blade and the remaining louvers will advance to the same position. The external water tank is not required during FAN only mode operation. Fan Operating Instructions NOTE: The exhaust hoses are not required during FAN only mode operation. 1) Press the...
... adjust "air flow" direction, (up / down only) adjust the center Horizontal Louver Blade and the remaining louvers will advance to the same position. The external water tank is not required during FAN only mode operation. Fan Operating Instructions NOTE: The exhaust hoses are not required during FAN only mode operation. 1) Press the...


