
Owners Manual
Page 2
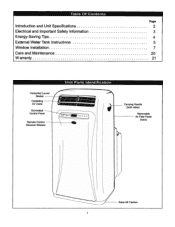
Table Of Contents Page Introduction and Unit Specifications 2 Electrical and Important Safety Information 3 Energy-Saving Tips 4 External Water Tank Instructions 5 Window Installation 7 Care and Maintenance 20 Warranty 21 Unit Parts Identification Horizontal Louver Blades Oscillating Air Vents Illuminated Control Panel Remote Control Receiver Window / / it// / GI / / / SC) Carrying Handle (both sides) Removable Air Filter Panel (back) Easy-roll Castors
Table Of Contents Page Introduction and Unit Specifications 2 Electrical and Important Safety Information 3 Energy-Saving Tips 4 External Water Tank Instructions 5 Window Installation 7 Care and Maintenance 20 Warranty 21 Unit Parts Identification Horizontal Louver Blades Oscillating Air Vents Illuminated Control Panel Remote Control Receiver Window / / it// / GI / / / SC) Carrying Handle (both sides) Removable Air Filter Panel (back) Easy-roll Castors
Owners Manual
Page 3
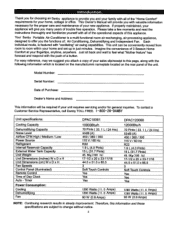
... Yes 1280 Watts (11.0 Amps) 1280 Watts (11.0 Amps) 90 W (0.8 Amps) 1280 Watts (11.0 Amps) 1280 Watts (11. 0 Amps) 90 W (0.8 Amps) NOTE: Continuing research results in just minutes. DANBY Unit specifications: Cooling Capacity Dehumidifying Capacity Noise Level Airflow CFM High / Medium / Low Power Source Refrigerant Internal Reservoir Capacity External Water Tank Capacity Unit Weight Unit Dimensions (inches) W x D x H Unit Dimensions (cm) Wx Dx H Fan Speeds Control Panel (Illuminated) Remote Control Time of this information and...
... Yes 1280 Watts (11.0 Amps) 1280 Watts (11.0 Amps) 90 W (0.8 Amps) 1280 Watts (11.0 Amps) 1280 Watts (11. 0 Amps) 90 W (0.8 Amps) NOTE: Continuing research results in just minutes. DANBY Unit specifications: Cooling Capacity Dehumidifying Capacity Noise Level Airflow CFM High / Medium / Low Power Source Refrigerant Internal Reservoir Capacity External Water Tank Capacity Unit Weight Unit Dimensions (inches) W x D x H Unit Dimensions (cm) Wx Dx H Fan Speeds Control Panel (Illuminated) Remote Control Time of this information and...
Owners Manual
Page 4
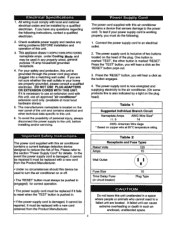
... a click as the button engages. 4. Fuse Size Time Delay Fuse (or circuit breaker) 15 Plug Type • The power supply cord must comply with this is marked 'TEST', the other technical data specific to the power cord. To test if your safety and protection, this unit, use an approved "air conditioner" extension cord only. (available at 60°C temperature rating. Table 1 Suggested Individual Branch Circuit Nameplate Amps 11.0 AWG Wire Size* 14 AWG- Please...
... a click as the button engages. 4. Fuse Size Time Delay Fuse (or circuit breaker) 15 Plug Type • The power supply cord must comply with this is marked 'TEST', the other technical data specific to the power cord. To test if your safety and protection, this unit, use an approved "air conditioner" extension cord only. (available at 60°C temperature rating. Table 1 Suggested Individual Branch Circuit Nameplate Amps 11.0 AWG Wire Size* 14 AWG- Please...
Owners Manual
Page 5
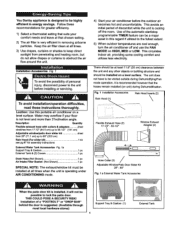
... Exhaust Hose (2) 17-1/2" - 55-1/2" Window Exhaust AdaDter (2) Energy-Saving Tips You Danby appliance is operating under AIR CONDITIONING mode. 4) Start your comfort needs and leave at that the hoses remain installed (on HIGH, MED or LOW. Loction: Use this regard if utilized to the unit before the outdoor air becomes hot and uncomfortable. This avoids an initial period of the automatic start/stop programmable TIMER feature can be vented outside during Dehumidifying/Fan mode operation...
... Exhaust Hose (2) 17-1/2" - 55-1/2" Window Exhaust AdaDter (2) Energy-Saving Tips You Danby appliance is operating under AIR CONDITIONING mode. 4) Start your comfort needs and leave at that the hoses remain installed (on HIGH, MED or LOW. Loction: Use this regard if utilized to the unit before the outdoor air becomes hot and uncomfortable. This avoids an initial period of the automatic start/stop programmable TIMER feature can be vented outside during Dehumidifying/Fan mode operation...

Owners Manual
Page 6
... indicator on , this will pump any excess water out of the internal system into position. After several seconds reconnect the power cord, switch to air conditioning mode and turn off the power to the unit and temporarily disconnect the power cord. However, running times. External Water Tank Instructions: 1. See Fig. 35 B IMPORTANT: Once external water tank is installed, ensure that the support brackets located on each side, pull up and...
... indicator on , this will pump any excess water out of the internal system into position. After several seconds reconnect the power cord, switch to air conditioning mode and turn off the power to the unit and temporarily disconnect the power cord. However, running times. External Water Tank Instructions: 1. See Fig. 35 B IMPORTANT: Once external water tank is installed, ensure that the support brackets located on each side, pull up and...
Owners Manual
Page 7
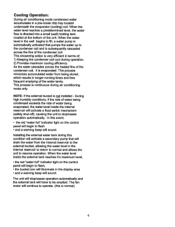
... high humidity conditions, if the rate of water being condensed exceeds the rate of ; 1) Keeping the condenser coil cool during air conditioning mode only. When the water level inside the internal reservoir will activate a float switch mechanism (safety shut-off), causing the unit to stop /cease operation automatically and the external tank will continue to operate. (this event, • the red "water full" indicator light on the control panel will begin to...
... high humidity conditions, if the rate of water being condensed exceeds the rate of ; 1) Keeping the condenser coil cool during air conditioning mode only. When the water level inside the internal reservoir will activate a float switch mechanism (safety shut-off), causing the unit to stop /cease operation automatically and the external tank will continue to operate. (this event, • the red "water full" indicator light on the control panel will begin to...
Owners Manual
Page 8
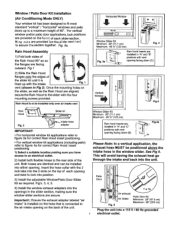
... are facing outward. Once the mounting holes on the back of the unit. 7 fig. 5a Fig. 5 Air exhaust Air intake Patio Door Kit Minimum: 28" (67.5 cm) Maximum: 80" (203 cm) Plug the unit into the unit. Important:: Ensure the exhaust adapter labeled "air intake" is lined up to a maximum height of 80". Window / Patio Door Kit Installation (Air Conditioning Mode ONLY) Your window kit has been designed to fit most...
... are facing outward. Once the mounting holes on the back of the unit. 7 fig. 5a Fig. 5 Air exhaust Air intake Patio Door Kit Minimum: 28" (67.5 cm) Maximum: 80" (203 cm) Plug the unit into the unit. Important:: Ensure the exhaust adapter labeled "air intake" is lined up to a maximum height of 80". Window / Patio Door Kit Installation (Air Conditioning Mode ONLY) Your window kit has been designed to fit most...
Owners Manual
Page 9
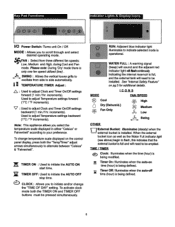
... need to adjust Temperature settings backward (1°C / °F increments). MODE : Allows you to initiate and/or change temperature scale displayed on the control panel display, press both the TIMER ON and TIMER OFF buttons must be installed. increments). Used to adjust Temperature settings forward (1°C / °F increments). : Used to scroll through and select desired operating mode. *FAN : Select from side to initiate the AUTO ON start time. To change the "TIME OF DAY" setting. TIMER OFF: Used...
... need to adjust Temperature settings backward (1°C / °F increments). MODE : Allows you to initiate and/or change temperature scale displayed on the control panel display, press both the TIMER ON and TIMER OFF buttons must be installed. increments). Used to adjust Temperature settings forward (1°C / °F increments). : Used to scroll through and select desired operating mode. *FAN : Select from side to initiate the AUTO ON start time. To change the "TIME OF DAY" setting. TIMER OFF: Used...
Owners Manual
Page 10
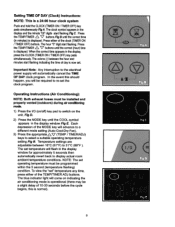
... "00" digits start flashing Fig C. The set the clock program. Fig D. 2) Press the MODE key until the correct (hour) time is now set " temperature any time, press either of the MODE key will advance to a different mode setting (Auto-Cool-Dry-Fan). 3) Press the appropriate AV (TEMP / TIMER/ADJ) keys to display actual room ambient temperature conditions. The clock symbol appears in the display window Fig E. To view the "set . Temperature settings are adjustable...
... "00" digits start flashing Fig C. The set the clock program. Fig D. 2) Press the MODE key until the correct (hour) time is now set " temperature any time, press either of the MODE key will advance to a different mode setting (Auto-Cool-Dry-Fan). 3) Press the appropriate AV (TEMP / TIMER/ADJ) keys to display actual room ambient temperature conditions. The clock symbol appears in the display window Fig E. To view the "set . Temperature settings are adjustable...
Owners Manual
Page 11
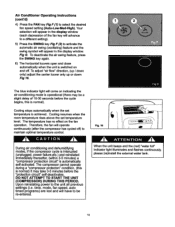
... will come on the fan operation. Air Conditioner Operating Instructions (cont'd) 4) Press the FAN key FigF(1) to the unit all previous settings (i.e. Your selection will appear in the display window (each depression of 10-30 seconds before the "protection circuit" self-deactivates. Upon reinstating power to select the desired fan speed setting (Auto-Low-Med-High). Cooling stops automatically when the set temperature level. CAUTION During air conditioning and dehumidifying modes, if the compressor cycle...
... will come on the fan operation. Air Conditioner Operating Instructions (cont'd) 4) Press the FAN key FigF(1) to the unit all previous settings (i.e. Your selection will appear in the display window (each depression of 10-30 seconds before the "protection circuit" self-deactivates. Upon reinstating power to select the desired fan speed setting (Auto-Low-Med-High). Cooling stops automatically when the set temperature level. CAUTION During air conditioning and dehumidifying modes, if the compressor cycle...
Owners Manual
Page 12
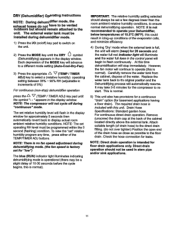
NOTE: The compressor will stop ) dehumidifier operation press the A V (TEMP / TIMER ADJ) key pad until the DRY symbol (Dehumidifying) appears in the display window. NOTE: The set operating RH level must be vented outdoors but should not be set for 20 seconds and the water full red indicator light will continue to operate (this unit. NOTE: There is no fan speed adjustment during dehumidifying mode. (the fan speedis factory set a few degrees...
NOTE: The compressor will stop ) dehumidifier operation press the A V (TEMP / TIMER ADJ) key pad until the DRY symbol (Dehumidifying) appears in the display window. NOTE: The set operating RH level must be vented outdoors but should not be set for 20 seconds and the water full red indicator light will continue to operate (this unit. NOTE: There is no fan speed adjustment during dehumidifying mode. (the fan speedis factory set a few degrees...
Owners Manual
Page 13
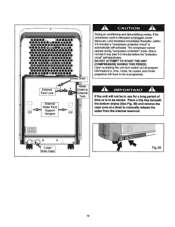
... Fig.38 12 time, mode, fan speed, auto timed programs) will not be in use for a long period of time or is automatically self-activated. Place a trip tray beneath the bottom drains (See Fig. 38) and remove the caps (one at a time) to manually release the water from the internal reservoir. Upon re-starting the unit (turn switch on) all program information...
... Fig.38 12 time, mode, fan speed, auto timed programs) will not be in use for a long period of time or is automatically self-activated. Place a trip tray beneath the bottom drains (See Fig. 38) and remove the caps (one at a time) to manually release the water from the internal reservoir. Upon re-starting the unit (turn switch on) all program information...
Owners Manual
Page 15
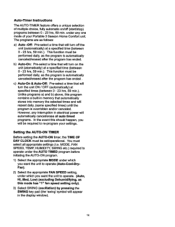
... electrical power will automatically cancel/erase all appropriate settings (i.e. Unlike programs a) and b) above, this should happen, you will turn off (start/stop) programs between 0 - 23 hrs, 59 min. Auto-Timer Instructions The AUTO-TIMER feature offers a unique selection of your settings. However, any one mode of multiple choice, fully automatic on the unit (atomatically) at a specified time (between 0 - 23 hrs, 59 min.). Setting the AUTO-ON TIMER...
... electrical power will automatically cancel/erase all appropriate settings (i.e. Unlike programs a) and b) above, this should happen, you will turn off (start/stop) programs between 0 - 23 hrs, 59 min. Auto-Timer Instructions The AUTO-TIMER feature offers a unique selection of your settings. However, any one mode of multiple choice, fully automatic on the unit (atomatically) at a specified time (between 0 - 23 hrs, 59 min.). Setting the AUTO-ON TIMER...
Owners Manual
Page 16
... to the set AUTO-ON time. The "TIMER-ON" icon (Fig L) will stop time. Press the clock buttons (TIME-ON / TIMER-OFF) simultaneously to revert back to the current time of day clock setting. -The unit will appear in the display window and the minute digits start to flash. To cancel or override the AUTO-ON program, simply turn off " (non-operational). 6) Press the TIMER-ON...
... to the set AUTO-ON time. The "TIMER-ON" icon (Fig L) will stop time. Press the clock buttons (TIME-ON / TIMER-OFF) simultaneously to revert back to the current time of day clock setting. -The unit will appear in the display window and the minute digits start to flash. To cancel or override the AUTO-ON program, simply turn off " (non-operational). 6) Press the TIMER-ON...
Owners Manual
Page 17
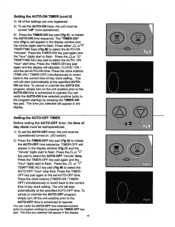
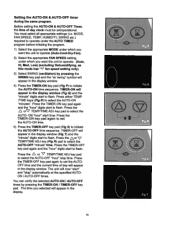
Setting the AUTO-ON & AUTO-OFF timer during the same program. MODE, FAN SPEED, TEMP, HUMIDITY, SWING etc.) required to operate under the AUTO TIMED program before initiating the program. 1) Select the appropriate MODE under which you want the unit to operate (Auto-Cool-Dry-Fan). 2) Select the appropriate FAN SPEED setting, under which you selected will appear in the display window (Fig T) and the "minute" digits start " and "stop time. Press the...
Setting the AUTO-ON & AUTO-OFF timer during the same program. MODE, FAN SPEED, TEMP, HUMIDITY, SWING etc.) required to operate under the AUTO TIMED program before initiating the program. 1) Select the appropriate MODE under which you want the unit to operate (Auto-Cool-Dry-Fan). 2) Select the appropriate FAN SPEED setting, under which you selected will appear in the display window (Fig T) and the "minute" digits start " and "stop time. Press the...
Owners Manual
Page 18
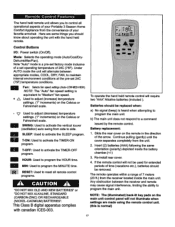
...: Power switch (On/Off). Mode: Selects the operating mode (Auto/Cool/DryDehumidifier/Fan). b) The main unit does not respond to activate the SLEEP program. Slide the rear cover on the main unit control panel will alternate between the receiver and remote may cause signal interference, limiting the ability to reset all operational aspects of your favorite armchair. The remote operates within a range of time (vacations etc.), batteries should be removed. Fan...
...: Power switch (On/Off). Mode: Selects the operating mode (Auto/Cool/DryDehumidifier/Fan). b) The main unit does not respond to activate the SLEEP program. Slide the rear cover on the main unit control panel will alternate between the receiver and remote may cause signal interference, limiting the ability to reset all operational aspects of your favorite armchair. The remote operates within a range of time (vacations etc.), batteries should be removed. Fan...

Owners Manual
Page 19
... low, replace. 2. Each time the button is pressed the temperature will appear in minutes. The time automatically sets (stops flashing) after 5 seconds. FAN SPEED ICONS LOW MEDIUM HIGH MODE Cool Dry Fan AUTO AVAILABLE FAN SPEEDS Low-Medium-High Low Low-Medium-High Low-Medium-High LCD Window 0 Timer On/Off 18 Remote Control Operating Instructions 1. Sending Signal: The remote control must be aimed directly at the infra-red eye located below control panel when...
... low, replace. 2. Each time the button is pressed the temperature will appear in minutes. The time automatically sets (stops flashing) after 5 seconds. FAN SPEED ICONS LOW MEDIUM HIGH MODE Cool Dry Fan AUTO AVAILABLE FAN SPEEDS Low-Medium-High Low Low-Medium-High Low-Medium-High LCD Window 0 Timer On/Off 18 Remote Control Operating Instructions 1. Sending Signal: The remote control must be aimed directly at the infra-red eye located below control panel when...

Owners Manual
Page 20
... within the remote control display window (including time of the remote. 3) Press the AV temperature buttons to cold during an 8 hour period. The sleep mode allows you to "Fahrenheit". 9. See the table below for sleep mode NOTE: When turning off ) reaction (5-15 seconds) before the unit actually stops. Remote Control Operating Instructions (cont'd) 6. Press both buttons simultaneously to switch from becoming to select the required "set cooling temperature that will erase "all remote control programs. This...
... within the remote control display window (including time of the remote. 3) Press the AV temperature buttons to cold during an 8 hour period. The sleep mode allows you to "Fahrenheit". 9. See the table below for sleep mode NOTE: When turning off ) reaction (5-15 seconds) before the unit actually stops. Remote Control Operating Instructions (cont'd) 6. Press both buttons simultaneously to switch from becoming to select the required "set cooling temperature that will erase "all remote control programs. This...
Owners Manual
Page 21
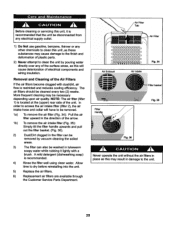
... direction of the unit. The air filters should be removed. 1a) To remove the air filter (Fig. 34): Pull the air filter upward in lukewarm soapy water while rubbing it lightly with dust/dirt, air flow is recommended. 4) Rinse the filter well using clean water. More frequent cleaning may result in place as this may be necessary depending upon air quality. In order to access the air intake filter (filter 2), the air intake hose...
... direction of the unit. The air filters should be removed. 1a) To remove the air filter (Fig. 34): Pull the air filter upward in lukewarm soapy water while rubbing it lightly with dust/dirt, air flow is recommended. 4) Rinse the filter well using clean water. More frequent cleaning may result in place as this may be necessary depending upon air quality. In order to access the air intake filter (filter 2), the air intake hose...
Owners Manual
Page 22
... power supply such as low voltage, defective house wiring or inadequate fuses. 4) Accident, alteration, abuse or misuse of the appliance such as inadequate air circulation in the room or abnormal operating conditions, (extremely high or low room temperature). 5) Use for commercial or industrial purposes. 6) Fire, water damage, theft, war, riot, hostility, acts of God such as herein provided, Danby Products Limited (Canada) or Danby Products Inc...
... power supply such as low voltage, defective house wiring or inadequate fuses. 4) Accident, alteration, abuse or misuse of the appliance such as inadequate air circulation in the room or abnormal operating conditions, (extremely high or low room temperature). 5) Use for commercial or industrial purposes. 6) Fire, water damage, theft, war, riot, hostility, acts of God such as herein provided, Danby Products Limited (Canada) or Danby Products Inc...


