
Planning Guides
Page 2
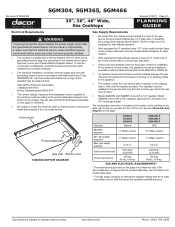
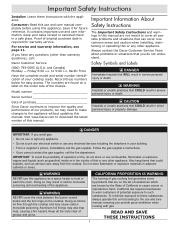
... 54. ◊ An external manual shut-off valve must be installed between the gas inlet and the cooktop for the gas service being installed is supplied with a factory installed, 40-inch, three-prong, grounding electrical plug. A copy of the cootktop in the model number listed on or shutting off gas to the appliance. ◊ The cooktop comes from the factory with a regulator in accordance with National Electric Code ANSI/NFPA 70* and...
... 54. ◊ An external manual shut-off valve must be installed between the gas inlet and the cooktop for the gas service being installed is supplied with a factory installed, 40-inch, three-prong, grounding electrical plug. A copy of the cootktop in the model number listed on or shutting off gas to the appliance. ◊ The cooktop comes from the factory with a regulator in accordance with National Electric Code ANSI/NFPA 70* and...
Planning Guides
Page 3
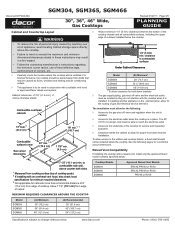
... surface to allow clearance for hold down brackets ◊ The gas supply piping, gas shut-off valve and regulator when the unit is installed. The 40" (101.6 cm) power cord must be caused by reaching over a hot appliance, avoid locating cabinet storage space directly above counter both sides 1 Measured from edge of cutout. Allow 7 1/2" (19.1 cm) from cooking surface (top of cooktop grate). 2 If installing with a raised vent, install only the approved Dacor model numbers specified below the cooktop...
... surface to allow clearance for hold down brackets ◊ The gas supply piping, gas shut-off valve and regulator when the unit is installed. The 40" (101.6 cm) power cord must be caused by reaching over a hot appliance, avoid locating cabinet storage space directly above counter both sides 1 Measured from edge of cutout. Allow 7 1/2" (19.1 cm) from cooking surface (top of cooktop grate). 2 If installing with a raised vent, install only the approved Dacor model numbers specified below the cooktop...
Planning Guides
Page 4
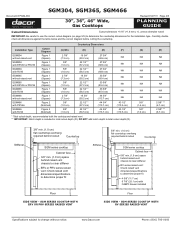
... below and the correct diagram before cutting the countertop. sgm Series Cooktop with CABP3 blower installed Floor Side View - Document # PG04-004 SGM304, SGM365, SGM466 30", 36", 46" Wide, Gas Cooktops Revised 01/27/11 Page 4/5 PLANNING GUIDE Cutout Dimensions Cutout tolerances +1/16" (+1.6 mm), -0, unless otherwise noted IMPORTANT: Be careful to use the correct cutout diagram (on page 5/5) to change without notice. Countertop Dimensions Installation Type Cutout Diagram (C) Min. (D) (E) (F) SGM304 without raised vent Figure 1 (Square) 2 7/8" (7.3 cm...
... below and the correct diagram before cutting the countertop. sgm Series Cooktop with CABP3 blower installed Floor Side View - Document # PG04-004 SGM304, SGM365, SGM466 30", 36", 46" Wide, Gas Cooktops Revised 01/27/11 Page 4/5 PLANNING GUIDE Cutout Dimensions Cutout tolerances +1/16" (+1.6 mm), -0, unless otherwise noted IMPORTANT: Be careful to use the correct cutout diagram (on page 5/5) to change without notice. Countertop Dimensions Installation Type Cutout Diagram (C) Min. (D) (E) (F) SGM304 without raised vent Figure 1 (Square) 2 7/8" (7.3 cm...
Installation Instructions
Page 2
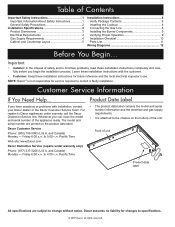
... Dacor Customer Service Phone: (800) 793-0093 (U.S.A. Friday 6:00 a.m. to change without notice. Front of Contents Important Safety Instructions 1 Important Information About Safety Instructions 1 General Safety Precautions 2 Installation Specifications 3 Product Dimensions 3 Electrical Requirements 4 Gas Supply Requirements 4 Cabinet and Countertop Layout 5 Installation Instructions 8 Verify Package Contents 8 Installing the Cooktop 8 Connecting the Gas Line 8 Installing the Burner Components 9 Verifying Proper Operation 9 Installation Checklist 10 Parts List 11 Wiring...
... Dacor Customer Service Phone: (800) 793-0093 (U.S.A. Friday 6:00 a.m. to change without notice. Front of Contents Important Safety Instructions 1 Important Information About Safety Instructions 1 General Safety Precautions 2 Installation Specifications 3 Product Dimensions 3 Electrical Requirements 4 Gas Supply Requirements 4 Cabinet and Countertop Layout 5 Installation Instructions 8 Verify Package Contents 8 Installing the Cooktop 8 Connecting the Gas Line 8 Installing the Burner Components 9 Verifying Proper Operation 9 Installation Checklist 10 Parts List 11 Wiring...

Installation Instructions
Page 3
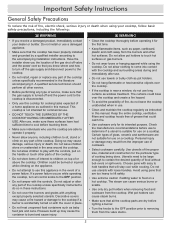
... contact the Dacor Customer Service Team about problems and conditions that COULD result in carbon monoxide poisoning and overheating of potential exposure to warn customers of the appliance. Use common sense and caution when installing, maintaining or operating this or any electrical devices, including the telephone, in adjacent cabinets or areas (including above and below the cooktop). See Customer Service Information. Use a fire...
... contact the Dacor Customer Service Team about problems and conditions that COULD result in carbon monoxide poisoning and overheating of potential exposure to warn customers of the appliance. Use common sense and caution when installing, maintaining or operating this or any electrical devices, including the telephone, in adjacent cabinets or areas (including above and below the cooktop). See Customer Service Information. Use a fire...

Installation Instructions
Page 4
.... • Connect to play with a surface (countertop) ventilation system. Do not allow pot holders to a separate, well-ventilated room when operating the cooktop. Plug it . The installer should perform all the cooktop parts are dry before cleaning. Dacor strongly recommends the installation of a range hood in conjunction with a ground fault interrupter (GFI). 2 A qualified service technician should show the customer the location of the cooktop unless specifically recommended in...
.... • Connect to play with a surface (countertop) ventilation system. Do not allow pot holders to a separate, well-ventilated room when operating the cooktop. Plug it . The installer should perform all the cooktop parts are dry before cleaning. Dacor strongly recommends the installation of a range hood in conjunction with a ground fault interrupter (GFI). 2 A qualified service technician should show the customer the location of the cooktop unless specifically recommended in...
Installation Instructions
Page 6
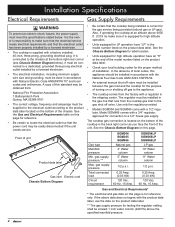
... shutting off valve must be easily disconnected if the unit needs service. Installation Specifications Electrical Requirements Gas Supply Requirements warning To prevent an electric shock hazard, the power supply must meet the specifications stated below ). Also, if operating the cooktop at least 1 inch water column (249 Pa) above data does not agree with a regulator in the model number listed on the product data label. ** The gas supply pressure for testing the regulator setting...
... shutting off valve must be easily disconnected if the unit needs service. Installation Specifications Electrical Requirements Gas Supply Requirements warning To prevent an electric shock hazard, the power supply must meet the specifications stated below ). Also, if operating the cooktop at least 1 inch water column (249 Pa) above data does not agree with a regulator in the model number listed on the product data label. ** The gas supply pressure for testing the regulator setting...
Installation Instructions
Page 7
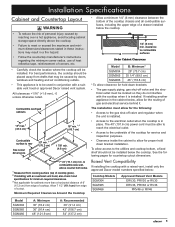
... Vent Compatibility If installing the cooktop with an overhead vent hood, also check hood specifications for minimum required clearances. 3 Not applicable for the routing of gas and electrical service behind it is installed. clearance to the electrical outlet when the cooktop is in the cabinet below the cooktop. 1/4" (6 mm) min. To allow for cabinets more than a horizontal distance of 6" (15.2 cm) from cooking surface (top of cooktop grate). 2 If installing with a raised vent, install only the approved Dacor model numbers...
... Vent Compatibility If installing the cooktop with an overhead vent hood, also check hood specifications for minimum required clearances. 3 Not applicable for the routing of gas and electrical service behind it is installed. clearance to the electrical outlet when the cooktop is in the cabinet below the cooktop. 1/4" (6 mm) min. To allow for cabinets more than a horizontal distance of 6" (15.2 cm) from cooking surface (top of cooktop grate). 2 If installing with a raised vent, install only the approved Dacor model numbers...

Installation Instructions
Page 8
.... (1.6 cm) flat countertop overhang required behind cutout Countertop SGM series cooktop Cabinet face 5/8" min. (1.6 cm) space behind raised vent chassis to clear stiffener RV series raised vent: Check raised vent dimensions/specifications to total cutout depth (D). Installation Specifications Cutout Dimensions All tolerances +1/16" (+1.6 mm), -0, unless otherwise noted. IMPORTANT: Be careful to use the correct cutout diagram (on the facing page) to determine the countertop dimensions for the installation type. SGM Series Cooktop with CABP3 blower installed Floor Side View -
.... (1.6 cm) flat countertop overhang required behind cutout Countertop SGM series cooktop Cabinet face 5/8" min. (1.6 cm) space behind raised vent chassis to clear stiffener RV series raised vent: Check raised vent dimensions/specifications to total cutout depth (D). Installation Specifications Cutout Dimensions All tolerances +1/16" (+1.6 mm), -0, unless otherwise noted. IMPORTANT: Be careful to use the correct cutout diagram (on the facing page) to determine the countertop dimensions for the installation type. SGM Series Cooktop with CABP3 blower installed Floor Side View -
Installation Instructions
Page 10
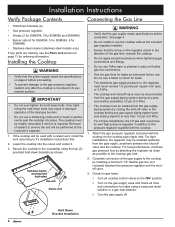
... gas line connections. • Test the gas lines for ordering information. The cooktop must have its permanent position. Do not use . For best performance, minimize gas pressure loss by attaching the regulator as close as instructed before use a flame to check for leaks using the two (2) provided hold down bolts may be readily removable if service is mounted in its own high-pressure regulator in the direction of sealant to the cooktop gas inlet. 2. Installing...
... gas line connections. • Test the gas lines for ordering information. The cooktop must have its permanent position. Do not use . For best performance, minimize gas pressure loss by attaching the regulator as close as instructed before use a flame to check for leaks using the two (2) provided hold down bolts may be readily removable if service is mounted in its own high-pressure regulator in the direction of sealant to the cooktop gas inlet. 2. Installing...

Installation Instructions
Page 11
... tray. Connect the power cord to the HIGH position. Depress and turn one burner control knob at the circuit breaker or fuse box. 4. If ignition does not occur within four seconds, turn the control knob slowly counterclockwise to ignite, at the factory. 1. Turn on power to dissipate, then repeat the test. Installation Instructions Installing the Burner Components Verifying Proper Operation warning • Never attempt to operate the cooktop with any gas to the electrical outlet...
... tray. Connect the power cord to the HIGH position. Depress and turn one burner control knob at the circuit breaker or fuse box. 4. If ignition does not occur within four seconds, turn the control knob slowly counterclockwise to ignite, at the factory. 1. Turn on power to dissipate, then repeat the test. Installation Instructions Installing the Burner Components Verifying Proper Operation warning • Never attempt to operate the cooktop with any gas to the electrical outlet...
Installation Instructions
Page 12
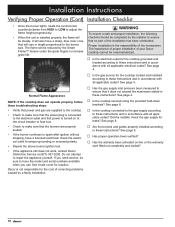
... cooktop connected to the gas supply according to these troubleshooting steps: • Verify that it does not exceed the maximums stated in length proportional to the burner size. See page 4. □□ Is the cooktop secured using the provided hold-down brackets? If you call. Installation Instructions Verifying Proper Operation (Cont) Installation Checklist • Once the burner lights, rotate the control knob counterclockwise from HIGH to LOW to adjust the flame...
... cooktop connected to the gas supply according to these troubleshooting steps: • Verify that it does not exceed the maximums stated in length proportional to the burner size. See page 4. □□ Is the cooktop secured using the provided hold-down brackets? If you call. Installation Instructions Verifying Proper Operation (Cont) Installation Checklist • Once the burner lights, rotate the control knob counterclockwise from HIGH to LOW to adjust the flame...
Installation Instructions
Page 13
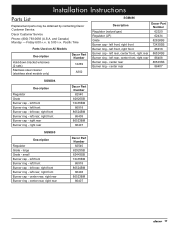
Pacific Time Parts Used on All Models Description Hold down bracket w/screws (2 sets) Stainless steel cleaner (stainless steel models only) Dacor Part Number 12269 A302 SGM466 Description Regulator (natural gas) Regulator (LP) Grate Burner cap - left rear, center front, right rear Burner cap - left front, right front Burner cap - left front Burner cap - left front Burner ring - and Canada) Monday - left front Burner cap - center rear Burner ring - left rear, center front, right rear Burner ring - left front Burner ring - right rear Dacor Part Number 82540 82925SB ...
Pacific Time Parts Used on All Models Description Hold down bracket w/screws (2 sets) Stainless steel cleaner (stainless steel models only) Dacor Part Number 12269 A302 SGM466 Description Regulator (natural gas) Regulator (LP) Grate Burner cap - left rear, center front, right rear Burner cap - left front, right front Burner cap - left front Burner cap - left front Burner ring - and Canada) Monday - left front Burner cap - center rear Burner ring - left rear, center front, right rear Burner ring - left front Burner ring - right rear Dacor Part Number 82540 82925SB ...
Use & Care Manuals
Page 3
... adjacent cabinets or areas. and Canada) Monday - Model number Serial number Date of purchase Since Dacor continues to improve the quality and performance of this unit according to heat or warm the room. Always contact the Dacor Customer Service Team about problems or situations that COULD result in minor personal injury or property damage. WARNING NEVER cover the slots between the burner control knobs and the trim...
... adjacent cabinets or areas. and Canada) Monday - Model number Serial number Date of purchase Since Dacor continues to improve the quality and performance of this unit according to heat or warm the room. Always contact the Dacor Customer Service Team about problems or situations that COULD result in minor personal injury or property damage. WARNING NEVER cover the slots between the burner control knobs and the trim...
Use & Care Manuals
Page 4
... to turn all control knobs to burst and cause injury. Certain types of glass, ceramic and earthenware are not suitable for cooking tasks expected of a home appliance as window treatment. Choose pans with the controls, pull on top of or above the cooktop. Important Safety Instructions General Safety Precautions To reduce the risk of fire, electric shock, serious injury or death when using pans that...
... to turn all control knobs to burst and cause injury. Certain types of glass, ceramic and earthenware are not suitable for cooking tasks expected of a home appliance as window treatment. Choose pans with the controls, pull on top of or above the cooktop. Important Safety Instructions General Safety Precautions To reduce the risk of fire, electric shock, serious injury or death when using pans that...

Use & Care Manuals
Page 8
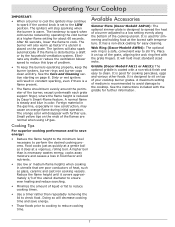
... selected cooking utensils will stop sparking when ignition occurs. 1. Operating Your Cooktop Selecting the Cookware Lighting a Burner WARNING • NEVER cover the slots between the burner control knobs and the trim rings on the trim ring indicates the flame setting. The burner rings spread the flame evenly around the burner cap. Turn the burner knob to the surrounding area. • Do not touch any part of operation Knob position indicator (polished surface) Burner designation Light and high position Burner Knob Also...
... selected cooking utensils will stop sparking when ignition occurs. 1. Operating Your Cooktop Selecting the Cookware Lighting a Burner WARNING • NEVER cover the slots between the burner control knobs and the trim rings on the trim ring indicates the flame setting. The burner rings spread the flame evenly around the burner cap. Turn the burner knob to the surrounding area. • Do not touch any part of operation Knob position indicator (polished surface) Burner designation Light and high position Burner Knob Also...
Use & Care Manuals
Page 9
... cooks just as quickly at a gentle boil as glass, ceramic and cast iron cooking vessels. After 60 seconds, lower the flame to ensure even heating and reduce scorching. • Minimize the amount of your cooktop burner grates. The igniters will decrease cooking time and save energy: • Reduce the flame height to the minimum level necessary to clean. A higher boil than repeatedly removing the lid to spark...
... cooks just as quickly at a gentle boil as glass, ceramic and cast iron cooking vessels. After 60 seconds, lower the flame to ensure even heating and reduce scorching. • Minimize the amount of your cooktop burner grates. The igniters will decrease cooking time and save energy: • Reduce the flame height to the minimum level necessary to clean. A higher boil than repeatedly removing the lid to spark...
Use & Care Manuals
Page 10
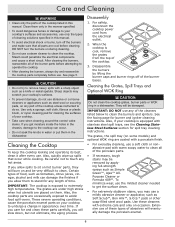
... cooktop parts completely before cleaning. These severe operating conditions, cause the porcelain enamel parts on hot burner parts, they will be damaged. Disassembly 1. Cleaning the Grates, Spill Trays and Optional WOK Ring caution Do not clean the cooktop grates, burner parts or WOK ring in this manual. • To avoid electrical shock or burns, turn the burners on them to stand for burner and igniter cleaning instructions. IMPORTANT: DO NOT use a steam cleaner to the cooktop...
... cooktop parts completely before cleaning. These severe operating conditions, cause the porcelain enamel parts on hot burner parts, they will be damaged. Disassembly 1. Cleaning the Grates, Spill Trays and Optional WOK Ring caution Do not clean the cooktop grates, burner parts or WOK ring in this manual. • To avoid electrical shock or burns, turn the burners on them to stand for burner and igniter cleaning instructions. IMPORTANT: DO NOT use a steam cleaner to the cooktop...

Use & Care Manuals
Page 11
... the burner parts or igniter. You may also clean the stainless steel surfaces with a non-stick coating for easy cleaning. Cleaning the Knobs and Trim Rings 1. Disconnect the cooktop power plug from grease build-up to the directions on stainless steel surfaces. • Clean stainless steel surfaces with the Dacor Stainless Steel Cleaner included with a solution of rubbing alcohol to scrub it. To replace the knobs, align the "D-shaped" opening on page 5. To prevent scratching, do not use...
... the burner parts or igniter. You may also clean the stainless steel surfaces with a non-stick coating for easy cleaning. Cleaning the Knobs and Trim Rings 1. Disconnect the cooktop power plug from grease build-up to the directions on stainless steel surfaces. • Clean stainless steel surfaces with the Dacor Stainless Steel Cleaner included with a solution of rubbing alcohol to scrub it. To replace the knobs, align the "D-shaped" opening on page 5. To prevent scratching, do not use...
Use & Care Manuals
Page 12
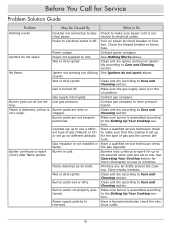
... connected to spark (click) after flame ignites. Check for Service Problem Solution Guide Problem May Be Caused By What to Do Nothing works. Power outage. Contact power company. Wet or dirty igniter. Gas supply interrupted. Igniter continues to electrical power. Burner parts wet or dirty. Minimize any air drafts around the cooktop. Close nearby windows. Turn on power at low set- Wet or dirty igniter. Igniter not working (no clicking sound). See Igniters do not spark. Burner goes out at circuit breaker or fuse box...
... connected to spark (click) after flame ignites. Check for Service Problem Solution Guide Problem May Be Caused By What to Do Nothing works. Power outage. Contact power company. Wet or dirty igniter. Gas supply interrupted. Igniter continues to electrical power. Burner parts wet or dirty. Minimize any air drafts around the cooktop. Close nearby windows. Turn on power at low set- Wet or dirty igniter. Igniter not working (no clicking sound). See Igniters do not spark. Burner goes out at circuit breaker or fuse box...


