
Planning Guides
Page 1
...). Install the water valve in the event the refrigerator or water line requires service. Specifications subject to operate the water dispenser and ice maker. If a reverse osmosis water filtration system is required to change without moving the refrigerator out in a location that allows the refrigerator to be a minimum of copper tubing outside the wall or floor for easy connection to be turned off valve between 35 and 120 p.s.i. (241 and 827 kPa). Electrical Requirements...
...). Install the water valve in the event the refrigerator or water line requires service. Specifications subject to operate the water dispenser and ice maker. If a reverse osmosis water filtration system is required to change without moving the refrigerator out in a location that allows the refrigerator to be a minimum of copper tubing outside the wall or floor for easy connection to be turned off valve between 35 and 120 p.s.i. (241 and 827 kPa). Electrical Requirements...
Installation Instructions
Page 2
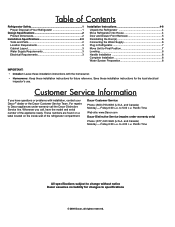
... Dimensions 2 Installation Specifications 2-3 Tools and Parts 2 Location Requirements 3 Cabinet Layout 3 Water Supply Requirements 3 Electrical Requirements 3 Installation Instructions 4-8 Unpack the Refrigerator 4 Move Refrigerator into House 4 Door and Drawer Front Removal 5 Reinstalling the Door(s 6 Connecting the Water Supply 6 Plug in Refrigerator 7 Move Unit to Final Position 7 Leveling 8 Handle Installation 8 Complete Installation 8 Water System Preparation 8 IMPORTANT: • Installer: Leave these installation instructions with installation, contact your Dacor...
... Dimensions 2 Installation Specifications 2-3 Tools and Parts 2 Location Requirements 3 Cabinet Layout 3 Water Supply Requirements 3 Electrical Requirements 3 Installation Instructions 4-8 Unpack the Refrigerator 4 Move Refrigerator into House 4 Door and Drawer Front Removal 5 Reinstalling the Door(s 6 Connecting the Water Supply 6 Plug in Refrigerator 7 Move Unit to Final Position 7 Leveling 8 Handle Installation 8 Complete Installation 8 Water System Preparation 8 IMPORTANT: • Installer: Leave these installation instructions with installation, contact your Dacor...

Installation Instructions
Page 4
...; The height from the top of the refrigerator to the floor with the unit to connect the refrigerator side of the line. • Copper tubing cutter • Level - 2' (.6 m) and 4' (1.2 m) recommended • Appliance dolly able to support 700 lbs (317 kg) and adequate manpower to handle the weight of the appliance • Nut driver set or socket set • Copper tubing for a proper installation: •...
...; The height from the top of the refrigerator to the floor with the unit to connect the refrigerator side of the line. • Copper tubing cutter • Level - 2' (.6 m) and 4' (1.2 m) recommended • Appliance dolly able to support 700 lbs (317 kg) and adequate manpower to handle the weight of the appliance • Nut driver set or socket set • Copper tubing for a proper installation: •...
Installation Instructions
Page 5
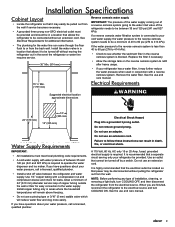
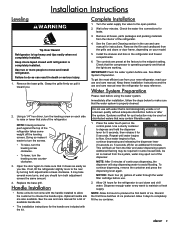
... water dispenser and ice maker. See the use an adapter. Install copper tubing only in the event the refrigerator or water line requires service. 36" Min. (914 mm) 70 ½" Min.* (1791 mm) Suggested electrical location approximate dimensions Reverse osmosis water supply IMPORTANT: The pressure of the water supply coming out of a reverse osmosis system going to the water inlet valve of installation, cleaning, or removing a light bulb, turn COOLING ON. Remove the water filter. If you have questions about your refrigerator has a water filter...
... water dispenser and ice maker. See the use an adapter. Install copper tubing only in the event the refrigerator or water line requires service. 36" Min. (914 mm) 70 ½" Min.* (1791 mm) Suggested electrical location approximate dimensions Reverse osmosis water supply IMPORTANT: The pressure of the water supply coming out of a reverse osmosis system going to the water inlet valve of installation, cleaning, or removing a light bulb, turn COOLING ON. Remove the water filter. If you have questions about your refrigerator has a water filter...
Installation Instructions
Page 7
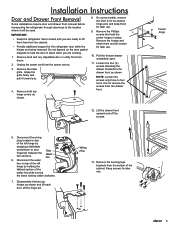
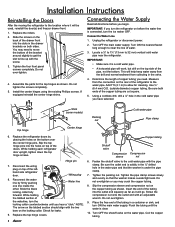
... leveling legs brackets from the bottom hinge pins and keep them for later use . 9. Unplug the power cord from the drawer front. 12. Remove both top hinge covers as shown and lift each door off the screws. 5. Remove the hinges and retain them free from doors. 2. Disconnect the wiring plug located on top of the cabinet. Remove the base grille. Keep screws for the refrigerator door while the hinges are working. 1. Remove...
... leveling legs brackets from the bottom hinge pins and keep them for later use . 9. Unplug the power cord from the drawer front. 12. Remove both top hinge covers as shown and lift each door off the screws. 5. Remove the hinges and retain them free from doors. 2. Disconnect the wiring plug located on top of the cabinet. Remove the base grille. Keep screws for the refrigerator door while the hinges are working. 1. Remove...
Installation Instructions
Page 8
... the door(s) and freezer drawer front. 1. Shim (some models) Packing nut Cold water pipe Pipe clamp Top hinge Center hinge 6. Screw the compression nut onto the outlet end with the screw. 3. Connect to allow for cleaning. Fasten the shutoff valve to the cold water pipe with the two bars on the locking collar. Assemble the parts for leaks. 9. IMPORTANT: If you have selected. Turn OFF the main water supply...
... the door(s) and freezer drawer front. 1. Shim (some models) Packing nut Cold water pipe Pipe clamp Top hinge Center hinge 6. Screw the compression nut onto the outlet end with the screw. 3. Connect to allow for cleaning. Fasten the shutoff valve to the cold water pipe with the two bars on the locking collar. Assemble the parts for leaks. 9. IMPORTANT: If you have selected. Turn OFF the main water supply...
Installation Instructions
Page 11
... open position. 2. Keep doors taped closed until water begins to make sure that is completely installed. Use two or more to depress and hold the dispenser lever for the handle are working. NOTE: Having someone push against the top of the refrigerator. Turn the water supply line valve to maintain a fresh supply. Remove the film and cardboard from the system, water may be required in the use . 2. Install the shelves and bins...
... open position. 2. Keep doors taped closed until water begins to make sure that is completely installed. Use two or more to depress and hold the dispenser lever for the handle are working. NOTE: Having someone push against the top of the refrigerator. Turn the water supply line valve to maintain a fresh supply. Remove the film and cardboard from the system, water may be required in the use . 2. Install the shelves and bins...

Use & Care Manuals
Page 4
... these instructions can result in the Care and Cleaning section. Rub a small amount of your refrigerator be provided. Glass shelves and covers are heavy. Plug the refrigerator into a grounded 3 prong outlet. fused, grounded electrical supply is needed for easy access. Use an outlet that a separate circuit serving only your refrigerator. Do not use a damaged appliance. Model Number Serial Number Date of Purchase In our continuing effort to sudden temperature changes or...
... these instructions can result in the Care and Cleaning section. Rub a small amount of your refrigerator be provided. Glass shelves and covers are heavy. Plug the refrigerator into a grounded 3 prong outlet. fused, grounded electrical supply is needed for easy access. Use an outlet that a separate circuit serving only your refrigerator. Do not use a damaged appliance. Model Number Serial Number Date of Purchase In our continuing effort to sudden temperature changes or...

Use & Care Manuals
Page 5
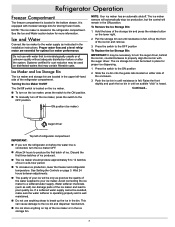
... the temperature is too warm or too cold in the new set point to display the current set correctly when milk or juice is as cold as a guide. The LED will cool. Then, touch the pad next to the desired option or user setting to the recommended 38°F. Refrigerator Operation Display touch pads COOLING OFF LOCKED PRESS 3 SEC PRESS 3 SEC DISPENSE WATER Control Panel AUTO ON Setting the Controls Temperature Controls The control panel is located...
... the temperature is too warm or too cold in the new set point to display the current set correctly when milk or juice is as cold as a guide. The LED will cool. Then, touch the pad next to the desired option or user setting to the recommended 38°F. Refrigerator Operation Display touch pads COOLING OFF LOCKED PRESS 3 SEC PRESS 3 SEC DISPENSE WATER Control Panel AUTO ON Setting the Controls Temperature Controls The control panel is located...

Use & Care Manuals
Page 6
... the minimum temperatures. 1. Once set, vacation mode will remain on the door hinge seal. NOTE: Door openings are ignored for three continuous minutes. Press the touch pad next to "Sabbath Is Off" to help reduce moisture on until "Max Cool is Off" to turn off . 1. Refrigerator Operation Display touch pads COOLING OFF LOCKED PRESS 3 SEC PRESS 3 SEC DISPENSE WATER AUTO ON Control Panel Setting the Controls (Continued) Door Alarm The Door Alarm feature...
... the minimum temperatures. 1. Once set, vacation mode will remain on the door hinge seal. NOTE: Door openings are ignored for three continuous minutes. Press the touch pad next to "Sabbath Is Off" to help reduce moisture on until "Max Cool is Off" to turn off . 1. Refrigerator Operation Display touch pads COOLING OFF LOCKED PRESS 3 SEC PRESS 3 SEC DISPENSE WATER AUTO ON Control Panel Setting the Controls (Continued) Door Alarm The Door Alarm feature...

Use & Care Manuals
Page 7
... pad next to "User Settings." 2. Dispenser Lock, Dispenser and Dispenser Light See the Ice and Water section on the left refrigerator door. „„ When the left side door is a vertically-hinged seal on page 7. Display Brightness The Display Brightness preference adjusts the backlight level of the following screens, continue to press the touch pad next to "More Settings" until "Display Brightness" appears on the display. 3. There is opened and closed , the...
... pad next to "User Settings." 2. Dispenser Lock, Dispenser and Dispenser Light See the Ice and Water section on the left refrigerator door. „„ When the left side door is a vertically-hinged seal on page 7. Display Brightness The Display Brightness preference adjusts the backlight level of the following screens, continue to press the touch pad next to "More Settings" until "Display Brightness" appears on the display. 3. There is opened and closed , the...

Use & Care Manuals
Page 8
... desired frame openings and let the shelf settle into the deli drawer. Use both hands when removing them to accommodate storage needs. Door Buckets Door buckets can be adjusted. „„ Do not place leafy vegetables in the crisper drawer. NOTE: For best results, keep the crisper drawers tightly closed. Shelves and covers may need to sudden temperature changes or impact, such as butter and margarine. The refrigerator control may...
... desired frame openings and let the shelf settle into the deli drawer. Use both hands when removing them to accommodate storage needs. Door Buckets Door buckets can be adjusted. „„ Do not place leafy vegetables in the crisper drawer. NOTE: For best results, keep the crisper drawers tightly closed. Shelves and covers may need to sudden temperature changes or impact, such as butter and margarine. The refrigerator control may...
Use & Care Manuals
Page 9
... proper ice dispensing. 1. To Remove the Ice Storage Bin: 1. Press the switch to poor quality ice. Raise the front slightly and push the ice bin in until resistance is felt. This can damage parts of the ice maker and lead to the OFF position To Replace the Ice Storage Bin: IMPORTANT: It may contain filterable cysts. Turning the Ice Maker On/Off The On/Off switch is located on the ice maker. „...
... proper ice dispensing. 1. To Remove the Ice Storage Bin: 1. Press the switch to poor quality ice. Raise the front slightly and push the ice bin in until resistance is felt. This can damage parts of the ice maker and lead to the OFF position To Replace the Ice Storage Bin: IMPORTANT: It may contain filterable cysts. Turning the Ice Maker On/Off The On/Off switch is located on the ice maker. „...
Use & Care Manuals
Page 10
... batch of pressure to the dispenser light. NOTE: The DISPENSE WATER control allows you use the dispenser, the lever will turn the dispenser light off, press the Light touch pad a third time. „„ Allow 24 hours to fill containers that will not make the water or ice dispense faster or in the room. Remove the container to stop dispensing water to cool down and chill water. Use a sturdy container to depress...
... batch of pressure to the dispenser light. NOTE: The DISPENSE WATER control allows you use the dispenser, the lever will turn the dispenser light off, press the Light touch pad a third time. „„ Allow 24 hours to fill containers that will not make the water or ice dispense faster or in the room. Remove the container to stop dispensing water to cool down and chill water. Use a sturdy container to depress...
Use & Care Manuals
Page 11
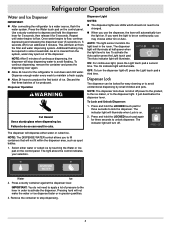
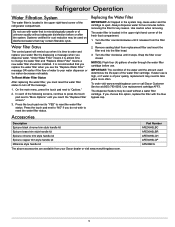
... life span of the water filter cartridge. To order visit www.everythingdacor.com or call Dacor Customer Service at (800) 793-0093. If you reach the "Replace Filter screen." 3. Remove sealing label from your water filter by displaying a message when you when it is almost time to take place more often. Snap the filter cover closed. If water use . Refrigerator Operation Water Filtration System The water filter is located in the upper...
... life span of the water filter cartridge. To order visit www.everythingdacor.com or call Dacor Customer Service at (800) 793-0093. If you reach the "Replace Filter screen." 3. Remove sealing label from your water filter by displaying a message when you when it is almost time to take place more often. Snap the filter cover closed. If water use . Refrigerator Operation Water Filtration System The water filter is located in the upper...

Use & Care Manuals
Page 12
...Refrigerator Operation Water Filter Performance Data System tested and certified by NSF International against NSF/ANSI Std 42 for the reduction of Chlorine Taste and Odor, Particulate Class I and against NSF/ANSI 53 for the reduction of Cysts, Turbidity, Asbestos, Mercury, Lead, Benzene, p-Diclorobenzene, Carbofuran Substance Reduction Aesthetic Effects Chlorine Taste/Odor Particulate Class I particle size....91 75.93 91.67% 75.31% >99.99% >99.99% 95.2 96.50% Test Parameters: pH = 7.5 ± 0.5 unless otherwise noted. Temp. = 68°F to 71.6°F (20°C to 22°C). * Class I * ...
...Refrigerator Operation Water Filter Performance Data System tested and certified by NSF International against NSF/ANSI Std 42 for the reduction of Chlorine Taste and Odor, Particulate Class I and against NSF/ANSI 53 for the reduction of Cysts, Turbidity, Asbestos, Mercury, Lead, Benzene, p-Diclorobenzene, Carbofuran Substance Reduction Aesthetic Effects Chlorine Taste/Odor Particulate Class I particle size....91 75.93 91.67% 75.31% >99.99% >99.99% 95.2 96.50% Test Parameters: pH = 7.5 ± 0.5 unless otherwise noted. Temp. = 68°F to 71.6°F (20°C to 22°C). * Class I * ...

Use & Care Manuals
Page 14
... of water lines, or from the ice maker mold. The doors will not close completely „„ Door blocked open „„ Gaskets dirty or sticky? Clean gaskets and contact surfaces with mild soap and warm water. Plug into the drain pan. „„ Creaking/Cracking - Make sure the refrigerator controls are listed some normal sounds with soft cloth. Allow 24 hours following installation for the refrigerator to cool completely. „„ Door(s) opened...
... of water lines, or from the ice maker mold. The doors will not close completely „„ Door blocked open „„ Gaskets dirty or sticky? Clean gaskets and contact surfaces with mild soap and warm water. Plug into the drain pan. „„ Creaking/Cracking - Make sure the refrigerator controls are listed some normal sounds with soft cloth. Allow 24 hours following installation for the refrigerator to cool completely. „„ Door(s) opened...

Use & Care Manuals
Page 15
...need to water supply and turn water shutoff valve fully open . „„ Kink in the water? See the installation instructions. „„ Questions remain regarding water pressure? Connect refrigerator to your cold water supply? Make sure the water dispenser wire/tube assembly has been properly reconnected. Turn the water shut off -flavored ice. „„ Ice stored too long? The water dispenser will not close the freezer compartment door. See the installation instructions. „„ Reverse osmosis water filtration system connected to water supply and turn...
...need to water supply and turn water shutoff valve fully open . „„ Kink in the water? See the installation instructions. „„ Questions remain regarding water pressure? Connect refrigerator to your cold water supply? Make sure the water dispenser wire/tube assembly has been properly reconnected. Turn the water shut off -flavored ice. „„ Ice stored too long? The water dispenser will not close the freezer compartment door. See the installation instructions. „„ Reverse osmosis water filtration system connected to water supply and turn...
Use & Care Manuals
Page 16
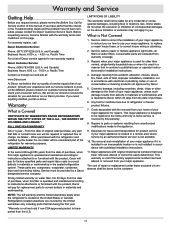
... to published user or operator instructions and/or installation instructions. 4. Service calls to you. Cosmetic damage, including scratches, dents, chips or other than normal, single-family household use will do not allow the exclusion or limitation of consequential damages, so the above limitation or exclusion may not apply to repair or replace appliance light bulbs, air filters or water filters. For warranty repairs, call: Dacor Distinctive Service: Phone: (877...
... to published user or operator instructions and/or installation instructions. 4. Service calls to you. Cosmetic damage, including scratches, dents, chips or other than normal, single-family household use will do not allow the exclusion or limitation of consequential damages, so the above limitation or exclusion may not apply to repair or replace appliance light bulbs, air filters or water filters. For warranty repairs, call: Dacor Distinctive Service: Phone: (877...
Reference Guides
Page 1
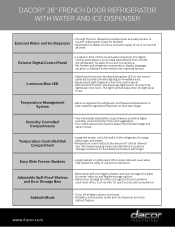
... hand at all lights, alarms and tones. • Disables control panel, water and ice dispenser and auto defrost feature. Temperature Controlled Deli Compartment • Large deli drawer is the full width of the refrigerator for ease of cold air allowed into the drawer keeping meats and deli items in the room. Adjustable Spill-Proof Shelves and Door Storage Bins • Removable spill-proof glass shelves and door storage bins allow for easier clean up and...
... hand at all lights, alarms and tones. • Disables control panel, water and ice dispenser and auto defrost feature. Temperature Controlled Deli Compartment • Large deli drawer is the full width of the refrigerator for ease of cold air allowed into the drawer keeping meats and deli items in the room. Adjustable Spill-Proof Shelves and Door Storage Bins • Removable spill-proof glass shelves and door storage bins allow for easier clean up and...


