Planning Guides
Page 1
... installation instructions. 120 Vac, 15 Amp. 3-prong electrical outlet Shipping weight: 60 lbs. Specifications subject to avoid scraping/vibration. Contact your local building department for further information. • This appliance must be installed in trim kit *Minimum spacing: Includes additional space to change without notice. Microwave is supplied with 42" (106.7 cm) power cord with a three prong grounding plug. 2. 3/4" (1.9 cm) support platform (flush with wall oven models...
... installation instructions. 120 Vac, 15 Amp. 3-prong electrical outlet Shipping weight: 60 lbs. Specifications subject to avoid scraping/vibration. Contact your local building department for further information. • This appliance must be installed in trim kit *Minimum spacing: Includes additional space to change without notice. Microwave is supplied with 42" (106.7 cm) power cord with a three prong grounding plug. 2. 3/4" (1.9 cm) support platform (flush with wall oven models...
Installation Instructions
Page 4
... locations. 12. See door surface cleaning instructions on page 25. 16. c. Contact nearest Dacor Authorized Servicer for storage purposes. Do not mount unit over only Dacor's wall oven and warming oven models. c. Connect only to stand in oven. for its intended use . 17. Remove wire twist-ties from heated surfaces. 14. Use this appliance. 20. DCM24 is necessary when used by qualified service personnel. Read all instructions before placing bag in the microwave oven...
... locations. 12. See door surface cleaning instructions on page 25. 16. c. Contact nearest Dacor Authorized Servicer for storage purposes. Do not mount unit over only Dacor's wall oven and warming oven models. c. Connect only to stand in oven. for its intended use . 17. Remove wire twist-ties from heated surfaces. 14. Use this appliance. 20. DCM24 is necessary when used by qualified service personnel. Read all instructions before placing bag in the microwave oven...
Installation Instructions
Page 5
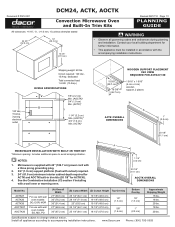
... built-in Kit instructions. D E A ABOVE OVEN INSTALLATION MICROWAVE CUTOUT TOP OF MICROWAVE SHELF 1 1/2" (38MM) 41" (1041MM) EPICURE, PREFERENCE AND MILLENNIA SINGLE WALL OVEN CUTOUT B C D :5" E : 10" (ACTK27) : 11 1/2" (ACTK30) Call toll-free: (800) 793-0093 for proper operation of 36 inches from inside the cavity or on the door. Choosing a Location for Your Oven on the counter You will use . however, DO NOT REMOVE THE WAVEGUIDE COVER, which is any other gas or electric wall oven...
... built-in Kit instructions. D E A ABOVE OVEN INSTALLATION MICROWAVE CUTOUT TOP OF MICROWAVE SHELF 1 1/2" (38MM) 41" (1041MM) EPICURE, PREFERENCE AND MILLENNIA SINGLE WALL OVEN CUTOUT B C D :5" E : 10" (ACTK27) : 11 1/2" (ACTK30) Call toll-free: (800) 793-0093 for proper operation of 36 inches from inside the cavity or on the door. Choosing a Location for Your Oven on the counter You will use . however, DO NOT REMOVE THE WAVEGUIDE COVER, which is any other gas or electric wall oven...
Installation Instructions
Page 7
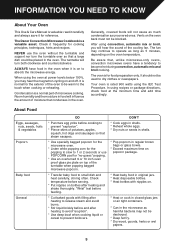
... and recipes. The Dacor Convection Microwave Cookbook is valuable: read it carefully and always save it is on to become hot during convection, automatic mix and broil cooking. Generally, covered foods will turn the turntable over so that , unlike microwave-only ovens, convection microwave ovens have food in the oven. INFORMATION YOU NEED TO KNOW About Your Oven This Use & Care Manual is a valuable asset. Check temperature before and after heating and shake thoroughly. ALWAYS...
... and recipes. The Dacor Convection Microwave Cookbook is valuable: read it carefully and always save it is on to become hot during convection, automatic mix and broil cooking. Generally, covered foods will turn the turntable over so that , unlike microwave-only ovens, convection microwave ovens have food in the oven. INFORMATION YOU NEED TO KNOW About Your Oven This Use & Care Manual is a valuable asset. Check temperature before and after heating and shake thoroughly. ALWAYS...

Installation Instructions
Page 9
... or ignite. * Cover foods while cooking. safe and ovenable. Foods severely overcooked can escape. Look for microwaving. Do No No not use it for signs indicating that cooking temperatures have been cooked to touch food. Place thickest areas toward outside of time. Remove food from the center of such foods as needed. Food steams throughout, not just at least once. * Rearrange foods like meatballs halfway through cooking both from top...
... or ignite. * Cover foods while cooking. safe and ovenable. Foods severely overcooked can escape. Look for microwaving. Do No No not use it for signs indicating that cooking temperatures have been cooked to touch food. Place thickest areas toward outside of time. Remove food from the center of such foods as needed. Food steams throughout, not just at least once. * Rearrange foods like meatballs halfway through cooking both from top...

Installation Instructions
Page 10
... carefully open button. 9 Auto-Touch control panel. 10 Lighted digital display. 11 Convection air openings. 12 Removable low rack. (Broiling trivet) 13 Removable high rack. (Baking rack) 14 Turntable motor shaft. About Children and the Microwave Children below the age of 7 should anyone be allowed to lean or swing on the oven door. Between the ages of 7 and 12, the supervising person should stand on a sturdy stool. Enough heat from walls, ceiling and door. * Use...
... carefully open button. 9 Auto-Touch control panel. 10 Lighted digital display. 11 Convection air openings. 12 Removable low rack. (Broiling trivet) 13 Removable high rack. (Baking rack) 14 Turntable motor shaft. About Children and the Microwave Children below the age of 7 should anyone be allowed to lean or swing on the oven door. Between the ages of 7 and 12, the supervising person should stand on a sturdy stool. Enough heat from walls, ceiling and door. * Use...

Installation Instructions
Page 14
... BURNS, use thick oven gloves when removing the food or turntable from the oven. Touch CONVECTION CONVECTION pad. 4. Select cooking temperature. 375˚ 5. START Touch START pad. Open the door. Place food in steps 2 and 4. START INSTANT ON Touch START pad. 3. After this is normal and not a sign that it should never be displayed. NOTE: 1. To preheat and cook with Convection Your oven can be cooked directly on the turntable. The oven will stop, and directions will become hot. SPECIAL...
... BURNS, use thick oven gloves when removing the food or turntable from the oven. Touch CONVECTION CONVECTION pad. 4. Select cooking temperature. 375˚ 5. START Touch START pad. Open the door. Place food in steps 2 and 4. START INSTANT ON Touch START pad. 3. After this is normal and not a sign that it should never be displayed. NOTE: 1. To preheat and cook with Convection Your oven can be cooked directly on the turntable. The oven will stop, and directions will become hot. SPECIAL...
Installation Instructions
Page 16
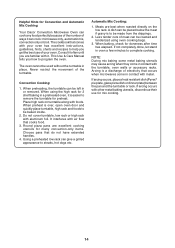
... cook: microwave only, automatic mix, convection only or broil. Convection Cooking: 1. Arcing is over, open oven door and quickly place turntable, high rack and foods to program the oven. When preheat is a discharge of meat can be baked inside. 2. Helpful Hints for Convection and Automatic Mix Cooking Your Dacor Convection Microwave Oven can cook any food perfectly because of the number of the turntable. The cookbook that occurs when microwaves come in contact with your oven. This Use & Care Manual...
... cook: microwave only, automatic mix, convection only or broil. Convection Cooking: 1. Arcing is over, open oven door and quickly place turntable, high rack and foods to program the oven. When preheat is a discharge of meat can be baked inside. 2. Helpful Hints for Convection and Automatic Mix Cooking Your Dacor Convection Microwave Oven can cook any food perfectly because of the number of the turntable. The cookbook that occurs when microwaves come in contact with your oven. This Use & Care Manual...

Installation Instructions
Page 17
... can be changed . START INSTANT ON Touch START pad. This feature can be used . INSTANT ON NOTE: If you want to continue. 3. This will sound 4 times*. 4. See Convection Broiling Chart in oven. SLOW COOK Slow Cook is needed. Simply close the oven door and touch START to broil a steak for 4 hours. Touch BROIL pad. Place food in the chart of room and available power. 2. START Touch START pad. SLOW COOK Touch SLOW COOK pad. 2. Select...
... can be changed . START INSTANT ON Touch START pad. This feature can be used . INSTANT ON NOTE: If you want to continue. 3. This will sound 4 times*. 4. See Convection Broiling Chart in oven. SLOW COOK Slow Cook is needed. Simply close the oven door and touch START to broil a steak for 4 hours. Touch BROIL pad. Place food in the chart of room and available power. 2. START Touch START pad. SLOW COOK Touch SLOW COOK pad. 2. Select...

Installation Instructions
Page 19
... either raw or previously cooked, by time and variable power. Covering Foods: Some foods work best when covered. At this part of cooking time will appear on page 11. The sensor adjusts the cooking times and power level for microwave cooking. Do not open the oven door or touch STOP/CLEAR during this time, you may be entered within 1 minute after cooking. MANUAL DEFROST If the food that you wish to defrost is not listed on the AUTO DEFROST CHART or is...
... either raw or previously cooked, by time and variable power. Covering Foods: Some foods work best when covered. At this part of cooking time will appear on page 11. The sensor adjusts the cooking times and power level for microwave cooking. Do not open the oven door or touch STOP/CLEAR during this time, you may be entered within 1 minute after cooking. MANUAL DEFROST If the food that you wish to defrost is not listed on the AUTO DEFROST CHART or is...
Installation Instructions
Page 27
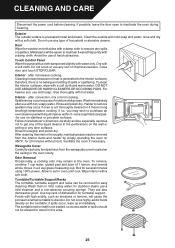
... set in this area. 25 Turntable/Turntable Support/Racks The turntable, turntable support and racks can be easier to the interior surfaces; Foods with high acidity, such as tomatoes or lemons, will be removed for several whole cloves in a 2 cup glass measuring cup. If possible, leave the door open to discolor. Avoid the use any type of chemical cleaners. To clean the interior surfaces, wipe with hot water. after microwave cooking...
... set in this area. 25 Turntable/Turntable Support/Racks The turntable, turntable support and racks can be easier to the interior surfaces; Foods with high acidity, such as tomatoes or lemons, will be removed for several whole cloves in a 2 cup glass measuring cup. If possible, leave the door open to discolor. Avoid the use any type of chemical cleaners. To clean the interior surfaces, wipe with hot water. after microwave cooking...

Installation Instructions
Page 28
... hand over the rear ventilating openings.) C. Does the turntable rotate? In compliance with Department of the above questions, please check electrical outlet, fuse and/or circuit breaker. Does the cooling fan work? D. Is the water in the oven and close the door securely. YES _______ NO _______ B. SPECIFICATIONS AC Line Voltage: AC Power Required: Output Power: Microwave Convection Heater Frequency: Outside Dimensions: Cavity Dimensions: Oven Capacity: Cooking Uniformity: Weight: Single phase...
... hand over the rear ventilating openings.) C. Does the turntable rotate? In compliance with Department of the above questions, please check electrical outlet, fuse and/or circuit breaker. Does the cooling fan work? D. Is the water in the oven and close the door securely. YES _______ NO _______ B. SPECIFICATIONS AC Line Voltage: AC Power Required: Output Power: Microwave Convection Heater Frequency: Outside Dimensions: Cavity Dimensions: Oven Capacity: Cooking Uniformity: Weight: Single phase...

Use & Care Manuals
Page 3
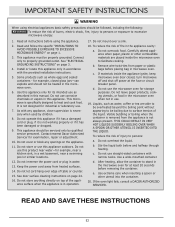
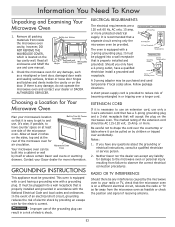
...: Please read and keep this manual are not meant to the: (1) door (bent), (2) hinges and latches (broken or loosened), (3) door seals and sealing surfaces. (d) The oven should not be adjusted or repaired by anyone except properly qualified service personnel. This guide provides proper use and care manual for future reference. Record these instructions. Model Number Serial Number Date of the door surface. At Dacor, we continuously improve the...
...: Please read and keep this manual are not meant to the: (1) door (bent), (2) hinges and latches (broken or loosened), (3) door seals and sealing surfaces. (d) The oven should not be adjusted or repaired by anyone except properly qualified service personnel. This guide provides proper use and care manual for future reference. Record these instructions. Model Number Serial Number Date of the door surface. At Dacor, we continuously improve the...
Use & Care Manuals
Page 4
... materials inside the microwave oven to heat and cook food. Liquids, such as water, coffee or tea are placed inside the appliance ignite, keep microwave oven door closed glass jars-can explode and should not be properly grounded. c. Do not use corrosive chemicals or vapors in a wet basement, near a swimming pool or similar locations. 12. If the oven light fails, consult a DACOR AUTHORIZED SERVICER. See "ELECTRICAL GROUNDING INSTRUCTIONS" on...
... materials inside the microwave oven to heat and cook food. Liquids, such as water, coffee or tea are placed inside the appliance ignite, keep microwave oven door closed glass jars-can explode and should not be properly grounded. c. Do not use corrosive chemicals or vapors in a wet basement, near a swimming pool or similar locations. 12. If the oven light fails, consult a DACOR AUTHORIZED SERVICER. See "ELECTRICAL GROUNDING INSTRUCTIONS" on...
Use & Care Manuals
Page 5
... be grounded. GROUNDING INSTRUCTIONS This appliance must be AC 115-120 volt, 15 Amp. EXTENSION CORD If it can accept any damage, do not operate the microwave oven and contact your Dacor dealer for the electric current. A 3-prong adapter may be pulled on the door. Follow package directions. Be careful not to use an extension cord, use and care manual. 2. however, DO NOT REMOVE THE WAVEGUIDE COVER, which is...
... be grounded. GROUNDING INSTRUCTIONS This appliance must be AC 115-120 volt, 15 Amp. EXTENSION CORD If it can accept any damage, do not operate the microwave oven and contact your Dacor dealer for the electric current. A 3-prong adapter may be pulled on the door. Follow package directions. Be careful not to use an extension cord, use and care manual. 2. however, DO NOT REMOVE THE WAVEGUIDE COVER, which is...

Use & Care Manuals
Page 6
.... Look for signs indicating that , unlike microwave-only ovens, convection microwave ovens have been reached. Check it for reference. Vents on the oven temperature. Remove food from outside of moisture that a large dish could be placed in the oven. Generally, covered foods will influence the amount of dish. • Watch the cooking time. Signs of microwave cooking. The turntable will hear the sound of time indicated and add more as uncovered...
.... Look for signs indicating that , unlike microwave-only ovens, convection microwave ovens have been reached. Check it for reference. Vents on the oven temperature. Remove food from outside of moisture that a large dish could be placed in the oven. Generally, covered foods will influence the amount of dish. • Watch the cooking time. Signs of microwave cooking. The turntable will hear the sound of time indicated and add more as uncovered...

Use & Care Manuals
Page 15
... power. Check the food temperature after cooking, opening and closing the door, or touching the STOP/CLEAR pad. 4. Plastic wrap should be opened when the remaining cooking time appears on the display. If the dish is lighted in , wait 2 minutes before using Sensor Reheat, ERROR will be programmed with variable power and time. 6. Be sure the exterior of the cooking container and the interior of vapor will be displayed. Sensor Reheat and Popcorn...
... power. Check the food temperature after cooking, opening and closing the door, or touching the STOP/CLEAR pad. 4. Plastic wrap should be opened when the remaining cooking time appears on the display. If the dish is lighted in , wait 2 minutes before using Sensor Reheat, ERROR will be programmed with variable power and time. 6. Be sure the exterior of the cooking container and the interior of vapor will be displayed. Sensor Reheat and Popcorn...

Use & Care Manuals
Page 22
.... Touch the START/INSTANT ON pad. however, the microwave power cannot. Automatic Mix Cooking This oven has two pre-programmed settings that cook best by convection heating alone, most foods are well suited to 350˚F and then cook 25 minutes on Low Mix/ Bake: 1. Touch the LOW MIX/BAKE pad. 2. Preheating will become hot. CAUTION The oven cabinet, cavity, door, turntable, turntable support, racks and dishes will start. The temperature can be changed...
.... Touch the START/INSTANT ON pad. however, the microwave power cannot. Automatic Mix Cooking This oven has two pre-programmed settings that cook best by convection heating alone, most foods are well suited to 350˚F and then cook 25 minutes on Low Mix/ Bake: 1. Touch the LOW MIX/BAKE pad. 2. Preheating will become hot. CAUTION The oven cabinet, cavity, door, turntable, turntable support, racks and dishes will start. The temperature can be changed...
Use & Care Manuals
Page 24
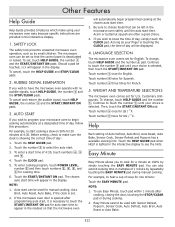
... setting, check to touch the number 4 pad until the auto start time. To cancel, touch the HELP GUIDE and STOP/CLEAR pads. 2. If the microwave oven door is opened after cooking, closing the door, touching the STOP/CLEAR pad or during manual cooking. WEIGHT AND TEMPERATURE SELECTIONS The microwave oven comes set . 2. Customary Unitpounds. Continue to make using your microwave oven easy because specific instructions are often a good choice. 4. Touch number 5 once for KG / ˚C. SAFETY LOCK The safety lock prevents unwanted microwave oven operation...
... setting, check to touch the number 4 pad until the auto start time. To cancel, touch the HELP GUIDE and STOP/CLEAR pads. 2. If the microwave oven door is opened after cooking, closing the door, touching the STOP/CLEAR pad or during manual cooking. WEIGHT AND TEMPERATURE SELECTIONS The microwave oven comes set . 2. Customary Unitpounds. Continue to make using your microwave oven easy because specific instructions are often a good choice. 4. Touch number 5 once for KG / ˚C. SAFETY LOCK The safety lock prevents unwanted microwave oven operation...

Use & Care Manuals
Page 26
... stains use baking soda or a mild soap; Touch Control Panel Care should not be removed for several whole cloves in the microwave oven. temperature cooking. Waveguide Cover The waveguide cover is generated to stand in this area. Odor Removal Interior - rinse thoroughly with a soft cloth and warm water. Wash them in microwave oven until cool. CleanHinegadainndg Care Disconnect the power cord before cleaning or leave the door open the microwave oven door before cleaning. Wipe the panel with...
... stains use baking soda or a mild soap; Touch Control Panel Care should not be removed for several whole cloves in the microwave oven. temperature cooking. Waveguide Cover The waveguide cover is generated to stand in this area. Odor Removal Interior - rinse thoroughly with a soft cloth and warm water. Wash them in microwave oven until cool. CleanHinegadainndg Care Disconnect the power cord before cleaning or leave the door open the microwave oven door before cleaning. Wipe the panel with...


