User Guide
Page 4
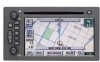
... page 3-2. Directional Indicator. D. Nav (Navigation Menu) Screen Button. See "Touch Sensitive Screen Buttons" on page 2-4. Overview A. B. G. Audio Key. See "Touch Sensitive Screen Buttons" on page 2-4. N. See "Touch Sensitive Screen Buttons" on page 2-1. P. Q. DVD/CD Eject Key 1-3 Power/Volume Knob. See "Hard Keys" on page 2-5. See "Finding a Station" on page 3-4. NAV RPT (Navigation Repeat) Key. See Navigation Audio System on page 3-2. DVD/CD Loading Slot R. See...
... page 3-2. Directional Indicator. D. Nav (Navigation Menu) Screen Button. See "Touch Sensitive Screen Buttons" on page 2-4. Overview A. B. G. Audio Key. See "Touch Sensitive Screen Buttons" on page 2-4. N. See "Touch Sensitive Screen Buttons" on page 2-1. P. Q. DVD/CD Eject Key 1-3 Power/Volume Knob. See "Hard Keys" on page 2-5. See "Finding a Station" on page 3-4. NAV RPT (Navigation Repeat) Key. See Navigation Audio System on page 3-2. DVD/CD Loading Slot R. See...
User Guide
Page 7
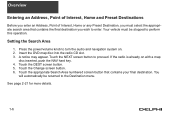
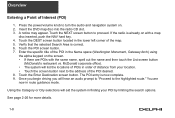
Setting the Search Area 1. Touch the Change screen button. 6. A notice may appear. You will automatically be stopped to the Destination menu. Touch the appropriate Search Area numbered screen button that contains the final destination you must be returned to perform this operation. Your ...more details. 1-6 Insert the DVD map disc into the radio CD slot. 3. If the radio is already on . 2. Press the power/volume knob to proceed. Touch the NEXT screen button to turn the audio and navigation system on with a map disc inserted, push the NAV hard key. 4. Overview ...
Setting the Search Area 1. Touch the Change screen button. 6. A notice may appear. You will automatically be stopped to the Destination menu. Touch the appropriate Search Area numbered screen button that contains the final destination you must be returned to perform this operation. Your ...more details. 1-6 Insert the DVD map disc into the radio CD slot. 3. If the radio is already on . 2. Press the power/volume knob to proceed. Touch the NEXT screen button to turn the audio and navigation system on with a map disc inserted, push the NAV hard key. 4. Overview ...
User Guide
Page 8
...DVD map disc into the radio CD slot. 3. Touch the NEXT screen button to the highlighted route." space ( ) screen button for more details. 1-7 Touch the Enter Destination screen...push the NAV hard key. 4. Once you begin driving you will hear an audio prompt to "Proceed to proceed. Touch the Address screen button. ...7. Verify that the selected Search Area is now complete. 12. Royal Oak Rd. See page 2-24 for misspellings. 8. Overview Entering an Address 1. Press the power/volume knob to turn the audio and navigation system...
...DVD map disc into the radio CD slot. 3. Touch the NEXT screen button to the highlighted route." space ( ) screen button for more details. 1-7 Touch the Enter Destination screen...push the NAV hard key. 4. Once you begin driving you will hear an audio prompt to "Proceed to proceed. Touch the Address screen button. ...7. Verify that the selected Search Area is now complete. 12. Royal Oak Rd. See page 2-24 for misspellings. 8. Overview Entering an Address 1. Press the power/volume knob to turn the audio and navigation system...
User Guide
Page 9
... the DVD map disc into the radio CD slot. 3. Touch the NEXT screen button to the address of distance from your POI by limiting the search options. Verify that the selected Search Area is now complete. 9. Press the power/volume knob to the highlighted route." Touch the DEST screen button located...Enter the specific title of fice). • The system will hear an audio prompt to "Proceed to turn the audio and navigation system on with the same name, spell out the name and then touch the List screen button (McDonald's restaurant vs. McDonald corporate of the POI in the...
... the DVD map disc into the radio CD slot. 3. Touch the NEXT screen button to the address of distance from your POI by limiting the search options. Verify that the selected Search Area is now complete. 9. Press the power/volume knob to the highlighted route." Touch the DEST screen button located...Enter the specific title of fice). • The system will hear an audio prompt to "Proceed to turn the audio and navigation system on with the same name, spell out the name and then touch the List screen button (McDonald's restaurant vs. McDonald corporate of the POI in the...
User Guide
Page 10
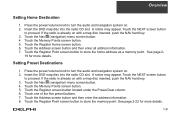
... details. Press the power/volume knob to proceed. Insert the DVD map disc into the radio CD slot. Touch one of the five preset buttons. 7. Touch the Register Point screen button to turn the audio and navigation system on with a map disc inserted, push the NAV hard key. 3. Setting Preset Destinations 1. See page 2-22 for more...
... details. Press the power/volume knob to proceed. Insert the DVD map disc into the radio CD slot. Touch one of the five preset buttons. 7. Touch the Register Point screen button to turn the audio and navigation system on with a map disc inserted, push the NAV hard key. 3. Setting Preset Destinations 1. See page 2-22 for more...
User Guide
Page 11
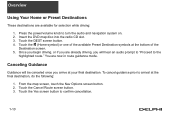
...;rm cancellation. 1-10 From the map screen, touch the Nav Options screen button. 2. Touch the Yes screen button to turn the audio and navigation system on. 2. To cancel guidance prior to the highlighted route." Overview Using Your Home or Preset Destinations These destinations are now in route guidance mode. Insert the DVD map disc into the radio CD slot...
...;rm cancellation. 1-10 From the map screen, touch the Nav Options screen button. 2. Touch the Yes screen button to turn the audio and navigation system on. 2. To cancel guidance prior to the highlighted route." Overview Using Your Home or Preset Destinations These destinations are now in route guidance mode. Insert the DVD map disc into the radio CD slot...
User Guide
Page 12
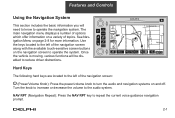
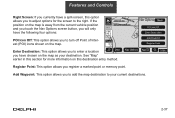
... the NAV RPT key to the audio system. Features and Controls Using the Navigation System This section includes the basic information you will be disabled to reduce driver distractions. Hard Keys The following hard keys are located to operate the system. See Navigation Menu on the navigation screen to the left of the navigation screen along with the available touch-sensitive screen...
... the NAV RPT key to the audio system. Features and Controls Using the Navigation System This section includes the basic information you will be disabled to reduce driver distractions. Hard Keys The following hard keys are located to operate the system. See Navigation Menu on the navigation screen to the left of the navigation screen along with the available touch-sensitive screen...

User Guide
Page 15
... the bottom of a map screen. Dest (Destination): Touch this screen button to display the Nav Options menu. This feature can also be light blue when active and dark blue when not active. Nav (Navigation) Options: Touch this screen button to display the main navigation menu. See Destination on page 2-38 for more information. Nav (Navigation Menu): Touch this screen button to display the...
... the bottom of a map screen. Dest (Destination): Touch this screen button to display the Nav Options menu. This feature can also be light blue when active and dark blue when not active. Nav (Navigation) Options: Touch this screen button to display the main navigation menu. See Destination on page 2-38 for more information. Nav (Navigation Menu): Touch this screen button to display the...

User Guide
Page 19
... longer receive voice prompts for navigation. You will be viewed by pressing the NAV hard key. The map can touch the Resume Guidance screen button to make system adjustments and plan routes. Features and Controls Navigation Menu Nav (Navigation Menu): Touch the navigation menu symbol screen button at the bottom of options and to use the available touch screen buttons to resume the...
... longer receive voice prompts for navigation. You will be viewed by pressing the NAV hard key. The map can touch the Resume Guidance screen button to make system adjustments and plan routes. Features and Controls Navigation Menu Nav (Navigation Menu): Touch the navigation menu symbol screen button at the bottom of options and to use the available touch screen buttons to resume the...
User Guide
Page 26
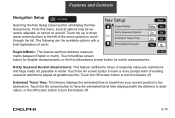
... switches distance measurements between English or metric. Touch the up or down arrow screen buttons to the left of existing seasonal restrictions played at guidance points. Touch the On screen button to scroll through the list. Touch the Off screen button to turn this feature off. Touch the On screen button to have a voice prompt warn of...the estimated time to travel time displayed with a brief explanation of seasonal maneuver restrictions and flags roads not passable in winter. Features and Controls Navigation Setup Selecting the Nav Setup screen button will display the...
... switches distance measurements between English or metric. Touch the up or down arrow screen buttons to the left of existing seasonal restrictions played at guidance points. Touch the On screen button to scroll through the list. Touch the Off screen button to turn this feature off. Touch the On screen button to have a voice prompt warn of...the estimated time to travel time displayed with a brief explanation of seasonal maneuver restrictions and flags roads not passable in winter. Features and Controls Navigation Setup Selecting the Nav Setup screen button will display the...
User Guide
Page 27
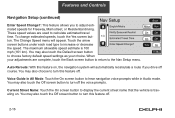
...allowable speed estimate is traveling on , the navigation system will appear. You may also touch the Default screen button to choose factory default speed settings as your adjustments are used to turn off . 2-16 Features and Controls Navigation Setup (continued) Enter Speed Change?: This feature...Touch the On screen button to increase or decrease the speed. These speed values are complete, touch the Back screen button to return to adjust estimated speeds for Freeway, Main street, or Residential driving. The Change Speed menu will automatically recalculate a route if you to the Nav...
...allowable speed estimate is traveling on , the navigation system will appear. You may also touch the Default screen button to choose factory default speed settings as your adjustments are used to turn off . 2-16 Features and Controls Navigation Setup (continued) Enter Speed Change?: This feature...Touch the On screen button to increase or decrease the speed. These speed values are complete, touch the Back screen button to return to adjust estimated speeds for Freeway, Main street, or Residential driving. The Change Speed menu will automatically recalculate a route if you to the Nav...

User Guide
Page 28
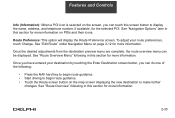
... it is. You may need to calibrate the system following a tire change the map appearance automatically every three months. Choose between Normal, Auto, 1, 2, 3, or 4. Touch the Yes screen button to calibrate the system, or the No screen button to view the adjusted map color. Map...4. Features and Controls Exit Information: This feature will calibrate wheel speed to assist in the Nav Setup menu. Touch the On screen button to display exit information icons, or touch the Off screen button to view the adjusted map color. When the desired color setting has been selected, ...
... it is. You may need to calibrate the system following a tire change the map appearance automatically every three months. Choose between Normal, Auto, 1, 2, 3, or 4. Touch the Yes screen button to calibrate the system, or the No screen button to view the adjusted map color. Map...4. Features and Controls Exit Information: This feature will calibrate wheel speed to assist in the Nav Setup menu. Touch the On screen button to display exit information icons, or touch the Off screen button to view the adjusted map color. When the desired color setting has been selected, ...
User Guide
Page 44
Route Preference: This option will display the Route Preference screen. To adjust your destination by touching the Enter Destination screen button, you can be displayed. See "Navigation Options" later in this section for more information. 2-33 See "Route Overview" following in this section for ... their icons. See "Edit Route" under Navigation Menu on the map screen displaying the new destination to make further changes. Once you have entered your route preferences, touch Change. See "Route Overview Menu" following : • Press the NAV hard key to begin route guidance. •...
Route Preference: This option will display the Route Preference screen. To adjust your destination by touching the Enter Destination screen button, you can be displayed. See "Navigation Options" later in this section for more information. 2-33 See "Route Overview" following in this section for ... their icons. See "Edit Route" under Navigation Menu on the map screen displaying the new destination to make further changes. Once you have entered your route preferences, touch Change. See "Route Overview Menu" following : • Press the NAV hard key to begin route guidance. •...
User Guide
Page 46
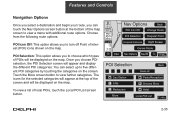
You can touch the Nav Options screen button at the top of the screen and will be displayed on the map. Choose from the following route options: POI Icon Off: This option allows you choose POI selection, the POI Selection screen will appear and display the different POI categories. Once... the selected categories will appear at the bottom of the map screen to view a menu with additional route options. Features and Controls Navigation Options Once you select a destination and begin your route, you can select up to five different POI categories by touching the categories on the...
You can touch the Nav Options screen button at the top of the screen and will be displayed on the map. Choose from the following route options: POI Icon Off: This option allows you choose POI selection, the POI Selection screen will appear and display the different POI categories. Once... the selected categories will appear at the bottom of the map screen to view a menu with additional route options. Features and Controls Navigation Options Once you select a destination and begin your route, you can select up to five different POI categories by touching the categories on the...
User Guide
Page 48
Features and Controls Right Screen: If you currently have the following four options: POI Icon Off: This option allows you to turn off Point of Interest (POI) icons shown on ... destination to your destination. See "Map" earlier in this section for the screen to adjust options for more information on the map is away from the current vehicle position and you touch the Nav Options screen button, you will only have a split-screen, this destination entry method. Register Point: This option allows you to the...
Features and Controls Right Screen: If you currently have the following four options: POI Icon Off: This option allows you to turn off Point of Interest (POI) icons shown on ... destination to your destination. See "Map" earlier in this section for the screen to adjust options for more information on the map is away from the current vehicle position and you touch the Nav Options screen button, you will only have a split-screen, this destination entry method. Register Point: This option allows you to the...
User Guide
Page 67
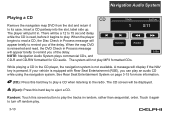
... screen will appear briefly to play. While playing a CD in the CD player, the navigation system is reinserted and read, the DVD Check in Process message will be a 12 to 15 second delay while the CD is read a CD, the Disc Check in . See Rear Seat Entertainment System on page 3-15 for CD audio. Touch...
... screen will appear briefly to play. While playing a CD in the CD player, the navigation system is reinserted and read, the DVD Check in Process message will be a 12 to 15 second delay while the CD is read a CD, the Disc Check in . See Rear Seat Entertainment System on page 3-15 for CD audio. Touch...


