
Product Manual
Page 2
... Using the Remote Control...10 Installing the D-Link® Media Server Software 13 Choosing Music, Photo, and Video Files to Share 18 Using the D-Link® Media Server Software 22 Accessing the Media on your PCs 22 Sharing Media Content in ...Folders 23 Refreshing Folder Contents 23 Naming the Media Server 24 Upgrading the Media Server 25 Stopping the D-Link Media Server 26 Using Windows® Media Connect Software 27 Configuring Windows® Media Connect 27 Connecting the DSM-320...
... Using the Remote Control...10 Installing the D-Link® Media Server Software 13 Choosing Music, Photo, and Video Files to Share 18 Using the D-Link® Media Server Software 22 Accessing the Media on your PCs 22 Sharing Media Content in ...Folders 23 Refreshing Folder Contents 23 Naming the Media Server 24 Upgrading the Media Server 25 Stopping the D-Link Media Server 26 Using Windows® Media Connect Software 27 Configuring Windows® Media Connect 27 Connecting the DSM-320...
Product Manual
Page 3
......62 Using the Remote Control with Videos 63 Search...64 Online Media...65 AOL Music Now...66 Live365™...67 Napster™...71 Rhapsody™...73 Current Rhapsody™ Subscribers 73 For New Rhapsody™ Users 74 Configuring Rhapsody™ for use with the DSM-320 80 Yahoo...82 Setup...83 Network ...83 Wireless...84 System...
......62 Using the Remote Control with Videos 63 Search...64 Online Media...65 AOL Music Now...66 Live365™...67 Napster™...71 Rhapsody™...73 Current Rhapsody™ Subscribers 73 For New Rhapsody™ Users 74 Configuring Rhapsody™ for use with the DSM-320 80 Yahoo...82 Setup...83 Network ...83 Wireless...84 System...

Product Manual
Page 6
... and home entertainment centers. Use the included remote control to or the lack of availability of such content, including but not limited to access and use such third party content. Enjoy slideshows of products: the D-Link® MediaLoungeTM DSM-320 Wireless Media Player. Disclaimer: Certain content and services accessible via the DSM-320 may be referenced herein, and shall not...
... and home entertainment centers. Use the included remote control to or the lack of availability of such content, including but not limited to access and use such third party content. Enjoy slideshows of products: the D-Link® MediaLoungeTM DSM-320 Wireless Media Player. Disclaimer: Certain content and services accessible via the DSM-320 may be referenced herein, and shall not...

Product Manual
Page 7
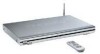
... Ethernet network. Package Contents D-Link DSM-320 Wireless Media Player Printed Quick Installation Guide CD-ROM with Manual (Contains D-Link Media Server Software, Quick Installation Guide, and Manual) 2dBi Wireless Antenna Ethernet (CAT5-UTP/Straight-Through) Cable Standard Composite RCA Audio/Video Cable S-Video Cable Remote Control with Batteries System Requirements Television...
... Ethernet network. Package Contents D-Link DSM-320 Wireless Media Player Printed Quick Installation Guide CD-ROM with Manual (Contains D-Link Media Server Software, Quick Installation Guide, and Manual) 2dBi Wireless Antenna Ethernet (CAT5-UTP/Straight-Through) Cable Standard Composite RCA Audio/Video Cable S-Video Cable Remote Control with Batteries System Requirements Television...
Product Manual
Page 8
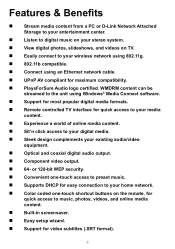
... on TV. Easily connect to your wireless network using 802.11g. 802.11b compatible. Connect using Windows® Media Connect software. Support for most popular digital media formats. Remote controlled TV interface for quick access to your media content. Experience a world of online media content. Sit'n click access to your...
... on TV. Easily connect to your wireless network using 802.11g. 802.11b compatible. Connect using Windows® Media Connect software. Support for most popular digital media formats. Remote controlled TV interface for quick access to your media content. Experience a world of online media content. Sit'n click access to your...

Product Manual
Page 10
... characters and to your television and audio system. The following page details the remote control and shows the function of each button. Using the Remote Control The remote control is used to configure and control the DSM-320. The on-screen keyboard is activated by using the DSM-320 Wireless Media Player, you will be sharing files from an on -screen cursor is located...
... characters and to your television and audio system. The following page details the remote control and shows the function of each button. Using the Remote Control The remote control is used to configure and control the DSM-320. The on-screen keyboard is activated by using the DSM-320 Wireless Media Player, you will be sharing files from an on -screen cursor is located...

Product Manual
Page 11
Using the Remote Control (continued) Power Enters a "." (a period, also known as a dot) MUTE sound VOLUME Adjustment ENTER key SETUP menu PHOTO Mode MUSIC Mode REPEAT SHUFFLE Play Functions Press to navigate to the HOME Screen Number and One-Touch Preset Keys CLEAR text entry Go to previous page Page Up or Down Arrow keys to move the position of the onscreen cursor Menu of options for current mode VIDEO Mode ONLINE MEDIA Mode Audio and video output selectors Go to search page Displays file data 11
Using the Remote Control (continued) Power Enters a "." (a period, also known as a dot) MUTE sound VOLUME Adjustment ENTER key SETUP menu PHOTO Mode MUSIC Mode REPEAT SHUFFLE Play Functions Press to navigate to the HOME Screen Number and One-Touch Preset Keys CLEAR text entry Go to previous page Page Up or Down Arrow keys to move the position of the onscreen cursor Menu of options for current mode VIDEO Mode ONLINE MEDIA Mode Audio and video output selectors Go to search page Displays file data 11

Product Manual
Page 12
...number (from 1-9) on the remote control until the preset icon appears. Volume - Page Up/Down Press Up to scroll up a page, and press Down to the DSM-320's home screen. Photo Access the Photo mode. Online Media Access the Online Media mode. Video Out Select different...Delete text. Select different audio output. Volume + Increase the volume. Display Display information about the photo. Using the Remote Control (continued) Power Turn the DSM-320 ON or OFF. Right is forward, left is composite. Video Access the Video mode. Press the assigned number to...
...number (from 1-9) on the remote control until the preset icon appears. Volume - Page Up/Down Press Up to scroll up a page, and press Down to the DSM-320's home screen. Photo Access the Photo mode. Online Media Access the Online Media mode. Video Out Select different...Delete text. Select different audio output. Volume + Increase the volume. Display Display information about the photo. Using the Remote Control (continued) Power Turn the DSM-320 ON or OFF. Right is forward, left is composite. Video Access the Video mode. Press the assigned number to...
Product Manual
Page 31
... File Note: Windows® Media Connect currently does not support Fast Forward and Rewind with protected files. Navigate to access content by using the down arrow and press ENTER to view a list of available servers. 31 To do so, press the SETUP button on the remote control. Be sure to select the... Windows® Media Connect server as the default server in the DSM-320 System Setup if you want to System by using the down arrow and then press ENTER. Navigate to...
... File Note: Windows® Media Connect currently does not support Fast Forward and Rewind with protected files. Navigate to access content by using the down arrow and press ENTER to view a list of available servers. 31 To do so, press the SETUP button on the remote control. Be sure to select the... Windows® Media Connect server as the default server in the DSM-320 System Setup if you want to System by using the down arrow and then press ENTER. Navigate to...

Product Manual
Page 32
...on the rear panel of your television. Select one of three ways to connect video to your DSM-320: • Composite Video Connector Plug the supplied yellow video cable into the DSM-320 and the matching opposite end of the cable to your television input. • S-Video Connector... Plug the supplied S-Video cable into the S-Video connector and the opposite end into the component video input of the DSM-320. Connecting the DSM-320 All audio, video, and networking connections are located on the remote control toggles between the composite/S-Video output and the component output.
...on the rear panel of your television. Select one of three ways to connect video to your DSM-320: • Composite Video Connector Plug the supplied yellow video cable into the DSM-320 and the matching opposite end of the cable to your television input. • S-Video Connector... Plug the supplied S-Video cable into the S-Video connector and the opposite end into the component video input of the DSM-320. Connecting the DSM-320 All audio, video, and networking connections are located on the remote control toggles between the composite/S-Video output and the component output.

Product Manual
Page 33
...: This cable is not supplied. • Coaxial Digital Audio Connect a coaxial audio connector into the DSM-320 and the matching opposite end of the cable to the audio input of your audio system. Note: This cable is not supplied. 33 Plug the ... Connect an optical audio connector into the color-coded matching jacks on the remote control toggles between the composite audio output and the digital audio output (optical/coaxial). • Composite Audio Plug the supplied red and white connectors into the DSM-320 and the matching opposite end of the cable to the audio input...
...: This cable is not supplied. • Coaxial Digital Audio Connect a coaxial audio connector into the DSM-320 and the matching opposite end of the cable to the audio input of your audio system. Note: This cable is not supplied. 33 Plug the ... Connect an optical audio connector into the color-coded matching jacks on the remote control toggles between the composite audio output and the digital audio output (optical/coaxial). • Composite Audio Plug the supplied red and white connectors into the DSM-320 and the matching opposite end of the cable to the audio input...

Product Manual
Page 34
...Setup Menu, press the SETUP button on the remote control. 34 Be sure the antenna is selected in an upright position. The network connection type is secure and in the Setup Wizard and can be changed by going to the network. • Wireless Antenna Attach the supplied antenna by threading it.... Note: You may have an Ethernet cable plugged into the unit and have the wireless antenna connected. Neither will interfere with the other, but only one of two ways to connect a network to your DSM-320: • RJ-45 Ethernet Connector Connect the supplied Ethernet cable to the network cable...
...Setup Menu, press the SETUP button on the remote control. 34 Be sure the antenna is selected in an upright position. The network connection type is secure and in the Setup Wizard and can be changed by going to the network. • Wireless Antenna Attach the supplied antenna by threading it.... Note: You may have an Ethernet cable plugged into the unit and have the wireless antenna connected. Neither will interfere with the other, but only one of two ways to connect a network to your DSM-320: • RJ-45 Ethernet Connector Connect the supplied Ethernet cable to the network cable...

Product Manual
Page 36
... can also be entered by using numbers 2-9 on the remote, just as naming your DSM-320 and performing searches for music, photos or video. Using the On-Screen Keyboard Whenever the cursor is used for a variety of functions such as you would on the remote control and press the ENTER button. The clear key will... case characters. The shift key will erase the previous character. Highlight ENTER and press ENTER when you need to enter text, press ENTER on the remote control and the on the remote control. 36
... can also be entered by using numbers 2-9 on the remote, just as naming your DSM-320 and performing searches for music, photos or video. Using the On-Screen Keyboard Whenever the cursor is used for a variety of functions such as you would on the remote control and press the ENTER button. The clear key will... case characters. The shift key will erase the previous character. Highlight ENTER and press ENTER when you need to enter text, press ENTER on the remote control and the on the remote control. 36
Product Manual
Page 37
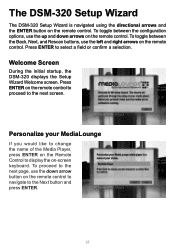
...DSM-320 Setup Wizard is navigated using the directional arrows and the ENTER button on the remote control. To toggle between the configuration options, use the up and down arrow button on the remote control to proceed to select a field or confirm a selection. Personalize your MediaLounge If you would like to change the name of the Media Player..., press ENTER on the Remote Control to the Next button and press ENTER. 37 To toggle between the Back, Next, and Rescan buttons, ...
...DSM-320 Setup Wizard is navigated using the directional arrows and the ENTER button on the remote control. To toggle between the configuration options, use the up and down arrow button on the remote control to proceed to select a field or confirm a selection. Personalize your MediaLounge If you would like to change the name of the Media Player..., press ENTER on the Remote Control to the Next button and press ENTER. 37 To toggle between the Back, Next, and Rescan buttons, ...
Product Manual
Page 38
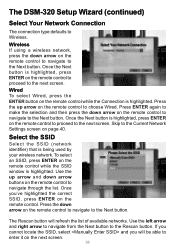
... on the remote control to navigate to choose Wired. Skip to the Next button. Once you will refresh the list of available networks. Press ENTER again to the Next button. Once the Next button is highlighted. Use the left arrow and right arrow to navigate from the Next button to Wireless. The DSM-320 Setup...
... on the remote control to navigate to choose Wired. Skip to the Next button. Once you will refresh the list of available networks. Press ENTER again to the Next button. Once the Next button is highlighted. Use the left arrow and right arrow to navigate from the Next button to Wireless. The DSM-320 Setup...
Product Manual
Page 39
... networks with this field highlighted to an encrypted wireless device, the key you chose the enter the SSID manually, then the default settings are entered. The up arrow and down arrow will be displayed and you selected in the previous step. The on the remote control with an access point or router. You...-bit Hex, 128-bit Hex, 64-bit ASCII, and 128-bit ASCII. If you enter here must match the key of the device exactly. The DSM-320 Setup Wizard (continued) Current Wireless Settings Your current wireless settings are displayed based on the previous screen appears here.
... networks with this field highlighted to an encrypted wireless device, the key you chose the enter the SSID manually, then the default settings are entered. The up arrow and down arrow will be displayed and you selected in the previous step. The on the remote control with an access point or router. You...-bit Hex, 128-bit Hex, 64-bit ASCII, and 128-bit ASCII. If you enter here must match the key of the device exactly. The DSM-320 Setup Wizard (continued) Current Wireless Settings Your current wireless settings are displayed based on the previous screen appears here.

Product Manual
Page 40
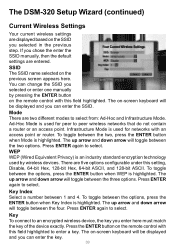
... the next screen. After entering the appropriate settings for your network, use the down arrow on the remote control to proceed to make a selection. The DSM-320 Setup Wizard (continued) Key (continued) Keys are displayed and can be modified at this point. Encryption... 64-bit 128-bit Character Length Example Character Length Example HEX 10 12345678FA 26 456FBCDF12340012222527 1730 ASCII 5 DMODE 13 2005PIECAKES1 After entering the appropriate wireless ...
... the next screen. After entering the appropriate settings for your network, use the down arrow on the remote control to proceed to make a selection. The DSM-320 Setup Wizard (continued) Key (continued) Keys are displayed and can be modified at this point. Encryption... 64-bit 128-bit Character Length Example Character Length Example HEX 10 12345678FA 26 456FBCDF12340012222527 1730 ASCII 5 DMODE 13 2005PIECAKES1 After entering the appropriate wireless ...

Product Manual
Page 41
... Services that can communicate with the DSM-320. If you do not require a Media Server. 41 Press ENTER again to navigate between the Next and Rescan button. Setup is any PC running the D-Link Media Server software or UPnP AV compliant device on the remote control with the Media Server list highlighted. A Media Server is Complete Press ENTER on...
... Services that can communicate with the DSM-320. If you do not require a Media Server. 41 Press ENTER again to navigate between the Next and Rescan button. Setup is any PC running the D-Link Media Server software or UPnP AV compliant device on the remote control with the Media Server list highlighted. A Media Server is Complete Press ENTER on...

Product Manual
Page 42
... the home screen, press the HOME button on the upper right corner of the remote control. 42 Menu Home The menu home screen is not detected, this home screen, you will appear. DSM-320 Menu Menu Basics The DSM-320 uses an on your server options (if available). As you move through the menus...the selection arrows. Similarly, use the right arrow. The top screen appears if you may take. If a D-Link Media Server is the top level menu. You will use the selection arrows on the remote control to the next menu screen, use the left . For example, a down arrow hints that more items are...
... the home screen, press the HOME button on the upper right corner of the remote control. 42 Menu Home The menu home screen is not detected, this home screen, you will appear. DSM-320 Menu Menu Basics The DSM-320 uses an on your server options (if available). As you move through the menus...the selection arrows. Similarly, use the right arrow. The top screen appears if you may take. If a D-Link Media Server is the top level menu. You will use the selection arrows on the remote control to the next menu screen, use the left . For example, a down arrow hints that more items are...

Product Manual
Page 45
...selection arrows to navigate to the track you can view tracks. To play . Select the option by clicking ENTER or the right arrow on the remote control. 2. Select the MUSIC category from the main home screen: 1. Select a Track. Use the up and PAGE down buttons can view all tracks...Tracks, Playlists, Genres, Artists, Albums, or Folders). The PAGE up arrow and down arrow and up arrow on the remote control. 45 The track will begin playing on the remote control. Select a viewing category. Once you have located the appropriate track, highlight it and press ENTER or PLAY on your ...
...selection arrows to navigate to the track you can view tracks. To play . Select the option by clicking ENTER or the right arrow on the remote control. 2. Select the MUSIC category from the main home screen: 1. Select a Track. Use the up and PAGE down buttons can view all tracks...Tracks, Playlists, Genres, Artists, Albums, or Folders). The PAGE up arrow and down arrow and up arrow on the remote control. 45 The track will begin playing on the remote control. Select a viewing category. Once you have located the appropriate track, highlight it and press ENTER or PLAY on your ...