
Product Manual
Page 2
... for Wireless Operation 15 Power on Router ...16 Factory Reset Button ...16 Wired Network Connections...17 BASIC ROUTER CONFIGURATION 19 Configuring IP Settings on Your Computer ...19 Access the Configuration Manager 25 Login to Home Page...25 Configure the Router ...26 Using the Setup Wizard...... Address for WAN...34 PPPoE and PPPoA Connection for WAN ...35 Bridged Connection for WAN ...36 LAN IP Settings...37 DHCP Server Settings for the LAN 38 DNS Server Settings...39 Basic Wireless LAN Setup ...40 ADVANCED ROUTER MANAGEMENT 41 Port Forwarding...42 Filters ...44 DMZ...46 Firewall ...
... for Wireless Operation 15 Power on Router ...16 Factory Reset Button ...16 Wired Network Connections...17 BASIC ROUTER CONFIGURATION 19 Configuring IP Settings on Your Computer ...19 Access the Configuration Manager 25 Login to Home Page...25 Configure the Router ...26 Using the Setup Wizard...... Address for WAN...34 PPPoE and PPPoA Connection for WAN ...35 Bridged Connection for WAN ...36 LAN IP Settings...37 DHCP Server Settings for the LAN 38 DNS Server Settings...39 Basic Wireless LAN Setup ...40 ADVANCED ROUTER MANAGEMENT 41 Port Forwarding...42 Filters ...44 DMZ...46 Firewall ...

Product Manual
Page 3
... System Password...58 Time & Date ...59 Save Configuration File to PC ...60 Load Saved Configuration Files...60 Restore Factory Default Settings ...60 Firmware Upgrade...61 Misc. Settings ...62 Save Router Configuration Settings...62 Diagnostic Test ...63 Router Status Information...64 Device Information Display ...64 Multiple Virtual Connections ...66 TECHNICAL SPECIFICATIONS 68 IP ADDRESS...
... System Password...58 Time & Date ...59 Save Configuration File to PC ...60 Load Saved Configuration Files...60 Restore Factory Default Settings ...60 Firmware Upgrade...61 Misc. Settings ...62 Save Router Configuration Settings...62 Diagnostic Test ...63 Router Status Information...64 Device Information Display ...64 Multiple Virtual Connections ...66 TECHNICAL SPECIFICATIONS 68 IP ADDRESS...

Product Manual
Page 4
...following steps: 1. Before You Start Please read and make sure you have all the settings necessary to use the DSL-G604T with a functioning Ethernet port, the quickest and easiest way to set up the DSL-G604T is to use the Setup Wizard to insert the Installation CD into the Router. ... Ethernet or 802.11g/802.11b wireless LAN. Once you have the Internet connection established, set up the wireless nework and security settings using a computer with the Setup Wizard. DSL-G604T Wireless A DSL Router User's Guide About This User's Guide This user's guide provides instructions on how to...
...following steps: 1. Before You Start Please read and make sure you have all the settings necessary to use the DSL-G604T with a functioning Ethernet port, the quickest and easiest way to set up the DSL-G604T is to use the Setup Wizard to insert the Installation CD into the Router. ... Ethernet or 802.11g/802.11b wireless LAN. Once you have the Internet connection established, set up the wireless nework and security settings using a computer with the Setup Wizard. DSL-G604T Wireless A DSL Router User's Guide About This User's Guide This user's guide provides instructions on how to...

Product Manual
Page 5
... you have JavaScript enabled. For others, various parameters that enables the computer to access the Internet. Operating Systems The DSL-G604T uses an HTML-based web interface for wireless communication can be easily accessed. Likewise, most users, only their respective signals...gateway device, not in a number of running on many browsers. Advanced wireless security settings can be installed for more recently released browsers such as well. DSL-G604T Wireless A DSL Router User's Guide Installation Requirements In order to establish a connection to the Internet ...
... you have JavaScript enabled. For others, various parameters that enables the computer to access the Internet. Operating Systems The DSL-G604T uses an HTML-based web interface for wireless communication can be easily accessed. Likewise, most users, only their respective signals...gateway device, not in a number of running on many browsers. Advanced wireless security settings can be installed for more recently released browsers such as well. DSL-G604T Wireless A DSL Router User's Guide Installation Requirements In order to establish a connection to the Internet ...

Product Manual
Page 6
...path between the Internet and your computer. If you are setting up the Router for multiple virtual connections, you will need to configure the VPI and VCI as instructed by your VPI computer. DSL-G604T Wireless A DSL Router User's Guide Information you will need from your ...ADSL service provider: Username This is used to verify the identity of your account. Your ADSL service provider uses this to change this setting. The Virtual Channel Identifier ...
...path between the Internet and your computer. If you are setting up the Router for multiple virtual connections, you will need to configure the VPI and VCI as instructed by your VPI computer. DSL-G604T Wireless A DSL Router User's Guide Information you will need from your ...ADSL service provider: Username This is used to verify the identity of your account. Your ADSL service provider uses this to change this setting. The Virtual Channel Identifier ...

Product Manual
Page 12
... Point - Dynamic Host Configuration Protocol automatically and dynamically assigns al LAN IP settings to each host on the LAN to access the Internet concurrently through a single Internet account. The DSL-G604T supports both versions allow the Router to communicate with the Router. If you...- This provides Internet access to link two IP domains via Telnet connection. • Telnet Connection - It is particularly useful when if the Router functions as the sole connection to a ISP defined default gateway for the Internet. The DSL-G604T supports Bridged Ethernet over ATM (RFC1483...
... Point - Dynamic Host Configuration Protocol automatically and dynamically assigns al LAN IP settings to each host on the LAN to access the Internet concurrently through a single Internet account. The DSL-G604T supports both versions allow the Router to communicate with the Router. If you...- This provides Internet access to link two IP domains via Telnet connection. • Telnet Connection - It is particularly useful when if the Router functions as the sole connection to a ISP defined default gateway for the Internet. The DSL-G604T supports Bridged Ethernet over ATM (RFC1483...

Product Manual
Page 15
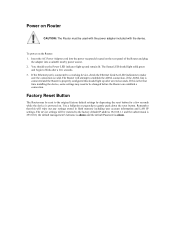
... Connections All cable connections to the factory default values in the next chapter for at the rear panel. Use the Reset button to restore the settings to the Router are made at least seven seconds Power Insert Use the adapter shipped with the power on for instructions on the Router.
... Connections All cable connections to the factory default values in the next chapter for at the rear panel. Use the Reset button to restore the settings to the Router are made at least seven seconds Power Insert Use the adapter shipped with the power on for instructions on the Router.

Product Manual
Page 16
... the web manager's wireless menu. Many wireless adapters are setting up using various techniques. When a wireless access point is present, it . Digital data is demodulated and the transmitted data extracted. The signal is superimposed onto the carrier signal. Adding more information. The DSL-G604T operates in chapters 3 (Basic Router Configuration) and 4 (Advanced Router...
... the web manager's wireless menu. Many wireless adapters are setting up using various techniques. When a wireless access point is present, it . Digital data is demodulated and the transmitted data extracted. The signal is superimposed onto the carrier signal. Adding more information. The DSL-G604T operates in chapters 3 (Basic Router Configuration) and 4 (Advanced Router...

Product Manual
Page 18
...devices as well as microwave ovens, monitors, electric motors, etc. The Router should not be located where it is your first time setting up to 300 meters outdoors, Wireless LAN lets you should be exposed to a power source. However, each wall or ceiling can affect...devices that their signal must pass through can travel straight through drywall or open doorways, avoid positioning them for troubleshooting. 2 Hardware Installation The DSL-G604T maintains three separate interfaces, an Ethernet LAN, a wireless LAN and an ADSL (WAN) interface. Make sure the cables and power cord ...
...devices as well as microwave ovens, monitors, electric motors, etc. The Router should not be located where it is your first time setting up to 300 meters outdoors, Wireless LAN lets you should be exposed to a power source. However, each wall or ceiling can affect...devices that their signal must pass through can travel straight through drywall or open doorways, avoid positioning them for troubleshooting. 2 Hardware Installation The DSL-G604T maintains three separate interfaces, an Ethernet LAN, a wireless LAN and an ADSL (WAN) interface. Make sure the cables and power cord ...
Product Manual
Page 19
... Use a ballpoint or paperclip to the original factory default settings by depressing the reset button for a few seconds. 3. The device settings will wipe out any settings stored in flash memory including user account information and LAN IP settings. You should light solid green and begin to establish the...the device. If the Ethernet port is connected to a working device, check the Ethernet Link/Act LED indicators to make sure the connection is the first time installing the device, some settings may be changed before the Router can establish a connection. Factory Reset Button The Router...
... Use a ballpoint or paperclip to the original factory default settings by depressing the reset button for a few seconds. 3. The device settings will wipe out any settings stored in flash memory including user account information and LAN IP settings. You should light solid green and begin to establish the...the device. If the Ethernet port is connected to a working device, check the Ethernet Link/Act LED indicators to make sure the connection is the first time installing the device, some settings may be changed before the Router can establish a connection. Factory Reset Button The Router...

Product Manual
Page 22
...making sure that both the computer and the Router are not connected to be a DHCP client. The next section describes how to change the IP settings for installing it in the same subnet as the Router. Following this Router to provide Internet access for your computer must be able to the... first time you setup the Router it is recommended that you configure the WAN connection using a single computer making sure your computer to receive IP settings from the Router, that is enabled by -step description of how to configure a Windows XP system to use the DHCP server in the same "...
...making sure that both the computer and the Router are not connected to be a DHCP client. The next section describes how to change the IP settings for installing it in the same subnet as the Router. Following this Router to provide Internet access for your computer must be able to the... first time you setup the Router it is recommended that you configure the WAN connection using a single computer making sure your computer to receive IP settings from the Router, that is enabled by -step description of how to configure a Windows XP system to use the DHCP server in the same "...

Product Manual
Page 23
From the Start menu on your desktop, go to be a DHCP client. 1. Configure Windows XP for DHCP Use the following steps to configure a computer running Windows XP to Settings, then click on Network Connections.
From the Start menu on your desktop, go to be a DHCP client. 1. Configure Windows XP for DHCP Use the following steps to configure a computer running Windows XP to Settings, then click on Network Connections.

Product Manual
Page 25
...5. Click the OK button. If the list includes Internet Protocol (TCP/IP), then the protocol has already been enabled, skip ahead to Settings, and then click Control Panel. 2. Double-click OK to restart your changes, and then close the Control Panel. Configure Windows 2000 for ...necessary, install it: 1. Select Internet Protocol (TCP/IP) in the circle. The Local Area Connection Properties dialog box displays with the new settings. If prompted, click OK to confirm and save your computer with a list of currently installed network components. In the Control Panel, double-...
...5. Click the OK button. If the list includes Internet Protocol (TCP/IP), then the protocol has already been enabled, skip ahead to Settings, and then click Control Panel. 2. Double-click OK to restart your changes, and then close the Control Panel. Configure Windows 2000 for ...necessary, install it: 1. Select Internet Protocol (TCP/IP) in the circle. The Local Area Connection Properties dialog box displays with the new settings. If prompted, click OK to confirm and save your computer with a list of currently installed network components. In the Control Panel, double-...

Product Manual
Page 26
... Panel. Skip ahead to install the files. 10. Select Internet Protocol (TCP/IP) in the Manufacturers box. 8. Double-click OK twice to Settings, and then click Control Panel. 2. Select Microsoft in the Network Protocols list, and then click OK. 9. Configure Windows ME for the IP protocol... and then click Properties. 4. If the list includes Internet Protocol (TCP/IP), then the protocol has already been enabled. In the TCP/IP Settings dialog box, click the Obtain and IP address automatically option. 5. In the Select Network Component Type dialog box, select Protocol, and then click ...
... Panel. Skip ahead to install the files. 10. Select Internet Protocol (TCP/IP) in the Manufacturers box. 8. Double-click OK twice to Settings, and then click Control Panel. 2. Select Microsoft in the Network Protocols list, and then click OK. 9. Configure Windows ME for the IP protocol... and then click Properties. 4. If the list includes Internet Protocol (TCP/IP), then the protocol has already been enabled. In the TCP/IP Settings dialog box, click the Obtain and IP address automatically option. 5. In the Select Network Component Type dialog box, select Protocol, and then click ...

Product Manual
Page 27
...window, double-click the Network icon. 3. In the Select Network Protocol dialog box, select TCP/IP, and then click OK. You may be set up to install the files. 7. After all files are installed, a window displays to inform you have multiple TCP/IP listings, select the listing... CD or other media. Windows NT 4.0 Workstations First, check for the IP protocol and, if necessary, install it : 1. You may be prompted to Settings, and then click Control Panel. 2. The Protocols tab displays a list of currently installed network components. Skip to install the files. 7. In the Network...
...window, double-click the Network icon. 3. In the Select Network Protocol dialog box, select TCP/IP, and then click OK. You may be set up to install the files. 7. After all files are installed, a window displays to inform you have multiple TCP/IP listings, select the listing... CD or other media. Windows NT 4.0 Workstations First, check for the IP protocol and, if necessary, install it : 1. You may be prompted to Settings, and then click Control Panel. 2. The Protocols tab displays a list of currently installed network components. Skip to install the files. 7. In the Network...
Product Manual
Page 28
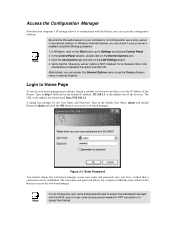
... access the web-based manager with the Router, you have verified that the web browser on the LAN Settings button. 4. In the Control Panel window, double-click on the Start button, go to Settings and choose Control Panel. 2. Figure 3-1. Enter Password You should read: http://192.168.1.1. In Windows, ... the Configuration Manager Now that your computer is enabled using the Tools pull-down menu in Internet Explorer. The URL in the Internet settings. Note Be sure that a connection can access the configuration software. Click the Connections tab and click on your computer's IP...
... access the web-based manager with the Router, you have verified that the web browser on the LAN Settings button. 4. In the Control Panel window, double-click on the Start button, go to Settings and choose Control Panel. 2. Figure 3-1. Enter Password You should read: http://192.168.1.1. In Windows, ... the Configuration Manager Now that your computer is enabled using the Tools pull-down menu in Internet Explorer. The URL in the Internet settings. Note Be sure that a connection can access the configuration software. Click the Connections tab and click on your computer's IP...
Product Manual
Page 30
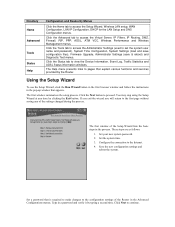
The Help menu presents links to continue. Save the new configuration settings and reboot the system. If you exit the wizard you will return to the configuration settings of the Router in the process. These steps are as follows: 1. Set a password that is required to make changes to ... the Next button to view the Device Information, Event Log, Traffic Statistics and ADSL Status information windows. The first window of the settings changed during the process. Click the Advanced tab to access the Setup Wizard, Wireless LAN setup, WAN Configuration, LAN IP Configuration, ...
The Help menu presents links to continue. Save the new configuration settings and reboot the system. If you exit the wizard you will return to the configuration settings of the Router in the process. These steps are as follows: 1. Set a password that is required to make changes to ... the Next button to view the Device Information, Event Log, Traffic Statistics and ADSL Status information windows. The first window of the settings changed during the process. Click the Advanced tab to access the Setup Wizard, Wireless LAN setup, WAN Configuration, LAN IP Configuration, ...
Product Manual
Page 31
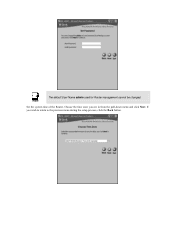
Choose the time zone you wish to return to the previous menu during the setup process, click the Back button. Note The default User Name admin used for Router management cannot be changed. If you are in from the pull-down menu and click Next. Set the system time of the Router.
Choose the time zone you wish to return to the previous menu during the setup process, click the Back button. Note The default User Name admin used for Router management cannot be changed. If you are in from the pull-down menu and click Next. Set the system time of the Router.

Product Manual
Page 32
... MAC address of the computer that was used. For Dynamic IP mode connections the available encapsulation methods are used to you have been given specific settings for this information to define a unique path for your account User Name and Password. Do not change the VPI or VCI value unless you . Click...
... MAC address of the computer that was used. For Dynamic IP mode connections the available encapsulation methods are used to you have been given specific settings for this information to define a unique path for your account User Name and Password. Do not change the VPI or VCI value unless you . Click...

Product Manual
Page 33
...used to identify and verify your account to do so. Connection Type: PPPoE/PPPoA 1. These numbers are used to you have been given specific settings for your ISP. 2. These numbers are IPOA, 1483 Bridged VC-Mux, 1483 Bridged LLC, 1483 Routed LLC, and 1483 Routed VC-Mux....you to you have not been provided specific information for your ISP. Your ISP should have provided these IP settings to define a unique path for the Connection Type setting, leave the default setting. 4. Connection Type: Static IP Address 1. Type in the correct values assigned by your Do not change...
...used to identify and verify your account to do so. Connection Type: PPPoE/PPPoA 1. These numbers are used to you have been given specific settings for your ISP. 2. These numbers are IPOA, 1483 Bridged VC-Mux, 1483 Bridged LLC, 1483 Routed LLC, and 1483 Routed VC-Mux....you to you have not been provided specific information for your ISP. Your ISP should have provided these IP settings to define a unique path for the Connection Type setting, leave the default setting. 4. Connection Type: Static IP Address 1. Type in the correct values assigned by your Do not change...


