Quick Install Guide
Page 4
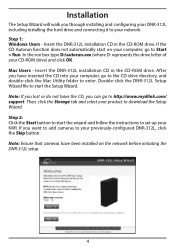
...your computer, go to the CD drive directory, and double-click the Mac Utility folder to enter. Insert the DNR-312L installation CD in the CD-ROM drive. Insert the DNR-312L installation CD in the CD-ROM drive. Note: If you lost or do not have been installed on your ... 2: Click the Start button to start the Setup Wizard. Installation The Setup Wizard will walk you through installing and configuring your DNR-312L including installing the hard drive and connecting it to your NVR. After you have inserted the CD into your computer, go to set up your network. Double-click the...
...your computer, go to the CD drive directory, and double-click the Mac Utility folder to enter. Insert the DNR-312L installation CD in the CD-ROM drive. Insert the DNR-312L installation CD in the CD-ROM drive. Note: If you lost or do not have been installed on your ... 2: Click the Start button to start the Setup Wizard. Installation The Setup Wizard will walk you through installing and configuring your DNR-312L including installing the hard drive and connecting it to your NVR. After you have inserted the CD into your computer, go to set up your network. Double-click the...
Quick Install Guide
Page 5
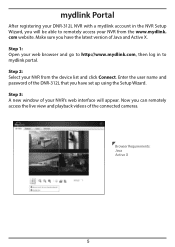
.... Step 3: A new window of your NVR from the www.mydlink. Now you have the latest version of the connected cameras. ENGLISH mydlink Portal After registering your DNR-312L NVR with a mydlink account in to mydlink portal. Step 1: Open your NVR from the device list and click Connect. ...Enter the user name and password of the DNR-312L that you can remotely access the live view and ...
.... Step 3: A new window of your NVR from the www.mydlink. Now you have the latest version of the connected cameras. ENGLISH mydlink Portal After registering your DNR-312L NVR with a mydlink account in to mydlink portal. Step 1: Open your NVR from the device list and click Connect. ...Enter the user name and password of the DNR-312L that you can remotely access the live view and ...
Quick Install Guide
Page 6
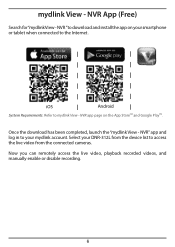
...Requirements: Refer to the Internet. NVR app page on your mydlink account. Now you can remotely access the live video from the device list to your smartphone or tablet when connected to mydlink View - mydlink View - NVR App (Free) Search for"mydlinkView - NVR "to download and install the... app on the App StoreSM and Google PlayTM. NVR" app and log in to access the live video, playback recorded videos, and manually enable or disable recording. 6 Once the download has been completed, launch the "mydlink View - Select your DNR-312L from the...
...Requirements: Refer to the Internet. NVR app page on your mydlink account. Now you can remotely access the live video from the device list to your smartphone or tablet when connected to mydlink View - mydlink View - NVR App (Free) Search for"mydlinkView - NVR "to download and install the... app on the App StoreSM and Google PlayTM. NVR" app and log in to access the live video, playback recorded videos, and manually enable or disable recording. 6 Once the download has been completed, launch the "mydlink View - Select your DNR-312L from the...

User Manual
Page 3
... Playback Control 70 Applications 71 Playback Manager 71 Remote Backup 72 Verification Tool 74 D-Link DNR-312L User Manual ii Windows 23 D-Link NVR Search Utility - Windows Users 10 Setup Wizard - Complete the Setup 21 Configuration 22 Accessing the Configuration Interface 22 D-Link NVR Search Utility - Table of Contents Table of Contents Preface i Manual Revisions i Trademarks i Product...
... Playback Control 70 Applications 71 Playback Manager 71 Remote Backup 72 Verification Tool 74 D-Link DNR-312L User Manual ii Windows 23 D-Link NVR Search Utility - Windows Users 10 Setup Wizard - Complete the Setup 21 Configuration 22 Accessing the Configuration Interface 22 D-Link NVR Search Utility - Table of Contents Table of Contents Preface i Manual Revisions i Trademarks i Product...
User Manual
Page 7
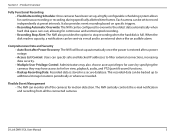
D-Link DNR-312L User Manual 3 Product Overview Introduction The DNR-312L is what makes it such a complete video recording solution. The NVR supports real-time monitoring and playback from network cameras located in local or remote sites to a high-speed 3.5-inch SATA hard disk. The DNR-312L can record ...video while you can support up for a PC*. Powered by mydlink technology, the DNR-312L can record video from anywhere via an Internet browser. The NVR's video management, video playback, and backup capability is...
D-Link DNR-312L User Manual 3 Product Overview Introduction The DNR-312L is what makes it such a complete video recording solution. The NVR supports real-time monitoring and playback from network cameras located in local or remote sites to a high-speed 3.5-inch SATA hard disk. The DNR-312L can record ...video while you can support up for a PC*. Powered by mydlink technology, the DNR-312L can record video from anywhere via an Internet browser. The NVR's video management, video playback, and backup capability is...
User Manual
Page 8
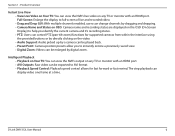
Complete Network Functionality • PPPoE Support: The NVR can be used as a DHCP server for users without requiring a dedicated PC. The recording is stored locally on a centralized web interface. • Megapixel Resolution Support: The DNR-312L supports high-resolution megapixel recording for expensive off-site hosted video storage. D-Link DNR-312L User Manual 4 With the DDNS service...
Complete Network Functionality • PPPoE Support: The NVR can be used as a DHCP server for users without requiring a dedicated PC. The recording is stored locally on a centralized web interface. • Megapixel Resolution Support: The DNR-312L supports high-resolution megapixel recording for expensive off-site hosted video storage. D-Link DNR-312L User Manual 4 With the DDNS service...
User Manual
Page 9
... allowing for motion detection. When the disk reaches capacity, a notification can be configured to additional storage locations periodically or whenever needed. D-Link DNR-312L User Manual 5 Section 1 - This recorded data can be set up automatically once the power is restored after a power outage. &#...stop recording when the hard disk is stored in a secure database. Comprehensive Data and Security • Auto Boot after Power Recovery: The NVR will boot up , a highly configurable scheduling system allows for live view, playback, audio, and PTZ (pan-tilt-zoom) functions. ...
... allowing for motion detection. When the disk reaches capacity, a notification can be configured to additional storage locations periodically or whenever needed. D-Link DNR-312L User Manual 5 Section 1 - This recorded data can be set up automatically once the power is restored after a power outage. &#...stop recording when the hard disk is stored in a secure database. Comprehensive Data and Security • Auto Boot after Power Recovery: The NVR will boot up , a highly configurable scheduling system allows for live view, playback, audio, and PTZ (pan-tilt-zoom) functions. ...
User Manual
Page 10
Product Overview Instant Live View • View Live Video on Your TV: You can view the NVR's live and recorded video. • Drag and Drop GUI: With multiple channels enabled, users can change channels by dragging and dropping. • Camera Name and ...: Audio picked up by a camera can view the NVR's output on any TV or monitor with an HDMI port. • AVI Outputs: Raw video can be exported to instantly restore a previously saved view. • Digital Zoom: Videos can display video one frame at a time. D-Link DNR-312L User Manual 6 Full-Screen: Enlarge the display...
Product Overview Instant Live View • View Live Video on Your TV: You can view the NVR's live and recorded video. • Drag and Drop GUI: With multiple channels enabled, users can change channels by dragging and dropping. • Camera Name and ...: Audio picked up by a camera can view the NVR's output on any TV or monitor with an HDMI port. • AVI Outputs: Raw video can be exported to instantly restore a previously saved view. • Digital Zoom: Videos can display video one frame at a time. D-Link DNR-312L User Manual 6 Full-Screen: Enlarge the display...
User Manual
Page 12
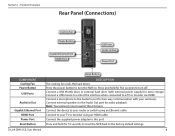
...Audio In/Out Power Port COMPONENT Cooling Fan Power Button USB Ports Audio In/Out Gigabit Ethernet Port HDMI Port Power Port Reset Button D-Link DNR-312L User Manual Reset Button DESCRIPTION The cooling fan cools the hard drives. Connect to the factory default settings. 8 Connect external speakers to ...the Audio Out port for two-way communication with external power supply) for 10 seconds to reset the NVR back to your router or switch using an HDMI cable. Press and hold for extra storage. Connect the supplied power adapter to a TV...
...Audio In/Out Power Port COMPONENT Cooling Fan Power Button USB Ports Audio In/Out Gigabit Ethernet Port HDMI Port Power Port Reset Button D-Link DNR-312L User Manual Reset Button DESCRIPTION The cooling fan cools the hard drives. Connect to the factory default settings. 8 Connect external speakers to ...the Audio Out port for two-way communication with external power supply) for 10 seconds to reset the NVR back to your router or switch using an HDMI cable. Press and hold for extra storage. Connect the supplied power adapter to a TV...
User Manual
Page 14
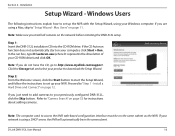
... your computer, click Start > Run. Note: The computer used to access the NVR web-based configuration interface must be in the same subnet. D-Link DNR-312L User Manual 10 Mac Users" on page 52 for instructions about adding cameras. Step 1: Insert the DNR-312L installation CD into the CD-ROM drive. Windows Users The following instructions...
... your computer, click Start > Run. Note: The computer used to access the NVR web-based configuration interface must be in the same subnet. D-Link DNR-312L User Manual 10 Mac Users" on page 52 for instructions about adding cameras. Step 1: Insert the DNR-312L installation CD into the CD-ROM drive. Windows Users The following instructions...
User Manual
Page 15
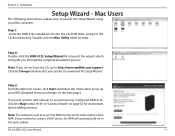
...drive directory. Click the Storage tab and select your product to launch the Setup Wizard using a DHCP server, the NVR will guide you through the complete installation process. D-Link DNR-312L User Manual 11 Mac Users The following instructions explain how to download the Setup Wizard. Note: The computer used to...Start and follow the instructions to set up your Mac computer. Installation Setup Wizard - Step 1: Insert the DNR-312L installation CD into the CD-ROM drive, and go to access the NVR must be on the next page.) If you do not have the CD, go to launch the wizard, ...
...drive directory. Click the Storage tab and select your product to launch the Setup Wizard using a DHCP server, the NVR will guide you through the complete installation process. D-Link DNR-312L User Manual 11 Mac Users The following instructions explain how to download the Setup Wizard. Note: The computer used to...Start and follow the instructions to set up your Mac computer. Installation Setup Wizard - Step 1: Insert the DNR-312L installation CD into the CD-ROM drive, and go to access the NVR must be on the next page.) If you do not have the CD, go to launch the wizard, ...

User Manual
Page 16
D-Link DNR-312L User Manual 12 Installation Step 1 - Click Next to continue. Install a Hard Drive and Connect The Setup Wizard's first screen shows you how to unscrew the two screws at the base. Slide the hard drive into the open the cover on your NVR, and then slide the cover back. Section 2 - Use a Phillips screwdriver to open hard drive bay of your DNR-312L, making sure the SATA connectors are aligned with the SATA socket at the bottom of your NVR so you can install a hard drive. Click Next to continue.
D-Link DNR-312L User Manual 12 Installation Step 1 - Click Next to continue. Install a Hard Drive and Connect The Setup Wizard's first screen shows you how to unscrew the two screws at the base. Slide the hard drive into the open the cover on your NVR, and then slide the cover back. Section 2 - Use a Phillips screwdriver to open hard drive bay of your DNR-312L, making sure the SATA connectors are aligned with the SATA socket at the bottom of your NVR so you can install a hard drive. Click Next to continue.

User Manual
Page 18
Section 2 - Installation Secure the cover by sliding it downwards and then using a Phillips screwdriver to continue. Click Next to tighten the screws at the base. D-Link DNR-312L User Manual 14 Connect one end of the included Ethernet cable to the Ethernet port on the back of the NVR and the other end of the Ethernet cable to continue. Click Next to your router.
Section 2 - Installation Secure the cover by sliding it downwards and then using a Phillips screwdriver to continue. Click Next to tighten the screws at the base. D-Link DNR-312L User Manual 14 Connect one end of the included Ethernet cable to the Ethernet port on the back of the NVR and the other end of the Ethernet cable to continue. Click Next to your router.

User Manual
Page 19
Make sure the Power LEDs are illuminated before clicking Next to power on the back of the NVR. Press the Power button to continue. Installation First, connect the power adapter to the power port on the NVR. D-Link DNR-312L User Manual 15 Section 2 -
Make sure the Power LEDs are illuminated before clicking Next to power on the back of the NVR. Press the Power button to continue. Installation First, connect the power adapter to the power port on the NVR. D-Link DNR-312L User Manual 15 Section 2 -

User Manual
Page 20
Section 2 - Note: If you must create a password, and then enter it again to confirm your password. If this NVR, the Admin ID is admin and the Password field is the first installation of your device from the list. D-Link DNR-312L User Manual 16 Installation Step 2 - Since a password is required, you need the MAC Address, refer to continue. Click Next to the label on the bottom of this is blank by default. Setup Your NVR and HDD Select your DNR-312L.
Section 2 - Note: If you must create a password, and then enter it again to confirm your password. If this NVR, the Admin ID is admin and the Password field is the first installation of your device from the list. D-Link DNR-312L User Manual 16 Installation Step 2 - Since a password is required, you need the MAC Address, refer to continue. Click Next to the label on the bottom of this is blank by default. Setup Your NVR and HDD Select your DNR-312L.

User Manual
Page 22
... or your Internet connection. If the DHCP server (i.e. Click Next to continue. Click Next to continue. If the NVR is unable to connect to the Internet automatically, you can select Static IP to obtain IP address information. D-Link DNR-312L User Manual 18 Section 2 - Installation The Setup Wizard will display it on this screen.
... or your Internet connection. If the DHCP server (i.e. Click Next to continue. Click Next to continue. If the NVR is unable to connect to the Internet automatically, you can select Static IP to obtain IP address information. D-Link DNR-312L User Manual 18 Section 2 - Installation The Setup Wizard will display it on this screen.
User Manual
Page 23
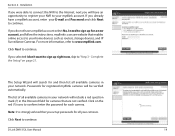
... The list of all available cameras in your cameras. Note: It is a secure website that enables online access to your NVR to continue. Click on page 21. D-Link DNR-312L User Manual 19 For more information, refer to continue. Click Next to www.mydlink.com. The Setup Wizard will have an... right now, skip to sign up passwords for a new account, and follow the instructions. Section 2 - Installation If you were able to connect the NVR to the Internet, next you selected I need to "Step 3 - If you set up for all available cameras in your mydlink account. mydlink is...
... The list of all available cameras in your cameras. Note: It is a secure website that enables online access to your NVR to continue. Click on page 21. D-Link DNR-312L User Manual 19 For more information, refer to continue. Click Next to www.mydlink.com. The Setup Wizard will have an... right now, skip to sign up passwords for a new account, and follow the instructions. Section 2 - Installation If you were able to connect the NVR to the Internet, next you selected I need to "Step 3 - If you set up for all available cameras in your mydlink account. mydlink is...

User Manual
Page 25
Make a note of your NVR settings. D-Link DNR-312L User Manual 21 Complete the Setup The final window of the Setup Wizard will display a summary of the details. Your DNR-312L is now ready to "Configuration" on page 22. For more configuration options, click Go to NVR and log in to the DNR-312L, and refer to use. Installation Step 3 - Or click Finish. Section 2 -
Make a note of your NVR settings. D-Link DNR-312L User Manual 21 Complete the Setup The final window of the Setup Wizard will display a summary of the details. Your DNR-312L is now ready to "Configuration" on page 22. For more configuration options, click Go to NVR and log in to the DNR-312L, and refer to use. Installation Step 3 - Or click Finish. Section 2 -

User Manual
Page 26
... Accessing the Configuration Interface There are several methods you can use to access the DNR-312L's configuration interface: • Open a web browser and enter the IP address of your DNR-312L. (Refer to "Configuration Interface" on page 23 or "D-Link NVR Search Utility - D-Link DNR-312L User Manual 22 Section 3 - Mac" on the CD that is on page 24...
... Accessing the Configuration Interface There are several methods you can use to access the DNR-312L's configuration interface: • Open a web browser and enter the IP address of your DNR-312L. (Refer to "Configuration Interface" on page 23 or "D-Link NVR Search Utility - D-Link DNR-312L User Manual 22 Section 3 - Mac" on the CD that is on page 24...

User Manual
Page 27
... sure the web browser is using a DHCP server and the computer receives IP settings from the DHCP server, the NVR will automatically be in , or are unable to connect to use DHCP for the NVR. D-Link DNR-312L User Manual 23 Insert the included CD into your LAN IP settings, or Disable to the... NVR IP address, use a proxy server. If you want to run this setup tool. Refresh: Click to the LAN Settings....
... sure the web browser is using a DHCP server and the computer receives IP settings from the DHCP server, the NVR will automatically be in , or are unable to connect to use DHCP for the NVR. D-Link DNR-312L User Manual 23 Insert the included CD into your LAN IP settings, or Disable to the... NVR IP address, use a proxy server. If you want to run this setup tool. Refresh: Click to the LAN Settings....