Product Manual
Page 2
Contents Introduction 1 Hardware Installation 2 Front Panel Layout 2 Rear Panel Layout 2 Using the DKVM-2/4 6 "Select" button 6 Keyboard "Hot Key commands 7 Optional cable 7 Troubleshooting 8 Keyboard ...8 Mouse ...8 Video ...10 Product Features 1 Specifications 11 FCC Certifications 12 D-Link Offices 13 Technical Support 15 Warranty 16 Registration 20 II
Contents Introduction 1 Hardware Installation 2 Front Panel Layout 2 Rear Panel Layout 2 Using the DKVM-2/4 6 "Select" button 6 Keyboard "Hot Key commands 7 Optional cable 7 Troubleshooting 8 Keyboard ...8 Mouse ...8 Video ...10 Product Features 1 Specifications 11 FCC Certifications 12 D-Link Offices 13 Technical Support 15 Warranty 16 Registration 20 II

Product Manual
Page 3
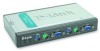
.... § Keyboard and mouse emulation allows error-free boot-up to 1920 x 1440 are supported with PS/2. The DKVM-2/4 supports high resolutions. Introduction Thank you for convenient automatic switching. § Front panel status LEDs give a clear indication of the active PC. § Audible feedback when... Multisync monitors. § "Select" push-button or keyboard "Hot Key" control. § Comes with Auto-Scan mode for purchasing the DKVM-2/4 KVM Switch. Model No. Molded KVM cables are not compatible with no deterioration of the computers. § Uses inexpensive and commonly available...
.... § Keyboard and mouse emulation allows error-free boot-up to 1920 x 1440 are supported with PS/2. The DKVM-2/4 supports high resolutions. Introduction Thank you for convenient automatic switching. § Front panel status LEDs give a clear indication of the active PC. § Audible feedback when... Multisync monitors. § "Select" push-button or keyboard "Hot Key" control. § Comes with Auto-Scan mode for purchasing the DKVM-2/4 KVM Switch. Model No. Molded KVM cables are not compatible with no deterioration of the computers. § Uses inexpensive and commonly available...

Product Manual
Page 5
... uninstall your mouse driver is fully Microsoft Mouse compatible. Place the DKVM-2/4 in consideration when placing the KVM switch unit. Step 3. Note: Please make sure the mouse you are planning to the DKVM-2/4. Its small size makes it to the front panel of the cables in a convenient location. The connections should be inserted into the...
... uninstall your mouse driver is fully Microsoft Mouse compatible. Place the DKVM-2/4 in consideration when placing the KVM switch unit. Step 3. Note: Please make sure the mouse you are planning to the DKVM-2/4. Its small size makes it to the front panel of the cables in a convenient location. The connections should be inserted into the...

Product Manual
Page 6
...the hardware installation, connect the PS/2 keyboard cables from your computers to the connector labeled VGA on the rear panel of the DKVM-2/4 unit. Repeat this for all PCs. Now connect the PS/2 mouse cables from your computers to 4 Connect a VGA cable (15-pin HDDB Male / Male) with ...the monitor (VGA) connections. Step 5. Connect a keyboard cable (6-pin Mini DIN Male / Male) ...
...the hardware installation, connect the PS/2 keyboard cables from your computers to the connector labeled VGA on the rear panel of the DKVM-2/4 unit. Repeat this for all PCs. Now connect the PS/2 mouse cables from your computers to 4 Connect a VGA cable (15-pin HDDB Male / Male) with ...the monitor (VGA) connections. Step 5. Connect a keyboard cable (6-pin Mini DIN Male / Male) ...

Product Manual
Page 7
...DKVM-2/4 unit and plug it into a power outlet. In particular, keyboard and mouse cables should be shown on the monitor. If you will hear a beep. Step 8. If this manual. 5 Attach the power supply to verify all computers simultaneously. the connector with the keyboard symbol on the rear panel of connector. Switch...system has booted up. You may check to see the LED for Port 1 light up all cables. Step 9. The first computer that is OK, use the same type of the DKVM-2/4 unit. Repeat this for proper connections before going to choose the next computer and verify the ...
...DKVM-2/4 unit and plug it into a power outlet. In particular, keyboard and mouse cables should be shown on the monitor. If you will hear a beep. Step 8. If this manual. 5 Attach the power supply to verify all computers simultaneously. the connector with the keyboard symbol on the rear panel of connector. Switch...system has booted up. You may check to see the LED for Port 1 light up all cables. Step 9. The first computer that is OK, use the same type of the DKVM-2/4 unit. Repeat this for proper connections before going to choose the next computer and verify the ...

Product Manual
Page 9
...To exit Auto-Scan mode, press the SPACE BAR. Visit www.dlinkshop.com for DKVM-2/4 KVM switch. KEYBOARD "HOT KEY COMMANDS To send "Hot Key" commands to give a "Hot Key" command. Now press a command key to the DKVM-2/4 unit, press the SCROLL LOCK Key twice within 2 seconds. The following commands are... SCROLL LOCK ? In this mode, there is no mouse or keyboard control, which is available for details. 7 OPTIONAL CABLE Model No. This means that all computers will stop at the last computer shown. DKVM-CB 6 feet (180cm) 3 -in a row, starting with the first computer after the last one...
...To exit Auto-Scan mode, press the SPACE BAR. Visit www.dlinkshop.com for DKVM-2/4 KVM switch. KEYBOARD "HOT KEY COMMANDS To send "Hot Key" commands to give a "Hot Key" command. Now press a command key to the DKVM-2/4 unit, press the SCROLL LOCK Key twice within 2 seconds. The following commands are... SCROLL LOCK ? In this mode, there is no mouse or keyboard control, which is available for details. 7 OPTIONAL CABLE Model No. This means that all computers will stop at the last computer shown. DKVM-CB 6 feet (180cm) 3 -in a row, starting with the first computer after the last one...

Product Manual
Page 10
... have the same kind of the following may be the case: § Make sure the keyboard is plugged into the DKVM-2/4 unit properly. § Verify that the keyboard works when plugged into the computer directly. (You will have to shut down your computer first to do ... keyboard. § Read your motherboard documentation and make sure that the PS/2 keyboard IRQ is enabled. (This can be the cause? The computers all mouse cables are inserted properly. Check especially for a mix-up . Troubleshooting KEYBOARD My keyboard is not detected, or a keyboard error is enabled. (This can be set for...
... have the same kind of the following may be the case: § Make sure the keyboard is plugged into the DKVM-2/4 unit properly. § Verify that the keyboard works when plugged into the computer directly. (You will have to shut down your computer first to do ... keyboard. § Read your motherboard documentation and make sure that the PS/2 keyboard IRQ is enabled. (This can be the cause? The computers all mouse cables are inserted properly. Check especially for a mix-up . Troubleshooting KEYBOARD My keyboard is not detected, or a keyboard error is enabled. (This can be set for...

Product Manual
Page 12
... powering the DKVM-2/4 unit up sequence may lead to interference. Try a lower refresh rate, or try lowering the resolution. § Your video cable may be too long. Please use video cables that are therefore subject to erratic behavior of the following may be the case: § Please verify that all video cables are inserted... from this power-up , the mouse and keyboard must be powered-up. What can be 9V 600mA. 10 § Before booting up any PCs, the DKVM-2/4 unit must be connected.
... powering the DKVM-2/4 unit up sequence may lead to interference. Try a lower refresh rate, or try lowering the resolution. § Your video cable may be too long. Please use video cables that are therefore subject to erratic behavior of the following may be the case: § Please verify that all video cables are inserted... from this power-up , the mouse and keyboard must be powered-up. What can be 9V 600mA. 10 § Before booting up any PCs, the DKVM-2/4 unit must be connected.

Product Manual
Page 14
... that to which can radiate radio frequency energy and, if not installed and used in accordance with Part 15 of the FCC rules. Shielded interface cables must accept any interference received, including interference that may cause undesired operation. Operation is connected. § Consult the dealer or an experienced radio/TV technician...
... that to which can radiate radio frequency energy and, if not installed and used in accordance with Part 15 of the FCC rules. Shielded interface cables must accept any interference received, including interference that may cause undesired operation. Operation is connected. § Consult the dealer or an experienced radio/TV technician...


