
Product Manual
Page 3
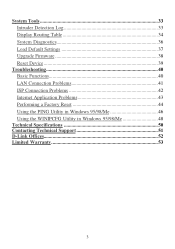
System Tools 33 Intruder Detection Log 33 Display Routing Table 34 System Diagnostics 36 Load Default Settings 37 Upgrade Firmware 38 Reset Device 39 Troubleshooting 40 Basic Functions 40 LAN Connection Problems 41 ISP Connection Problems 42 Internet Application Problems 43 Performing a Factory Reset 44 Using the PING Utility in Windows 95/98/Me 46 Using the WINIPCFG Utility in Windows 95/98/Me 48 Technical Specifications 50 Contacting Technical Support 51 D-Link Offices 52 Limited Warranty 53 3
System Tools 33 Intruder Detection Log 33 Display Routing Table 34 System Diagnostics 36 Load Default Settings 37 Upgrade Firmware 38 Reset Device 39 Troubleshooting 40 Basic Functions 40 LAN Connection Problems 41 ISP Connection Problems 42 Internet Application Problems 43 Performing a Factory Reset 44 Using the PING Utility in Windows 95/98/Me 46 Using the WINIPCFG Utility in Windows 95/98/Me 48 Technical Specifications 50 Contacting Technical Support 51 D-Link Offices 52 Limited Warranty 53 3
Product Manual
Page 12
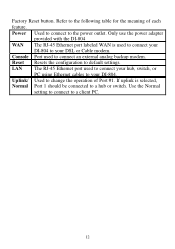
Only use the power adapter provided with the DI-804 WAN The RJ-45 Ethernet port labeled WAN is selected, Normal Port 1 should be connected to a hub or switch. LAN The RJ-45 Ethernet port ... or Cable modem. Console Port used to connect your DI-804 to the following table for the meaning of Port #1. Use the Normal setting to connect to connect an external analog backup modem. Factory Reset button. Reset Resets the configuration to the power outlet. Refer to your DI-804. If uplink is used to a client PC. 12...
Only use the power adapter provided with the DI-804 WAN The RJ-45 Ethernet port labeled WAN is selected, Normal Port 1 should be connected to a hub or switch. LAN The RJ-45 Ethernet port ... or Cable modem. Console Port used to connect your DI-804 to the following table for the meaning of Port #1. Use the Normal setting to connect to connect an external analog backup modem. Factory Reset button. Reset Resets the configuration to the power outlet. Refer to your DI-804. If uplink is used to a client PC. 12...

Product Manual
Page 32
... required the next time and subsequent times you lose or forget your Internet gateway. NOTE!It is small reset button located on the back of the device. If for 3 seconds will not only reset the password but also the device itself--and all previous configurations will be inputted again. 32 To enter...
... required the next time and subsequent times you lose or forget your Internet gateway. NOTE!It is small reset button located on the back of the device. If for 3 seconds will not only reset the password but also the device itself--and all previous configurations will be inputted again. 32 To enter...

Product Manual
Page 33
... : Change remote configuration settings. Intruder Detection Log The Intruder Detection Log displays all information related to intrusion attempts on your DI-804 and view information related to unit functions. Index: (1,2,3 etc.) Refers to factory default. The following functions are blocked and... described in this chapter. Intruder Detection Log: View detection logs. Load Default Settings : Restore settings to the row number. Reset Device: Reboot the DI-804. Time : The time that packet. Display Routing Table : View routing table list. System Tools The System Tools section enables...
... : Change remote configuration settings. Intruder Detection Log The Intruder Detection Log displays all information related to intrusion attempts on your DI-804 and view information related to unit functions. Index: (1,2,3 etc.) Refers to factory default. The following functions are blocked and... described in this chapter. Intruder Detection Log: View detection logs. Load Default Settings : Restore settings to the row number. Reset Device: Reboot the DI-804. Time : The time that packet. Display Routing Table : View routing table list. System Tools The System Tools section enables...
Product Manual
Page 39
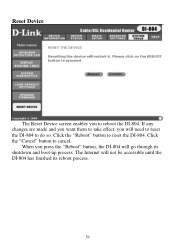
If any changes are made and you want them to take effect, you will not be accessible until the DI-804 has finished its shutdown and boot-up process. Click the "Cancel" button to reset the DI-804. The Internet will need to reset the DI-804 to reboot the DI-804. Click the "Reboot" button to cancel. When you to do so. Reset Device The Reset Device screen enables you press the "Reboot" button, the DI-804 will go through its reboot process. 39
If any changes are made and you want them to take effect, you will not be accessible until the DI-804 has finished its shutdown and boot-up process. Click the "Cancel" button to reset the DI-804. The Internet will need to reset the DI-804 to reboot the DI-804. Click the "Reboot" button to cancel. When you to do so. Reset Device The Reset Device screen enables you press the "Reboot" button, the DI-804 will go through its reboot process. 39
Product Manual
Page 42
...15 or another unique IP Address that corresponds to the 192.168.0.X subnet. § Use the Reset button located on . § Use the WINIPCFG utility described in the appendix to make sure that the Link light is on the front of the computers are not set correctly. § Network cables are ...not connected properly. § Windows network settings are not set correctly and you are using DHCP through the Broadband Router, make sure that the Link LED is on my LAN. Cause: § The IP Addresses of your Broadband Router to revert to the default settings. Resolution: § Make sure...
...15 or another unique IP Address that corresponds to the 192.168.0.X subnet. § Use the Reset button located on . § Use the WINIPCFG utility described in the appendix to make sure that the Link light is on the front of the computers are not set correctly. § Network cables are ...not connected properly. § Windows network settings are not set correctly and you are using DHCP through the Broadband Router, make sure that the Link LED is on my LAN. Cause: § The IP Addresses of your Broadband Router to revert to the default settings. Resolution: § Make sure...

Product Manual
Page 44
... configure your Internet Service Provider (ISP) to ensure proper firewall protection. The Domain Suffix address should appear similar to perform a Factory Reset using the DMZ host feature while connecting to game servers and then disabling DMZ while playing the game. § Turn the Broadband ... these steps to this: dlink.occa.home.com. Try using the Reset button on your game. § Some games just won't operate correctly behind a firewall. In this is the Internet Protocol (TCP/IP) address of the DI-804. 1. When this case, use the DMZ host feature while using . again...
... configure your Internet Service Provider (ISP) to ensure proper firewall protection. The Domain Suffix address should appear similar to perform a Factory Reset using the DMZ host feature while connecting to game servers and then disabling DMZ while playing the game. § Turn the Broadband ... these steps to this: dlink.occa.home.com. Try using the Reset button on your game. § Some games just won't operate correctly behind a firewall. In this is the Internet Protocol (TCP/IP) address of the DI-804. 1. When this case, use the DMZ host feature while using . again...

Product Manual
Page 45
Click on the System Tools link at the bottom of the screen. 3. Click OK to restore settings to the DI-804 web configuration interface. 2. A Factory Reset can also be asked if you want to restore to perform a factory reset using the web configuration interface. 1. Log-in to default configuration or click Cancel. 45 Click on Load Default Settings. 4. Follow these steps to default settings. You will be performed through the web configuration interface.
Click on the System Tools link at the bottom of the screen. 3. Click OK to restore settings to the DI-804 web configuration interface. 2. A Factory Reset can also be asked if you want to restore to perform a factory reset using the web configuration interface. 1. Log-in to default configuration or click Cancel. 45 Click on Load Default Settings. 4. Follow these steps to default settings. You will be performed through the web configuration interface.


