
Product Manual
Page 10
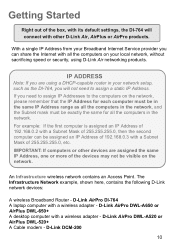
... speed or security, using a DHCP-capable router in your Broadband Internet Service provider you need to assign a static IP Address. D-Link AirPro DI-764 A laptop computer with a wireless adapter - With a single IP Address from your network setup, such as all the computers in the network. The Infrastructure Network example, shown here, contains the following...
... speed or security, using a DHCP-capable router in your Broadband Internet Service provider you need to assign a static IP Address. D-Link AirPro DI-764 A laptop computer with a wireless adapter - With a single IP Address from your network setup, such as all the computers in the network. The Infrastructure Network example, shown here, contains the following...
Product Manual
Page 11
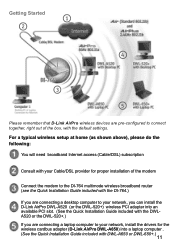
For a typical wireless setup at home (as shown above), please do the following: You will need broadband Internet access (Cable/DSL) subscription Consult with your network, install the drivers for the wireless cardbus adapter (D-Link AirPro DWL-A650) into an available PCI slot. (See the Quick ..., right out of the modem Connect the modem to the DI-764 multimode wireless broadband router (see the Quick Installation Guide included with the DI-764.) If you are connecting a desktop computer to your network, you can install the D-Link AirPro DWL-A520 (or the DWL-520+) wireless PCI adapter...
For a typical wireless setup at home (as shown above), please do the following: You will need broadband Internet access (Cable/DSL) subscription Consult with your network, install the drivers for the wireless cardbus adapter (D-Link AirPro DWL-A650) into an available PCI slot. (See the Quick ..., right out of the modem Connect the modem to the DI-764 multimode wireless broadband router (see the Quick Installation Guide included with the DI-764.) If you are connecting a desktop computer to your network, you can install the D-Link AirPro DWL-A520 (or the DWL-520+) wireless PCI adapter...
Product Manual
Page 12
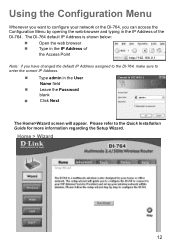
... to the Quick Installation Guide for more information regarding the Setup Wizard. Home > Wizard 12 Leave the Password blank ! Using the Configuration Menu Whenever you want to configure your network or the DI-764, you have changed the default IP Address assigned to the DI-764, make sure to enter the correct IP Address. ! Please...
... to the Quick Installation Guide for more information regarding the Setup Wizard. Home > Wizard 12 Leave the Password blank ! Using the Configuration Menu Whenever you want to configure your network or the DI-764, you have changed the default IP Address assigned to the DI-764, make sure to enter the correct IP Address. ! Please...
Product Manual
Page 24
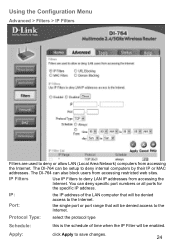
...Apply: click Apply to deny internal computers by their IP or MAC addresses. You can also block users from accessing restricted web sites. The DI-764 can be denied access to the Internet. the single port or port range that will be enabled. Protocol Type: select the protocol type ...Schedule: this is the schedule of the LAN computer that will be setup to save changes. 24 Using the Configuration Menu Advanced > Filters > IP Filters Filters are used to deny LAN IP addresses from accessing the...
...Apply: click Apply to deny internal computers by their IP or MAC addresses. You can also block users from accessing restricted web sites. The DI-764 can be denied access to the Internet. the single port or port range that will be enabled. Protocol Type: select the protocol type ...Schedule: this is the schedule of the LAN computer that will be setup to save changes. 24 Using the Configuration Menu Advanced > Filters > IP Filters Filters are used to deny LAN IP addresses from accessing the...

Product Manual
Page 41
Networking Basics Using the Network Setup Wizard in Windows XP In this screen appears, Click Next. 41 Go to Start>Control Panel>Network Connections Select Set up a home or small office network When this section you will learn how to websites such as http://www.homenethelp.com and http://www.microsoft.com/windows2000 for information about networking computers using Microsoft Windows XP. Note: Please refer to establish a network at home or work, using Windows 2000, ME or 98.
Networking Basics Using the Network Setup Wizard in Windows XP In this screen appears, Click Next. 41 Go to Start>Control Panel>Network Connections Select Set up a home or small office network When this section you will learn how to websites such as http://www.homenethelp.com and http://www.microsoft.com/windows2000 for information about networking computers using Microsoft Windows XP. Note: Please refer to establish a network at home or work, using Windows 2000, ME or 98.

Product Manual
Page 44
When the changes are complete, click Next. Please wait while the Network Setup Wizard configures the computer. This may take a few minutes. 44 Networking Basics Please wait while the Network Setup Wizard applies the changes.
When the changes are complete, click Next. Please wait while the Network Setup Wizard configures the computer. This may take a few minutes. 44 Networking Basics Please wait while the Network Setup Wizard applies the changes.

Product Manual
Page 45
Click Next. Networking Basics In the window below, select the option that fits your network. Insert a disk into the Floppy Disk Drive, in this example, Create a Network Setup Disk has been selected. You will run this disk on each of the computers on your needs. In this case drive A. 45
Click Next. Networking Basics In the window below, select the option that fits your network. Insert a disk into the Floppy Disk Drive, in this example, Create a Network Setup Disk has been selected. You will run this disk on each of the computers on your needs. In this case drive A. 45

Product Manual
Page 46
After you complete the Network Setup Wizard you will use the Network Setup Disk to run the Network Setup Wizard once on each of the computers on your network. Networking Basics Please read the information under Here's how in the screen below. To continue click Next. 46
After you complete the Network Setup Wizard you will use the Network Setup Disk to run the Network Setup Wizard once on each of the computers on your network. Networking Basics Please read the information under Here's how in the screen below. To continue click Next. 46

Product Manual
Page 47
You have completed configuring this screen, then click Finish to complete the Network Setup Wizard. Next, you will take effect when you restart the computer. The new settings will need to run the Network Setup Disk on all your computers, your network. Click Yes to use. 47 After running the Network Setup Disk on all the other computers on your new wireless network will be ready to restart the computer. Networking Basics Please read the information on this computer.
You have completed configuring this screen, then click Finish to complete the Network Setup Wizard. Next, you will take effect when you restart the computer. The new settings will need to run the Network Setup Disk on all your computers, your network. Click Yes to use. 47 After running the Network Setup Disk on all the other computers on your new wireless network will be ready to restart the computer. Networking Basics Please read the information on this computer.

Product Manual
Page 56
... Wizard: 1. Sharing an network printer 3. On the following pages, we have not covered here, in home or small office networking, see the Network Setup Wizard section at the beginning of the computers on your network. Networking Basics Adding and Sharing Printers in Windows XP After you have run the... Network Setup Wizard on all the computers in your network (please see Using the Shared Documents folder and Sharing files and folders in the Help and...
... Wizard: 1. Sharing an network printer 3. On the following pages, we have not covered here, in home or small office networking, see the Network Setup Wizard section at the beginning of the computers on your network. Networking Basics Adding and Sharing Printers in Windows XP After you have run the... Network Setup Wizard on all the computers in your network (please see Using the Shared Documents folder and Sharing files and folders in the Help and...

Product Manual
Page 61
Go to Start> Printers and Faxes 61 Sharing a network printer After you can run the Network Setup Wizard on all the computers on your network. You have run the Add Printer Wizard on all the computers on your network, you have successfully added a local printer. Go to Start> Printers and Faxes A successful installation will display the printer icon as shown at right. Networking Basics Adding a local printer ! Please follow these directions to use the Add Printer Wizard to share a printer on your network: !
Go to Start> Printers and Faxes 61 Sharing a network printer After you can run the Network Setup Wizard on all the computers on your network. You have run the Add Printer Wizard on all the computers on your network, you have successfully added a local printer. Go to Start> Printers and Faxes A successful installation will display the printer icon as shown at right. Networking Basics Adding a local printer ! Please follow these directions to use the Add Printer Wizard to share a printer on your network: !

Product Manual
Page 64
Networking Basics Sharing a network printer ! To share this printer on your network ! Make sure you have completed adding the printer. Go to Start > Printers and Faxes The printer icon will appear at right, indicating proper installation. Remember the printer name ! To check for proper installation: ! You have already run the Network Setup Wizard on all the computers in the network, you can share the printer. 64 Run the Add Printer Wizard on all the computers on all the network computers After you run the Add Printer Wizard on your network: !
Networking Basics Sharing a network printer ! To share this printer on your network ! Make sure you have completed adding the printer. Go to Start > Printers and Faxes The printer icon will appear at right, indicating proper installation. Remember the printer name ! To check for proper installation: ! You have already run the Network Setup Wizard on all the computers in the network, you can share the printer. 64 Run the Add Printer Wizard on all the computers on all the network computers After you run the Add Printer Wizard on your network: !

Product Manual
Page 65
To share an LPR printer, please follow these directions: ! Click Next 65 Click on your network. Select Local Printer... ! Click Next ! Networking Basics Sharing an LPR printer To share an LPR printer (using a print server,) you have run the Network Setup Wizard on all the computers on Add a Printer The screen to Start > Printers and Faxes ! Please make sure that you will appear ! Go to the right will need a Print Server such as the DP-101P+.
To share an LPR printer, please follow these directions: ! Click Next 65 Click on your network. Select Local Printer... ! Click Next ! Networking Basics Sharing an LPR printer To share an LPR printer (using a print server,) you have run the Network Setup Wizard on all the computers on Add a Printer The screen to Start > Printers and Faxes ! Please make sure that you will appear ! Go to the right will need a Print Server such as the DP-101P+.

Product Manual
Page 69
... your network in order to share the printer. It is optional. ! Select Yes, to complete the addition of your printer if you run the Network Setup Wizard on all the computers on your printer. ! Note: You must run the Add Printer Wizard. 69 Networking Basics Sharing an LPR printer ! Click Finish...
... your network in order to share the printer. It is optional. ! Select Yes, to complete the addition of your printer if you run the Network Setup Wizard on all the computers on your printer. ! Note: You must run the Add Printer Wizard. 69 Networking Basics Sharing an LPR printer ! Click Finish...
Product Manual
Page 70
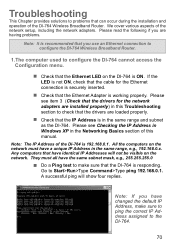
We cover various aspects of the DI-764 is 192.168.0.1. Check that the DI-764 is responding. Note: The IP Address of the network setup, including the network adapters. Go to Start>Run>Type Command>Type ping 192.168.0.1. Please read the following if you are having problems. Note...: It is recommended that you have a unique IP Address in the Networking Basics section of the DI-764 Wireless Broadband Router. Any...
We cover various aspects of the DI-764 is 192.168.0.1. Check that the DI-764 is responding. Note: The IP Address of the network setup, including the network adapters. Go to Start>Run>Type Command>Type ping 192.168.0.1. Please read the following if you are having problems. Note...: It is recommended that you have a unique IP Address in the Networking Basics section of the DI-764 Wireless Broadband Router. Any...


