
Product Manual
Page 7
... ...4 Management Methods ...4 Local Console Management 4 Telnet Management...4 D-View/ SNMP Management 4 Updating Firmware ...5 2...6 Installing the DES-3224 ...6 Unpacking the DES-3224 6 Installation Options ...6 Power On ...7 3...8 Connecting the DES-3224 to the Network 8 Cable Specifications ...8 Ports...10 MDI-II Port ...10 MDI-X Port...10 RS-232 Port...10 DES-3224 to DES-3224 Connection 11 Connecting the DES-3224 to the DES-5024 and Hubs 11...
... ...4 Management Methods ...4 Local Console Management 4 Telnet Management...4 D-View/ SNMP Management 4 Updating Firmware ...5 2...6 Installing the DES-3224 ...6 Unpacking the DES-3224 6 Installation Options ...6 Power On ...7 3...8 Connecting the DES-3224 to the Network 8 Cable Specifications ...8 Ports...10 MDI-II Port ...10 MDI-X Port...10 RS-232 Port...10 DES-3224 to DES-3224 Connection 11 Connecting the DES-3224 to the DES-5024 and Hubs 11...

Product Manual
Page 8
LEDs...12 DES-3224 LED Panel...13 Speed/ Link/ Activity LED 13 5...15 Managing the DES-3224 ...15 Local Console Management 15 Telnet ...16 Log In ...17 Help Message...18 Panel Conventions...19 Console Program...20 System Configuration 20 User Account Management 20 Switch Port 1-8, 9-16, 17-24 Configuration 20 Spanning Tree ...User Account Management 33 User Account Change Menu 33 Create New User ...33 Delete Users ...35 Change Password ...37 Switch Port Configuration 38 Switch Port Configuration Menu 38 Spanning Tree Configuration 40 STA Operation Levels 40 Table of Contents vi
LEDs...12 DES-3224 LED Panel...13 Speed/ Link/ Activity LED 13 5...15 Managing the DES-3224 ...15 Local Console Management 15 Telnet ...16 Log In ...17 Help Message...18 Panel Conventions...19 Console Program...20 System Configuration 20 User Account Management 20 Switch Port 1-8, 9-16, 17-24 Configuration 20 Spanning Tree ...User Account Management 33 User Account Change Menu 33 Create New User ...33 Delete Users ...35 Change Password ...37 Switch Port Configuration 38 Switch Port Configuration Menu 38 Spanning Tree Configuration 40 STA Operation Levels 40 Table of Contents vi

Product Manual
Page 12
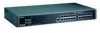
...eight broadcast domains. • Port Trunking support for bandwidth aggregation between two DES-3224 switches. Each section briefly describes the features of the DES-3224 • Management Methods • Updating Firmware Features The DES-3224 has the following sections. Most of the, displayed in Figure 1, has LEDs...Mbps. • The DES-3224 can be configured and customized to your network. • The DES-3224 can be explained in greater detail later in three ways: Local Console Management, Telnet and SNMP. • Supports Cut-through and Store-and-Forward switching. • Supports ...
...eight broadcast domains. • Port Trunking support for bandwidth aggregation between two DES-3224 switches. Each section briefly describes the features of the DES-3224 • Management Methods • Updating Firmware Features The DES-3224 has the following sections. Most of the, displayed in Figure 1, has LEDs...Mbps. • The DES-3224 can be configured and customized to your network. • The DES-3224 can be explained in greater detail later in three ways: Local Console Management, Telnet and SNMP. • Supports Cut-through and Store-and-Forward switching. • Supports ...
Product Manual
Page 14
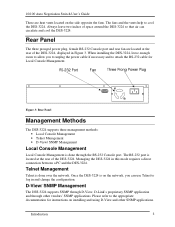
... D-View/ SNMP Management The DES-3224 supports SNMP through D-View, D-Link's proprietary SNMP application and through the RS-232 Console port. When installing the DES-3224, leave enough room to allow you can circulate and cool the DES-3224. Managing the DES-3224 in Figure 3. Once the DES-3224 is done through other SNMP ... to attach the RS-232 cable for Local Console Management. 10/100 Auto Negotiation Switch User's Guide There are located at the rear of the DES-3224. Rear Panel The three pronged power plug, female RS-232 Console port and rear fan are heat vents located...
... D-View/ SNMP Management The DES-3224 supports SNMP through D-View, D-Link's proprietary SNMP application and through the RS-232 Console port. When installing the DES-3224, leave enough room to allow you can circulate and cool the DES-3224. Managing the DES-3224 in Figure 3. Once the DES-3224 is done through other SNMP ... to attach the RS-232 cable for Local Console Management. 10/100 Auto Negotiation Switch User's Guide There are located at the rear of the DES-3224. Rear Panel The three pronged power plug, female RS-232 Console port and rear fan are heat vents located...
Product Manual
Page 25
... if you are logged into the DES-3224 and are available on the DES-3224: • Local Console Management (out-of-band) • Telnet Management (in-band) • D-View/ SNMP Management The DES-3224 can change all the settings and configure the DES-3224, set the IP address and perform...to manage the DES-3224. 10/100 Auto Negotiation Switch User's Guide 5 Managing the DES-3224 This chapter shows the menus used to the RS232 port located at the appropriate panel for carrying them out. Local Console Management Local Console Management is used to log into the DES-3224 for the ...
... if you are logged into the DES-3224 and are available on the DES-3224: • Local Console Management (out-of-band) • Telnet Management (in-band) • D-View/ SNMP Management The DES-3224 can change all the settings and configure the DES-3224, set the IP address and perform...to manage the DES-3224. 10/100 Auto Negotiation Switch User's Guide 5 Managing the DES-3224 This chapter shows the menus used to the RS232 port located at the appropriate panel for carrying them out. Local Console Management Local Console Management is used to log into the DES-3224 for the ...

Product Manual
Page 26
...Console Management to the DES-3224. Telnet management can manage the DES-3224 via Telnet session. Run Telnet. 3. Log in using the default User Name and Password. The User Name and Password are case sensitive. • User Name: D-Link • Default Password: D-Link 5. However, first you must assign a unique IP address to log into the DES-3224... Follow these steps to the DES-3224. 2. Managing the DES-3224 16 Assign an IP address to manage the DES-3224 through the MDI-II Uplink port of the DES-3224 or any of your choice. 10/100 Auto Negotiation Switch User's Guide • Parity...
...Console Management to the DES-3224. Telnet management can manage the DES-3224 via Telnet session. Run Telnet. 3. Log in using the default User Name and Password. The User Name and Password are case sensitive. • User Name: D-Link • Default Password: D-Link 5. However, first you must assign a unique IP address to log into the DES-3224... Follow these steps to the DES-3224. 2. Managing the DES-3224 16 Assign an IP address to manage the DES-3224 through the MDI-II Uplink port of the DES-3224 or any of your choice. 10/100 Auto Negotiation Switch User's Guide • Parity...

Product Manual
Page 30
... 1-8 Configuration, Switch Port 9-16 and Switch Port 17-24, allow you to configure individual ports. Spanning Tree Configuration The Spanning Tree Configuration menu allows you add users, delete users and modify user account information. 10/100 Auto Negotiation Switch User's Guide Console Program The Console Program, shown in Figure 8, is the main menu of the DES-3224.
... 1-8 Configuration, Switch Port 9-16 and Switch Port 17-24, allow you to configure individual ports. Spanning Tree Configuration The Spanning Tree Configuration menu allows you add users, delete users and modify user account information. 10/100 Auto Negotiation Switch User's Guide Console Program The Console Program, shown in Figure 8, is the main menu of the DES-3224.
Product Manual
Page 32
... Reset The System Reset menu allows you to reload factory default configurations. This feature is used to reset the DES-3224 through Local Console Management. Press Enter. Managing the DES-3224 22 10/100 Auto Negotiation Switch User's Guide System Information The System Information menu displays the Hardware revision, MAC address, LAN IP address and other...
... Reset The System Reset menu allows you to reload factory default configurations. This feature is used to reset the DES-3224 through Local Console Management. Press Enter. Managing the DES-3224 22 10/100 Auto Negotiation Switch User's Guide System Information The System Information menu displays the Hardware revision, MAC address, LAN IP address and other...

Product Manual
Page 48
...to configure and then go to save your changes. Managing the DES-3224 38 The only difference between the three panels is the port ...Press Enter to go to use a disabled port. Figure 23: Switch Port Configuration menu State All ports have two states: enabled or disabled...receive data packets. Select the group of individual ports. Switch Port Configuration Menu The Switch Port Configuration menu, displayed in Figure 23, enables you.... Select Save and press Enter to the appropriate panel. Switch Port Configuration The Switch Port Configuration panels are the same for each. The options...
...to configure and then go to save your changes. Managing the DES-3224 38 The only difference between the three panels is the port ...Press Enter to go to use a disabled port. Figure 23: Switch Port Configuration menu State All ports have two states: enabled or disabled...receive data packets. Select the group of individual ports. Switch Port Configuration Menu The Switch Port Configuration menu, displayed in Figure 23, enables you.... Select Save and press Enter to the appropriate panel. Switch Port Configuration The Switch Port Configuration panels are the same for each. The options...

Product Manual
Page 68
...manually set to help you can see the results displayed on process. If you are having any problems connecting to the DES-3224 through Local Console Management during the powering on your monitor. If you are pinned out correctly. Ethernet is intended to a particular speed and... you solve the most common source of the hardware components on the DES-3224 are explained in detail in auto negotiation mode auto negotiate the proper speed and duplex mode. 10/100 Auto Negotiation Switch User's Guide 6 Troubleshooting This troubleshooting section is more fault tolerant than...
...manually set to help you can see the results displayed on process. If you are having any problems connecting to the DES-3224 through Local Console Management during the powering on your monitor. If you are pinned out correctly. Ethernet is intended to a particular speed and... you solve the most common source of the hardware components on the DES-3224 are explained in detail in auto negotiation mode auto negotiate the proper speed and duplex mode. 10/100 Auto Negotiation Switch User's Guide 6 Troubleshooting This troubleshooting section is more fault tolerant than...
Product Manual
Page 69
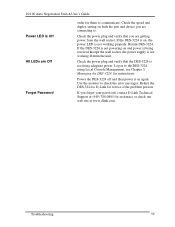
...Switch User's Guide Power LED is not working properly. Use the monitor to D-Link for them to communicate. Troubleshooting 59 If the DES-3224 is not powering on both the port and device you forget your password, contact D-Link Technical Support at (949) 788-0805 for instructions. Return the DES-3224... power LED is receiving adequate power. Check the power plug and verify that you are connecting to the DES-3224 using Local Console Management, see Chapter 5, Managing the DES-3224, for assistance or check our web site at www.dlink.com. Check the speed and duplex setting on...
...Switch User's Guide Power LED is not working properly. Use the monitor to D-Link for them to communicate. Troubleshooting 59 If the DES-3224 is not powering on both the port and device you forget your password, contact D-Link Technical Support at (949) 788-0805 for instructions. Return the DES-3224... power LED is receiving adequate power. Check the power plug and verify that you are connecting to the DES-3224 using Local Console Management, see Chapter 5, Managing the DES-3224, for assistance or check our web site at www.dlink.com. Check the speed and duplex setting on...
Product Manual
Page 74
...Negotiation Switch User's Guide A Access Level 34, 35 Access Right 44 All LEDs Off 59 Audience 1 Authentication 45 B Boot PROM Firmware 23 Bridge Priority 41 C Cable Specifications 8 Cables 58 Change Password 37 Cold Start 45 Confirm password 34 Confirm Password 34, 37 Console Program ...User 34 H Hardware Revision 23 Hello Time 41 Help Message 18 I Install DES-3224 6 Index Installation 6, 7 IP Address 45 L LAN Default Gateway 24 LAN IP Address 24 LAN Subnet Mask 24 LED 3 Link Change 45 Local Console Management 4, 15 Log In 17 M MAC Address 23 Management Methods 4 ...
...Negotiation Switch User's Guide A Access Level 34, 35 Access Right 44 All LEDs Off 59 Audience 1 Authentication 45 B Boot PROM Firmware 23 Bridge Priority 41 C Cable Specifications 8 Cables 58 Change Password 37 Cold Start 45 Confirm password 34 Confirm Password 34, 37 Console Program ...User 34 H Hardware Revision 23 Hello Time 41 Help Message 18 I Install DES-3224 6 Index Installation 6, 7 IP Address 45 L LAN Default Gateway 24 LAN IP Address 24 LAN Subnet Mask 24 LED 3 Link Change 45 Local Console Management 4, 15 Log In 17 M MAC Address 23 Management Methods 4 ...

