User Manual
Page 2
... Revisions Date 06/29/2015 10/16 2015 12/24 2015 Description DCS-7517 Revision A1 with firmware version 1.00 Minor updates Trademarks D-Link and the D-Link logo are trademarks or registered trademarks of their respective companies. Copyright © 2016 by D-Link Corporation. D-Link DCS-7517 User Manual 2 This publication may not be reproduced, in whole or in...
... Revisions Date 06/29/2015 10/16 2015 12/24 2015 Description DCS-7517 Revision A1 with firmware version 1.00 Minor updates Trademarks D-Link and the D-Link logo are trademarks or registered trademarks of their respective companies. Copyright © 2016 by D-Link Corporation. D-Link DCS-7517 User Manual 2 This publication may not be reproduced, in whole or in...
User Manual
Page 3
... Overview 9 microSD Card Installation 11 Cable Connectors 12 Installation 13 Hardware Installation 13 Assembly and Installation 13 Cable Connections 15 General Connection Using the 12 V DC Power Adapter 15 Connection Using Power over Ethernet 16 Software Installation 17 Setup Wizard 17 Web-based Configuration Utility 22 Configuration 24 Live Video 24... Recording 64 Recording Settings 64 Local Storage 66 PTZ Control 68 Digital PTZ 68 Lens Control 69 System 70 User Settings 70 Device Settings 71 D-Link DCS-7517 User Manual 3
... Overview 9 microSD Card Installation 11 Cable Connectors 12 Installation 13 Hardware Installation 13 Assembly and Installation 13 Cable Connections 15 General Connection Using the 12 V DC Power Adapter 15 Connection Using Power over Ethernet 16 Software Installation 17 Setup Wizard 17 Web-based Configuration Utility 22 Configuration 24 Live Video 24... Recording 64 Recording Settings 64 Local Storage 66 PTZ Control 68 Digital PTZ 68 Lens Control 69 System 70 User Settings 70 Device Settings 71 D-Link DCS-7517 User Manual 3

User Manual
Page 4
Regulatory Information 79 Regulatory Information 79 D-Link DCS-7517 User Manual 4 Time and Date 72 Maintenance 73 Parameter List 74 Logs 75 Appendix A - Technical Specifications 76 Technical Specifications 76 Appendix B -
Regulatory Information 79 Regulatory Information 79 D-Link DCS-7517 User Manual 4 Time and Date 72 Maintenance 73 Parameter List 74 Logs 75 Appendix A - Technical Specifications 76 Technical Specifications 76 Appendix B -
User Manual
Page 5
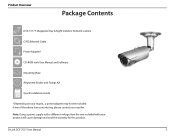
Product Overview Package Contents DCS-7517 5 Megapixel Day & Night Outdoor Network Camera CAT5 Ethernet Cable Power Adapter* CD-ROM with your product will cause damage and void the warranty for this product. If any of the above items are missing, please contact your region, a power adapter may not be included. Note: Using a power supply with a different voltage than the one included with User Manual and Software Mounting Plate Alignment Sticker and Fixings Kit Quick Installation Guide *Depending on your reseller. D-Link DCS-7517 User Manual 5
Product Overview Package Contents DCS-7517 5 Megapixel Day & Night Outdoor Network Camera CAT5 Ethernet Cable Power Adapter* CD-ROM with your product will cause damage and void the warranty for this product. If any of the above items are missing, please contact your region, a power adapter may not be included. Note: Using a power supply with a different voltage than the one included with User Manual and Software Mounting Plate Alignment Sticker and Fixings Kit Quick Installation Guide *Depending on your reseller. D-Link DCS-7517 User Manual 5

User Manual
Page 6
... dark environments. Together with an industry-leading 5 megapixel progressive scan CMOS sensor and H.264 compression, the DCS-7517 connects to a network to provide professional high-quality live video over Ethernet (PoE) also allows it to a hard drive. The included D-Link D-ViewCam™ is capable of field as well as image quality. D-Link DCS-7517 User Manual 6
... dark environments. Together with an industry-leading 5 megapixel progressive scan CMOS sensor and H.264 compression, the DCS-7517 connects to a network to provide professional high-quality live video over Ethernet (PoE) also allows it to a hard drive. The included D-Link D-ViewCam™ is capable of field as well as image quality. D-Link DCS-7517 User Manual 6

User Manual
Page 7
Product Overview System Requirements Network Requirements • An Ethernet-based network DCS-7517 Web-based Configuration Utility Requirements Computer with the following: • Windows®, Macintosh, or Linux-based operating system • An installed Ethernet adapter Browser Requirements: &#... or above (2.8 GHz processor or faster with 512 MB memory and a 32 MB video card is required for multiple camera viewing and recording in D-ViewCam) D-Link DCS-7517 User Manual 7
Product Overview System Requirements Network Requirements • An Ethernet-based network DCS-7517 Web-based Configuration Utility Requirements Computer with the following: • Windows®, Macintosh, or Linux-based operating system • An installed Ethernet adapter Browser Requirements: &#... or above (2.8 GHz processor or faster with 512 MB memory and a 32 MB video card is required for multiple camera viewing and recording in D-ViewCam) D-Link DCS-7517 User Manual 7

User Manual
Page 8
... and 30 fps with Full HD resolution. D-Link DCS-7517 User Manual 8 Product Overview Features Remote Focus Lens The DCS-7517 allows quick and accurate remote focusing of the lens via Intranet or Internet. DC-iris The DC-iris lens in the DCS-7517 solves the long-standing problem of capturing sharp... image monitoring, recording images to a hard drive, viewing up to -use web configuration interface, which protects against the elements. The DCS-7517 also incorporates Power over Ethernet (PoE), allowing it to 32 cameras on one screen, and taking up too much network bandwidth. Weatherproof...
... and 30 fps with Full HD resolution. D-Link DCS-7517 User Manual 8 Product Overview Features Remote Focus Lens The DCS-7517 allows quick and accurate remote focusing of the lens via Intranet or Internet. DC-iris The DC-iris lens in the DCS-7517 solves the long-standing problem of capturing sharp... image monitoring, recording images to a hard drive, viewing up to -use web configuration interface, which protects against the elements. The DCS-7517 also incorporates Power over Ethernet (PoE), allowing it to 32 cameras on one screen, and taking up too much network bandwidth. Weatherproof...

User Manual
Page 9
... The light sensor measures the lighting conditions and switches between color and infrared accordingly. 6 microSD Card Cover Unscrew to remove/change the camera's microSD card. D-Link DCS-7517 User Manual 9
... The light sensor measures the lighting conditions and switches between color and infrared accordingly. 6 microSD Card Cover Unscrew to remove/change the camera's microSD card. D-Link DCS-7517 User Manual 9

User Manual
Page 10
D-Link DCS-7517 User Manual 10 Product Overview Hardware Overview 4 2 1 3 1 Sunshield Shields the camera sensor from direct sunlight. 2 Adjustment Screw Allows repositioning of the sunshield. 3 Camera Shoe Adjustable mounting seat. 4 Wire in Bracket Assembles tightly and protects the cables from outdoor wear and tear.
D-Link DCS-7517 User Manual 10 Product Overview Hardware Overview 4 2 1 3 1 Sunshield Shields the camera sensor from direct sunlight. 2 Adjustment Screw Allows repositioning of the sunshield. 3 Camera Shoe Adjustable mounting seat. 4 Wire in Bracket Assembles tightly and protects the cables from outdoor wear and tear.

User Manual
Page 11
Product Overview microSD Card Installation Open the microSD Card Cover Unscrew the microSD card cover and pull it down to open it. Install the microSD Card Push the microSD card into the slot. To eject, push the microSD card into the camera with the gold contacts oriented towards the base of the camera. D-Link DCS-7517 User Manual 11 Note: Make sure that the weatherproof seals are secured firmly in place when reattaching the microSD card cover.
Product Overview microSD Card Installation Open the microSD Card Cover Unscrew the microSD card cover and pull it down to open it. Install the microSD Card Push the microSD card into the slot. To eject, push the microSD card into the camera with the gold contacts oriented towards the base of the camera. D-Link DCS-7517 User Manual 11 Note: Make sure that the weatherproof seals are secured firmly in place when reattaching the microSD card cover.

User Manual
Page 12
... the factory default settings. 6 DI/DO Connector I/O connectors for external devices. 7 Ethernet Jack Connects to the camera. D-Link DCS-7517 User Manual 12 Product Overview Cable Connectors 1 2 3 45 67 1 Power Connector Power connector for the provided 12V DC power adapter. 2 Audio In (Red) Connects to a microphone. 3 Audio Out (Green) Connects to a speaker. 4 BNC Connector...
... the factory default settings. 6 DI/DO Connector I/O connectors for external devices. 7 Ethernet Jack Connects to the camera. D-Link DCS-7517 User Manual 12 Product Overview Cable Connectors 1 2 3 45 67 1 Power Connector Power connector for the provided 12V DC power adapter. 2 Audio In (Red) Connects to a microphone. 3 Audio Out (Green) Connects to a speaker. 4 BNC Connector...

User Manual
Page 13
... center and pull the cables through the cable channel on the bottom. Installation Hardware Installation Assembly and Installation It is on the base. Alignment sticker D-Link DCS-7517 User Manual 13 Make sure the camera base will be positioned so that the cable channel is highly recommended that you want to position the...
... center and pull the cables through the cable channel on the bottom. Installation Hardware Installation Assembly and Installation It is on the base. Alignment sticker D-Link DCS-7517 User Manual 13 Make sure the camera base will be positioned so that the cable channel is highly recommended that you want to position the...
User Manual
Page 14
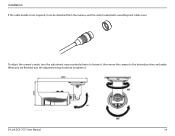
When you are finished, turn the adjustment ring counterclockwise to the desired position and angle. D-Link DCS-7517 User Manual 14 To adjust the camera's angle, turn the adjustment ring clockwise to tighten it , then move the camera to loosen it . Installation If the cable bundle is not required, it can be detached from the camera, and the socket sealed with a weatherproof cable cover.
When you are finished, turn the adjustment ring counterclockwise to the desired position and angle. D-Link DCS-7517 User Manual 14 To adjust the camera's angle, turn the adjustment ring clockwise to tighten it , then move the camera to loosen it . Installation If the cable bundle is not required, it can be detached from the camera, and the socket sealed with a weatherproof cable cover.
User Manual
Page 15
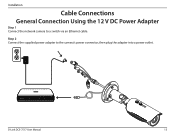
Step 2 Connect the supplied power adapter to a switch via an Ethernet cable. D-Link DCS-7517 User Manual 15 Installation Cable Connections General Connection Using the 12 V DC Power Adapter Step 1 Connect the network camera to the camera's power connector, then plug the adapter into a power outlet.
Step 2 Connect the supplied power adapter to a switch via an Ethernet cable. D-Link DCS-7517 User Manual 15 Installation Cable Connections General Connection Using the 12 V DC Power Adapter Step 1 Connect the network camera to the camera's power connector, then plug the adapter into a power outlet.
User Manual
Page 16
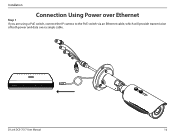
Installation Connection Using Power over Ethernet Step 1 If you are using a PoE switch, connect the IP camera to the PoE switch via an Ethernet cable, which will provide transmission of both power and data over a single cable. D-Link DCS-7517 User Manual 16
Installation Connection Using Power over Ethernet Step 1 If you are using a PoE switch, connect the IP camera to the PoE switch via an Ethernet cable, which will provide transmission of both power and data over a single cable. D-Link DCS-7517 User Manual 16
User Manual
Page 17
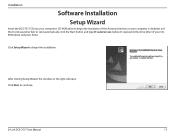
D-Link DCS-7517 User Manual 17 Installation Software Installation Setup Wizard Insert the DCS-7517 CD into your computer's CD-ROM drive to begin the installation. Click Setup Wizard to begin the installation. If the Autorun function on the right will open. After clicking Setup Wizard, the window on your CDROM drive) and press Enter. Click Next to start automatically, click the Start button and type D:\autorun.exe (where D: represents the drive letter of your computer is disabled, or if the D-Link Launcher fails to continue.
D-Link DCS-7517 User Manual 17 Installation Software Installation Setup Wizard Insert the DCS-7517 CD into your computer's CD-ROM drive to begin the installation. Click Setup Wizard to begin the installation. If the Autorun function on the right will open. After clicking Setup Wizard, the window on your CDROM drive) and press Enter. Click Next to start automatically, click the Start button and type D:\autorun.exe (where D: represents the drive letter of your computer is disabled, or if the D-Link Launcher fails to continue.
User Manual
Page 18
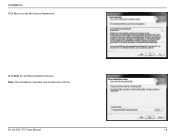
Installation Click Yes to finish. D-Link DCS-7517 User Manual 18 Note: The installation may take several minutes to accept the License Agreement. Click Next to start the installation process.
Installation Click Yes to finish. D-Link DCS-7517 User Manual 18 Note: The installation may take several minutes to accept the License Agreement. Click Next to start the installation process.

User Manual
Page 19
Click on the D-Link Setup Wizard SE icon that was created in your Windows Start menu. Start > D-Link > Setup Wizard SE D-Link DCS-7517 User Manual 19 Installation Click Finish to complete the installation.
Click on the D-Link Setup Wizard SE icon that was created in your Windows Start menu. Start > D-Link > Setup Wizard SE D-Link DCS-7517 User Manual 19 Installation Click Finish to complete the installation.
User Manual
Page 20
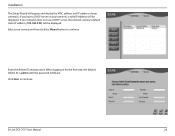
D-Link DCS-7517 User Manual 20 When logging in for the first time, the default Admin ID is admin with the password left blank. Installation The Setup Wizard will be displayed. Enter the Admin ID and password. Click Next to continue. If your network does not use a DHCP server, the network camera's default static IP address (192.168.0.20) will appear and display the MAC address and IP address of your camera(s). Select your network, a valid IP Address will be displayed. If you have a DHCP server on your camera and then click the Wizard button to continue.
D-Link DCS-7517 User Manual 20 When logging in for the first time, the default Admin ID is admin with the password left blank. Installation The Setup Wizard will be displayed. Enter the Admin ID and password. Click Next to continue. If your network does not use a DHCP server, the network camera's default static IP address (192.168.0.20) will appear and display the MAC address and IP address of your camera(s). Select your network, a valid IP Address will be displayed. If you have a DHCP server on your camera and then click the Wizard button to continue.

User Manual
Page 21
D-Link DCS-7517 User Manual 21 Installation Select DHCP if your settings and click Restart. Click Next to manually enter the IP settings for the camera. Select Static IP if you want to continue. Take a moment to confirm your camera obtains an IP address automatically from a DHCP server such as a router.
D-Link DCS-7517 User Manual 21 Installation Select DHCP if your settings and click Restart. Click Next to manually enter the IP settings for the camera. Select Static IP if you want to continue. Take a moment to confirm your camera obtains an IP address automatically from a DHCP server such as a router.


