Product Manual
Page 2
... Package Contents 4 Installation 5 Hardware Overview 5 Hardware Reset 7 Preparing for Installation 8 Adjusting the Viewing Angle 11 Standard Mounting Instructions 12 Pendant Mount (DCS-34-2 16 Bent Mount (DCS-34-3 18 Network and Power Connections 20 Configuration 21 Configuration with Wizard 21 Web-based Configuration Utility 26 Live Video 28 ... 33 Network Setup 35 Dynamic DNS 37 Image Setup 38 Lens Control 42 Motion Detection 43 Time and Date 44 D-Link DCS-6511 User Manual Event Setup 45 Application 46 Add Server 47 Add Media 48 Add Event 51 Add Recording 52 SD Card...
... Package Contents 4 Installation 5 Hardware Overview 5 Hardware Reset 7 Preparing for Installation 8 Adjusting the Viewing Angle 11 Standard Mounting Instructions 12 Pendant Mount (DCS-34-2 16 Bent Mount (DCS-34-3 18 Network and Power Connections 20 Configuration 21 Configuration with Wizard 21 Web-based Configuration Utility 26 Live Video 28 ... 33 Network Setup 35 Dynamic DNS 37 Image Setup 38 Lens Control 42 Motion Detection 43 Time and Date 44 D-Link DCS-6511 User Manual Event Setup 45 Application 46 Add Server 47 Add Media 48 Add Event 51 Add Recording 52 SD Card...
Product Manual
Page 16
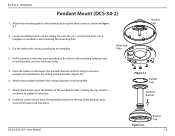
... and insert the plastic anchors into place. 8. Cut the hole in marking the mounting hole. 3. Mounting Plate 4. Attach the pendant bracket to the bracket cap using the screws provided. 7. Locate a suitable position on the ceiling for a 34 mm (+2 ... Pendant Bracket D-Link DCS-6511 User Manual Figure 3.2 Bracket Cap 16 A template is included to aid in the ceiling according to tighten it into these holes. 5. Insert the screw into the base of the pendant bracket at the top of the pendant bracket, rotating the cap counterclockwise to the template. Installation Pendant Mount (DCS-...
... and insert the plastic anchors into place. 8. Cut the hole in marking the mounting hole. 3. Mounting Plate 4. Attach the pendant bracket to the bracket cap using the screws provided. 7. Locate a suitable position on the ceiling for a 34 mm (+2 ... Pendant Bracket D-Link DCS-6511 User Manual Figure 3.2 Bracket Cap 16 A template is included to aid in the ceiling according to tighten it into these holes. 5. Insert the screw into the base of the pendant bracket at the top of the pendant bracket, rotating the cap counterclockwise to the template. Installation Pendant Mount (DCS-...
Product Manual
Page 18
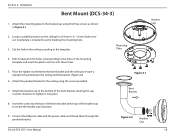
... to be cut. Connect the Ethernet cable and the power cable and thread them through the pendant bracket. Installation Bent Mount (DCS-34-3) 1. Cut the hole in marking the mounting hole. 3. Place the rubber seal between the ceiling and the bracket. (Figure 4.2) 6. Insert the screw into the ... holes. 5. Attach the bracket cap to the bottom of the bracket cap to tighten it into place. D-Link DCS-6511 User Manual Figure 4.2 Bracket Cap 18 Attach the mounting plate to aid in the ceiling according to ensure a waterproof seal between the bent bracket and the ceiling to...
... to be cut. Connect the Ethernet cable and the power cable and thread them through the pendant bracket. Installation Bent Mount (DCS-34-3) 1. Cut the hole in marking the mounting hole. 3. Place the rubber seal between the ceiling and the bracket. (Figure 4.2) 6. Insert the screw into the ... holes. 5. Attach the bracket cap to the bottom of the bracket cap to tighten it into place. D-Link DCS-6511 User Manual Figure 4.2 Bracket Cap 18 Attach the mounting plate to aid in the ceiling according to ensure a waterproof seal between the bent bracket and the ceiling to...
