Product Manual
Page 2
... Hardware Overview 5 Hardware Reset 7 Preparing for Installation 8 Adjusting the Viewing Angle 11 Standard Mounting Instructions 12 Pendant Mount (DCS-34-2 16 Bent Mount (DCS-34-3 18 Network and Power Connections 20 Configuration 21 Configuration with Wizard 21 Web-based Configuration Utility 26 Live Video 28 Setup 30 Wizard 30 Internet Connection Setup Wizard 30 Motion Detection Setup Wizard 33 Network Setup 35 Dynamic DNS 37 Image Setup 38 Lens Control 42 Motion Detection 43 Time and Date 44 D-Link DCS-6511 User Manual Event Setup 45 Application 46 Add Server 47 Add...
... Hardware Overview 5 Hardware Reset 7 Preparing for Installation 8 Adjusting the Viewing Angle 11 Standard Mounting Instructions 12 Pendant Mount (DCS-34-2 16 Bent Mount (DCS-34-3 18 Network and Power Connections 20 Configuration 21 Configuration with Wizard 21 Web-based Configuration Utility 26 Live Video 28 Setup 30 Wizard 30 Internet Connection Setup Wizard 30 Motion Detection Setup Wizard 33 Network Setup 35 Dynamic DNS 37 Image Setup 38 Lens Control 42 Motion Detection 43 Time and Date 44 D-Link DCS-6511 User Manual Event Setup 45 Application 46 Add Server 47 Add...
Product Manual
Page 4
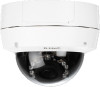
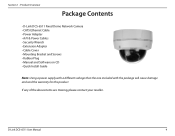
... contact your reseller. Product Overview PPraocdkaugcteOCvoenrtveinetws • D-Link DCS-6511 Fixed Dome Network Camera • CAT5 Ethernet Cable • Power Adapter • A/V & Power Cables • Security Wrench • Extension Adapter • Cable Cover • Mounting Bracket and Screws • Rubber Plug • Manual and Software on CD • Quick Install Guide Note: Using a power supply with a different voltage than the one included with the package will cause damage and void the warranty for this product. D-Link DCS-6511 User Manual 4
... contact your reseller. Product Overview PPraocdkaugcteOCvoenrtveinetws • D-Link DCS-6511 Fixed Dome Network Camera • CAT5 Ethernet Cable • Power Adapter • A/V & Power Cables • Security Wrench • Extension Adapter • Cable Cover • Mounting Bracket and Screws • Rubber Plug • Manual and Software on CD • Quick Install Guide Note: Using a power supply with a different voltage than the one included with the package will cause damage and void the warranty for this product. D-Link DCS-6511 User Manual 4
Product Manual
Page 7
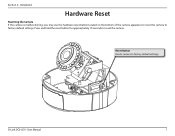
Press and hold the reset button for approximately 10 seconds to factory default settings D-Link DCS-6511 User Manual 7 Reset Button Resets camera to reset the camera. Installation Hardware Reset Resetting the Camera If the camera is malfunctioning, you may use the hardware reset button located on the bottom of the camera apparatus to reset the camera to factory default settings. Section 2 -
Press and hold the reset button for approximately 10 seconds to factory default settings D-Link DCS-6511 User Manual 7 Reset Button Resets camera to reset the camera. Installation Hardware Reset Resetting the Camera If the camera is malfunctioning, you may use the hardware reset button located on the bottom of the camera apparatus to reset the camera to factory default settings. Section 2 -
Product Manual
Page 9
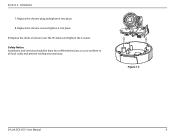
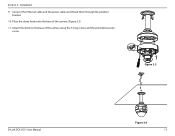
Replace the chrome plug and tighten it into place. 8. Replace the chrome nut and tighten it into place B. Figure 1.3 D-Link DCS-6511 User Manual 9 Section 2 - Replace the dome enclosure over the IP camera and tighten the 4 screws. Safety Notice: Installation and servicing should be done by certified technicians so as to conform to all local codes and prevent voiding your warranty. Installation 7.
Replace the chrome plug and tighten it into place. 8. Replace the chrome nut and tighten it into place B. Figure 1.3 D-Link DCS-6511 User Manual 9 Section 2 - Replace the dome enclosure over the IP camera and tighten the 4 screws. Safety Notice: Installation and servicing should be done by certified technicians so as to conform to all local codes and prevent voiding your warranty. Installation 7.
Product Manual
Page 10
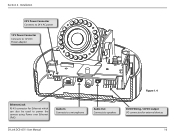
Installation 24 V Power Connector Connects to 24 V AC power 12 V Power Connector Connects to 12 V DC Power adapter Figure 1.4 Ethernet Jack RJ-45 connector for Ethernet which can also be used to power the camera using Power over Ethernet (PoE) Audio In Connects to a microphone Audio Out Connects to speakers DI/DO Wiring, 12V DC output I/O connectors for external devices D-Link DCS-6511 User Manual 10 Section 2 -
Installation 24 V Power Connector Connects to 24 V AC power 12 V Power Connector Connects to 12 V DC Power adapter Figure 1.4 Ethernet Jack RJ-45 connector for Ethernet which can also be used to power the camera using Power over Ethernet (PoE) Audio In Connects to a microphone Audio Out Connects to speakers DI/DO Wiring, 12V DC output I/O connectors for external devices D-Link DCS-6511 User Manual 10 Section 2 -
Product Manual
Page 11
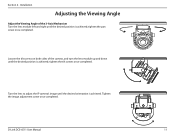
tighten the pan screw once completed. tighten the tilt screws once completed. Turn the lens to adjust the IP camera's image until the desired position is achieved; D-Link DCS-6511 User Manual 11 Tighten the image adjustment screw once completed. Loosen the tilt screws on both sides of the 3-Axis Mechanism Turn the lens module left and right until the desired position is achieved. Installation Adjusting the Viewing Angle Adjust the Viewing Angle of the camera, and turn the lens module up and down until the desired orientation is achieved; Section 2 -
tighten the pan screw once completed. tighten the tilt screws once completed. Turn the lens to adjust the IP camera's image until the desired position is achieved; D-Link DCS-6511 User Manual 11 Tighten the image adjustment screw once completed. Loosen the tilt screws on both sides of the 3-Axis Mechanism Turn the lens module left and right until the desired position is achieved. Installation Adjusting the Viewing Angle Adjust the Viewing Angle of the camera, and turn the lens module up and down until the desired orientation is achieved; Section 2 -
Product Manual
Page 13
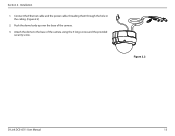
Connect the Ethernet cable and the power cable, threading them through the hole in the ceiling. (Figure 2.2) 2. Attach the dome to the base of the camera. 3. Push the dome body up over the base of the camera using the 3 long screws and the provided security screw. Installation 1. Figure 2.2 D-Link DCS-6511 User Manual 13 Section 2 -
Connect the Ethernet cable and the power cable, threading them through the hole in the ceiling. (Figure 2.2) 2. Attach the dome to the base of the camera. 3. Push the dome body up over the base of the camera using the 3 long screws and the provided security screw. Installation 1. Figure 2.2 D-Link DCS-6511 User Manual 13 Section 2 -
Product Manual
Page 17
Connect the Ethernet cable and the power cable and thread them through the pendant bracket. 10. Figure 3.3 D-Link DCS-6511 User Manual Figure 3.4 17 Attach the dome to the base of the camera. (Figure 3.3) 11. Installation 9. Section 2 - Place the dome body onto the base of the camera using the 3 long screws and the provided security screw.
Connect the Ethernet cable and the power cable and thread them through the pendant bracket. 10. Figure 3.3 D-Link DCS-6511 User Manual Figure 3.4 17 Attach the dome to the base of the camera. (Figure 3.3) 11. Installation 9. Section 2 - Place the dome body onto the base of the camera using the 3 long screws and the provided security screw.
Product Manual
Page 20
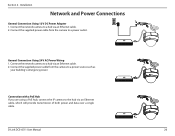
... the supplied power cable from the camera to a power outlet. General Connection Using 24 V AC Power Wiring 1. D-Link DCS-6511 User Manual 20 Connect the network camera to the hub via an Ethernet cable. 2. Connection with a PoE Hub If you are using a PoE hub, connect the IP camera to a hub via an Ethernet cable, which will provide transmission of both power and data over a single cable. Connect the supplied power cable from the camera to a hub via an Ethernet cable. 2. Installation Network and Power Connections General Connection Using 12 V DC Power Adapter 1. Connect...
... the supplied power cable from the camera to a power outlet. General Connection Using 24 V AC Power Wiring 1. D-Link DCS-6511 User Manual 20 Connect the network camera to the hub via an Ethernet cable. 2. Connection with a PoE Hub If you are using a PoE hub, connect the IP camera to a hub via an Ethernet cable, which will provide transmission of both power and data over a single cable. Connect the supplied power cable from the camera to a hub via an Ethernet cable. 2. Installation Network and Power Connections General Connection Using 12 V DC Power Adapter 1. Connect...
Product Manual
Page 21
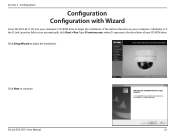
Type D:\autorun.exe, where D: represents the drive letter of your computer is disabled, or if the D-Link Launcher fails to begin the installation. Click Next to begin the installation. Click Setup Wizard to start automatically, click Start > Run. If the Autorun function on your CD-ROM drive. D-Link DCS-6511 User Manual 21 Section 3 - Configuration Configuration Configuration with Wizard Insert the DCS-6511 CD into your computer's CD-ROM drive to continue.
Type D:\autorun.exe, where D: represents the drive letter of your computer is disabled, or if the D-Link Launcher fails to begin the installation. Click Next to begin the installation. Click Setup Wizard to start automatically, click Start > Run. If the Autorun function on your CD-ROM drive. D-Link DCS-6511 User Manual 21 Section 3 - Configuration Configuration Configuration with Wizard Insert the DCS-6511 CD into your computer's CD-ROM drive to continue.

Product Manual
Page 24
Section 3 - If your camera(s). Enter the Admin ID and password. Click Next, to proceed to continue. If you have a DHCP server on your network, a valid IP Address will appear and display the MAC address and IP address of your network does not use a DHCP server, the network camera's default static IP address 192.168.0.20 will be displayed. Click the Wizard button to the next page. When logging in for the first time, the default Admin ID is admin with the password left blank. Configuration The Setup Wizard will be displayed. D-Link DCS-6511 User Manual 24
Section 3 - If your camera(s). Enter the Admin ID and password. Click Next, to proceed to continue. If you have a DHCP server on your network, a valid IP Address will appear and display the MAC address and IP address of your network does not use a DHCP server, the network camera's default static IP address 192.168.0.20 will be displayed. Click the Wizard button to the next page. When logging in for the first time, the default Admin ID is admin with the password left blank. Configuration The Setup Wizard will be displayed. D-Link DCS-6511 User Manual 24

Product Manual
Page 26
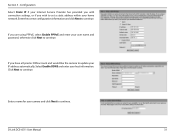
... D-Link Setup Wizard SE icon that was created in your new D-Link Network Camera using the Web-based Configuration Utility. Alternatively, you may manually open your web browser to the IP address of the camera: 192.168.0.20 D-Link DCS-6511 User Manual 26 The Setup Wizard will automatically open a browser and enter the IP address of the camera. Start > D-Link > Setup Wizard SE Select the camera and click the button labeled "Link" to configure your Windows Start menu. Configuration Web-based Configuration Utility This section explains how to access...
... D-Link Setup Wizard SE icon that was created in your new D-Link Network Camera using the Web-based Configuration Utility. Alternatively, you may manually open your web browser to the IP address of the camera: 192.168.0.20 D-Link DCS-6511 User Manual 26 The Setup Wizard will automatically open a browser and enter the IP address of the camera. Start > D-Link > Setup Wizard SE Select the camera and click the button labeled "Link" to configure your Windows Start menu. Configuration Web-based Configuration Utility This section explains how to access...
Product Manual
Page 30
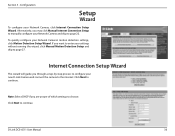
... D-Link Camera and connect the camera to the internet. Internet Connection Setup Wizard This wizard will guide you want to enter your Network Camera and skip to configure your Network Camera's motion detection settings, click Motion Detection Setup Wizard. D-Link DCS-6511 User Manual 30 Click Next to continue. If you through a step-by-step process to page 22. Alternatively, you are unsure of which settings to page 27. Note: Select DHCP if you may click Manual Internet Connection Setup to manually configure your settings...
... D-Link Camera and connect the camera to the internet. Internet Connection Setup Wizard This wizard will guide you want to enter your Network Camera and skip to configure your Network Camera's motion detection settings, click Motion Detection Setup Wizard. D-Link DCS-6511 User Manual 30 Click Next to continue. If you through a step-by-step process to page 22. Alternatively, you are unsure of which settings to page 27. Note: Select DHCP if you may click Manual Internet Connection Setup to manually configure your settings...
Product Manual
Page 31
.... D-Link DCS-6511 User Manual 31 Click Next to continue. Enter a name for your home network. If you have a Dynamic DNS account and would like the camera to update your IP address automatically, Select Enable DDNS and enter your user name and password, otherwise click Next to continue. Configuration Select Static IP if your Internet Service Provider has provided you with connection settings, or if you wish to set a static address within your camera and...
.... D-Link DCS-6511 User Manual 31 Click Next to continue. Enter a name for your home network. If you have a Dynamic DNS account and would like the camera to update your IP address automatically, Select Enable DDNS and enter your user name and password, otherwise click Next to continue. Configuration Select Static IP if your Internet Service Provider has provided you with connection settings, or if you wish to set a static address within your camera and...
Product Manual
Page 33
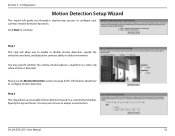
... how to configure your camera's motion detection functions. Step 1 This step will guide you through a step-by-step process to configure motion detection. Click Next to detect movement. Specify the day and hours. D-Link DCS-6511 User Manual 33 Please see the Motion Detection section on a customized schedule. Configuration Motion Detection Setup Wizard This wizard will allow you to always record motion. Step 2 This step allows you to enable or disable motion detection...
... how to configure your camera's motion detection functions. Step 1 This step will guide you through a step-by-step process to configure motion detection. Click Next to detect movement. Specify the day and hours. D-Link DCS-6511 User Manual 33 Please see the Motion Detection section on a customized schedule. Configuration Motion Detection Setup Wizard This wizard will allow you to always record motion. Step 2 This step allows you to enable or disable motion detection...
Product Manual
Page 35
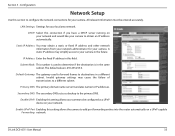
... the primary DNS. Invalid gateway settings may cause the failure of transmissions to IP addresses. Enable UPnP: Enabling this field. All relevant information must be configured as a backup to destinations in the same subnet. Default Gateway: The gateway used to add port forwarding entries into the router automatically on your network and would like your camera. Primary DNS: The primary domain name server translates names to a different subnet. D-Link DCS-6511 User Manual 35 DHCP: Select this setting allows the camera to...
... the primary DNS. Invalid gateway settings may cause the failure of transmissions to IP addresses. Enable UPnP: Enabling this field. All relevant information must be configured as a backup to destinations in the same subnet. Default Gateway: The gateway used to add port forwarding entries into the router automatically on your network and would like your camera. Primary DNS: The primary domain name server translates names to a different subnet. D-Link DCS-6511 User Manual 35 DHCP: Select this setting allows the camera to...
Product Manual
Page 36
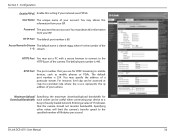
... 443. Access Name for RTSP streaming to a busy or heavily loaded network. The default port number is 80. Entering a value of a particular stream. D-Link DCS-6511 User Manual 36 The default port number is the number of your device to mobile devices, such as mobile phones or PDAs. Configuration Enable PPPoE: Enable this information from your network uses PPPoE. You may obtain this setting if your ISP. Password: The password to the HTTPS port of Kilobytes...
... 443. Access Name for RTSP streaming to a busy or heavily loaded network. The default port number is 80. Entering a value of a particular stream. D-Link DCS-6511 User Manual 36 The default port number is the number of your device to mobile devices, such as mobile phones or PDAs. Configuration Enable PPPoE: Enable this information from your network uses PPPoE. You may obtain this setting if your ISP. Password: The password to the HTTPS port of Kilobytes...
Product Manual
Page 37
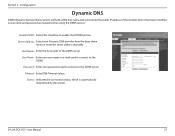
... used to connect to enable the DDNS function. A user name and password are required when using the DDNS service. User Name: Enter your Dynamic DNS provider from the drop-down menu or enter the server address manually. Enable DDNS: Select this checkbox to the DDNS server. D-Link DCS-6511 User Manual 37 Configuration Dynamic DNS DDNS (Dynamic Domain Name Server) will hold a DNS host name and synchronize the public IP address of the DDNS server. Timeout: Enter DNS Timeout...
... used to connect to enable the DDNS function. A user name and password are required when using the DDNS service. User Name: Enter your Dynamic DNS provider from the drop-down menu or enter the server address manually. Enable DDNS: Select this checkbox to the DDNS server. D-Link DCS-6511 User Manual 37 Configuration Dynamic DNS DDNS (Dynamic Domain Name Server) will hold a DNS host name and synchronize the public IP address of the DDNS server. Timeout: Enter DNS Timeout...
Product Manual
Page 54
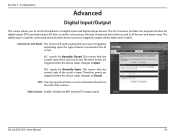
... the device status changes to control the behavior of the camera. stands for Normally Closed. The digital input is closed. D-Link DCS-6511 User Manual 54 Therefore events are triggered when the device status changes to illuminate the LED on the side of digital input and digital output devices. N.C. This means that is used for connecting a diversity of device connected to the DI circuit. stands for Normally Open. Video Output: Enable/ disable...
... the device status changes to control the behavior of the camera. stands for Normally Closed. The digital input is closed. D-Link DCS-6511 User Manual 54 Therefore events are triggered when the device status changes to illuminate the LED on the side of digital input and digital output devices. N.C. This means that is used for connecting a diversity of device connected to the DI circuit. stands for Normally Open. Video Output: Enable/ disable...
Product Manual
Page 60
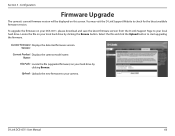
... firmware version. D-Link DCS-6511 User Manual 60 Configuration Firmware Upgrade The camera's current firmware version will be displayed on your DCS-6511, please download and save the latest firmware version from the D-Link Support Page to start upgrading the firmware. Version: Current Product Displays the camera model name. Name: File Path: Locate the file (upgraded firmware) on your local hard drive by clicking Browse. Select the file and click the Upload button to your hard drive by clicking the Browse button. Section 3 - To upgrade the firmware on your local hard drive...
... firmware version. D-Link DCS-6511 User Manual 60 Configuration Firmware Upgrade The camera's current firmware version will be displayed on your DCS-6511, please download and save the latest firmware version from the D-Link Support Page to start upgrading the firmware. Version: Current Product Displays the camera model name. Name: File Path: Locate the file (upgraded firmware) on your local hard drive by clicking Browse. Select the file and click the Upload button to your hard drive by clicking the Browse button. Section 3 - To upgrade the firmware on your local hard drive...


