
Product Manual
Page 2
... Video 26 Overview 27 Setup 29 Internet Connection Setup Wizard 30 Network Setup 34 LAN Settings 35 Port Settings 36 HTTPS settings 37 Wireless Setup (DCS-5635 only 38 Setting up a Wireless Connection with WPS.......... 40 Dynamic DDNS 41 Image Setup 42 Audio and Video 44 Video Profiles 44 Enable External... 71 Log 72 Help 73 Appendix 74 Frequently Asked Questions 74 How to Ping Your IP Address 77 Using & Configuring 3G Compatible Cell Phones 78 D-Link DCS-5605/DCS-5635 User Manual 1
... Video 26 Overview 27 Setup 29 Internet Connection Setup Wizard 30 Network Setup 34 LAN Settings 35 Port Settings 36 HTTPS settings 37 Wireless Setup (DCS-5635 only 38 Setting up a Wireless Connection with WPS.......... 40 Dynamic DDNS 41 Image Setup 42 Audio and Video 44 Video Profiles 44 Enable External... 71 Log 72 Help 73 Appendix 74 Frequently Asked Questions 74 How to Ping Your IP Address 77 Using & Configuring 3G Compatible Cell Phones 78 D-Link DCS-5605/DCS-5635 User Manual 1
Product Manual
Page 3
Play from RealPlayer 79 Play from PVPlayer 84 Reset and Restore 86 Enabling UPnP™ for Windows® XP 87 Technical Specifications 91 Contacting Technical Support 93 Warranty 94 Registration 97 D-Link DCS-5605/DCS-5635 User Manual 2
Play from RealPlayer 79 Play from PVPlayer 84 Reset and Restore 86 Enabling UPnP™ for Windows® XP 87 Technical Specifications 91 Contacting Technical Support 93 Warranty 94 Registration 97 D-Link DCS-5605/DCS-5635 User Manual 2

Product Manual
Page 4
... with the DCS-5605/DCS-5635 will cause damage and void the warranty for this product. If any of the above items are missing, please contact your reseller. System Requirements • Internet Explorer 6.0 or higher • Pentium 4, 2Ghz processor or higher • 128MB RAM or higher • 32MB AGP Video Card D-Link DCS-5605/DCS-5635 User...
... with the DCS-5605/DCS-5635 will cause damage and void the warranty for this product. If any of the above items are missing, please contact your reseller. System Requirements • Internet Explorer 6.0 or higher • Pentium 4, 2Ghz processor or higher • 128MB RAM or higher • 32MB AGP Video Card D-Link DCS-5605/DCS-5635 User...

Product Manual
Page 5
...or office space in MJPEG, MPEG-4 and H.264 formats. EASY TO INSTALL AND SIMPLE TO MANAGE The DCS-5605/DCS-5635 can also set up to 80% compared to the network. D-Link DCS-5605/DCS-5635 User Manual 4 This enables you are available depending on the web, to assign a name and ...domain to remember the IP address. Introduction A HIGH-PERFORMANCE SURVEILLANCE SOLUTION The DCS-5605/DCS-5635 is required. The 10x optical zoom lens ...
...or office space in MJPEG, MPEG-4 and H.264 formats. EASY TO INSTALL AND SIMPLE TO MANAGE The DCS-5605/DCS-5635 can also set up to 80% compared to the network. D-Link DCS-5605/DCS-5635 User Manual 4 This enables you are available depending on the web, to assign a name and ...domain to remember the IP address. Introduction A HIGH-PERFORMANCE SURVEILLANCE SOLUTION The DCS-5605/DCS-5635 is required. The 10x optical zoom lens ...

Product Manual
Page 6
...'s video feed or VCR for E-mail alerts. Up to 20 user names and passwords are triggered on the other varieties of the D-Link product, which fails to External Devices - D-Link DCS-5605/DCS-5635 User Manual 5 The Camera can modify the Camera settings from the remote site via the Intranet or the Internet. With the...
...'s video feed or VCR for E-mail alerts. Up to 20 user names and passwords are triggered on the other varieties of the D-Link product, which fails to External Devices - D-Link DCS-5605/DCS-5635 User Manual 5 The Camera can modify the Camera settings from the remote site via the Intranet or the Internet. With the...

Product Manual
Page 7
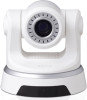
...connector to use the camera with two pairs of external alarm devices. The Ethernet port can also be used to the wireless antennas D-Link DCS-5605/DCS-5635 User Manual 6 The I/O connectors provide the physical interface to send 9 and receive digital signals to the I /O Connector pair...and hold for 10 seconds to reset the camera back to the default settings. 23 4 5 6 7 Antenna 9 connector(DCS-5635 Only) Connects to power the camera using a PoE switch (DCS-5605 only). One 5 I /O Connector section in the supplied power adapter to an outlet. 4 Ethernet Port Connect an Ethernet...
...connector to use the camera with two pairs of external alarm devices. The Ethernet port can also be used to the wireless antennas D-Link DCS-5605/DCS-5635 User Manual 6 The I/O connectors provide the physical interface to send 9 and receive digital signals to the I /O Connector pair...and hold for 10 seconds to reset the camera back to the default settings. 23 4 5 6 7 Antenna 9 connector(DCS-5635 Only) Connects to power the camera using a PoE switch (DCS-5605 only). One 5 I /O Connector section in the supplied power adapter to an outlet. 4 Ethernet Port Connect an Ethernet...

Product Manual
Page 8
... initializing a connection, and illuminate with solid blue 2 WPS/Link LED once the connection has been established (DCS-5635 only). The Link LED will illuminate green once a connection has been established. 3 Microphone The built-in microphone can be used capture audio from color to infrared accordingly. D-Link DCS-5605/DCS-5635 User Manual 7 The WPS LED will illuminate...
... initializing a connection, and illuminate with solid blue 2 WPS/Link LED once the connection has been established (DCS-5635 only). The Link LED will illuminate green once a connection has been established. 3 Microphone The built-in microphone can be used capture audio from color to infrared accordingly. D-Link DCS-5605/DCS-5635 User Manual 7 The WPS LED will illuminate...

Product Manual
Page 9
Camera Installation It is recommended to connect the camera to your wall outlet. Step 1 - Attach the supplied power supply to the network. Step 2 - D-Link DCS-5605/DCS-5635 User Manual 8 Connect an Ethernet cable to the network cable connector located on the DCS-5605/DCS-5635's back panel and connect the other end to your computer and configure it to the power input connector located on the DCS-5605/DCS-5635's back panel and attach it before mounting.
Camera Installation It is recommended to connect the camera to your wall outlet. Step 1 - Attach the supplied power supply to the network. Step 2 - D-Link DCS-5605/DCS-5635 User Manual 8 Connect an Ethernet cable to the network cable connector located on the DCS-5605/DCS-5635's back panel and connect the other end to your computer and configure it to the power input connector located on the DCS-5605/DCS-5635's back panel and attach it before mounting.

Product Manual
Page 10
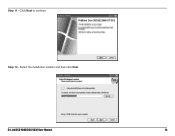
When the autorun screen appears, click Installation Wizard. Insert the D-Link CD. Step 4 - The Welcome screen will appear. Click Next to continue. Installation Wizard Step 3 - D-Link DCS-5605/DCS-5635 User Manual 9
When the autorun screen appears, click Installation Wizard. Insert the D-Link CD. Step 4 - The Welcome screen will appear. Click Next to continue. Installation Wizard Step 3 - D-Link DCS-5605/DCS-5635 User Manual 9

Product Manual
Page 11
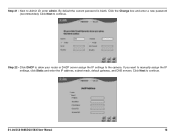
If you do not want to continue. Click Next to install the wizard into the default location, click Browse and select a new folder. Click Yes to the license agreement to continue. Step 6 - Step 5 - D-Link DCS-5605/DCS-5635 User Manual 10
If you do not want to continue. Click Next to install the wizard into the default location, click Browse and select a new folder. Click Yes to the license agreement to continue. Step 6 - Step 5 - D-Link DCS-5605/DCS-5635 User Manual 10

Product Manual
Page 12
Step 8 - D-Link DCS-5605/DCS-5635 User Manual 11 Click Finish to run the wizard. Uncheck the I would like to launch Setup Wizard SE box if you to playback video taken by the DCS-5605/5635. Step 7 - Now, click on ffdshow from the autorun screen. This will install the proper codecs that will allow you do not want to complete the installation.
Step 8 - D-Link DCS-5605/DCS-5635 User Manual 11 Click Finish to run the wizard. Uncheck the I would like to launch Setup Wizard SE box if you to playback video taken by the DCS-5605/5635. Step 7 - Now, click on ffdshow from the autorun screen. This will install the proper codecs that will allow you do not want to complete the installation.

Product Manual
Page 13
Select your language from the drop-down menu and then click OK. D-Link DCS-5605/DCS-5635 User Manual 12 Step 10 - Click I Agree to the license agreement to continue. Step 9 -
Select your language from the drop-down menu and then click OK. D-Link DCS-5605/DCS-5635 User Manual 12 Step 10 - Click I Agree to the license agreement to continue. Step 9 -
Product Manual
Page 14
Select the installation location and then click Next. D-Link DCS-5605/DCS-5635 User Manual 13 Step 11 - Step 12 - Click Next to continue.
Select the installation location and then click Next. D-Link DCS-5605/DCS-5635 User Manual 13 Step 11 - Step 12 - Click Next to continue.

Product Manual
Page 15
Step 13 - Step 14 - Select the components you want to install and then click Next to continue. D-Link DCS-5605/DCS-5635 User Manual 14 Select the Start Menu folder and then click Next.
Step 13 - Step 14 - Select the components you want to install and then click Next to continue. D-Link DCS-5605/DCS-5635 User Manual 14 Select the Start Menu folder and then click Next.

Product Manual
Page 16
Step 15 - Select the speaker setup on your computer and then click Next. D-Link DCS-5605/DCS-5635 User Manual 15 Step 16 - Select the additional tasks you want to perform and then click Next to continue.
Step 15 - Select the speaker setup on your computer and then click Next. D-Link DCS-5605/DCS-5635 User Manual 15 Step 16 - Select the additional tasks you want to perform and then click Next to continue.

Product Manual
Page 18
Your camera should be displayed in your computer correctly and is connected to your Windows Start menu. If it does not, then click the Search button. Click on . The main screen will appear. D-Link DCS-5605/DCS-5635 User Manual 17 If your camera does not appear, make sure the camera is powered on the D-Link Setup Wizard SE icon that was created in the list. Step 19 - Step 20 -
Your camera should be displayed in your computer correctly and is connected to your Windows Start menu. If it does not, then click the Search button. Click on . The main screen will appear. D-Link DCS-5605/DCS-5635 User Manual 17 If your camera does not appear, make sure the camera is powered on the D-Link Setup Wizard SE icon that was created in the list. Step 19 - Step 20 -
Product Manual
Page 19
If you want to Admin ID, enter admin. Next to manually assign the IP settings, click Static and enter the IP address, subnet mask, default gateway, and DNS servers. D-Link DCS-5605/DCS-5635 User Manual 18 Click Next to continue. Step 22 - Click the Change box and enter a new password (recommended). Click Next to continue. By default the current password is blank. Click DHCP to allow your router or DHCP server assign the IP settings to the camera. Step 21 -
If you want to Admin ID, enter admin. Next to manually assign the IP settings, click Static and enter the IP address, subnet mask, default gateway, and DNS servers. D-Link DCS-5605/DCS-5635 User Manual 18 Click Next to continue. Step 22 - Click the Change box and enter a new password (recommended). Click Next to continue. By default the current password is blank. Click DHCP to allow your router or DHCP server assign the IP settings to the camera. Step 21 -

Product Manual
Page 20
Enter the encryption key or passphrase. D-Link DCS-5605/DCS-5635 User Manual 19 Enter the SSID or wireless network name. Authentication - Encryption - Step 23 - Network Name (SSID) - This must be the same name as ... Next to use the wireless feature of encryption. If you are connecting to a wireless client, select Adhoc. Wireless Channel - Connection Mode - If you have the DCS-5635 wireless camera, setup the following wireless settings: Wireless - If you are connecting to a wireless router or access point. Select Infrastructure if you do not...
Enter the encryption key or passphrase. D-Link DCS-5605/DCS-5635 User Manual 19 Enter the SSID or wireless network name. Authentication - Encryption - Step 23 - Network Name (SSID) - This must be the same name as ... Next to use the wireless feature of encryption. If you are connecting to a wireless client, select Adhoc. Wireless Channel - Connection Mode - If you have the DCS-5635 wireless camera, setup the following wireless settings: Wireless - If you are connecting to a wireless router or access point. Select Infrastructure if you do not...
Product Manual
Page 21
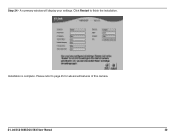
Click Restart to page 25 for advanced features of this camera. Please refer to finish the installation. Step 24 - A summary window will display your settings. D-Link DCS-5605/DCS-5635 User Manual 20 Installation is complete.
Click Restart to page 25 for advanced features of this camera. Please refer to finish the installation. Step 24 - A summary window will display your settings. D-Link DCS-5605/DCS-5635 User Manual 20 Installation is complete.
Product Manual
Page 22
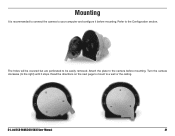
D-Link DCS-5605/DCS-5635 User Manual 21 Turn the camera clockwise (to the right) until it before mounting. Mounting It is recommended to connect the camera to your computer and configure it stops. Attach the plate to a wall or the ceiling. The holes will be covered but are perferated to the Configuration section. Refer to be easily removed. Read the directions on the next page to mount to the camera before mounting.
D-Link DCS-5605/DCS-5635 User Manual 21 Turn the camera clockwise (to the right) until it before mounting. Mounting It is recommended to connect the camera to your computer and configure it stops. Attach the plate to a wall or the ceiling. The holes will be covered but are perferated to the Configuration section. Refer to be easily removed. Read the directions on the next page to mount to the camera before mounting.


