User Manual
Page 2
... Description DCS-4802E Revision A1 with firmware version 1.00 Added DCS-37-1/DCS-37-2 information Update safety & EN55032 Class A statement Trademarks D-Link and the D-Link logo are trademarks or registered trademarks of their respective companies. All other countries. D-Link DCS-4802E User Manual 2... This publication may become obsolete as our services and websites develop and change. All rights reserved. Copyright © 2016 D-Link Corporation. Information in this publication and to...
... Description DCS-4802E Revision A1 with firmware version 1.00 Added DCS-37-1/DCS-37-2 information Update safety & EN55032 Class A statement Trademarks D-Link and the D-Link logo are trademarks or registered trademarks of their respective companies. All other countries. D-Link DCS-4802E User Manual 2... This publication may become obsolete as our services and websites develop and change. All rights reserved. Copyright © 2016 D-Link Corporation. Information in this publication and to...
User Manual
Page 3
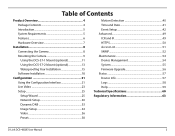
... Contents Product Overview 4 Package Contents 4 Introduction 5 System Requirements 5 Features 6 Hardware Overview 7 Installation 8 Connecting the Camera 8 Mounting the Camera 9 Using the DCS-37-1 Mount (optional 11 Using the DCS-37-2 Mount (optional 13 Waterproofing Your Installation 15 Software Installation 18 Configuration 21 Using the Configuration Interface 21 Live Video 23 Setup 25... 54 Device Management 54 System 55 Firmware Upgrade 56 Status 57 Device Info 57 Logs 58 Help 59 Technical Specifications 60 Regulatory Information 63 D-Link DCS-4802E User Manual 3
... Contents Product Overview 4 Package Contents 4 Introduction 5 System Requirements 5 Features 6 Hardware Overview 7 Installation 8 Connecting the Camera 8 Mounting the Camera 9 Using the DCS-37-1 Mount (optional 11 Using the DCS-37-2 Mount (optional 13 Waterproofing Your Installation 15 Software Installation 18 Configuration 21 Using the Configuration Interface 21 Live Video 23 Setup 25... 54 Device Management 54 System 55 Firmware Upgrade 56 Status 57 Device Info 57 Logs 58 Help 59 Technical Specifications 60 Regulatory Information 63 D-Link DCS-4802E User Manual 3
User Manual
Page 4
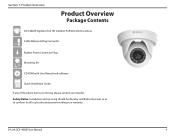
D-Link DCS-4802E User Manual 4 Section 1: Product Overview Product Overview Package Contents DCS-4802E Vigilance Full HD Outdoor PoE Mini Dome Camera Cable Waterproofing Connector Rubber Power Connector Plug Mounting Kit CD-ROM with User Manual and software Quick Installation Guide If any of the above items are missing, please contact your warranty. Safety Notice: Installation and servicing should be done by certified technicians so as to conform to all local codes and prevent voiding your reseller.
D-Link DCS-4802E User Manual 4 Section 1: Product Overview Product Overview Package Contents DCS-4802E Vigilance Full HD Outdoor PoE Mini Dome Camera Cable Waterproofing Connector Rubber Power Connector Plug Mounting Kit CD-ROM with User Manual and software Quick Installation Guide If any of the above items are missing, please contact your warranty. Safety Notice: Installation and servicing should be done by certified technicians so as to conform to all local codes and prevent voiding your reseller.
User Manual
Page 5
... capability to view up to be accessed remotely, controlled and configured from any PC/Notebook over Ethernet (PoE) port D-Link DCS-4802E User Manual 5 The DCS-4802E is a professional surveillance and security solution for both indoor and outdoor applications. The simple installation and intuitive web-based interface offer easy configuration across the ...
... capability to view up to be accessed remotely, controlled and configured from any PC/Notebook over Ethernet (PoE) port D-Link DCS-4802E User Manual 5 The DCS-4802E is a professional surveillance and security solution for both indoor and outdoor applications. The simple installation and intuitive web-based interface offer easy configuration across the ...
User Manual
Page 6
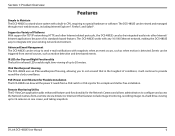
Events can be integrated easily into your existing network environment. D-Link DCS-4802E User Manual 6 IR LEDs for TCP/IP networking, HTTP, and other Internet/ Intranet applications because of up to 20 meters. Section 1: Product Overview Features Simple to Maintain The DCS-4802E is a stand-alone system with snapshots when an event occurs, such as motion detection...
Events can be integrated easily into your existing network environment. D-Link DCS-4802E User Manual 6 IR LEDs for TCP/IP networking, HTTP, and other Internet/ Intranet applications because of up to 20 meters. Section 1: Product Overview Features Simple to Maintain The DCS-4802E is a stand-alone system with snapshots when an event occurs, such as motion detection...
User Manual
Page 7
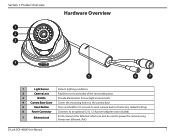
... V, 1.5 A power adapter (not included) 7 Ethernet Jack RJ-45 connector for Ethernet which can also be used to power the camera using Power over Ethernet (PoE) D-Link DCS-4802E User Manual 7
... V, 1.5 A power adapter (not included) 7 Ethernet Jack RJ-45 connector for Ethernet which can also be used to power the camera using Power over Ethernet (PoE) D-Link DCS-4802E User Manual 7
User Manual
Page 8
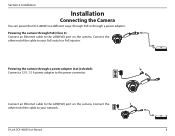
... Camera You can power the DCS-4802E two different ways: through PoE or through a power adapter (not included): Connect a 12 V, 1.5 A power adapter to your PoE switch or PoE injector. Powering the camera through PoE (Class 2): Connect an Ethernet cable to the LAN(PoE) port on the camera. D-Link DCS-4802E User Manual 8 Powering the camera through...
... Camera You can power the DCS-4802E two different ways: through PoE or through a power adapter (not included): Connect a 12 V, 1.5 A power adapter to your PoE switch or PoE injector. Powering the camera through PoE (Class 2): Connect an Ethernet cable to the LAN(PoE) port on the camera. D-Link DCS-4802E User Manual 8 Powering the camera through...
User Manual
Page 9
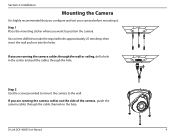
... running the camera cables through the wall or ceiling, drill a hole in the center and pull the cables through the cable channel on the base. D-Link DCS-4802E User Manual 9 If you configure and test your camera before mounting it.
... running the camera cables through the wall or ceiling, drill a hole in the center and pull the cables through the cable channel on the base. D-Link DCS-4802E User Manual 9 If you configure and test your camera before mounting it.
User Manual
Page 10
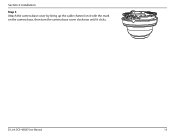
Section 2: Installation Step 3 Attach the camera base cover by lining up the cable channel on it with the mark on the camera base, then turn the camera base cover clockwise until it clicks. D-Link DCS-4802E User Manual 10
Section 2: Installation Step 3 Attach the camera base cover by lining up the cable channel on it with the mark on the camera base, then turn the camera base cover clockwise until it clicks. D-Link DCS-4802E User Manual 10
User Manual
Page 11
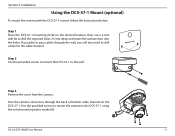
...you plan to pass cables through the back or bottom cable channel on the DCS-37-1. Step 2 Use the provided screws to mount the DCS-37-1 to the DCS-37-1 using the set of mounting holes marked B. D-Link DCS-4802E User Manual 11 Use the provided screws to mount the camera to the wall. Step... 1 Place the DCS-37-1 mounting sticker in the desired location, then use a 6 mm drill ...
...you plan to pass cables through the back or bottom cable channel on the DCS-37-1. Step 2 Use the provided screws to mount the DCS-37-1 to the DCS-37-1 using the set of mounting holes marked B. D-Link DCS-4802E User Manual 11 Use the provided screws to mount the camera to the wall. Step... 1 Place the DCS-37-1 mounting sticker in the desired location, then use a 6 mm drill ...
User Manual
Page 12
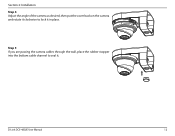
Step 5 If you are passing the camera cables through the wall, place the rubber stopper into the bottom cable channel to lock it . Section 2: Installation Step 4 Adjust the angle of the camera as desired, then put the cover back on the camera and rotate it clockwise to seal it in place. D-Link DCS-4802E User Manual 12
Step 5 If you are passing the camera cables through the wall, place the rubber stopper into the bottom cable channel to lock it . Section 2: Installation Step 4 Adjust the angle of the camera as desired, then put the cover back on the camera and rotate it clockwise to seal it in place. D-Link DCS-4802E User Manual 12
User Manual
Page 13
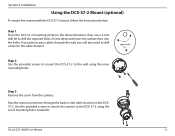
...using the set of mounting holes marked B. Step 2 Use the provided screws to mount the DCS-37-2 to drill the required holes 25 mm deep and insert the wall anchors into the holes. D-Link DCS-4802E User Manual 13 Pass the camera connectors through the wall, you will also need to drill a hole for... the cable channel. Use the provided screws to mount the camera to pass cables through the back or side cable channel on the DCS37-2. If you plan to the DCS-37-2 ...
...using the set of mounting holes marked B. Step 2 Use the provided screws to mount the DCS-37-2 to drill the required holes 25 mm deep and insert the wall anchors into the holes. D-Link DCS-4802E User Manual 13 Pass the camera connectors through the wall, you will also need to drill a hole for... the cable channel. Use the provided screws to mount the camera to pass cables through the back or side cable channel on the DCS37-2. If you plan to the DCS-37-2 ...
User Manual
Page 14
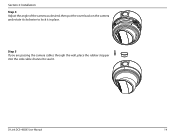
Step 5 If you are passing the camera cables through the wall, place the rubber stopper into the side cable channel to lock it . D-Link DCS-4802E User Manual 14 Section 2: Installation Step 4 Adjust the angle of the camera as desired, then put the cover back on the camera and rotate it clockwise to seal it in place.
Step 5 If you are passing the camera cables through the wall, place the rubber stopper into the side cable channel to lock it . D-Link DCS-4802E User Manual 14 Section 2: Installation Step 4 Adjust the angle of the camera as desired, then put the cover back on the camera and rotate it clockwise to seal it in place.
User Manual
Page 15
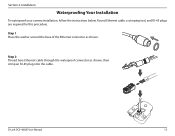
D-Link DCS-4802E User Manual 15 Step 2 Thread bare Ethernet cable through the waterproof connector as shown. Round Ethernet cable, a crimping tool, and RJ-45 plugs are required for this procedure. Step 1 Place the washer around the base of the Ethernet connector as shown, then crimp an RJ-45 plug onto the cable. Section 2: Installation Waterproofing Your Installation To waterproof your camera installation, follow the instructions below.
D-Link DCS-4802E User Manual 15 Step 2 Thread bare Ethernet cable through the waterproof connector as shown. Round Ethernet cable, a crimping tool, and RJ-45 plugs are required for this procedure. Step 1 Place the washer around the base of the Ethernet connector as shown, then crimp an RJ-45 plug onto the cable. Section 2: Installation Waterproofing Your Installation To waterproof your camera installation, follow the instructions below.
User Manual
Page 16
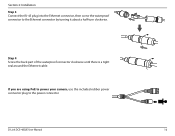
D-Link DCS-4802E User Manual 16 Step 4 Screw the back part of the waterproof connector clockwise until there is a tight seal around the Ethernet cable. If you are using PoE to power your camera, use the included rubber power connector plug to the Ethernet connector by turning it about a half-turn clockwise. Section 2: Installation Step 3 Connect the RJ-45 plug into the Ethernet connector, then screw the waterproof connector to the power connector.
D-Link DCS-4802E User Manual 16 Step 4 Screw the back part of the waterproof connector clockwise until there is a tight seal around the Ethernet cable. If you are using PoE to power your camera, use the included rubber power connector plug to the Ethernet connector by turning it about a half-turn clockwise. Section 2: Installation Step 3 Connect the RJ-45 plug into the Ethernet connector, then screw the waterproof connector to the power connector.
User Manual
Page 17
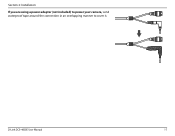
Section 2: Installation If you are using a power adapter (not included) to power your camera, wind waterproof tape around the connection in an overlapping manner to cover it. D-Link DCS-4802E User Manual 17
Section 2: Installation If you are using a power adapter (not included) to power your camera, wind waterproof tape around the connection in an overlapping manner to cover it. D-Link DCS-4802E User Manual 17

User Manual
Page 18
D-Link DCS-4802E User Manual 18 If the Autorun function on the D-Link Setup Wizard SE icon that was created in your Windows Start menu (Start > D-Link > Setup Wizard SE). Step 2 Click on your computer is disabled, or if the D-Link Launcher fails to begin the installation. Section 2: Installation Software Installation Step 1 Insert the DCS-4802E CD into your computer's CD-ROM drive to start automatically, click the Start button and type D:\autorun.exe (where D: represents the drive letter of your CD-ROM drive) and press Enter.
D-Link DCS-4802E User Manual 18 If the Autorun function on the D-Link Setup Wizard SE icon that was created in your Windows Start menu (Start > D-Link > Setup Wizard SE). Step 2 Click on your computer is disabled, or if the D-Link Launcher fails to begin the installation. Section 2: Installation Software Installation Step 1 Insert the DCS-4802E CD into your computer's CD-ROM drive to start automatically, click the Start button and type D:\autorun.exe (where D: represents the drive letter of your CD-ROM drive) and press Enter.

User Manual
Page 19
... the admin ID and password for the first time, the default Admin ID is admin with the password left blank. If you wish to continue. D-Link DCS-4802E User Manual 19 When logging in for the camera, and enter the new ID and password you have a DHCP server on your network, a valid IP Address...
... the admin ID and password for the first time, the default Admin ID is admin with the password left blank. If you wish to continue. D-Link DCS-4802E User Manual 19 When logging in for the camera, and enter the new ID and password you have a DHCP server on your network, a valid IP Address...
User Manual
Page 20
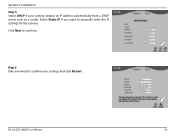
D-Link DCS-4802E User Manual 20 Select Static IP if you want to continue. Step 6 Take a moment to confirm your camera obtains an IP address automatically from a DHCP server such as a router. Click Next to manually enter the IP settings for the camera. Section 2: Installation Step 5 Select DHCP if your settings and click Restart.
D-Link DCS-4802E User Manual 20 Select Static IP if you want to continue. Step 6 Take a moment to confirm your camera obtains an IP address automatically from a DHCP server such as a router. Click Next to manually enter the IP settings for the camera. Section 2: Installation Step 5 Select DHCP if your settings and click Restart.

User Manual
Page 21
... you did not create a password, the default password is blank. D-Link DCS-4802E User Manual 21 To log in your DCS-4802E. Step 2 Select the camera and click Link to easily access and configure your Windows Start menu (Start > D-Link > Setup Wizard SE). At the end of the wizard, click Link, or enter the IP address of the camera.
... you did not create a password, the default password is blank. D-Link DCS-4802E User Manual 21 To log in your DCS-4802E. Step 2 Select the camera and click Link to easily access and configure your Windows Start menu (Start > D-Link > Setup Wizard SE). At the end of the wizard, click Link, or enter the IP address of the camera.