User Manual
Page 3
... 21 Live Video 23 Setup 25 Setup Wizard 25 Network Setup 30 Dynamic DNS 33 Image Setup 34 Video 36 Preset 38 Motion Detection 40 Time and Date 41 Event Setup 42 Advanced 49 ICR and IR 49 HTTPS 50 Access List 51 SNMP 52 Maintenance 54 Device Management 54 System 55 Firmware Upgrade 56 Status 57 Device Info 57 Logs 58 Help 59 Technical Specifications 60 Regulatory Information 63 D-Link DCS-4802E User Manual 3
... 21 Live Video 23 Setup 25 Setup Wizard 25 Network Setup 30 Dynamic DNS 33 Image Setup 34 Video 36 Preset 38 Motion Detection 40 Time and Date 41 Event Setup 42 Advanced 49 ICR and IR 49 HTTPS 50 Access List 51 SNMP 52 Maintenance 54 Device Management 54 System 55 Firmware Upgrade 56 Status 57 Device Info 57 Logs 58 Help 59 Technical Specifications 60 Regulatory Information 63 D-Link DCS-4802E User Manual 3
User Manual
Page 4
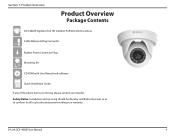
Safety Notice: Installation and servicing should be done by certified technicians so as to conform to all local codes and prevent voiding your reseller. Section 1: Product Overview Product Overview Package Contents DCS-4802E Vigilance Full HD Outdoor PoE Mini Dome Camera Cable Waterproofing Connector Rubber Power Connector Plug Mounting Kit CD-ROM with User Manual and software Quick Installation Guide If any of the above items are missing, please contact your warranty. D-Link DCS-4802E User Manual 4
Safety Notice: Installation and servicing should be done by certified technicians so as to conform to all local codes and prevent voiding your reseller. Section 1: Product Overview Product Overview Package Contents DCS-4802E Vigilance Full HD Outdoor PoE Mini Dome Camera Cable Waterproofing Connector Rubber Power Connector Plug Mounting Kit CD-ROM with User Manual and software Quick Installation Guide If any of the above items are missing, please contact your warranty. D-Link DCS-4802E User Manual 4
User Manual
Page 5
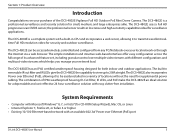
... a variety of the DCS-4802E Vigilance Full HD Outdoor PoE Mini Dome Camera. The DCS-4802E has an IP66 certified weatherproof housing designed for surveillance applications. The DCS-4802E uses a Full HD progressive scan CMOS sensor; The DCS-4802E can be easily installed in CPU and incorporates a web server, allowing it to be accessed remotely, controlled and configured from any PC/Notebook over Ethernet (PoE) port D-Link DCS-4802E User Manual 5 System Requirements • Computer with Microsoft Windows® 8, 7, or...
... a variety of the DCS-4802E Vigilance Full HD Outdoor PoE Mini Dome Camera. The DCS-4802E has an IP66 certified weatherproof housing designed for surveillance applications. The DCS-4802E uses a Full HD progressive scan CMOS sensor; The DCS-4802E can be easily installed in CPU and incorporates a web server, allowing it to be accessed remotely, controlled and configured from any PC/Notebook over Ethernet (PoE) port D-Link DCS-4802E User Manual 5 System Requirements • Computer with Microsoft Windows® 8, 7, or...
User Manual
Page 6
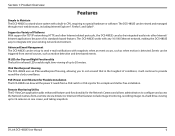
... weatherproof housing, allowing you to rest assured that in the toughest of its standards-based features. Other features include image monitoring, recording images to a hard drive, viewing up to Maintain The DCS-4802E is detected. Events can be viewed and managed through most web browsers, including Internet Explorer®, Firefox®, and Safari®. Remote Monitoring Utility The D-ViewCam application adds enhanced features and functionality for a simple and clutter-free installation. D-Link DCS-4802E User Manual 6 Section...
... weatherproof housing, allowing you to rest assured that in the toughest of its standards-based features. Other features include image monitoring, recording images to a hard drive, viewing up to Maintain The DCS-4802E is detected. Events can be viewed and managed through most web browsers, including Internet Explorer®, Firefox®, and Safari®. Remote Monitoring Utility The D-ViewCam application adds enhanced features and functionality for a simple and clutter-free installation. D-Link DCS-4802E User Manual 6 Section...
User Manual
Page 7
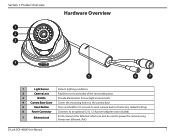
... 4 5 6 7 1 Light Sensor Detects lighting conditions 2 Camera Lens Fixed lens to record video of the surrounding area 3 IR LEDs Provide illumination for low-light environments 4 Camera Base Cover Covers the mounting holes on the camera base 5 Reset Button Press and hold for 10 seconds to reset camera back to the factory default settings 6 Power Connector Connects to an optional 12 V, 1.5 A power adapter (not included) 7 Ethernet Jack RJ-45 connector for Ethernet which can also be used to power the camera using Power over Ethernet (PoE) D-Link DCS-4802E User Manual 7
... 4 5 6 7 1 Light Sensor Detects lighting conditions 2 Camera Lens Fixed lens to record video of the surrounding area 3 IR LEDs Provide illumination for low-light environments 4 Camera Base Cover Covers the mounting holes on the camera base 5 Reset Button Press and hold for 10 seconds to reset camera back to the factory default settings 6 Power Connector Connects to an optional 12 V, 1.5 A power adapter (not included) 7 Ethernet Jack RJ-45 connector for Ethernet which can also be used to power the camera using Power over Ethernet (PoE) D-Link DCS-4802E User Manual 7
User Manual
Page 8
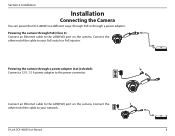
... 2: Installation Installation Connecting the Camera You can power the DCS-4802E two different ways: through PoE or through a power adapter (not included): Connect a 12 V, 1.5 A power adapter to the power connector. Powering the camera through a power adapter. D-Link DCS-4802E User Manual 8 Connect an Ethernet cable to the LAN(PoE) port on the camera. Powering the camera through PoE (Class 2): Connect an Ethernet cable to the LAN(PoE) port on the camera. Connect the other end of the cable to your network. Connect the other end of the cable to your PoE switch or PoE...
... 2: Installation Installation Connecting the Camera You can power the DCS-4802E two different ways: through PoE or through a power adapter (not included): Connect a 12 V, 1.5 A power adapter to the power connector. Powering the camera through a power adapter. D-Link DCS-4802E User Manual 8 Connect an Ethernet cable to the LAN(PoE) port on the camera. Powering the camera through PoE (Class 2): Connect an Ethernet cable to the LAN(PoE) port on the camera. Connect the other end of the cable to your network. Connect the other end of the cable to your PoE switch or PoE...
User Manual
Page 9
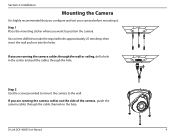
... mm deep, then insert the wall anchors into the holes. Section 2: Installation Mounting the Camera It is highly recommended that you want to position the camera. If you are running the camera cables out the side of the camera, guide the camera cables through the hole. Use a 6 mm drill bit to the wall. D-Link DCS-4802E User Manual 9 If you are running the camera cables through the wall or ceiling, drill a hole...
... mm deep, then insert the wall anchors into the holes. Section 2: Installation Mounting the Camera It is highly recommended that you want to position the camera. If you are running the camera cables out the side of the camera, guide the camera cables through the hole. Use a 6 mm drill bit to the wall. D-Link DCS-4802E User Manual 9 If you are running the camera cables through the wall or ceiling, drill a hole...
User Manual
Page 11
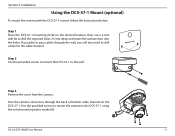
... holes 25 mm deep and insert the wall anchors into the holes. If you will also need to drill a hole for the cable channel. Use the provided screws to mount the camera to pass cables through the back or bottom cable channel on the DCS-37-1. D-Link DCS-4802E User Manual 11 Section 2: Installation Using the DCS-37-1 Mount (optional) To mount the camera with the DCS-37-1 mount, follow the instructions below.
... holes 25 mm deep and insert the wall anchors into the holes. If you will also need to drill a hole for the cable channel. Use the provided screws to mount the camera to pass cables through the back or bottom cable channel on the DCS-37-1. D-Link DCS-4802E User Manual 11 Section 2: Installation Using the DCS-37-1 Mount (optional) To mount the camera with the DCS-37-1 mount, follow the instructions below.
User Manual
Page 13
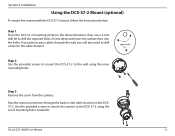
... also need to the wall using the set of mounting holes marked B. D-Link DCS-4802E User Manual 13 Use the provided screws to mount the camera to drill the required holes 25 mm deep and insert the wall anchors into the holes. Pass the camera connectors through the wall, you plan to pass cables through the back or side cable channel on the DCS37-2. Step 1 Place the DCS-37-2 mounting sticker...
... also need to the wall using the set of mounting holes marked B. D-Link DCS-4802E User Manual 13 Use the provided screws to mount the camera to drill the required holes 25 mm deep and insert the wall anchors into the holes. Pass the camera connectors through the wall, you plan to pass cables through the back or side cable channel on the DCS37-2. Step 1 Place the DCS-37-2 mounting sticker...

User Manual
Page 19
... to change the admin ID and password for the first time, the default Admin ID is admin with the password left blank. D-Link DCS-4802E User Manual 19 If your network, a valid IP Address will be displayed. If you wish to use a DHCP server, the network camera's default static IP 192.168.0.20 will appear and display the MAC address and IP address of your camera, then click the Wizard button to continue. Section 2: Installation Step 3 The Setup Wizard...
... to change the admin ID and password for the first time, the default Admin ID is admin with the password left blank. D-Link DCS-4802E User Manual 19 If your network, a valid IP Address will be displayed. If you wish to use a DHCP server, the network camera's default static IP 192.168.0.20 will appear and display the MAC address and IP address of your camera, then click the Wizard button to continue. Section 2: Installation Step 3 The Setup Wizard...
User Manual
Page 20
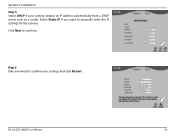
Step 6 Take a moment to manually enter the IP settings for the camera. Select Static IP if you want to confirm your camera obtains an IP address automatically from a DHCP server such as a router. Click Next to continue. D-Link DCS-4802E User Manual 20 Section 2: Installation Step 5 Select DHCP if your settings and click Restart.
Step 6 Take a moment to manually enter the IP settings for the camera. Select Static IP if you want to confirm your camera obtains an IP address automatically from a DHCP server such as a router. Click Next to continue. D-Link DCS-4802E User Manual 20 Section 2: Installation Step 5 Select DHCP if your settings and click Restart.

User Manual
Page 21
..., use your web browser to access the web configuration. After entering your Windows Start menu (Start > D-Link > Setup Wizard SE). Step 2 Select the camera and click Link to the IP address of your DCS-4802E. At the end of the wizard, click Link, or enter the IP address of the camera. If you did not create a password, the default password is designed to allow you to easily access and configure your camera into a web browser, such...
..., use your web browser to access the web configuration. After entering your Windows Start menu (Start > D-Link > Setup Wizard SE). Step 2 Select the camera and click Link to the IP address of your DCS-4802E. At the end of the wizard, click Link, or enter the IP address of the camera. If you did not create a password, the default password is designed to allow you to easily access and configure your camera into a web browser, such...

User Manual
Page 22
Click OK to continue. D-Link DCS-4802E User Manual 22 Step 4 This section displays your video profile and view or operate the camera. You can select your camera's live video. Section 3: Configuration Step 3 Enter admin as the default username and leave the password blank.
Click OK to continue. D-Link DCS-4802E User Manual 22 Step 4 This section displays your video profile and view or operate the camera. You can select your camera's live video. Section 3: Configuration Step 3 Enter admin as the default username and leave the password blank.
User Manual
Page 26
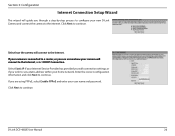
... set a static address within your home network. Section 3: Configuration Internet Connection Setup Wizard This wizard will connect to the Internet, select DHCP Connection. If your camera is connected to a router, or you are using PPPoE, select Enable PPPoE and enter your new D-Link Camera and connect the camera to configure your user name and password. Enter the correct configuration information and click Next to continue. Click Next to continue. Select Static IP if your Internet Service...
... set a static address within your home network. Section 3: Configuration Internet Connection Setup Wizard This wizard will connect to the Internet, select DHCP Connection. If your camera is connected to a router, or you are using PPPoE, select Enable PPPoE and enter your new D-Link Camera and connect the camera to configure your user name and password. Enter the correct configuration information and click Next to continue. Click Next to continue. Select Static IP if your Internet Service...
User Manual
Page 28
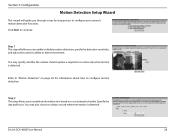
... adjust the camera's ability to enable motion detection based on page 40 for information about how to continue. Refer to "Motion Detection" on a customized schedule. D-Link DCS-4802E User Manual 28 Step 1 This step will guide you through a step-by-step process to always record whenever motion is detected. Specify the day and hours. You may specify whether the camera should capture a snapshot or a video clip when motion is detected. Section 3: Configuration Motion Detection Setup...
... adjust the camera's ability to enable motion detection based on page 40 for information about how to continue. Refer to "Motion Detection" on a customized schedule. D-Link DCS-4802E User Manual 28 Step 1 This step will guide you through a step-by-step process to always record whenever motion is detected. Specify the day and hours. You may specify whether the camera should capture a snapshot or a video clip when motion is detected. Section 3: Configuration Motion Detection Setup...
User Manual
Page 31
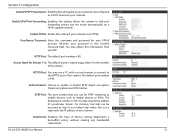
... port number that you use a PC with a secure browser to connect to the HTTPS port of your camera. The default port number is 554. Section 3: Configuration Enable UPnP Presentation: Enabling this setting allows the camera to add port forwarding entries into the router automatically on your network. Enable UPnP Port Forwarding: Enabling this setting allows your camera to enable or disable RTSP digest encryption. For instance, live1.sdp can be configured as mobile phones or PDAs. User Name / Password: Enter the username and password for RTSP streaming...
... port number that you use a PC with a secure browser to connect to the HTTPS port of your camera. The default port number is 554. Section 3: Configuration Enable UPnP Presentation: Enabling this setting allows the camera to add port forwarding entries into the router automatically on your network. Enable UPnP Port Forwarding: Enabling this setting allows your camera to enable or disable RTSP digest encryption. For instance, live1.sdp can be configured as mobile phones or PDAs. User Name / Password: Enter the username and password for RTSP streaming...
User Manual
Page 56
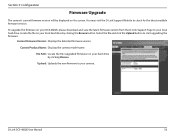
... Browse button. Current Product Name: Displays the camera model name. File Path: Locate the file (upgraded firmware) on your DCS-4802E, please download and save the latest firmware version from the D-Link Support Page to your camera. Select the file and click the Upload button to check for the latest available firmware version. D-Link DCS-4802E User Manual 56 Current Firmware Version: Displays the detected firmware version. Locate the file on this screen. Section 3: Configuration Firmware Upgrade The camera's current firmware version will be displayed on...
... Browse button. Current Product Name: Displays the camera model name. File Path: Locate the file (upgraded firmware) on your DCS-4802E, please download and save the latest firmware version from the D-Link Support Page to your camera. Select the file and click the Upload button to check for the latest available firmware version. D-Link DCS-4802E User Manual 56 Current Firmware Version: Displays the detected firmware version. Locate the file on this screen. Section 3: Configuration Firmware Upgrade The camera's current firmware version will be displayed on...

User Manual
Page 61
...; Browser: Internet Explorer, Firefox, Safari ƒƒ Motion detection ƒƒ Event notification and uploading of snapshots/video clips via e-mail or FTP General Remote Management ƒƒ Take snapshots/video clips and save to local hard drive D-ViewCam™ System ƒƒ Operating System: Microsoft Windows 8/7/Vista Requirements ƒƒ Web Browser: Internet Explorer 7 or higher D-ViewCam™ ƒƒ Remote management/control of up to 32 cameras Software Functions...
...; Browser: Internet Explorer, Firefox, Safari ƒƒ Motion detection ƒƒ Event notification and uploading of snapshots/video clips via e-mail or FTP General Remote Management ƒƒ Take snapshots/video clips and save to local hard drive D-ViewCam™ System ƒƒ Operating System: Microsoft Windows 8/7/Vista Requirements ƒƒ Web Browser: Internet Explorer 7 or higher D-ViewCam™ ƒƒ Remote management/control of up to 32 cameras Software Functions...
Quick Installation Guide
Page 6
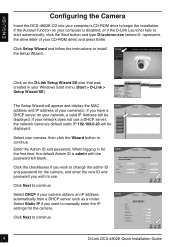
... and follow the instructions to continue. 4 D-Link DCS-4802E Quick Installation Guide Click Next to install the Setup Wizard. ENGLISH Configuring the Camera Insert the DCS-4802E CD into your camera(s). If you have a DHCP server on your computer is admin with the password left blank. When logging in your network does not use . Select Static IP if you want to manually enter the IP settings for the camera, and enter the...
... and follow the instructions to continue. 4 D-Link DCS-4802E Quick Installation Guide Click Next to install the Setup Wizard. ENGLISH Configuring the Camera Insert the DCS-4802E CD into your camera(s). If you have a DHCP server on your computer is admin with the password left blank. When logging in your network does not use . Select Static IP if you want to manually enter the IP settings for the camera, and enter the...
Quick Installation Guide
Page 7
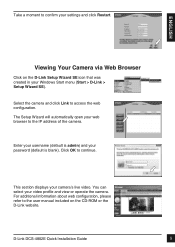
... select your password (default is admin) and your video profile and view or operate the camera. Click OK to access the web configuration. Take a moment to confirm your web browser to the IP address of the camera. The Setup Wizard will automatically open your settings and click Restart. D-Link DCS-4802E Quick Installation Guide 5 ENGLISH Viewing Your Camera via Web Browser Click on the CD-ROM or the D-Link website. This section displays your Windows Start menu (Start > D-Link > Setup Wizard SE...
... select your password (default is admin) and your video profile and view or operate the camera. Click OK to access the web configuration. Take a moment to confirm your web browser to the IP address of the camera. The Setup Wizard will automatically open your settings and click Restart. D-Link DCS-4802E Quick Installation Guide 5 ENGLISH Viewing Your Camera via Web Browser Click on the CD-ROM or the D-Link website. This section displays your Windows Start menu (Start > D-Link > Setup Wizard SE...


