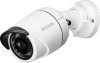
Quick Install Guide
Page 7
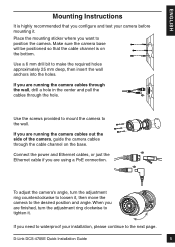
...on the bottom. If you are finished, turn the adjustment ring counterclockwise to loosen it, then move the camera to the next page. D-Link DCS-4705E Quick Installation Guide 5 Place the mounting sticker where you need to waterproof your camera before mounting it . If you want to the wall.... adjustment ring clockwise to make the required holes approximately 25 mm deep, then insert the wall anchors into the holes. When you configure and test your installation, please continue to the desired position and angle. Use a 6 mm drill bit to tighten it . Make sure the camera ...
...on the bottom. If you are finished, turn the adjustment ring counterclockwise to loosen it, then move the camera to the next page. D-Link DCS-4705E Quick Installation Guide 5 Place the mounting sticker where you need to waterproof your camera before mounting it . If you want to the wall.... adjustment ring clockwise to make the required holes approximately 25 mm deep, then insert the wall anchors into the holes. When you configure and test your installation, please continue to the desired position and angle. Use a 6 mm drill bit to tighten it . Make sure the camera ...

Quick Install Guide
Page 78
... In a residential environment this device must accept any interference received, including interference that may cause radio interference. 76 D-Link DCS-4705E Quick Installation Guide Operation is compliant with Canadian ICES-003. This equipment generates, uses, and can radiate radio frequency ...the equipment. Regulatory Statements (Only for Class A product) Federal Communication Commission Interference Statement This equipment has been tested and found to comply with the instruction manual, may cause harmful interference to radio communications. Caution This device complies...
... In a residential environment this device must accept any interference received, including interference that may cause radio interference. 76 D-Link DCS-4705E Quick Installation Guide Operation is compliant with Canadian ICES-003. This equipment generates, uses, and can radiate radio frequency ...the equipment. Regulatory Statements (Only for Class A product) Federal Communication Commission Interference Statement This equipment has been tested and found to comply with the instruction manual, may cause harmful interference to radio communications. Caution This device complies...
Quick Install Guide
Page 79
...the receiving antenna. - Cet appareil numérique de la classe B est conforme à la norme NMB-003 du Canada. D-Link DCS-4705E Quick Installation Guide 77 This equipment generates, uses and can be determined by turning the equipment off and on a circuit different from that ... by one of the FCC Rules. Regulatory Statements (Only for Class B product) Federal Communication Commission Interference Statement This equipment has been tested and found to comply with the limits for compliance could void the user's authority to operate the equipment. These limits are designed to...
...the receiving antenna. - Cet appareil numérique de la classe B est conforme à la norme NMB-003 du Canada. D-Link DCS-4705E Quick Installation Guide 77 This equipment generates, uses and can be determined by turning the equipment off and on a circuit different from that ... by one of the FCC Rules. Regulatory Statements (Only for Class B product) Federal Communication Commission Interference Statement This equipment has been tested and found to comply with the limits for compliance could void the user's authority to operate the equipment. These limits are designed to...
User Manual
Page 9
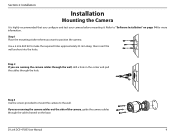
...information. Step 2 If you are running the camera cables out the side of the camera, guide the camera cables through the hole. D-Link DCS-4705E User Manual 9 Section 2: Installation Installation Mounting the Camera It is highly recommended that you want to make the required holes approximately 25 mm ...deep, then insert the wall anchors into the holes. Step 1 Place the mounting sticker where you configure and test your camera before mounting it. Use a 6 mm drill bit to position the camera. Step 3 Use the screws provided to mount the ...
...information. Step 2 If you are running the camera cables out the side of the camera, guide the camera cables through the hole. D-Link DCS-4705E User Manual 9 Section 2: Installation Installation Mounting the Camera It is highly recommended that you want to make the required holes approximately 25 mm ...deep, then insert the wall anchors into the holes. Step 1 Place the mounting sticker where you configure and test your camera before mounting it. Use a 6 mm drill bit to position the camera. Step 3 Use the screws provided to mount the ...
