Product Manual
Page 2
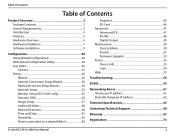
... 24 Live Video 25 Camera 25 Setup 26 Wizard 26 Internet Connection Setup Wizard 26 Motion Detection Setup Wizard 30 Network Setup 33 Wireless Setup (DCS-3430 only 35 Dynamic DNS 36 Image Setup 37 Audio and Video 38 Motion Detection 40 Time and Date 41 Recording 42 How to save video... Networking Basics 61 Check your IP address 61 Statically Assign an IP address 62 Technical Specifications 63 Contacting Technical Support 66 Warranty 67 Registration 73 D-Link DCS-3411/3430 User Manual 2
... 24 Live Video 25 Camera 25 Setup 26 Wizard 26 Internet Connection Setup Wizard 26 Motion Detection Setup Wizard 30 Network Setup 33 Wireless Setup (DCS-3430 only 35 Dynamic DNS 36 Image Setup 37 Audio and Video 38 Motion Detection 40 Time and Date 41 Recording 42 How to save video... Networking Basics 61 Check your IP address 61 Statically Assign an IP address 62 Technical Specifications 63 Contacting Technical Support 66 Warranty 67 Registration 73 D-Link DCS-3411/3430 User Manual 2
Product Manual
Page 3
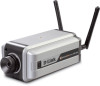
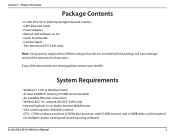
... (2.8GHz plus processor with the package will cause damage and void the warranty for multiple camera viewing and recording using software) D-Link DCS-3411/3430 User Manual 3 Section 1 - Product Overview PPraocdkaugcteOCvoenrtveinetws • D-Link DCS-3411/3430 Day & Night Network Camera • CAT5 Ethernet Cable • Power Adapter • Manual and Software on CD • Quick Install...
... (2.8GHz plus processor with the package will cause damage and void the warranty for multiple camera viewing and recording using software) D-Link DCS-3411/3430 User Manual 3 Section 1 - Product Overview PPraocdkaugcteOCvoenrtveinetws • D-Link DCS-3411/3430 Day & Night Network Camera • CAT5 Ethernet Cable • Power Adapter • Manual and Software on CD • Quick Install...
Product Manual
Page 4
...equipment for the end-user's intended use of the D-Link product, which fails to comply with MPEG4. Product Overview Introduction The D-Link DCS-3411/3430 Day & Night Network Camera is a powerful surveillance system that the D-Link product provided herein is prohibited in certain states or jurisdictions... of capturing video in the world! You can reduce the size of his or her state. D-Link disclaims any liability whatsoever for any software. D-Link DCS-3411/3430 User Manual 4 Simple installation procedures, along with the built-in using an Internet browser anywhere in...
...equipment for the end-user's intended use of the D-Link product, which fails to comply with MPEG4. Product Overview Introduction The D-Link DCS-3411/3430 Day & Night Network Camera is a powerful surveillance system that the D-Link product provided herein is prohibited in certain states or jurisdictions... of capturing video in the world! You can reduce the size of his or her state. D-Link disclaims any liability whatsoever for any software. D-Link DCS-3411/3430 User Manual 4 Simple installation procedures, along with the built-in using an Internet browser anywhere in...

Product Manual
Page 5
The camera also features 16x digital zoom for live video images over the Intranet and Internet. D-Link DCS-3411/3430 User Manual 5 When using H.264 you can reduce the bandwidth and storage needs by up to 80% when compared to MJPEG or by the... amusement parks and other Internet/Intranet applications because of Protocols: Supporting TCP/IP networking, SMTP e-mail, HTTP and other Internet related protocols, the DCS-3411/3430 Network Camera can be integrated easily into traditional system (CCTV) for both analog and digital video streaming purposes. • Powerful Surveillance and Remote ...
The camera also features 16x digital zoom for live video images over the Intranet and Internet. D-Link DCS-3411/3430 User Manual 5 When using H.264 you can reduce the bandwidth and storage needs by up to 80% when compared to MJPEG or by the... amusement parks and other Internet/Intranet applications because of Protocols: Supporting TCP/IP networking, SMTP e-mail, HTTP and other Internet related protocols, the DCS-3411/3430 Network Camera can be integrated easily into traditional system (CCTV) for both analog and digital video streaming purposes. • Powerful Surveillance and Remote ...
Product Manual
Page 6
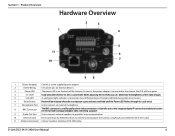
... held until the Power LED flashes through its cycle twice. 7 Microphone Port Use to connect an external microphone. 8 BNC Connector The BNC connector is connected. D-Link DCS-3411/3430 User Manual 6 Product Overview Hardware Overview 2 3 1 4 5 11 6 7 10 98 1 Power Receptor Connects to the supplied power adapter. 2 DI/DO Wiring I/O connectors for external devices...
... held until the Power LED flashes through its cycle twice. 7 Microphone Port Use to connect an external microphone. 8 BNC Connector The BNC connector is connected. D-Link DCS-3411/3430 User Manual 6 Product Overview Hardware Overview 2 3 1 4 5 11 6 7 10 98 1 Power Receptor Connects to the supplied power adapter. 2 DI/DO Wiring I/O connectors for external devices...
Product Manual
Page 7
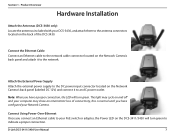
...Attach the external power supply to the DC power input connector located on the back of connectivity, this is normal until you have configured your computer may cycle on the DCS-3411/3430 will turn green to the network. D-Link DCS-3411/3430 User Manual 7 Section 1 - ...The light may show an intermittent loss of the DCS 3430. Product Overview Hardware Installation Attach the Antennas (DCS-3430 only) Locate the antennas included with ...
...Attach the external power supply to the DC power input connector located on the back of connectivity, this is normal until you have configured your computer may cycle on the DCS-3411/3430 will turn green to the network. D-Link DCS-3411/3430 User Manual 7 Section 1 - ...The light may show an intermittent loss of the DCS 3430. Product Overview Hardware Installation Attach the Antennas (DCS-3430 only) Locate the antennas included with ...

Product Manual
Page 8
Attach the camera stand to the Network Camera bottom socket cavity. Product Overview The Network Camera comes with a camera stand with a swivel ball screw head that can be mounted to the ceiling, or any wall securely. There are holes located in the base of the camera stand allowing the Network Camera to be attached to the Network Camera and station it for camera stand 8 D-Link DCS-3411/3430 User Manual Socket for your application. Section 1 -
Attach the camera stand to the Network Camera bottom socket cavity. Product Overview The Network Camera comes with a camera stand with a swivel ball screw head that can be mounted to the ceiling, or any wall securely. There are holes located in the base of the camera stand allowing the Network Camera to be attached to the Network Camera and station it for camera stand 8 D-Link DCS-3411/3430 User Manual Socket for your application. Section 1 -

Product Manual
Page 9
... to the next screen. The steps and screens are shown in the CD-ROM drive. If it does start on the computer and Insert the D-Link DCS-3411/3430 Driver CD in Windows® XP. In the Run command box type "D:\autorun.exe", where D: represents the drive letter of your computer, click Start...
... to the next screen. The steps and screens are shown in the CD-ROM drive. If it does start on the computer and Insert the D-Link DCS-3411/3430 Driver CD in Windows® XP. In the Run command box type "D:\autorun.exe", where D: represents the drive letter of your computer, click Start...
Product Manual
Page 10
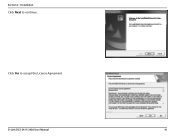
Click Yes to continue. Section 2 - D-Link DCS-3411/3430 User Manual 10 Installation Click Next to accept the License Agreement.
Click Yes to continue. Section 2 - D-Link DCS-3411/3430 User Manual 10 Installation Click Next to accept the License Agreement.

Product Manual
Page 11
D-Link DCS-3411/3430 User Manual 11 Installation To start the installation click Next. Section 2 - Note: The installation may take several minutes to complete.
D-Link DCS-3411/3430 User Manual 11 Installation To start the installation click Next. Section 2 - Note: The installation may take several minutes to complete.

Product Manual
Page 12
Section 2 - D-Link DCS-3411/3430 User Manual 12 Installation Click Finish to complete the installation.
Section 2 - D-Link DCS-3411/3430 User Manual 12 Installation Click Finish to complete the installation.

Product Manual
Page 13
Click ffdshow Click I Agree to playback video taken by the DCS-3411/3430. D-Link DCS-3411/3430 User Manual 13 Section 2 - Installation Now, click on ffdshow from the autorun screen. This will install the proper codecs that will allow you to continue.
Click ffdshow Click I Agree to playback video taken by the DCS-3411/3430. D-Link DCS-3411/3430 User Manual 13 Section 2 - Installation Now, click on ffdshow from the autorun screen. This will install the proper codecs that will allow you to continue.
Product Manual
Page 14
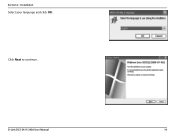
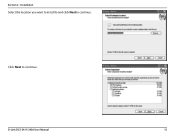
Section 2 - Installation Select your language and click OK. Click Next to continue. D-Link DCS-3411/3430 User Manual 14
Section 2 - Installation Select your language and click OK. Click Next to continue. D-Link DCS-3411/3430 User Manual 14
Product Manual
Page 15
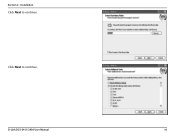
Installation Select the location you want to install to and click Next to continue. D-Link DCS-3411/3430 User Manual 15 Click Next to continue. Section 2 -
Installation Select the location you want to install to and click Next to continue. D-Link DCS-3411/3430 User Manual 15 Click Next to continue. Section 2 -
Product Manual
Page 16
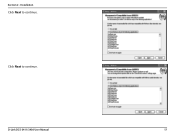
Installation Click Next to continue. Click Next to continue. Section 2 - D-Link DCS-3411/3430 User Manual 16
Installation Click Next to continue. Click Next to continue. Section 2 - D-Link DCS-3411/3430 User Manual 16
Product Manual
Page 17
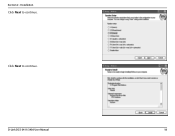
Section 2 - Installation Click Next to continue. D-Link DCS-3411/3430 User Manual 17 Click Next to continue.
Section 2 - Installation Click Next to continue. D-Link DCS-3411/3430 User Manual 17 Click Next to continue.
Product Manual
Page 18
Installation Click Next to continue. Click Next to continue. D-Link DCS-3411/3430 User Manual 18 Section 2 -
Installation Click Next to continue. Click Next to continue. D-Link DCS-3411/3430 User Manual 18 Section 2 -

Product Manual
Page 19
Section 2 - Installation Once ffdshow is finished installing, click Finish. D-Link DCS-3411/3430 User Manual 19
Section 2 - Installation Once ffdshow is finished installing, click Finish. D-Link DCS-3411/3430 User Manual 19
Product Manual
Page 20
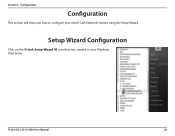
Configuration Configuration This section will show you how to configure your Windows Start menu. D-Link DCS-3411/3430 User Manual 20 Setup Wizard Configuration Click on the D-Link Setup Wizard SE icon that was created in your new D-Link Network Camera using the Setup Wizard. Section 3 -
Configuration Configuration This section will show you how to configure your Windows Start menu. D-Link DCS-3411/3430 User Manual 20 Setup Wizard Configuration Click on the D-Link Setup Wizard SE icon that was created in your new D-Link Network Camera using the Setup Wizard. Section 3 -
Product Manual
Page 21
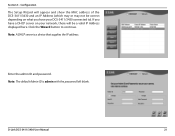
If you have a DHCP server on what you have your network, there will be a valid IP Address displayed here. Note: The default Admin ID is a device that supplies the IP address. Section 3 - Note: A DHCP server is admin with the password left blank. D-Link DCS-3411/3430 User Manual 21 Configuration The Setup Wizard will appear and show the MAC address of the DCS-3411/3430 and an IP Address (which may or may not be correct depending on your DCS-3411/3430 connected to continue. Enter the admin ID and password. Click the Wizard button to ).
If you have a DHCP server on what you have your network, there will be a valid IP Address displayed here. Note: The default Admin ID is a device that supplies the IP address. Section 3 - Note: A DHCP server is admin with the password left blank. D-Link DCS-3411/3430 User Manual 21 Configuration The Setup Wizard will appear and show the MAC address of the DCS-3411/3430 and an IP Address (which may or may not be correct depending on your DCS-3411/3430 connected to continue. Enter the admin ID and password. Click the Wizard button to ).


