
Product Manual
Page 2
... 53 Status 54 Device Info 54 Logs 55 Help 56 DI/DO Schematics 57 Technical Specifications 59 Contacting Technical Support 61 Warranty 62 Registration 68 D-Link DCS-3112 User Manual 2
... 53 Status 54 Device Info 54 Logs 55 Help 56 DI/DO Schematics 57 Technical Specifications 59 Contacting Technical Support 61 Warranty 62 Registration 68 D-Link DCS-3112 User Manual 2

Product Manual
Page 3
... reserved. Manual Revisions Revision 1.0 Date September 6, 2011 Description DCS-3112 Revision A1 with firmware version V1.00 Trademarks D-Link and the D-Link logo are trademarks or registered trademarks of D-Link Corporation or its subsidiaries in the contents hereof without prior expressed written permission from D-Link Systems, Inc. D-Link DCS-3112 User Manual 3 This publication may not be reproduced, in...
... reserved. Manual Revisions Revision 1.0 Date September 6, 2011 Description DCS-3112 Revision A1 with firmware version V1.00 Trademarks D-Link and the D-Link logo are trademarks or registered trademarks of D-Link Corporation or its subsidiaries in the contents hereof without prior expressed written permission from D-Link Systems, Inc. D-Link DCS-3112 User Manual 3 This publication may not be reproduced, in...

Product Manual
Page 4
D-Link DCS-3112 User Manual 4 Section 1 - Product Overview Package Contents DCS-3112 Network Camera Camera Stand CAT5 Ethernet Cable Power Adapter Manual and Wizard on CD-ROM If any of the above items are missing, please contact your reseller.
D-Link DCS-3112 User Manual 4 Section 1 - Product Overview Package Contents DCS-3112 Network Camera Camera Stand CAT5 Ethernet Cable Power Adapter Manual and Wizard on CD-ROM If any of the above items are missing, please contact your reseller.

Product Manual
Page 5
Section 2 - Hardware Overview 1 2 Hardware Overview Rear 8 7 34 5 6 1 DC Power 12V DC 2 Audio In External Audio Input connector 3 Reset Press and hold this button for 10 seconds to reset the camera 4 BNC Video analog output 5 Audio Out Audio Output for external speakers 6 I/O Connector I/O connectors for external devices 7 LED Power and network indicator 8 Ethernet (PoE) RJ-45 connector for Ethernet which can also be used to power the camera using Power over Ethernet (PoE) D-Link DCS-3112 User Manual 5
Section 2 - Hardware Overview 1 2 Hardware Overview Rear 8 7 34 5 6 1 DC Power 12V DC 2 Audio In External Audio Input connector 3 Reset Press and hold this button for 10 seconds to reset the camera 4 BNC Video analog output 5 Audio Out Audio Output for external speakers 6 I/O Connector I/O connectors for external devices 7 LED Power and network indicator 8 Ethernet (PoE) RJ-45 connector for Ethernet which can also be used to power the camera using Power over Ethernet (PoE) D-Link DCS-3112 User Manual 5

Product Manual
Page 6
Hardware Overview Front 2 1 1 Lens Connector Connect to a CS mount 2 ICR Sensor The IR-Cut Removable sensor judges lighting conditions and switches from color to infrared accordingly D-Link DCS-3112 User Manual 6 Section 2 -
Hardware Overview Front 2 1 1 Lens Connector Connect to a CS mount 2 ICR Sensor The IR-Cut Removable sensor judges lighting conditions and switches from color to infrared accordingly D-Link DCS-3112 User Manual 6 Section 2 -

Product Manual
Page 7
NTSC: TV output signal selector 4. AES: Auto Electric Shutter 2. Section 2 - PAL: TV output signal selector 12 1 DC-Iris Connector Connector for DC auto iris lens 2 DIP Switch Toggles several different camera options D-Link DCS-3112 User Manual 7 DC IRIS: Use an auto iris (DC drive) 3. Hardware Overview 1.
NTSC: TV output signal selector 4. AES: Auto Electric Shutter 2. Section 2 - PAL: TV output signal selector 12 1 DC-Iris Connector Connector for DC auto iris lens 2 DIP Switch Toggles several different camera options D-Link DCS-3112 User Manual 7 DC IRIS: Use an auto iris (DC drive) 3. Hardware Overview 1.

Product Manual
Page 8
Hardware Overview 1 1 SD Card Slot Local SD card for storing recorded images and videos D-Link DCS-3112 User Manual 8 Section 2 -
Hardware Overview 1 1 SD Card Slot Local SD card for storing recorded images and videos D-Link DCS-3112 User Manual 8 Section 2 -

Product Manual
Page 9
If the Autorun function on the right will open. After clicking Setup Wizard, the window on your computer is disabled, or if the D-Link Launcher fails to begin the installation. Click Next to begin the installation. Type D:\autorun.exe, where D: represents the drive letter of your computer's CD-ROM drive to start automatically, click Start > Run. Configuration Configuration with Wizard Insert the DCS-3112 CD into your CD-ROM drive. Click Installation Wizard to continue. D-Link DCS-3112 User Manual 9 Section 3 -
If the Autorun function on the right will open. After clicking Setup Wizard, the window on your computer is disabled, or if the D-Link Launcher fails to begin the installation. Click Next to begin the installation. Type D:\autorun.exe, where D: represents the drive letter of your computer's CD-ROM drive to start automatically, click Start > Run. Configuration Configuration with Wizard Insert the DCS-3112 CD into your CD-ROM drive. Click Installation Wizard to continue. D-Link DCS-3112 User Manual 9 Section 3 -

Product Manual
Page 10
To start the installation process, click Next. Section 3 - Configuration Click Yes to continue. D-Link DCS-3112 User Manual 10 Then, click Next to accept the License Agreement. Note: The installation may take several minutes to finish.
To start the installation process, click Next. Section 3 - Configuration Click Yes to continue. D-Link DCS-3112 User Manual 10 Then, click Next to accept the License Agreement. Note: The installation may take several minutes to finish.

Product Manual
Page 11
Configuration Click Finish to complete the installation. Start > D-Link > Setup Wizard SE D-Link DCS-3112 User Manual 11 Section 3 - Click on the D-Link Setup Wizard SE icon that was created in your Windows Start menu.
Configuration Click Finish to complete the installation. Start > D-Link > Setup Wizard SE D-Link DCS-3112 User Manual 11 Section 3 - Click on the D-Link Setup Wizard SE icon that was created in your Windows Start menu.

Product Manual
Page 12
If your camera(s). When logging in for the first time, the default Admin ID is admin with the password left blank. Configuration The Setup Wizard will appear and display the MAC address and IP address of your network does not use a DHCP server, the network camera's default static IP address 192.168.0.20 will be displayed. Click the Wizard button to the next page. Section 3 - If you have a DHCP server on your network, a valid IP Address will be displayed. Enter the Admin ID and password. Click Next, to proceed to continue. D-Link DCS-3112 User Manual 12
If your camera(s). When logging in for the first time, the default Admin ID is admin with the password left blank. Configuration The Setup Wizard will appear and display the MAC address and IP address of your network does not use a DHCP server, the network camera's default static IP address 192.168.0.20 will be displayed. Click the Wizard button to the next page. Section 3 - If you have a DHCP server on your network, a valid IP Address will be displayed. Enter the Admin ID and password. Click Next, to proceed to continue. D-Link DCS-3112 User Manual 12

Product Manual
Page 13
D-Link DCS-3112 User Manual 13 Select static IP if the camera will use the same IP address each time it boots up. Click Next, to proceed to confirm your camera obtains an IP address automatically when it is started. Configuration Select DHCP if your settings and click Restart. Take a moment to the next page. Section 3 -
D-Link DCS-3112 User Manual 13 Select static IP if the camera will use the same IP address each time it boots up. Click Next, to proceed to confirm your camera obtains an IP address automatically when it is started. Configuration Select DHCP if your settings and click Restart. Take a moment to the next page. Section 3 -
Product Manual
Page 14
... Wizard will receive an IP address assigned. Start > D-Link > Setup Wizard SE Select the camera and click the button labeled "Link" to the IP address of the camera: 192.168.0.20 D-Link DCS-3112 User Manual 14 Section 3 - Click on the D-Link Setup Wizard SE icon that was created in your new... D-Link Network Camera using the Web-based Configuration Utility. Note:...
... Wizard will receive an IP address assigned. Start > D-Link > Setup Wizard SE Select the camera and click the button labeled "Link" to the IP address of the camera: 192.168.0.20 D-Link DCS-3112 User Manual 14 Section 3 - Click on the D-Link Setup Wizard SE icon that was created in your new... D-Link Network Camera using the Web-based Configuration Utility. Note:...

Product Manual
Page 15
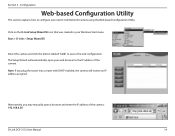
D-Link DCS-3112 User Manual 15 Section 3 - Check Always trust content from D-Link and then click Yes to continue. Configuration Enter admin as the default username and leave the password blank. Click OK to continue.
D-Link DCS-3112 User Manual 15 Section 3 - Check Always trust content from D-Link and then click Yes to continue. Configuration Enter admin as the default username and leave the password blank. Click OK to continue.
Product Manual
Page 16
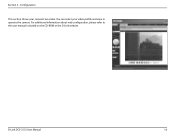
You can select your camera's live video. D-Link DCS-3112 User Manual 16 Configuration This section shows your video profile and view or operate the camera. For additional information about web configuration, please refer to the user manual included on the CD-ROM or the D-Link website. Section 3 -
You can select your camera's live video. D-Link DCS-3112 User Manual 16 Configuration This section shows your video profile and view or operate the camera. For additional information about web configuration, please refer to the user manual included on the CD-ROM or the D-Link website. Section 3 -

Product Manual
Page 17
D-ViewCam is included for IP surveillance. Follow the Installation Wizard to configure all the advanced settings for your cameras. Configuration D-ViewCam Setup Wizard D-ViewCam software is a comprehensive management tool for the administrator to install the VMS software. D-Link DCS-3112 User Manual 17 Insert the CD-ROM into the CD-ROM drive. You may use the software to install D-ViewCam. Section 3 - Click "Install D-ViewCam Software" from menu, and select "D-ViewCam" to manage multiple D-Link IP cameras remotely.
D-ViewCam is included for IP surveillance. Follow the Installation Wizard to configure all the advanced settings for your cameras. Configuration D-ViewCam Setup Wizard D-ViewCam software is a comprehensive management tool for the administrator to install the VMS software. D-Link DCS-3112 User Manual 17 Insert the CD-ROM into the CD-ROM drive. You may use the software to install D-ViewCam. Section 3 - Click "Install D-ViewCam Software" from menu, and select "D-ViewCam" to manage multiple D-Link IP cameras remotely.

Product Manual
Page 18
D-Link DCS-3112 User Manual 18 To start D-ViewCam, select Start > All Programs > D-Link D-ViewCam > Main Console. For more detail operation of using D-ViewCam software, please refer to complete the installation. Configuration Click Finish to D-ViewCam Manual. Section 3 -
D-Link DCS-3112 User Manual 18 To start D-ViewCam, select Start > All Programs > D-Link D-ViewCam > Main Console. For more detail operation of using D-ViewCam software, please refer to complete the installation. Configuration Click Finish to D-ViewCam Manual. Section 3 -

Product Manual
Page 19
... 1 Video Profile 2 Video Profile 3 Full screen mode Taking a Snapshot Recording a Video Clip Set a Storage Folder Listen/Stop Listening Talk/Stop Talking Start/Stop Digital Output D-Link DCS-3112 User Manual Control Pad This control pad can zoom in on the live video. You can be enabled. You may also select your language using...
... 1 Video Profile 2 Video Profile 3 Full screen mode Taking a Snapshot Recording a Video Clip Set a Storage Folder Listen/Stop Listening Talk/Stop Talking Start/Stop Digital Output D-Link DCS-3112 User Manual Control Pad This control pad can zoom in on the live video. You can be enabled. You may also select your language using...

Product Manual
Page 20
... defined, selecting a preset from back and forth within the FOV Stops the camera ePTZ motion Preset Path Starts the camera's motion along the predefined path D-Link DCS-3112 User Manual 20 ePTZ Speed: This camera uses electronic pan/tilt/zoom (ePTZ) to select and view areas of interest in the field of interest...
... defined, selecting a preset from back and forth within the FOV Stops the camera ePTZ motion Preset Path Starts the camera's motion along the predefined path D-Link DCS-3112 User Manual 20 ePTZ Speed: This camera uses electronic pan/tilt/zoom (ePTZ) to select and view areas of interest in the field of interest...

Product Manual
Page 21
Click Next to continue. D-Link DCS-3112 User Manual 21 Alternatively, you through a step-by-step process to the internet. Internet Connection Setup Wizard This wizard will guide you may click Manual Internet Connection Setup to manually configure your new D-Link Camera and connect the camera to configure your Network Camera. To quickly configure your...
Click Next to continue. D-Link DCS-3112 User Manual 21 Alternatively, you through a step-by-step process to the internet. Internet Connection Setup Wizard This wizard will guide you may click Manual Internet Connection Setup to manually configure your new D-Link Camera and connect the camera to configure your Network Camera. To quickly configure your...


