
Quick Installation Guide
Page 5
...deep with a 6mm drill bit where you want to support the screws. Step 6: Adjust the angle and rotation of the wall or ceiling. Make sure that are in the wall or ceiling. You can also rotate the camera on the material of concrete, drill the holes first, then insert the .... You 6 can use a pencil to the right or left , then attach the camera by rotating it . 1 Step 2: Place the baseplate where you marked. Mount the Camera Step 1: Rotate the baseplate counterclockwise and remove it until the alignment tab points up . Step 3: Depending on the baseplate about 45° to...
...deep with a 6mm drill bit where you want to support the screws. Step 6: Adjust the angle and rotation of the wall or ceiling. Make sure that are in the wall or ceiling. You can also rotate the camera on the material of concrete, drill the holes first, then insert the .... You 6 can use a pencil to the right or left , then attach the camera by rotating it . 1 Step 2: Place the baseplate where you marked. Mount the Camera Step 1: Rotate the baseplate counterclockwise and remove it until the alignment tab points up . Step 3: Depending on the baseplate about 45° to...
User Manual
Page 14
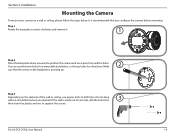
...Link DCS-2530L User Manual 14 Section 2: Installation Mounting the Camera To mount your camera on the material of concrete, drill the holes first, 3 then insert the plastic anchors to mark the holes. Make 2 sure that you configure the camera before mounting. It is recommended that the arrow on the baseplate is made out of the wall... use the lower holes for a removable installation, or the top holes for a fixed one. If the wall is pointing up. Step 1 Rotate the baseplate counter-clockwise and remove it. 1 Step 2 Place the baseplate where you marked. Step ...
...Link DCS-2530L User Manual 14 Section 2: Installation Mounting the Camera To mount your camera on the material of concrete, drill the holes first, 3 then insert the plastic anchors to mark the holes. Make 2 sure that you configure the camera before mounting. It is recommended that the arrow on the baseplate is made out of the wall... use the lower holes for a removable installation, or the top holes for a fixed one. If the wall is pointing up. Step 1 Rotate the baseplate counter-clockwise and remove it. 1 Step 2 Place the baseplate where you marked. Step ...