
User Manual
Page 3
... 5 Introduction 6 Features 7 Hardware Overview 8 Front View 8 Rear View 9 Side View 10 Installation 11 Zero Configuration Setup 11 Camera Setup Wizard 14 Windows Users 14 Mac Users 15 Manual Hardware Installation 17 Mount the Camera 18 mydlink 19 Configuration 20 Using the Configuration Interface 20 Live Video 21 Setup 23 Setup Wizard 23... 56 System 57 Firmware Upgrade 58 Status 59 Device Info 59 Logs 60 Help 61 DI/DO Specifications 62 Technical Specifications 63 Safety Statements 66 D-Link DCS-2210L User Manual 3
... 5 Introduction 6 Features 7 Hardware Overview 8 Front View 8 Rear View 9 Side View 10 Installation 11 Zero Configuration Setup 11 Camera Setup Wizard 14 Windows Users 14 Mac Users 15 Manual Hardware Installation 17 Mount the Camera 18 mydlink 19 Configuration 20 Using the Configuration Interface 20 Live Video 21 Setup 23 Setup Wizard 23... 56 System 57 Firmware Upgrade 58 Status 59 Device Info 59 Logs 60 Help 61 DI/DO Specifications 62 Technical Specifications 63 Safety Statements 66 D-Link DCS-2210L User Manual 3

User Manual
Page 4
Note: Using a power supply with a different voltage than the one included with User Manual and software Quick Installation Guide If any of the above items are missing, please contact your product will cause damage and void the warranty for this product. Section 1: Product Overview Product Overview Package Contents DCS-2210L Full HD PoE Day/Night Network Camera CAT5 Ethernet cable Power adapter CD-ROM with your reseller. D-Link DCS-2210L User Manual 4
Note: Using a power supply with a different voltage than the one included with User Manual and software Quick Installation Guide If any of the above items are missing, please contact your product will cause damage and void the warranty for this product. Section 1: Product Overview Product Overview Package Contents DCS-2210L Full HD PoE Day/Night Network Camera CAT5 Ethernet cable Power adapter CD-ROM with your reseller. D-Link DCS-2210L User Manual 4
User Manual
Page 6
...Link DCS-2210L User Manual 6 The DCS-2210L can be accessed remotely, and controlled from any PC over Ethernet (PoE) means you capture details like never before - It also comes with a built-in IR-cut filter and IR LED makes sure you to worry about available power outlets when setting up your camera... on your local network or through the Internet via a web browser. The DCS-2210L is a complete system with the D-Link D-ViewCam™ software bundle that transmits high quality video images for ...
...Link DCS-2210L User Manual 6 The DCS-2210L can be accessed remotely, and controlled from any PC over Ethernet (PoE) means you capture details like never before - It also comes with a built-in IR-cut filter and IR LED makes sure you to worry about available power outlets when setting up your camera... on your local network or through the Internet via a web browser. The DCS-2210L is a complete system with the D-Link D-ViewCam™ software bundle that transmits high quality video images for ...
User Manual
Page 7
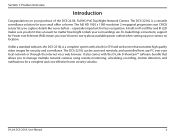
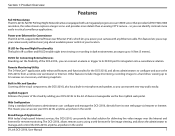
... devices manageable via the free mydlink web portal. Section 1: Product Overview Features Full HD Resolution The DCS-2210L Full HD PoE Day/Night Network Camera is equipped with any Ethernet cable. IR LED for delivering live image viewing, and allows the administrator... of Applications With today's high-speed Internet services, the DCS-2210L can configure and manage the DCS-2210L directly from a remote site via Intranet or Internet. D-Link DCS-2210L User Manual 7 Power over Ethernet for Convenience The DCS-2210L supports 802.3af Power over the Intranet and Internet for...
... devices manageable via the free mydlink web portal. Section 1: Product Overview Features Full HD Resolution The DCS-2210L Full HD PoE Day/Night Network Camera is equipped with any Ethernet cable. IR LED for delivering live image viewing, and allows the administrator... of Applications With today's high-speed Internet services, the DCS-2210L can configure and manage the DCS-2210L directly from a remote site via Intranet or Internet. D-Link DCS-2210L User Manual 7 Power over Ethernet for Convenience The DCS-2210L supports 802.3af Power over the Intranet and Internet for...

User Manual
Page 8
Night mode activates the IR LED and toggles the IR-Cut-Removable filter. 6 Microphone Records audio from the surrounding area D-Link DCS-2210L User Manual 8 Section 1: Product Overview Hardware Overview Front View 4 1 5 2 6 3 1 Status LED Indicates the camera's current status 2 Infrared LED Used to illuminate the camera's field of view at night 3 PIR Sensor Passive Infrared sensor for motion detection 4 Camera Lens Records video of the surrounding area 5 Light Sensor The light sensor helps switch the camera between day and night modes.
Night mode activates the IR LED and toggles the IR-Cut-Removable filter. 6 Microphone Records audio from the surrounding area D-Link DCS-2210L User Manual 8 Section 1: Product Overview Hardware Overview Front View 4 1 5 2 6 3 1 Status LED Indicates the camera's current status 2 Infrared LED Used to illuminate the camera's field of view at night 3 PIR Sensor Passive Infrared sensor for motion detection 4 Camera Lens Records video of the surrounding area 5 Light Sensor The light sensor helps switch the camera between day and night modes.

User Manual
Page 9
Section 1: Product Overview 1 2 3 Rear View 4 5 6 1 Ethernet Port RJ45 connector for Ethernet 2 Speaker Audio output 3 Reset Button Press and hold this button for 10 seconds to reset the camera 4 Power Connector Connects to the DC 5 V power adapter 5 DI/DO Connector I/O connectors for external devices 6 Adjustment Ring Tighten or loosen the adjustment ring to adjust the camera's position D-Link DCS-2210L User Manual 9
Section 1: Product Overview 1 2 3 Rear View 4 5 6 1 Ethernet Port RJ45 connector for Ethernet 2 Speaker Audio output 3 Reset Button Press and hold this button for 10 seconds to reset the camera 4 Power Connector Connects to the DC 5 V power adapter 5 DI/DO Connector I/O connectors for external devices 6 Adjustment Ring Tighten or loosen the adjustment ring to adjust the camera's position D-Link DCS-2210L User Manual 9

User Manual
Page 11
... Supply (optional) Attach the external power supply to the DC Power receptor located on the back of the DCS-2210L and connect it to your router. D-Link DCS-2210L User Manual 11 Section 2: Installation Zero Configuration Setup If you have a D-Link Cloud Router, you to set up your camera by simply plugging it in and connecting it to...
... Supply (optional) Attach the external power supply to the DC Power receptor located on the back of the DCS-2210L and connect it to your router. D-Link DCS-2210L User Manual 11 Section 2: Installation Zero Configuration Setup If you have a D-Link Cloud Router, you to set up your camera by simply plugging it in and connecting it to...

User Manual
Page 12
Section 2: Installation Check Your mydlink Account From any computer, open a web browser, go to http://www.mydlink.com and log into your account. Click on the device name to your account. Make a note of the details and click OK to add the camera to continue. A summary and confirmation notification will appear in the bottom-left corner. D-Link DCS-2210L User Manual 12 Once mydlink detects your camera, a New Device Found! notice will appear with the automatically configured details.
Section 2: Installation Check Your mydlink Account From any computer, open a web browser, go to http://www.mydlink.com and log into your account. Click on the device name to your account. Make a note of the details and click OK to add the camera to continue. A summary and confirmation notification will appear in the bottom-left corner. D-Link DCS-2210L User Manual 12 Once mydlink detects your camera, a New Device Found! notice will appear with the automatically configured details.

User Manual
Page 13
Your camera is now complete and your camera has been added to your camera. D-Link DCS-2210L User Manual 13 You can skip to mydlink on page 19 to learn more about the mydlink features of your mydlink account. Section 2: Installation Zero Configuration is now set up, and you can now view your camera on page 20 for advanced configuration of this camera, or to Configuration on the mydlink Live View tab.
Your camera is now complete and your camera has been added to your camera. D-Link DCS-2210L User Manual 13 You can skip to mydlink on page 19 to learn more about the mydlink features of your mydlink account. Section 2: Installation Zero Configuration is now set up, and you can now view your camera on page 20 for advanced configuration of this camera, or to Configuration on the mydlink Live View tab.

User Manual
Page 14
D-Link DCS-2210L User Manual 14 Simply click Set up your Cloud Camera to go to My Computer, browse to start the autorun program. Note: If the autorun program does not open, go through the Setup Wizard, which will guide you step-by-step through the installation process from connecting your hardware to configuring your camera and registering it with your CD drive, and double-click on the autorun.exe file. Section 2: Installation Camera Setup Wizard Windows Users Insert the Installation CD-ROM into your computer's optical drive to your mydlink account.
D-Link DCS-2210L User Manual 14 Simply click Set up your Cloud Camera to go to My Computer, browse to start the autorun program. Note: If the autorun program does not open, go through the Setup Wizard, which will guide you step-by-step through the installation process from connecting your hardware to configuring your camera and registering it with your CD drive, and double-click on the autorun.exe file. Section 2: Installation Camera Setup Wizard Windows Users Insert the Installation CD-ROM into your computer's optical drive to your mydlink account.

User Manual
Page 15
On the desktop, open , which will guide you step-by-step through the installation process from connecting your hardware to configuring your camera and registering it with your mydlink account. Section 2: Installation Mac Users Insert the Installation CD-ROM into your CD drive and double-click on the SetupWizard file. D-Link DCS-2210L User Manual 15 Within 20-30 seconds, the Setup Wizard will open your computer's CD drive.
On the desktop, open , which will guide you step-by-step through the installation process from connecting your hardware to configuring your camera and registering it with your mydlink account. Section 2: Installation Mac Users Insert the Installation CD-ROM into your CD drive and double-click on the SetupWizard file. D-Link DCS-2210L User Manual 15 Within 20-30 seconds, the Setup Wizard will open your computer's CD drive.

User Manual
Page 16
Log on page 20 for advanced configuration of this camera, or go to Configuration on to your mydlink account and explore the exciting benefits available to learn more about the mydlink features of your camera login details and IP address details and click Done. Your camera is now set up . D-Link DCS-2210L User Manual 16 Section 2: Installation Confirm your camera. Your DCS-2210L camera is now set up , and you can skip to mydlink on page 19 to you.
Log on page 20 for advanced configuration of this camera, or go to Configuration on to your mydlink account and explore the exciting benefits available to learn more about the mydlink features of your camera login details and IP address details and click Done. Your camera is now set up . D-Link DCS-2210L User Manual 16 Section 2: Installation Confirm your camera. Your DCS-2210L camera is now set up , and you can skip to mydlink on page 19 to you.

User Manual
Page 17
D-Link DCS-2210L User Manual 17 Attach the External Power Supply (optional) Attach the external power supply to the DC Power receptor located on the back of the DCS-2210L and connect it to your wall outlet or power strip. Note: In order to use the mydlink features of this product,... you wish to set up your camera without using a Power over Ethernet (PoE) connection: Connect the included Ethernet cable to the Ethernet port located on the rear panel of the DCS-2210L and connect it to your router. Section 2: Installation Manual Hardware ...
D-Link DCS-2210L User Manual 17 Attach the External Power Supply (optional) Attach the external power supply to the DC Power receptor located on the back of the DCS-2210L and connect it to your wall outlet or power strip. Note: In order to use the mydlink features of this product,... you wish to set up your camera without using a Power over Ethernet (PoE) connection: Connect the included Ethernet cable to the Ethernet port located on the rear panel of the DCS-2210L and connect it to your router. Section 2: Installation Manual Hardware ...

User Manual
Page 18
... to drill two 2 holes or screws where you marked. The space between the camera and the screwheads should be 3mm. 3. Place the base cover on the wall. D-Link DCS-2210L User Manual 18 Make sure 3 to fit the screw-heads over the screw that is locked. 4. Lightly pull the base... forward to mark the holes. 2. We suggest that it downward to assist you configure the camera before mounting. 1. If the wall is...
... to drill two 2 holes or screws where you marked. The space between the camera and the screwheads should be 3mm. 3. Place the base cover on the wall. D-Link DCS-2210L User Manual 18 Make sure 3 to fit the screw-heads over the screw that is locked. 4. Lightly pull the base... forward to mark the holes. 2. We suggest that it downward to assist you configure the camera before mounting. 1. If the wall is...
User Manual
Page 19
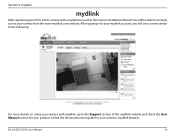
Section 3: mydlink mydlink After registering your DCS-2210L camera with a mydlink account in to your mydlink account, you will be able to find the latest instruction guide for your product to remotely access your camera's mydlink features. D-Link DCS-2210L User Manual 19 After signing in the Camera Installation Wizard. You will see a screen similar to the following: For more details on using your camera with mydlink, go to the Support section of the mydlink website and check the User Manual section for your camera from the www.mydlink.com website.
Section 3: mydlink mydlink After registering your DCS-2210L camera with a mydlink account in to your mydlink account, you will be able to find the latest instruction guide for your product to remotely access your camera's mydlink features. D-Link DCS-2210L User Manual 19 After signing in the Camera Installation Wizard. You will see a screen similar to the following: For more details on using your camera with mydlink, go to the Support section of the mydlink website and check the User Manual section for your camera from the www.mydlink.com website.
User Manual
Page 20
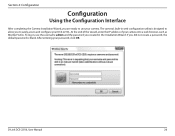
... the username admin and the password you did not create a password, the default password is designed to allow you to use your DCS-2210L. D-Link DCS-2210L User Manual 20 After entering your camera into a web browser, such as Mozilla Firefox. At the end of the wizard, enter the IP address of your password, click OK.... If you created in web configuration utility is blank. Section 4: Configuration Configuration Using the Configuration Interface After completing the Camera Installation Wizard, you are ready to easily access and configure your...
... the username admin and the password you did not create a password, the default password is designed to allow you to use your DCS-2210L. D-Link DCS-2210L User Manual 20 After entering your camera into a web browser, such as Mozilla Firefox. At the end of the wizard, enter the IP address of your password, click OK.... If you created in web configuration utility is blank. Section 4: Configuration Configuration Using the Configuration Interface After completing the Camera Installation Wizard, you are ready to easily access and configure your...

User Manual
Page 21
...status of the available icons listed below to operate the camera. When a recording is the fastest. Preset Path Starts the camera's motion along the predefined path. Right-click to zoom out or left side of the SD card. D-Link DCS-2210L User Manual 21 Section 4: Configuration Live Video This ...section shows your camera must be used to zoom in on the live video. ePTZ Speed: You may select any of your...
...status of the available icons listed below to operate the camera. When a recording is the fastest. Preset Path Starts the camera's motion along the predefined path. Right-click to zoom out or left side of the SD card. D-Link DCS-2210L User Manual 21 Section 4: Configuration Live Video This ...section shows your camera must be used to zoom in on the live video. ePTZ Speed: You may select any of your...

User Manual
Page 22
... presets have been defined, selecting a preset from this menu. Section 4: Configuration Global View: This window indicates the total field of view (FOV) of interest (ROI). D-Link DCS-2210L User Manual 22 The red box indicates the visible region of the camera.
... presets have been defined, selecting a preset from this menu. Section 4: Configuration Global View: This window indicates the total field of view (FOV) of interest (ROI). D-Link DCS-2210L User Manual 22 The red box indicates the visible region of the camera.
User Manual
Page 24
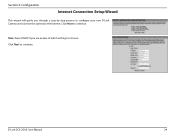
Note: Select DHCP if you through a step-by-step process to configure your new D-Link Camera and connect the camera to the Internet. D-Link DCS-2210L User Manual 24 Section 4: Configuration Internet Connection Setup Wizard This wizard will guide you are unsure of which settings to choose. Click Next to continue. Click Next to continue.
Note: Select DHCP if you through a step-by-step process to configure your new D-Link Camera and connect the camera to the Internet. D-Link DCS-2210L User Manual 24 Section 4: Configuration Internet Connection Setup Wizard This wizard will guide you are unsure of which settings to choose. Click Next to continue. Click Next to continue.

User Manual
Page 25
Click Next to continue. D-Link DCS-2210L User Manual 25 If you have a Dynamic DNS account and would like the camera to update your IP address automatically, Select Enable DDNS and enter your camera and click Next to continue. Enter a name for your host information. If you are using PPPoE, select Enable PPPoE and enter your...
Click Next to continue. D-Link DCS-2210L User Manual 25 If you have a Dynamic DNS account and would like the camera to update your IP address automatically, Select Enable DDNS and enter your camera and click Next to continue. Enter a name for your host information. If you are using PPPoE, select Enable PPPoE and enter your...

