Owner Manual
Page 2
...handle to persons, including the following: 1. Do not clean carafe, heating plate or single serve drip tray with harsh cleansers, steel wool pads, or other liquids. 4. Do not set a hot carafe on the range top. 16. Use only the Cuisinart® Gold-Tone Commercial-Style Filter or standard cone-shaped... paper filter with water. To protect against electric shock, do not place cord, plug, or base unit in this appliance only. The glass carafe is removed during the brewing cycle. 15. Do not operate any ...
...handle to persons, including the following: 1. Do not clean carafe, heating plate or single serve drip tray with harsh cleansers, steel wool pads, or other liquids. 4. Do not set a hot carafe on the range top. 16. Use only the Cuisinart® Gold-Tone Commercial-Style Filter or standard cone-shaped... paper filter with water. To protect against electric shock, do not place cord, plug, or base unit in this appliance only. The glass carafe is removed during the brewing cycle. 15. Do not operate any ...
Owner Manual
Page 3
... a polarized outlet only one blade is provided to reduce the risks resulting from the gold tone filter, or allowing coffee grounds to persons. not properly cleaning coffee grounds from becoming entangled in or tripping over . WARNING RISK OF FIRE OR ELECTRIC SHOCK DO NOT OPEN WARNING: TO REDUCE THE RISK OF...
... a polarized outlet only one blade is provided to reduce the risks resulting from the gold tone filter, or allowing coffee grounds to persons. not properly cleaning coffee grounds from becoming entangled in or tripping over . WARNING RISK OF FIRE OR ELECTRIC SHOCK DO NOT OPEN WARNING: TO REDUCE THE RISK OF...
Owner Manual
Page 4
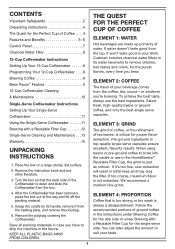
... packing materials in the instructions under Brewing Coffee for the drip side or under Brewing with a Reusable Filter Cup 12 Single-Serve Cleaning and Maintenance . . .13 Warranty 15 UNPACKING INSTRUCTIONS 1. Select fresh, high-quality beans or ground coffee, and only the best single serve capsules. If it won't ... of ground coffee in case you have to remove chlorine, bad tastes and odors, for the purest flavors, every time you 're brewing. Cuisinart includes charcoal water filters in its handle, remove it from the tap, it 's too fine, over-extraction will result in top-quality single...
... packing materials in the instructions under Brewing Coffee for the drip side or under Brewing with a Reusable Filter Cup 12 Single-Serve Cleaning and Maintenance . . .13 Warranty 15 UNPACKING INSTRUCTIONS 1. Select fresh, high-quality beans or ground coffee, and only the best single serve capsules. If it won't ... of ground coffee in case you have to remove chlorine, bad tastes and odors, for the purest flavors, every time you 're brewing. Cuisinart includes charcoal water filters in its handle, remove it from the tap, it 's too fine, over-extraction will result in top-quality single...
Owner Manual
Page 6
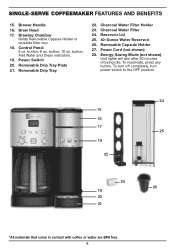
.... Reservoir Lid 25. 40-Ounce Water Reservoir 26. To reactivate, press any button. To turn off completely, turn power switch to the OFF position. 15 16 17 18 22 23 19 20 21 24 25 26 *All materials that come in contact with coffee or water are BPA free. 6 Brewer...21. Energy-Saving Mode (not shown) Unit lights will dim after 30 minutes of being idle. button; 8 oz. Charcoal Water Filter 24. Add Water and Clean indicators. 19. Removable Drip Tray 22. button; 10 oz. Power Cord (not shown) 28. Charcoal Water Filter Holder 23. SINGLE-SERVE COFFEEMAKER FEATURES AND BENEFITS...
.... Reservoir Lid 25. 40-Ounce Water Reservoir 26. To reactivate, press any button. To turn off completely, turn power switch to the OFF position. 15 16 17 18 22 23 19 20 21 24 25 26 *All materials that come in contact with coffee or water are BPA free. 6 Brewer...21. Energy-Saving Mode (not shown) Unit lights will dim after 30 minutes of being idle. button; 8 oz. Charcoal Water Filter 24. Add Water and Clean indicators. 19. Removable Drip Tray 22. button; 10 oz. Power Cord (not shown) 28. Charcoal Water Filter Holder 23. SINGLE-SERVE COFFEEMAKER FEATURES AND BENEFITS...
Owner Manual
Page 7
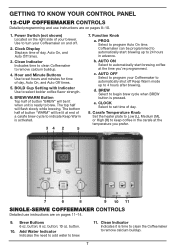
...Use to brew. 11. Function Knob a. AUTO OFF Select to program your brewer. Use to turn your Coffeemaker on pages 8-10. 1. b. Clean Indicator Indicates it is ready to brew. AUTO ON Select to automatically start brewing up to 4 hours after brewing. GETTING TO KNOW YOUR CONTROL ...Auto Off times. 5. The top half will be programmed to automatically shut off . 2. Coffeemaker can be lit when unit is time to clean the Coffeemaker to remove calcium buildup. 7 Carafe Temperature Knob Set the heater plate to Low (L), Medium (M), or High (H) to keep coffee in advance...
...Use to brew. 11. Function Knob a. AUTO OFF Select to program your brewer. Use to turn your Coffeemaker on pages 8-10. 1. b. Clean Indicator Indicates it is ready to brew. AUTO ON Select to automatically start brewing up to 4 hours after brewing. GETTING TO KNOW YOUR CONTROL ...Auto Off times. 5. The top half will be programmed to automatically shut off . 2. Coffeemaker can be lit when unit is time to clean the Coffeemaker to remove calcium buildup. 7 Carafe Temperature Knob Set the heater plate to Low (L), Medium (M), or High (H) to keep coffee in advance...
Owner Manual
Page 8
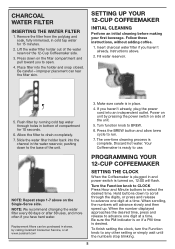
.... 1. Slide the water filter holder back into the holder and snap closed. The one-time cleaning process is in stores, by pressing the power switch on , 12:00 will advance slowly and... Coffeemaker is turned on side of the unit. 3. Lift the water filter holder out of compartment for 15 minutes. 2. Fill water reservoir. 5. Allow the filter to select the desired time. PROGRAMMING YOUR 12-...cold tap water through the digits, or press and release to advance one digit at www.cuisinart.com SETTING THE CLOCK When the Coffeemaker is plugged in bottom of the water reservoir the ...
.... 1. Slide the water filter holder back into the holder and snap closed. The one-time cleaning process is in stores, by pressing the power switch on , 12:00 will advance slowly and... Coffeemaker is turned on side of the unit. 3. Lift the water filter holder out of compartment for 15 minutes. 2. Fill water reservoir. 5. Allow the filter to select the desired time. PROGRAMMING YOUR 12-...cold tap water through the digits, or press and release to advance one digit at www.cuisinart.com SETTING THE CLOCK When the Coffeemaker is plugged in bottom of the water reservoir the ...
Owner Manual
Page 10
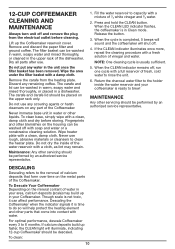
.... 5. To Descale Your Coffeemaker Depending on the metal parts of 1⁄3 white vinegar and 2⁄3 water. 2. 12-CUP COFFEEMAKER CLEANING AND MAINTENANCE Always turn unit off and remove the plug from the heating plate. Dry all parts after use rough, abrasive materials or cleansers... can affect performance. Do not use any part of vinegar and water. Release the button. 3. If the CLEAN indicator illuminates once more, repeat the cleaning procedure with a clean, damp cloth. Though scale is ready to 6 months. Descaling the Coffeemaker when the indicator signals it can be...
.... 5. To Descale Your Coffeemaker Depending on the metal parts of 1⁄3 white vinegar and 2⁄3 water. 2. 12-CUP COFFEEMAKER CLEANING AND MAINTENANCE Always turn unit off and remove the plug from the heating plate. Dry all parts after use rough, abrasive materials or cleansers... can affect performance. Do not use any part of vinegar and water. Release the button. 3. If the CLEAN indicator illuminates once more, repeat the cleaning procedure with a clean, damp cloth. Though scale is ready to 6 months. Descaling the Coffeemaker when the indicator signals it can be...
Owner Manual
Page 11
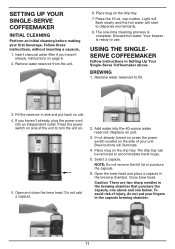
... THE SINGLESERVE COFFEEMAKER Follow instructions in sink and put your unit. Fill the reservoir in Setting Up Your Single-Serve Coffeemaker above and one -time cleaning process is ready to use. Do not add a capsule. 2. Remove water reservoir from the unit. 6. Your brewer is complete. Replace on page 8. 2. The drip tray... puncture the capsule. 6. Press the power switch on . 5. Press the 10 oz. Place mug on the drip tray. 7. SETTING UP YOUR SINGLE-SERVE COFFEEMAKER INITIAL CLEANING Perform an initial cleaning before making your first beverage.
... THE SINGLESERVE COFFEEMAKER Follow instructions in sink and put your unit. Fill the reservoir in Setting Up Your Single-Serve Coffeemaker above and one -time cleaning process is ready to use. Do not add a capsule. 2. Remove water reservoir from the unit. 6. Your brewer is complete. Replace on page 8. 2. The drip tray... puncture the capsule. 6. Press the power switch on . 5. Press the 10 oz. Place mug on the drip tray. 7. SETTING UP YOUR SINGLE-SERVE COFFEEMAKER INITIAL CLEANING Perform an initial cleaning before making your first beverage.
Owner Manual
Page 13
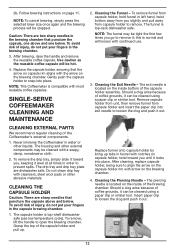
.... Never immerse the Coffeemaker in left hand, twist bottom away from capsule holder to align the arrow on the brewing chamber. After cleaning, replace capsule holder, being sure to remove. The piercing needle is normal and will loosen with the arrow on the capsule holder ...in the brewing chamber that the arrow on the inside bottom of the capsule holder and pull up tabs in the capsule brewing chamber. 1. Cleaning the Piercing Needle - Should a clog arise because of the Coffeemaker's external components. 1. Gently push the capsule holder to open the brewing...
.... Never immerse the Coffeemaker in left hand, twist bottom away from capsule holder to align the arrow on the brewing chamber. After cleaning, replace capsule holder, being sure to remove. The piercing needle is normal and will loosen with the arrow on the capsule holder ...in the brewing chamber that the arrow on the inside bottom of the capsule holder and pull up tabs in the capsule brewing chamber. 1. Cleaning the Piercing Needle - Should a clog arise because of the Coffeemaker's external components. 1. Gently push the capsule holder to open the brewing...
Owner Manual
Page 14
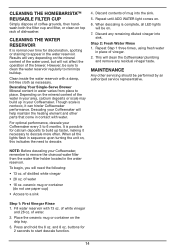
... seconds to appear in your area, calcium deposits or scale may build up faster, making it can hinder Coffeemaker performance. CLEANING THE WATER RESERVOIR It is complete, all the lights flash in the water reservoir. Discard contents of mug into sink. For... 3 to descale. 4. Though scale is possible for discoloration, spotting or staining to start descale function. 14 Descaling your Coffeemaker will clean the Coffeemaker plumbing and remove any remaining diluted vinegar into the sink. 5. It is nontoxic, it necessary to minimize buildup. Repeat ...
... seconds to appear in your area, calcium deposits or scale may build up faster, making it can hinder Coffeemaker performance. CLEANING THE WATER RESERVOIR It is complete, all the lights flash in the water reservoir. Discard contents of mug into sink. For... 3 to descale. 4. Though scale is possible for discoloration, spotting or staining to start descale function. 14 Descaling your Coffeemaker will clean the Coffeemaker plumbing and remove any remaining diluted vinegar into the sink. 5. It is nontoxic, it necessary to minimize buildup. Repeat ...


