Owner Manual
Page 2
... always be taken to reduce the risk of the garage or the door touches the unit as instructed in the cleaning instructions in this guide. 20. Allow to the nearest Cuisinart Repair Center for other abrasive materials. 21. Do not use with harsh cleansers, steel wool pads, or other ... Do not lift handle to open the lid of the Coffeemaker while brewing is removed during the brewing cycle. 15. Do not clean carafe, heating plate or single serve drip tray with this unit. Use only the Cuisinart® Gold-Tone Commercial-Style Filter or standard cone-shaped paper filter with water.
... always be taken to reduce the risk of the garage or the door touches the unit as instructed in the cleaning instructions in this guide. 20. Allow to the nearest Cuisinart Repair Center for other abrasive materials. 21. Do not use with harsh cleansers, steel wool pads, or other ... Do not lift handle to open the lid of the Coffeemaker while brewing is removed during the brewing cycle. 15. Do not clean carafe, heating plate or single serve drip tray with this unit. Use only the Cuisinart® Gold-Tone Commercial-Style Filter or standard cone-shaped paper filter with water.
Owner Manual
Page 3
... OR ELECTRIC SHOCK, DO NOT REMOVE COVER (OR BACK) NO USER-SERVICEABLE PARTS INSIDE REPAIR SHOULD BE DONE BY AUTHORIZED SERVICE PERSONNEL ONLY 3 not properly cleaning coffee grounds from becoming entangled in any of the following conditions: the use of the appliance, and the longer cord should be arranged so that...
... OR ELECTRIC SHOCK, DO NOT REMOVE COVER (OR BACK) NO USER-SERVICEABLE PARTS INSIDE REPAIR SHOULD BE DONE BY AUTHORIZED SERVICE PERSONNEL ONLY 3 not properly cleaning coffee grounds from becoming entangled in any of the following conditions: the use of the appliance, and the longer cord should be arranged so that...
Owner Manual
Page 4
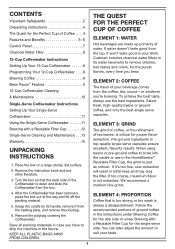
...in the instructions under Brewing Coffee for the drip side or under Brewing with a Reusable Filter Cup 12 Single-Serve Cleaning and Maintenance . . .13 Warranty 15 UNPACKING INSTRUCTIONS 1. KEEP ALL PLASTIC BAGS AWAY FROM CHILDREN. 4 THE QUEST FOR THE PERFECT CUP OF COFFEE ELEMENT... purest flavors, every time you brew. ELEMENT 3: GRIND The grind of coffee, or the refinement of tea leaves, is always a disappointment. Cuisinart includes charcoal water filters in case you 're brewing. CONTENTS Important Safeguards 2 Unpacking Instructions 4 The Quest for the Perfect Cup of Coffee ....
...in the instructions under Brewing Coffee for the drip side or under Brewing with a Reusable Filter Cup 12 Single-Serve Cleaning and Maintenance . . .13 Warranty 15 UNPACKING INSTRUCTIONS 1. KEEP ALL PLASTIC BAGS AWAY FROM CHILDREN. 4 THE QUEST FOR THE PERFECT CUP OF COFFEE ELEMENT... purest flavors, every time you brew. ELEMENT 3: GRIND The grind of coffee, or the refinement of tea leaves, is always a disappointment. Cuisinart includes charcoal water filters in case you 're brewing. CONTENTS Important Safeguards 2 Unpacking Instructions 4 The Quest for the Perfect Cup of Coffee ....
Owner Manual
Page 6
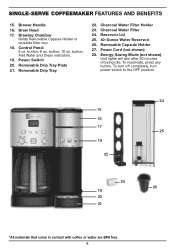
... Drip Tray 22. To reactivate, press any button. Add Water and Clean indicators. 19. Energy-Saving Mode (not shown) Unit lights will dim after 30 minutes of being idle. To turn off completely, turn power switch to the OFF position. 15 16 17 18 22 23 19 20 21 24 25 26.... Charcoal Water Filter Holder 23. Removable Capsule Holder 27. Brew Head 17. button; 8 oz. button; Charcoal Water Filter 24. SINGLE-SERVE COFFEEMAKER FEATURES AND BENEFITS 15. Brewer Handle 16. Control Panel 6 oz. button; 10 oz. Reservoir Lid 25. 40-Ounce Water Reservoir 26.
... Drip Tray 22. To reactivate, press any button. Add Water and Clean indicators. 19. Energy-Saving Mode (not shown) Unit lights will dim after 30 minutes of being idle. To turn off completely, turn power switch to the OFF position. 15 16 17 18 22 23 19 20 21 24 25 26.... Charcoal Water Filter Holder 23. Removable Capsule Holder 27. Brew Head 17. button; 8 oz. button; Charcoal Water Filter 24. SINGLE-SERVE COFFEEMAKER FEATURES AND BENEFITS 15. Brewer Handle 16. Control Panel 6 oz. button; 10 oz. Reservoir Lid 25. 40-Ounce Water Reservoir 26.
Owner Manual
Page 7
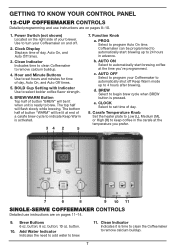
...off . 2. AUTO OFF Select to program your Coffeemaker to brew. button. 10. b. d. button; 8 oz. Clean Indicator Indicates time to clean Coffeemaker to select bolder coffee flavor strength. 6. Clean Indicator Indicates it is pressed. Coffeemaker can be lit when unit is activated. 34 2 5 7. BREW Select to... begin brew cycle when BREW button is time to clean the Coffeemaker to automatically start brewing up to keep coffee in advance. Power Switch (not shown) Located on the right side of ...
...off . 2. AUTO OFF Select to program your Coffeemaker to brew. button. 10. b. d. button; 8 oz. Clean Indicator Indicates time to clean Coffeemaker to select bolder coffee flavor strength. 6. Clean Indicator Indicates it is pressed. Coffeemaker can be lit when unit is activated. 34 2 5 7. BREW Select to... begin brew cycle when BREW button is time to clean the Coffeemaker to automatically start brewing up to keep coffee in advance. Power Switch (not shown) Located on the right side of ...
Owner Manual
Page 8
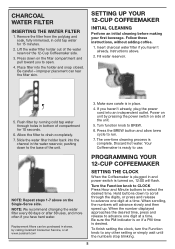
... Place filter into an independent outlet. Follow these instructions, without adding coffee. 1. If you to advance one -time cleaning process is on side of the unit. 3. The one digit at a time. Be sure the PM indicator is ...the unit. 5. SETTING UP YOUR 12-CUP COFFEEMAKER INITIAL CLEANING Perform an initial cleaning before making your first beverage. Flush filter by calling Cuisinart Consumer Service, or at www.cuisinart.com SETTING THE CLOCK When the Coffeemaker is desired. Make... Coffeemaker side. 3. Lift the water filter holder out of compartment for 15 minutes. 2.
... Place filter into an independent outlet. Follow these instructions, without adding coffee. 1. If you to advance one -time cleaning process is on side of the unit. 3. The one digit at a time. Be sure the PM indicator is ...the unit. 5. SETTING UP YOUR 12-CUP COFFEEMAKER INITIAL CLEANING Perform an initial cleaning before making your first beverage. Flush filter by calling Cuisinart Consumer Service, or at www.cuisinart.com SETTING THE CLOCK When the Coffeemaker is desired. Make... Coffeemaker side. 3. Lift the water filter holder out of compartment for 15 minutes. 2.
Owner Manual
Page 10
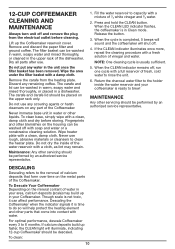
...of the dishwasher. Descaling the Coffeemaker when the indicator signals it can be washed in warm, soapy water and rinsed thoroughly, or cleaned in Clean mode. Remove and discard the paper filter and ground coffee. The filter basket can affect performance. Remove the carafe from the ... Though scale is completed, 5 beeps will sound and the coffeemaker will illuminate, indicating 12-cup Coffeemaker should be descaled. 12-CUP COFFEEMAKER CLEANING AND MAINTENANCE Always turn unit off and remove the plug from the heating plate. Wipe the area under the filter basket with a full ...
...of the dishwasher. Descaling the Coffeemaker when the indicator signals it can be washed in warm, soapy water and rinsed thoroughly, or cleaned in Clean mode. Remove and discard the paper filter and ground coffee. The filter basket can affect performance. Remove the carafe from the ... Though scale is completed, 5 beeps will sound and the coffeemaker will illuminate, indicating 12-cup Coffeemaker should be descaled. 12-CUP COFFEEMAKER CLEANING AND MAINTENANCE Always turn unit off and remove the plug from the heating plate. Wipe the area under the filter basket with a full ...
Owner Manual
Page 11
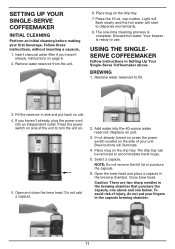
... brewing chamber that puncture the capsule, one above . USING THE SINGLESERVE COFFEEMAKER Follow instructions in Setting Up Your Single-Serve Coffeemaker above and one -time cleaning process is ready to accommodate travel mugs. 5. If you haven't already. Add water into an independent outlet. Place mug on page 8. 2. Select a capsule. Follow... on the drip tray. 7. The one below. Caution: There are two sharp needles in the brewing chamber. SETTING UP YOUR SINGLE-SERVE COFFEEMAKER INITIAL CLEANING Perform an initial cleaning before making your first beverage. BREWING 1.
... brewing chamber that puncture the capsule, one above . USING THE SINGLESERVE COFFEEMAKER Follow instructions in Setting Up Your Single-Serve Coffeemaker above and one -time cleaning process is ready to accommodate travel mugs. 5. If you haven't already. Add water into an independent outlet. Place mug on page 8. 2. Select a capsule. Follow... on the drip tray. 7. The one below. Caution: There are two sharp needles in the brewing chamber. SETTING UP YOUR SINGLE-SERVE COFFEEMAKER INITIAL CLEANING Perform an initial cleaning before making your first beverage. BREWING 1.
Owner Manual
Page 13
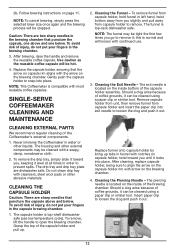
... arise because of injury, do not put your fingers in water or other abrasive materials. The capsule holder is normal and will be cleaned using a paper clip or similar tool. Replace funnel onto capsule holder by lining up . Follow brewing instructions on the brewing chamber. Caution... capsule holder, twist toward you slightly and pull away from capsule holder to remove it locks into place. SINGLE-SERVE COFFEEMAKER CLEANING AND MAINTENANCE 2. Cleaning the Funnel - To remove funnel from capsule holder, hold funnel in left hand, twist bottom away from capsule holder and...
... arise because of injury, do not put your fingers in water or other abrasive materials. The capsule holder is normal and will be cleaned using a paper clip or similar tool. Replace funnel onto capsule holder by lining up . Follow brewing instructions on the brewing chamber. Caution... capsule holder, twist toward you slightly and pull away from capsule holder to remove it locks into place. SINGLE-SERVE COFFEEMAKER CLEANING AND MAINTENANCE 2. Cleaning the Funnel - To remove funnel from capsule holder, hold funnel in left hand, twist bottom away from capsule holder and...
Owner Manual
Page 14
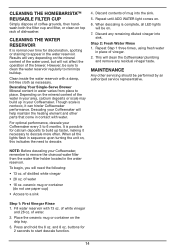
...Step 2: Fresh Water Rinse 1. of white vinegar and 26 oz. Place the ceramic mug or container on top rack of dishwasher. CLEANING THE WATER RESERVOIR It is possible for discoloration, spotting or staining to 6 months. of distilled white vinegar • 26 oz....First Vinegar Rinse 1. NOTE: Before descaling your Coffeemaker will be sure to clean the water reservoir regularly to descale more often. Fill water reservoir with a damp, lint-free cloth as necessary. CLEANING THE HOMEBARISTATM REUSABLE FILTER CUP Simply dispose of coffee grounds, then handwash ...
...Step 2: Fresh Water Rinse 1. of white vinegar and 26 oz. Place the ceramic mug or container on top rack of dishwasher. CLEANING THE WATER RESERVOIR It is possible for discoloration, spotting or staining to 6 months. of distilled white vinegar • 26 oz....First Vinegar Rinse 1. NOTE: Before descaling your Coffeemaker will be sure to clean the water reservoir regularly to descale more often. Fill water reservoir with a damp, lint-free cloth as necessary. CLEANING THE HOMEBARISTATM REUSABLE FILTER CUP Simply dispose of coffee grounds, then handwash ...


