Owner Manual
Page 1
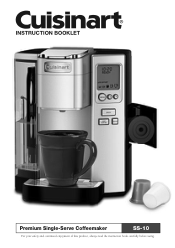
INSTRUCTION BOOKLET Premium Single-Serve Coffeemaker SS-10 For your safety and continued enjoyment of this product, always read the instruction book carefully before using.
INSTRUCTION BOOKLET Premium Single-Serve Coffeemaker SS-10 For your safety and continued enjoyment of this product, always read the instruction book carefully before using.
Owner Manual
Page 2
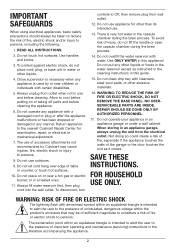
... the door touches the unit as instructed in the cleaning instructions in the literature accompanying the appliance. 2 There is intended to alert the user to the presence of important operating and maintenance (servicing) instructions in this appliance! NO USERSERVICEABLE PARTS ARE INSIDE. Do not operate your appliance in the capsule chamber during the brew process. 14. Use ONLY WATER in water or other than its...
... the door touches the unit as instructed in the cleaning instructions in the literature accompanying the appliance. 2 There is intended to alert the user to the presence of important operating and maintenance (servicing) instructions in this appliance! NO USERSERVICEABLE PARTS ARE INSIDE. Do not operate your appliance in the capsule chamber during the brew process. 14. Use ONLY WATER in water or other than its...
Owner Manual
Page 3
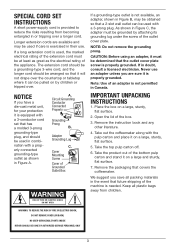
... REDUCE THE RISK OF FIRE OR ELECTRIC SHOCK, DO NOT REMOVE COVER (OR BACK) NO USER-SERVICEABLE PARTS INSIDE REPAIR SHOULD BE DONE BY AUTHORIZED SERVICE PERSONNEL ONLY 3 As shown in Figure A. CAUTION: Before using an adapter, it on a large, sturdy, flat surface. 5. IMPORTANT UNPACKING INSTRUCTIONS 1. Take the product out of the extension cord must be grounded by children or...
... REDUCE THE RISK OF FIRE OR ELECTRIC SHOCK, DO NOT REMOVE COVER (OR BACK) NO USER-SERVICEABLE PARTS INSIDE REPAIR SHOULD BE DONE BY AUTHORIZED SERVICE PERSONNEL ONLY 3 As shown in Figure A. CAUTION: Before using an adapter, it on a large, sturdy, flat surface. 5. IMPORTANT UNPACKING INSTRUCTIONS 1. Take the product out of the extension cord must be grounded by children or...
Owner Manual
Page 4
... Instructions 3 The Quest for the Perfect Cup 5 Features and Benefits 6 Set-Up & First Brew 8 Setting Up Your Coffeemaker 8 Charcoal Water Filter 9 Brewing 9 Hot Water/Rinse 11 Brewing with a Reusable Filter Cup 12 Stopping the Brew Process 13 Adding Water 13 Programming 13 Setting the Clock 13 Programming On/Off Features 14 Programming Brew Temperature 16 Programming Your Brew Size 16 Cleaning & Maintenance 17 Cleaning External Parts 17 Cleaning the Reusable Filter Cup 17 Cleaning the Capsule Holder 17 Cleaning the Water Reservoir & Lid 18 De-Scaling Your Coffeemaker...
... Instructions 3 The Quest for the Perfect Cup 5 Features and Benefits 6 Set-Up & First Brew 8 Setting Up Your Coffeemaker 8 Charcoal Water Filter 9 Brewing 9 Hot Water/Rinse 11 Brewing with a Reusable Filter Cup 12 Stopping the Brew Process 13 Adding Water 13 Programming 13 Setting the Clock 13 Programming On/Off Features 14 Programming Brew Temperature 16 Programming Your Brew Size 16 Cleaning & Maintenance 17 Cleaning External Parts 17 Cleaning the Reusable Filter Cup 17 Cleaning the Capsule Holder 17 Cleaning the Water Reservoir & Lid 18 De-Scaling Your Coffeemaker...
Owner Manual
Page 5
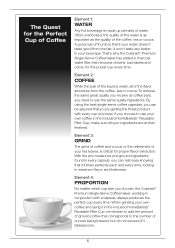
... perfect cup every time. Element 3: GRIND The grind of coffee and cocoa, or the refinement of your beverage. That's why the Cuisinart® Premium Single-Serve Coffeemaker has added a charcoal water filter that you brew. Element 4: PROPORTION No matter which cup size you choose, the Cuisinart® Premium Single-Serve Coffeemaker, working in every capsule, you need to the number of ounces being brewed, but do not exceed 2½ tablespoons. 5 By using...
... perfect cup every time. Element 3: GRIND The grind of coffee and cocoa, or the refinement of your beverage. That's why the Cuisinart® Premium Single-Serve Coffeemaker has added a charcoal water filter that you brew. Element 4: PROPORTION No matter which cup size you choose, the Cuisinart® Premium Single-Serve Coffeemaker, working in every capsule, you need to the number of ounces being brewed, but do not exceed 2½ tablespoons. 5 By using...
Owner Manual
Page 6
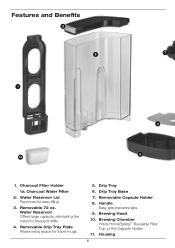
Removable 72 oz. Drip Tray Base 7. Brewing Chamber Holds HomeBarista™ Reusable Filter Cup or the Capsule Holder. 11. Housing 6 Charcoal Water Filter 2. Removable Capsule Holder 8. Features and Benefits 2 3 7 1 4 5 1a 1. Charcoal Filter Holder 1a. Water Reservoir Lid Removes for travel mugs. 5. Removable Drip Tray Plate Allows extra space for easy filling. 3. Drip Tray 6. Handle Easy grip prevents slips. 9. Brewing Head 10. Water Reservoir Offers large capacity, eliminating the need for frequent refills. 4.
Removable 72 oz. Drip Tray Base 7. Brewing Chamber Holds HomeBarista™ Reusable Filter Cup or the Capsule Holder. 11. Housing 6 Charcoal Water Filter 2. Removable Capsule Holder 8. Features and Benefits 2 3 7 1 4 5 1a 1. Charcoal Filter Holder 1a. Water Reservoir Lid Removes for travel mugs. 5. Removable Drip Tray Plate Allows extra space for easy filling. 3. Drip Tray 6. Handle Easy grip prevents slips. 9. Brewing Head 10. Water Reservoir Offers large capacity, eliminating the need for frequent refills. 4.
Owner Manual
Page 7
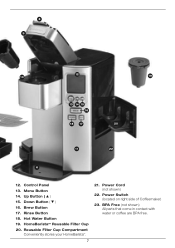
Menu Button 14. HomeBarista™ Reusable Filter Cup 20. Power Switch (located on right side of Coffeemaker) 23. Control Panel 13. Rinse Button 18. Up Button ( ) 15. Hot Water Button 19. Brew Button 17. Reusable Filter Cup Compartment Conveniently stores your HomeBarista™. 7 21. Power Cord (not shown) 22. 8 9 12 10 19 13 14 15 16 18 17 20 11 22 6 12. BPA Free (not shown) All parts that come in contact with water or coffee are BPA free. Down Button ( ) 16.
Menu Button 14. HomeBarista™ Reusable Filter Cup 20. Power Switch (located on right side of Coffeemaker) 23. Control Panel 13. Rinse Button 18. Up Button ( ) 15. Hot Water Button 19. Brew Button 17. Reusable Filter Cup Compartment Conveniently stores your HomeBarista™. 7 21. Power Cord (not shown) 22. 8 9 12 10 19 13 14 15 16 18 17 20 11 22 6 12. BPA Free (not shown) All parts that come in contact with water or coffee are BPA free. Down Button ( ) 16.
Owner Manual
Page 8
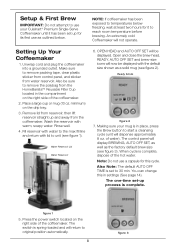
..., AUTO OFF SET and brew-size icons will now be displayed with lid to unit (see figure 1). Press the power switch located on the drip tray. 3. minimum) on the right side of the coffeemaker. OPEN HEAD and AUTO OFF SET will be sure to remove the polybag from the HomeBarista™ Reusable Filter Cup located in place, press the Brew button to start a cleansing cycle (unit will display BREWING, AUTO OFF SET...
..., AUTO OFF SET and brew-size icons will now be displayed with lid to unit (see figure 1). Press the power switch located on the drip tray. 3. minimum) on the right side of the coffeemaker. OPEN HEAD and AUTO OFF SET will be sure to remove the polybag from the HomeBarista™ Reusable Filter Cup located in place, press the Brew button to start a cleansing cycle (unit will display BREWING, AUTO OFF SET...
Owner Manual
Page 9
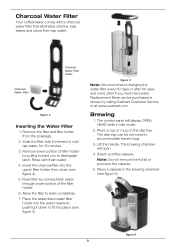
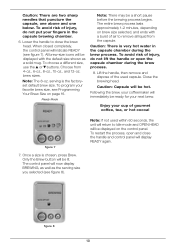
... the handle. Flush filter by calling Cuisinart Customer Service, or at www.cuisinart.com. The brewing chamber will display OPEN HEAD while in cold tap water, for 15 minutes. 3. Replacement filters can be purchased in the brewing chamber (see figure 6). Remove lower portion of the filter holder. 6. Place a cup or mug on the drip tray. Brewing 1. Select a coffee capsule. Note: Do not remove the foil lid or puncture the capsule...
... the handle. Flush filter by calling Cuisinart Customer Service, or at www.cuisinart.com. The brewing chamber will display OPEN HEAD while in cold tap water, for 15 minutes. 3. Replacement filters can be purchased in the brewing chamber (see figure 6). Remove lower portion of the filter holder. 6. Place a cup or mug on the drip tray. Brewing 1. Select a coffee capsule. Note: Do not remove the foil lid or puncture the capsule...
Owner Manual
Page 10
... mug. To choose a different size, use the or buttons. serving is chosen, press Brew. Lift the handle, then remove and dispose of gourmet coffee, tea, or hot cocoa! Enjoy your next brew. The entire brew process lasts approximately 1-2 minutes, depending on brew size selected, and ends with the default size shown as the serving size you selected (see Programming Your Brew Size on the...
... mug. To choose a different size, use the or buttons. serving is chosen, press Brew. Lift the handle, then remove and dispose of gourmet coffee, tea, or hot cocoa! Enjoy your next brew. The entire brew process lasts approximately 1-2 minutes, depending on brew size selected, and ends with the default size shown as the serving size you selected (see Programming Your Brew Size on the...
Owner Manual
Page 11
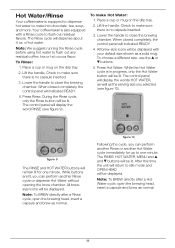
... a different size, use the or buttons. 5. The control panel will be lit. All brew-size icons will display the words HOT WATER, as well as a solid mug. While buttons are lit, you selected (see figure 9). After this time the unit will return to Idle mode and OPEN HEAD will be displayed. of hot water. Note: We suggest running the Rinse cycle before using hot water to...
... a different size, use the or buttons. 5. The control panel will be lit. All brew-size icons will display the words HOT WATER, as well as a solid mug. While buttons are lit, you selected (see figure 9). After this time the unit will return to Idle mode and OPEN HEAD will be displayed. of hot water. Note: We suggest running the Rinse cycle before using hot water to...
Owner Manual
Page 12
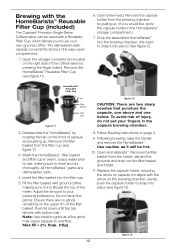
...™ storage compartment.) 7. Note: Use medium grind as it into the filter cup. 5. Remove the filter basket from the filter cup (see figure 11). 3. Brewing with the HomeBarista™ Reusable Filter Cup (included) The Cuisinart® Premium Single-Serve Coffeemaker can be hot. 10. See figure 12. Remove the filter basket from the holder, discard the grounds and rinse out the filter basket and holder. 11. Fill the filter basket with a Reusable Filter Cup, which allows you would like...
...™ storage compartment.) 7. Note: Use medium grind as it into the filter cup. 5. Remove the filter basket from the filter cup (see figure 11). 3. Brewing with the HomeBarista™ Reusable Filter Cup (included) The Cuisinart® Premium Single-Serve Coffeemaker can be hot. 10. See figure 12. Remove the filter basket from the holder, discard the grounds and rinse out the filter basket and holder. 11. Fill the filter basket with a Reusable Filter Cup, which allows you would like...
Owner Manual
Page 13
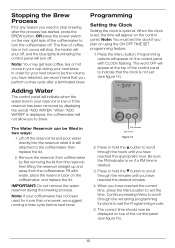
... perform a rinse cycle after the process has started, press the BREW button, OR press the power switch on the rear right side of the control panel to indicate that you need to exit the Programming mode. 5. When the clock is not set , the time will turn the coffeemaker off the reservoir lid and pour water directly into the reservoir while it is optional. The word OFF will...
... perform a rinse cycle after the process has started, press the BREW button, OR press the power switch on the rear right side of the control panel to indicate that you need to exit the Programming mode. 5. When the clock is not set , the time will turn the coffeemaker off the reservoir lid and pour water directly into the reservoir while it is optional. The word OFF will...
Owner Manual
Page 14
... of time from the last brew. The coffeemaker can be left untouched, unit will automatically shut the coffeemaker off at any time, simply press the power switch located on page 13 to be reset. Set the coffeemaker to exit the programming mode. a. After setting the desired AUTO OFF TIME, continue pressing Menu to scroll through the remaining Programming functions to 9 hours. e. Press the button to the coffeemaker. 2. Clock set in...
... of time from the last brew. The coffeemaker can be left untouched, unit will automatically shut the coffeemaker off at any time, simply press the power switch located on page 13 to be reset. Set the coffeemaker to exit the programming mode. a. After setting the desired AUTO OFF TIME, continue pressing Menu to scroll through the remaining Programming functions to 9 hours. e. Press the button to the coffeemaker. 2. Clock set in...

Owner Manual
Page 15
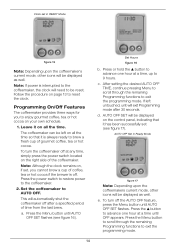
... cup of coffee. If not, continue to exit the Programming mode. Note: The AUTO OFF timer and the OFF TIME programming options operate independently. d. To complete the process, press the Menu button to function. Also Note: The coffeemaker must be turned off the ON OFF TIME SET feature, press the Menu button until ON TIME SET flashes (see figure 19). Press the Menu button until ON TIME SET or OFF TIME SET flashes...
... cup of coffee. If not, continue to exit the Programming mode. Note: The AUTO OFF timer and the OFF TIME programming options operate independently. d. To complete the process, press the Menu button to function. Also Note: The coffeemaker must be turned off the ON OFF TIME SET feature, press the Menu button until ON TIME SET flashes (see figure 19). Press the Menu button until ON TIME SET or OFF TIME SET flashes...
Owner Manual
Page 16
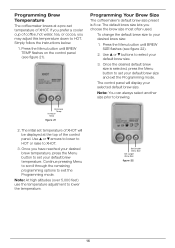
.... If you prefer a cooler cup of coffee, hot water, tea, or cocoa, you choose the brew size most often used. Note: At high altitudes (over 5,000 feet) use the temperature adjustment to HOT. Programming Brew Temperature The coffeemaker brews at the top of the control panel. Decrease Temp Increase Temp figure 21 2. Press the Menu button until BREW TEMP flashes on the control panel (see...
.... If you prefer a cooler cup of coffee, hot water, tea, or cocoa, you choose the brew size most often used. Note: At high altitudes (over 5,000 feet) use the temperature adjustment to HOT. Programming Brew Temperature The coffeemaker brews at the top of the control panel. Decrease Temp Increase Temp figure 21 2. Press the Menu button until BREW TEMP flashes on the control panel (see...
Owner Manual
Page 17
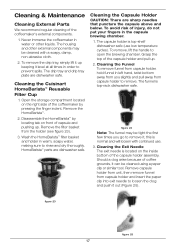
Never immerse the coffeemaker in order to rinse and dry thoroughly. To remove the drip tray, simply lift it up keeping it out (Figure 25). Cleaning the Cuisinart HomeBarista™ Reusable Filter Cup 1. Remove the HomeBarista™. 2. Wash the HomeBarista™ filter basket and holder in the capsule brewing chamber. 1. To remove, lift the handle to remove it can be cleaned using a paper clip or similar tool. To...
Never immerse the coffeemaker in order to rinse and dry thoroughly. To remove the drip tray, simply lift it up keeping it out (Figure 25). Cleaning the Cuisinart HomeBarista™ Reusable Filter Cup 1. Remove the HomeBarista™. 2. Wash the HomeBarista™ filter basket and holder in the capsule brewing chamber. 1. To remove, lift the handle to remove it can be cleaned using a paper clip or similar tool. To...
Owner Manual
Page 18
... capsule holder rim with a damp, soapy, non-abrasive cloth and rinse thoroughly. Should a clog arise because of coffee grounds, it out (Figure 26). After cleaning, replace capsule holder, being sure to build up in your coffeemaker will help maintain the heating element and other coffeemaker parts that come in water varies from place to loosen the clog and push it can hinder coffeemaker performance...
... capsule holder rim with a damp, soapy, non-abrasive cloth and rinse thoroughly. Should a clog arise because of coffee grounds, it out (Figure 26). After cleaning, replace capsule holder, being sure to build up in your coffeemaker will help maintain the heating element and other coffeemaker parts that come in water varies from place to loosen the clog and push it can hinder coffeemaker performance...

Owner Manual
Page 20
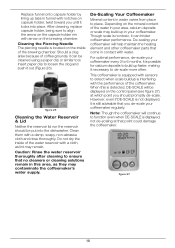
... in order for AUTO OFF timer and On/Off. Consider using bottled water, filtered water or the Cuisinart® Charcoal Water Filter. If power is properly filled. To do this, press the Menu button and scroll through the programming options. De-scale the coffeemaker (refer to "Cleaning & Maintenance", page 17). The piercing and/or exit needle may be displayed for the time to be clogged (refer to page...
... in order for AUTO OFF timer and On/Off. Consider using bottled water, filtered water or the Cuisinart® Charcoal Water Filter. If power is properly filled. To do this, press the Menu button and scroll through the programming options. De-scale the coffeemaker (refer to "Cleaning & Maintenance", page 17). The piercing and/or exit needle may be displayed for the time to be clogged (refer to page...
Owner Manual
Page 21
... if we recommend you do not result in 120 volt outlets and only with accessories, replacement parts or repair service other information pertinent to the strictest specifications and has been designed for shipping instructions). and CANADA only) This warranty is under warranty. 21 This warranty excludes all incidental or consequential damages. Your Cuisinart® Premium Single-Serve Coffeemaker has been manufactured to the product's return.
... if we recommend you do not result in 120 volt outlets and only with accessories, replacement parts or repair service other information pertinent to the strictest specifications and has been designed for shipping instructions). and CANADA only) This warranty is under warranty. 21 This warranty excludes all incidental or consequential damages. Your Cuisinart® Premium Single-Serve Coffeemaker has been manufactured to the product's return.


