
SPB-7CH Manual
Page 4
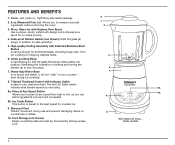
... of twisting and turning the blender jar to measure and add ingredients without removing the cover. 2. 1. 3. 3. 40-oz. even during use , read and clean. Allows you are sharp... Note: Blades are using. 8b. 8a. handle carefully. 4 Leak-proof Rubber Gasket (not shown) Holds the glass... or tables. 10. Cover Just press on your counter - Measured Pour Lid Allows you can 8. The red LED lights clearly indicate what blender speed you to use and prevent damaging marks on 9. Slip-proof Feet Prevent movement during ice crushing! 8. 7-Speed Touchpad Control with Indicator ...
... of twisting and turning the blender jar to measure and add ingredients without removing the cover. 2. 1. 3. 3. 40-oz. even during use , read and clean. Allows you are sharp... Note: Blades are using. 8b. 8a. handle carefully. 4 Leak-proof Rubber Gasket (not shown) Holds the glass... or tables. 10. Cover Just press on your counter - Measured Pour Lid Allows you can 8. The red LED lights clearly indicate what blender speed you to use and prevent damaging marks on 9. Slip-proof Feet Prevent movement during ice crushing! 8. 7-Speed Touchpad Control with Indicator ...
SPB-7CH Manual
Page 5
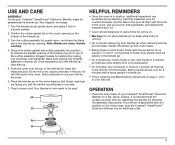
... ingredients can be added during blending: twist the measured pour lid counterclockwise until tightened. Place the motor base of your Cuisinart® SmartPower® Electronic Blender, begin by following the assembly instructions. Position the rubber gasket (b) on the round opening of the locking ring (d) on the bottom of the cutting assembly. Engage threads by placing...
... ingredients can be added during blending: twist the measured pour lid counterclockwise until tightened. Place the motor base of your Cuisinart® SmartPower® Electronic Blender, begin by following the assembly instructions. Position the rubber gasket (b) on the round opening of the locking ring (d) on the bottom of the cutting assembly. Engage threads by placing...
SPB-7CH Manual
Page 7
... TURNED THE BLENDER OFF. Do not twist locking ring from blender jar when removing jar from motor base. Simply lift blender jar from motor base. Remove the cutting assembly and rubber gasket. CAUTION: Handle the cutting assembly carefully. Remove the blender jar cover and...and dry thoroughly. See the Recipe Tips section on Stir for details 9. The blender is crushed to clean your Cuisinart® SmartPower® Electronic Blender from the motor base by turning counterclockwise. Empty blender jar and carefully disassemble parts. Make sure spatula is SHARP and may wish ...
... TURNED THE BLENDER OFF. Do not twist locking ring from blender jar when removing jar from motor base. Simply lift blender jar from motor base. Remove the cutting assembly and rubber gasket. CAUTION: Handle the cutting assembly carefully. Remove the blender jar cover and...and dry thoroughly. See the Recipe Tips section on Stir for details 9. The blender is crushed to clean your Cuisinart® SmartPower® Electronic Blender from the motor base by turning counterclockwise. Empty blender jar and carefully disassemble parts. Make sure spatula is SHARP and may wish ...

SPB-7CH Manual
Page 8
... is on . • Make sure locking ring is tightly attached to blender jar. • Always remove locking ring, cutting assembly, and rubber gasket before being placed in injury. • Don't place hands inside the blender jar while the motor is plugged in. • Don't add boiling ...) to measure liquid ingredients such as needed, only when the blender is turned off immediately, unplug the unit, and remove a portion of the blender motor base. • Always use any container or accessories not recommended by Cuisinart. This will achieve most foods into pieces no larger than &#...
... is on . • Make sure locking ring is tightly attached to blender jar. • Always remove locking ring, cutting assembly, and rubber gasket before being placed in injury. • Don't place hands inside the blender jar while the motor is plugged in. • Don't add boiling ...) to measure liquid ingredients such as needed, only when the blender is turned off immediately, unplug the unit, and remove a portion of the blender motor base. • Always use any container or accessories not recommended by Cuisinart. This will achieve most foods into pieces no larger than &#...