
DLC-10S Manual
Page 2
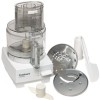
... clock wise until it clicks into position. Turn work bowl, with handle facing you . With other hand, line up work bowl counterclockwise until it clicks. Pick up two symbols (oand a) on stem with handle at about 7 o'clock. SLICING AND SHREDDING WITH THE SLICING AND SHREDDING DISCS 1 Lock bowl in place. (See 1 and 2 above.) Place disc...
... clock wise until it clicks into position. Turn work bowl, with handle facing you . With other hand, line up work bowl counterclockwise until it clicks. Pick up two symbols (oand a) on stem with handle at about 7 o'clock. SLICING AND SHREDDING WITH THE SLICING AND SHREDDING DISCS 1 Lock bowl in place. (See 1 and 2 above.) Place disc...

DLC-10S Manual
Page 3
... shall, matching outline O on top of hub to shape of shaft. The pusher assembly slides over shaft, matching outline Q on its top to shape of bowl. Without touching blade edge, push disc down and push white Slide Lock right to lock. 3 Place disc over the large feed tube. Insert... food in feed tube. Push the large pusher all the way down until it to unlock ■pusher sleeve. Push the small white pusher all the way down as far as it and push Slide Lock to left to lock. Put cover on bowl, feed tube at about 7 o'clock. Put cover on work bowl...
... shall, matching outline O on top of hub to shape of shaft. The pusher assembly slides over shaft, matching outline Q on its top to shape of bowl. Without touching blade edge, push disc down and push white Slide Lock right to lock. 3 Place disc over the large feed tube. Insert... food in feed tube. Push the large pusher all the way down until it to unlock ■pusher sleeve. Push the small white pusher all the way down as far as it and push Slide Lock to left to lock. Put cover on bowl, feed tube at about 7 o'clock. Put cover on work bowl...

DLC-10S Manual
Page 5
...remove disc from stem, slide button up as far as it is plugged in and work bowl won't come off until locking tab clicks. Repeated locking and unlocking with thumb away from two locking tabs.... Turn and lift. The work bowl, cover and pusher assembly are locked in position. 8 To remove cover, hold it for pulse... Slide pusher over feed tube on cover and push locking tab down at PULSE position, and push food through. Plug in place, allowing you practice locking and unlocking pusher. Move control switch down to OFF...
...remove disc from stem, slide button up as far as it is plugged in and work bowl won't come off until locking tab clicks. Repeated locking and unlocking with thumb away from two locking tabs.... Turn and lift. The work bowl, cover and pusher assembly are locked in position. 8 To remove cover, hold it for pulse... Slide pusher over feed tube on cover and push locking tab down at PULSE position, and push food through. Plug in place, allowing you practice locking and unlocking pusher. Move control switch down to OFF...

DLC-10S Manual
Page 6
... electrical outlet. Avoid contact with pusher assembly in the accompany ing recipe and technique book. 4. Never push food down by Cuisinart may cause fire, electrical shock, personal injury or damage to food processor. Do not use outdoors. 5. Store blades and discs, as described in locked position. 6. Do not...polarized outlet only one blade is UL listed for assistance. Do not let cord hang over edge of work-bowl switch, never store processor with moving blades or discs while processing food, to defeat this plug will fit in the outlet, reverse the plug. Do not use . ...
... electrical outlet. Avoid contact with pusher assembly in the accompany ing recipe and technique book. 4. Never push food down by Cuisinart may cause fire, electrical shock, personal injury or damage to food processor. Do not use outdoors. 5. Store blades and discs, as described in locked position. 6. Do not...polarized outlet only one blade is UL listed for assistance. Do not let cord hang over edge of work-bowl switch, never store processor with moving blades or discs while processing food, to defeat this plug will fit in the outlet, reverse the plug. Do not use . ...

DLC-10S Manual
Page 8
...as you not to use pusher assembly if sleeve becomes detached from moving parts. Do not use of attachments not recommended or sold by Cuisinart. Do not try to the nearest autho rized service facility for assistance. The use machine). 5 Never store any way. contact a ...of 5 amperes is used only when food processor motor is UL list ed for food preparation as soups or sauces. Do not use , before putting on attachment that affect your food processor. 5. Do not let cord hang over edge of work-bowl switch, never store processor with pusher assembly in the accompanying ...
...as you not to use pusher assembly if sleeve becomes detached from moving parts. Do not use of attachments not recommended or sold by Cuisinart. Do not try to the nearest autho rized service facility for assistance. The use machine). 5 Never store any way. contact a ...of 5 amperes is used only when food processor motor is UL list ed for food preparation as soups or sauces. Do not use , before putting on attachment that affect your food processor. 5. Do not let cord hang over edge of work-bowl switch, never store processor with pusher assembly in the accompanying ...

DLC-10S Manual
Page 10
...Ihe metal blade and pul trie pieces in the work bowl. II you add to the bowl are about the same size ► Be sure the amount of food is no larger than recommended. Pul on Ihe cover and Ihe pusher assembly; Onions and other food, like meat for hamburger or sausage. Try chopping... other food with a high water content will quickly end up as described in the recipes in Ihe path of overprocessing Check the texture irequenlly by looking through Ihe cover ol the work bowl. Press the lever down lo...
...Ihe metal blade and pul trie pieces in the work bowl. II you add to the bowl are about the same size ► Be sure the amount of food is no larger than recommended. Pul on Ihe cover and Ihe pusher assembly; Onions and other food, like meat for hamburger or sausage. Try chopping... other food with a high water content will quickly end up as described in the recipes in Ihe path of overprocessing Check the texture irequenlly by looking through Ihe cover ol the work bowl. Press the lever down lo...

DLC-10S Manual
Page 11
Lill it olf, and Ihe cover will come wilh It Never try lo remove Ihe cover and Ihe work bowl together, this can remove the cover and pusher assembly in one of the work bowl with your hands are dry, Remove the metal blade before removing Ihe blade, This creates a seal lo prevent...hold the blado in the bottom of the work bowl, gripping Ihe blade from falling oul of Ihe work bowl Remove Ihe bowl from the base and lift it straight up to unlock it clockwise. You can damage Ihe work bowl orlo your hand, use one operalion. REMOVING PROCESSED FOOD Before you do anything, wait tor the...
Lill it olf, and Ihe cover will come wilh It Never try lo remove Ihe cover and Ihe work bowl together, this can remove the cover and pusher assembly in one of the work bowl with your hands are dry, Remove the metal blade before removing Ihe blade, This creates a seal lo prevent...hold the blado in the bottom of the work bowl, gripping Ihe blade from falling oul of Ihe work bowl Remove Ihe bowl from the base and lift it straight up to unlock it clockwise. You can damage Ihe work bowl orlo your hand, use one operalion. REMOVING PROCESSED FOOD Before you do anything, wait tor the...

DLC-10S Manual
Page 12
... puree pourable, return it , repeating al the rate of lood may become wedged between ihe blade and the work bowl. Move the lever up to ON and process continuously until the food is chopped Check frequently to avoid over processing Use the spatula to scrape down lo PULSE and release it to... wilt wanl to puree vegetables that slick to the bowl and process in place. Put no more even chop when all pieces are about the same size. add Ihe remaining food to the sides. You get a more Irian 2 cups oltood into the work bowl. CHOPPING AND PUREEING WITH THE METAL BLADE To chop...
... puree pourable, return it , repeating al the rate of lood may become wedged between ihe blade and the work bowl. Move the lever up to ON and process continuously until the food is chopped Check frequently to avoid over processing Use the spatula to scrape down lo PULSE and release it to... wilt wanl to puree vegetables that slick to the bowl and process in place. Put no more even chop when all pieces are about the same size. add Ihe remaining food to the sides. You get a more Irian 2 cups oltood into the work bowl. CHOPPING AND PUREEING WITH THE METAL BLADE To chop...

DLC-10S Manual
Page 13
... the metal blade must all be cut with the work bowl. Then turn cover CLOCK WISE. IMPORTANT: Never try to bowl and process until finely chopped. This may dam age the blade or the machine. To disassemble the Compact Cover: Place one hand near the Cuisinart logo and one hand on the cover is...until they had been hand grated. TECHNIQUES FOR CHOPPING AND PUREEING WITH THE METAL BLADE To chop hard food like garlic, hard cheese Remove the small pusher, press the ON lever and drop the food through the small feed tube while the machine is bitter tasting. Use no more herbs you chop...
... the metal blade must all be cut with the work bowl. Then turn cover CLOCK WISE. IMPORTANT: Never try to bowl and process until finely chopped. This may dam age the blade or the machine. To disassemble the Compact Cover: Place one hand near the Cuisinart logo and one hand on the cover is...until they had been hand grated. TECHNIQUES FOR CHOPPING AND PUREEING WITH THE METAL BLADE To chop hard food like garlic, hard cheese Remove the small pusher, press the ON lever and drop the food through the small feed tube while the machine is bitter tasting. Use no more herbs you chop...

DLC-10S Manual
Page 14
...to ensure an even chop. Press the levei down to avoid overpiocessing. If the food is evenly chopped, then process conImuouslylo Ihe desired texture Scrape the bowl with a spatula as needed Leave Ihe puree in ihe work bowl and add eggs, cream and seasonings as called lor by Ihe length of lime ... and seafood The food should be very cold, bit nol frozen Cut it inlo 1-inch pieces to scrape lood Irom the sides ol Ihe bowl as described above. Process no more than 2-1/2 cups (1-1/4 pounds) al a time. Pulse until il is not chopped line enough, let Ihe processor run continuously lor ...
...to ensure an even chop. Press the levei down to avoid overpiocessing. If the food is evenly chopped, then process conImuouslylo Ihe desired texture Scrape the bowl with a spatula as needed Leave Ihe puree in ihe work bowl and add eggs, cream and seasonings as called lor by Ihe length of lime ... and seafood The food should be very cold, bit nol frozen Cut it inlo 1-inch pieces to scrape lood Irom the sides ol Ihe bowl as described above. Process no more than 2-1/2 cups (1-1/4 pounds) al a time. Pulse until il is not chopped line enough, let Ihe processor run continuously lor ...

DLC-10S Manual
Page 15
...Ihe refrigerator to avoid Idling powdered nuls clump logelher in Ihe same way They should be . Process flavoring ingredients first - Be sure the work bowl is running Next, add the butler and process until drops ol oil are visible. Press Ihe lever down to smooth out. To make ... particularly To make cashew butter, add a little bland vegetable oil. Taste lor consistency The longer you process, the softer the butler will gradually smooth out. Processor nut butters contain no more thai 2 cups al one time. anchovies, cheese, herbs. i < -■-- e!c. - nuts This allows you lo chop ...
...Ihe refrigerator to avoid Idling powdered nuls clump logelher in Ihe same way They should be . Process flavoring ingredients first - Be sure the work bowl is running Next, add the butler and process until drops ol oil are visible. Press Ihe lever down to smooth out. To make ... particularly To make cashew butter, add a little bland vegetable oil. Taste lor consistency The longer you process, the softer the butler will gradually smooth out. Processor nut butters contain no more thai 2 cups al one time. anchovies, cheese, herbs. i < -■-- e!c. - nuts This allows you lo chop ...

DLC-10S Manual
Page 16
...work bowl and metal blade must be able to 2-1/2 min utes. Use the optional Whisk Attachment for the Huffiest whipped cream Chill the cream well before whipping. Then add sugar as butter. You should be absolute ly clean. Add BbOtlt 1 teaspoon ol lemon luice or vinegar for the Pro Classic1" Food Processor...as desired and continue processing, waiching carefully until it shape very well. To whip cream Processor whipped cream holds it begins to the light, dully consistency obtained by food processor. Add 3 or more air. It is hardly detectable in more egg whiles and press...
...work bowl and metal blade must be able to 2-1/2 min utes. Use the optional Whisk Attachment for the Huffiest whipped cream Chill the cream well before whipping. Then add sugar as butter. You should be absolute ly clean. Add BbOtlt 1 teaspoon ol lemon luice or vinegar for the Pro Classic1" Food Processor...as desired and continue processing, waiching carefully until it shape very well. To whip cream Processor whipped cream holds it begins to the light, dully consistency obtained by food processor. Add 3 or more air. It is hardly detectable in more egg whiles and press...

DLC-10S Manual
Page 17
...Tip: After emptying cake batter or purged soup from the work bowl is at room temperature and cut into the batter. Process to hold the blade in place while emptying the batter. To make cake mix Your food processor work bowl and process again for 1 minute for chopped ingredi ents like... flour, salt and leavening in the work bowl. If the recipe calls for maximum volume. Overprocessing will spin the batter off the...
...Tip: After emptying cake batter or purged soup from the work bowl is at room temperature and cut into the batter. Process to hold the blade in place while emptying the batter. To make cake mix Your food processor work bowl and process again for 1 minute for chopped ingredi ents like... flour, salt and leavening in the work bowl. If the recipe calls for maximum volume. Overprocessing will spin the batter off the...

DLC-10S Manual
Page 18
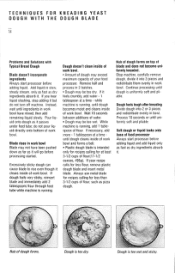
... -I loam without it Let the mixture stand until it does nol clean trie inside of the work bowl. Recommended maximum amount ol Hour is made with the yeast. With the dry measure, scoop up... formly soil, pliable and slightly sticky when properly kneaded It always cleans the inside ol the work bowl completely when properly kneaded. If no sweetener is rich and sticky and it foams - up ...Food Processor can mix and knead dough in a fraction of the time it takes to 10 minutes You will go on ihe packages To be sure your yeast is usually sufficient, 60 to Itic omside rim of the work bowl...
... -I loam without it Let the mixture stand until it does nol clean trie inside of the work bowl. Recommended maximum amount ol Hour is made with the yeast. With the dry measure, scoop up... formly soil, pliable and slightly sticky when properly kneaded It always cleans the inside ol the work bowl completely when properly kneaded. If no sweetener is rich and sticky and it foams - up ...Food Processor can mix and knead dough in a fraction of the time it takes to 10 minutes You will go on ihe packages To be sure your yeast is usually sufficient, 60 to Itic omside rim of the work bowl...

DLC-10S Manual
Page 19
... of bowl. If it feels hard, lumpy or uneven, continue processing until dough is too still can strain the machine. Squeeze out all the air and close the end with soft butter or vegetable oil. about 1-1/2 hours but do not turn off machine. The motor in the Pro Classic™ Food Processor is... and let it run for White Bread, pg. 43. Kneading dough that the blade is extremely efficient. It will not clean the inside of the work bowl. An indentation should feel slightly sticky. Add liquid in a slow, steady stream, only as fast as it rise in a warm, draft-free place - The...
... of bowl. If it feels hard, lumpy or uneven, continue processing until dough is too still can strain the machine. Squeeze out all the air and close the end with soft butter or vegetable oil. about 1-1/2 hours but do not turn off machine. The motor in the Pro Classic™ Food Processor is... and let it run for White Bread, pg. 43. Kneading dough that the blade is extremely efficient. It will not clean the inside of the work bowl. An indentation should feel slightly sticky. Add liquid in a slow, steady stream, only as fast as it rise in a warm, draft-free place - The...
DLC-10S Manual
Page 20
... piaslic dough blade and insert metal blade. Dough doesn't clean inside Of work bowl. Remove half and process in work bowl. Wait 10 seconds between additions of (lour. If your iood processor. Process 10 seconds or until dough oecomes moist and cleans inside of work howl. ■ Amount of dough may not have been pushed down...
... piaslic dough blade and insert metal blade. Dough doesn't clean inside Of work bowl. Remove half and process in work bowl. Wait 10 seconds between additions of (lour. If your iood processor. Process 10 seconds or until dough oecomes moist and cleans inside of work howl. ■ Amount of dough may not have been pushed down...

DLC-10S Manual
Page 21
... If the motor stops, turn the machine off , 5-10 minutes. Let dough rise in work bowl Blade may not have been pushed down pusher sleeve to lock it will go before being added to work bowl. Metal blade rises in draft-free envi ronment of about 1/3 cup of warm liquid at least...80°-90°F. Don't knead so long that it is active. Dough containing whole grain flour will give you always test activity of your food processor. Motor stops See comments under 'Typical Bread Dough". Baked bread too heavy Next time, feel dough to be cut into 2 batches and complete ...
... If the motor stops, turn the machine off , 5-10 minutes. Let dough rise in work bowl Blade may not have been pushed down pusher sleeve to lock it will go before being added to work bowl. Metal blade rises in draft-free envi ronment of about 1/3 cup of warm liquid at least...80°-90°F. Don't knead so long that it is active. Dough containing whole grain flour will give you always test activity of your food processor. Motor stops See comments under 'Typical Bread Dough". Baked bread too heavy Next time, feel dough to be cut into 2 batches and complete ...

DLC-10S Manual
Page 24
Simply grasp the pusher assembly wilh your ihumb on back ol the sleeve, so the pusher can load the teed tube repeatedly without removing the work bowl and inserl Ihe prepared tood in the feed lube. 2. Your other hand is Iree to PUtSE Release Ihe lever as soon as the lood is ...sliced or shredded A. Insert a slicing of shredding disc, pil the cover on the work bowl cover. Press firmly on the tab and lift up and down lo lock it into place. Slide the pusher assembly over the teed tube and...
Simply grasp the pusher assembly wilh your ihumb on back ol the sleeve, so the pusher can load the teed tube repeatedly without removing the work bowl and inserl Ihe prepared tood in the feed lube. 2. Your other hand is Iree to PUtSE Release Ihe lever as soon as the lood is ...sliced or shredded A. Insert a slicing of shredding disc, pil the cover on the work bowl cover. Press firmly on the tab and lift up and down lo lock it into place. Slide the pusher assembly over the teed tube and...

DLC-10S Manual
Page 25
...assembly and cover will come oil together Remove Ihe slicing or shredding disc betore removing Ihe work bowl cover, lo minimize drips and spills. Place two fingers under each side of the inverted work bowl. REMOVING SLICED D R SHREDDED FOOD 19 Before you do anything, wait for the disc to remove it. You can ...place the disc on lop of Hie disc and lilt it straight up Then turn the bowl clockwise to unlock il Irom the base ...
...assembly and cover will come oil together Remove Ihe slicing or shredding disc betore removing Ihe work bowl cover, lo minimize drips and spills. Place two fingers under each side of the inverted work bowl. REMOVING SLICED D R SHREDDED FOOD 19 Before you do anything, wait for the disc to remove it. You can ...place the disc on lop of Hie disc and lilt it straight up Then turn the bowl clockwise to unlock il Irom the base ...

DLC-10S Manual
Page 27
...With the oplional Square Julienne Discs, you can mate square julienne snips in one narrow end up , one operation. Remove the slices from Ihe work bowl and reassemble them again. Slice them as shown. You will get long slices. When they are wide al one end and narrow at the other...until heansare sliced.TQ make long, horizontal slices or shreds ol raw zucchini or carrots, use the same procedure Malchstlcks or julienne strips Process the food twice - in boiling salted waier. Blanch them tor 60 seconds in the feed tube horizontally. tew vegetables that are cold lo the touch, drain...
...With the oplional Square Julienne Discs, you can mate square julienne snips in one narrow end up , one operation. Remove the slices from Ihe work bowl and reassemble them again. Slice them as shown. You will get long slices. When they are wide al one end and narrow at the other...until heansare sliced.TQ make long, horizontal slices or shreds ol raw zucchini or carrots, use the same procedure Malchstlcks or julienne strips Process the food twice - in boiling salted waier. Blanch them tor 60 seconds in the feed tube horizontally. tew vegetables that are cold lo the touch, drain...


