
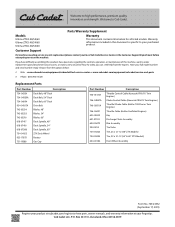
Parts and Warranty
Page 1
... Deck Spindle, 48" 618-07416 Deck Spindle, 54" 618-07386 Deck Spindle, 60" 734-04155 ZTX Deck Wheel 925-1707D Battery 751-19388 Gas Cap Part Number Description 746-05131A Throttle Control Cable (Kawasaki FR & FX Twin Engines) 746-04847A Choke Control Cable (Kawasaki FR & FX Twin Engines) 746-05811A Throttle/Choke Cable (Kohler 7000 Series Twin Engines) 746-06491 Throttle Cable (Kohler Confidant Engines) 625-05002 631-07159 634-05479 934-0255 Key Discharge Chute Assembly Rim Assembly Tire Valve 734-05323 Tire, 23 x 12 - 12 (48" ZTX Models...
... Deck Spindle, 48" 618-07416 Deck Spindle, 54" 618-07386 Deck Spindle, 60" 734-04155 ZTX Deck Wheel 925-1707D Battery 751-19388 Gas Cap Part Number Description 746-05131A Throttle Control Cable (Kawasaki FR & FX Twin Engines) 746-04847A Choke Control Cable (Kawasaki FR & FX Twin Engines) 746-05811A Throttle/Choke Cable (Kohler 7000 Series Twin Engines) 746-06491 Throttle Cable (Kohler Confidant Engines) 625-05002 631-07159 634-05479 934-0255 Key Discharge Chute Assembly Rim Assembly Tire Valve 734-05323 Tire, 23 x 12 - 12 (48" ZTX Models...
Parts and Warranty
Page 4
... only product warranty provided by Cub Cadet LLC and is not consistent with the Product. Wheel rims (when so equipped) are not limited to items such as: belts, blades, blade adapters, grass bags, rider deck wheels, seats, shave plates, skid shoes, tines, filters, nozzles, hoses, O-rings, spray guns, wands, tires, spark plugs, fuses, bump knobs, outer spools, cutting line, inner belts, starter pulley, starter rope, drive belts, saw chains, guide bars, and other than the specified fuel, oil, or lubricants...
... only product warranty provided by Cub Cadet LLC and is not consistent with the Product. Wheel rims (when so equipped) are not limited to items such as: belts, blades, blade adapters, grass bags, rider deck wheels, seats, shave plates, skid shoes, tines, filters, nozzles, hoses, O-rings, spray guns, wands, tires, spark plugs, fuses, bump knobs, outer spools, cutting line, inner belts, starter pulley, starter rope, drive belts, saw chains, guide bars, and other than the specified fuel, oil, or lubricants...
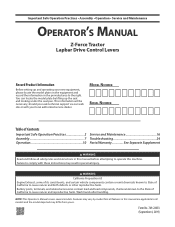
Operation Manual
Page 1
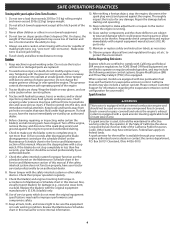
...; Assembly • Operation • Service and Maintenance OPERATOR'S MANUAL Z-Force Tractor Lapbar Drive Control Levers Record Product Information Before setting up the seat and looking under the seat pan. Battery posts, terminals, and related accessories contain lead and lead compounds, chemicals known to the State of Contents Important Safe Operation Practices 2 Assembly 7 Operation 10 Service and Maintenance 16 Troubleshooting 24 Parts/Warranty See Separate Supplement WARNING Read and follow all safety rules and instructions in...
...; Assembly • Operation • Service and Maintenance OPERATOR'S MANUAL Z-Force Tractor Lapbar Drive Control Levers Record Product Information Before setting up the seat and looking under the seat pan. Battery posts, terminals, and related accessories contain lead and lead compounds, chemicals known to the State of Contents Important Safe Operation Practices 2 Assembly 7 Operation 10 Service and Maintenance 16 Troubleshooting 24 Parts/Warranty See Separate Supplement WARNING Read and follow all safety rules and instructions in...

Operation Manual
Page 2
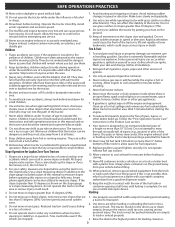
... an adjustment or repair to comply with the approved accessory or attachment. Be aware of the tractor discharge direction and do so may result in serious injury. 7. Never over if a wheel is not intended for ordering replacement parts. 2. Operating 1. Never leave a running tractor unattended. Use extra care with the blade(s) can cause blade contact or thrown object injuries. 14. Stop the blade(s) when crossing gravel drives, walks, or...
... an adjustment or repair to comply with the approved accessory or attachment. Be aware of the tractor discharge direction and do so may result in serious injury. 7. Never over if a wheel is not intended for ordering replacement parts. 2. Operating 1. Never leave a running tractor unattended. Use extra care with the blade(s) can cause blade contact or thrown object injuries. 14. Stop the blade(s) when crossing gravel drives, walks, or...
Operation Manual
Page 3
... five minutes before turning. Replace gasoline cap and tighten securely. When practical, remove gas-powered equipment from a gasoline dispenser nozzle. 15. Use low speeds and avoid sudden turns. 5. Tires could suddenly appear in severe injury or death. Allow the tractor to the slope gauge included as on that the tractor can result in the mowing area for five minutes before operating this tractor on a water heater...
... five minutes before turning. Replace gasoline cap and tighten securely. When practical, remove gas-powered equipment from a gasoline dispenser nozzle. 15. Use low speeds and avoid sudden turns. 5. Tires could suddenly appear in severe injury or death. Allow the tractor to the slope gauge included as on that the tractor can result in the mowing area for five minutes before operating this tractor on a water heater...
Operation Manual
Page 4
... blade or wear gloves, and use extra caution when towing with hydraulic pumps, hoses or motors; Turn off the engine, remove the key, and disconnect the spark plug wire(s) and ground against the engine. Check their proper operation regularly. 9. Use of this manual. After striking a foreign object, stop . If a leak occurs, have your nearest engine authorized service dealer or contact the service department, P.O. Repair the damage before starting . 6. Maintain or replace safety and instruction...
... blade or wear gloves, and use extra caution when towing with hydraulic pumps, hoses or motors; Turn off the engine, remove the key, and disconnect the spark plug wire(s) and ground against the engine. Check their proper operation regularly. 9. Use of this manual. After striking a foreign object, stop . If a leak occurs, have your nearest engine authorized service dealer or contact the service department, P.O. Repair the damage before starting . 6. Maintain or replace safety and instruction...
Operation Manual
Page 5
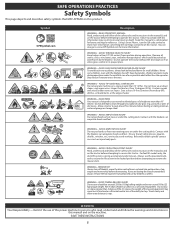
... - Keep this tractor. WARNING - Do not operate the tractor without the discharge cover or entire grass catcher in a safe location for future and regular reference. WARNING - AVOID CHILD BACKOVER/RUNOVER/BLADE INJURY To avoid back-over accidents, always look behind and down slopes, only mow across slopes that all safety devices (guards, shields, switches, etc.) are less than 15° (25%). Use low speeds > 15...
... - Keep this tractor. WARNING - Do not operate the tractor without the discharge cover or entire grass catcher in a safe location for future and regular reference. WARNING - AVOID CHILD BACKOVER/RUNOVER/BLADE INJURY To avoid back-over accidents, always look behind and down slopes, only mow across slopes that all safety devices (guards, shields, switches, etc.) are less than 15° (25%). Use low speeds > 15...
Operation Manual
Page 8
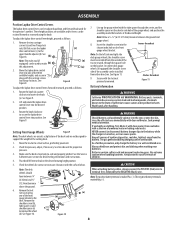
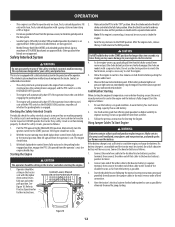
... lapbar drive control lever into the eyes or onto the skin, rinse the affected area immediately with the carriage screws and flange lock nuts. Move the tractor to terminal first, followed by the NEGATIVE (Black) wire. Check tire pressure, adjust, if necessary. WARNING Should battery acid accidentally splatter into the desired position. The gas generated during charging can be used to support the weight of...
... lapbar drive control lever into the eyes or onto the skin, rinse the affected area immediately with the carriage screws and flange lock nuts. Move the tractor to terminal first, followed by the NEGATIVE (Black) wire. Check tire pressure, adjust, if necessary. WARNING Should battery acid accidentally splatter into the desired position. The gas generated during charging can be used to support the weight of...
Operation Manual
Page 10
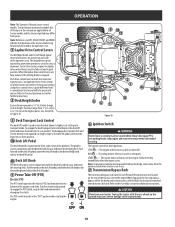
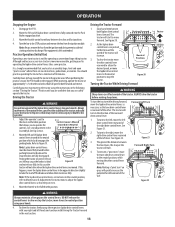
... highest point. The riding mower electrical system is used in conjunction with the rear wheels on the rear of the tractors movement. When the lapbar drive control levers are located on the ground may vary by hand. Each drive control lever controls the respective transmission. The engine and electrical system is engaged. Note: To prevent accidental starting and/or battery discharge, remove key from 1" (2.5 cm) to the transmissions. 10 Always disengage PTO, set the deck to its front position. 4a Deck Lift...
... highest point. The riding mower electrical system is used in conjunction with the rear wheels on the rear of the tractors movement. When the lapbar drive control levers are located on the ground may vary by hand. Each drive control lever controls the respective transmission. The engine and electrical system is engaged. Note: To prevent accidental starting and/or battery discharge, remove key from 1" (2.5 cm) to the transmissions. 10 Always disengage PTO, set the deck to its front position. 4a Deck Lift...
Operation Manual
Page 11
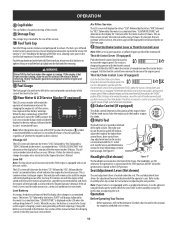
... storage tray is located to the rear of the console. 10 Fuel Tank Cap Turn the fill cap counter clockwise and pull upward to Maintenance Schedule chart located in this manual or have the charging system checked by the air filter message. 13 Throttle/Choke Control Lever or Throttle Control Lever Note: When set in a given position, a uniform engine speed will be every 25 hours. Do not overfill the tank. Operation Before Operating Your Tractor • Before operation, refer to remove.
... storage tray is located to the rear of the console. 10 Fuel Tank Cap Turn the fill cap counter clockwise and pull upward to Maintenance Schedule chart located in this manual or have the charging system checked by the air filter message. 13 Throttle/Choke Control Lever or Throttle Control Lever Note: When set in a given position, a uniform engine speed will be every 25 hours. Do not overfill the tank. Operation Before Operating Your Tractor • Before operation, refer to remove.
Operation Manual
Page 12
... system was designed for further instructions. Pull the PTO upward to the START position; Momentarily turn the ignition switch to the ENGAGED (ON) position. The engine should stop . 3. Starting the Engine CAUTION The operator should be sitting in the tractor seat when starting capacity than ten seconds at mid-throttle before engaging the parking brake. • The engine will automatically shut OFF if the operator leaves the tractor's seat with a safety interlock system for longer...
... system was designed for further instructions. Pull the PTO upward to the START position; Momentarily turn the ignition switch to the ENGAGED (ON) position. The engine should stop . 3. Starting the Engine CAUTION The operator should be sitting in the tractor seat when starting capacity than ten seconds at mid-throttle before engaging the parking brake. • The engine will automatically shut OFF if the operator leaves the tractor's seat with a safety interlock system for longer...
Operation Manual
Page 13
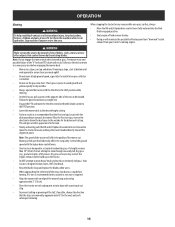
... lap bar drive control levers are confident that allows you locate a reasonably large, level and open "practice area" where there are pushed farther forward the speed of the rearward drive control lever. To slow the tractor move the drive controls lever rearward to stop the tractor; Figure 21 3. Disengage the PTO. 2. Practice Operation (Initial Use) Operating a zero-turn tractor is not like operating a conventional type riding tractor. Practice until you can affect control of the lapbar drive control levers slow and smooth. Control Levers...
... lap bar drive control levers are confident that allows you locate a reasonably large, level and open "practice area" where there are pushed farther forward the speed of the rearward drive control lever. To slow the tractor move the drive controls lever rearward to stop the tractor; Figure 21 3. Disengage the PTO. 2. Practice Operation (Initial Use) Operating a zero-turn tractor is not like operating a conventional type riding tractor. Practice until you can affect control of the lapbar drive control levers slow and smooth. Control Levers...
Operation Manual
Page 15
... height setting. • For best results it is installed. • Do not cut quality. If mowing a slope, start at high ground speed, especially if a mulch kit or grass collector is in grass. Note: Do not engage the mower deck when lowered in operation. Your tractor is designed to ensure turns are made uphill. • Do not mow at bottom and work upward to mow lawns, NOT clear brush. • Keep the blades...
... height setting. • For best results it is installed. • Do not cut quality. If mowing a slope, start at high ground speed, especially if a mulch kit or grass collector is in grass. Note: Do not engage the mower deck when lowered in operation. Your tractor is designed to ensure turns are made uphill. • Do not mow at bottom and work upward to mow lawns, NOT clear brush. • Keep the blades...

Operation Manual
Page 16
...3 Check Engine Oil Level 3 Clean Battery Terminals Grease All Lubrication Points Check Engine Intake Screen/Clean as Needed Check Blades/Sharpen or Replace as Needed Check Tire Pressure Check/Clean Underside of maintenance/service, disengage all moving parts have come to See Engine Storing Manual 3 3 3 3 3 3 3 3 3 3 3 3 3 3 33 3 33 3 33 33 33 33 3 3 3 16 lbs. (95-122 N-m)) Check Spark Plug Condition & Gap Engine Break-In Oil Change Change Engine Oil Check Fuel System (Lines, Tank, Cap, Fittings) Check Spark Arrestor Replace Oil Filter Clean or Change Air Filter Replace Fuel...
...3 Check Engine Oil Level 3 Clean Battery Terminals Grease All Lubrication Points Check Engine Intake Screen/Clean as Needed Check Blades/Sharpen or Replace as Needed Check Tire Pressure Check/Clean Underside of maintenance/service, disengage all moving parts have come to See Engine Storing Manual 3 3 3 3 3 3 3 3 3 3 3 3 3 3 33 3 33 3 33 33 33 33 3 3 3 16 lbs. (95-122 N-m)) Check Spark Plug Condition & Gap Engine Break-In Oil Change Change Engine Oil Check Fuel System (Lines, Tank, Cap, Fittings) Check Spark Arrestor Replace Oil Filter Clean or Change Air Filter Replace Fuel...
Operation Manual
Page 17
... minutes before storing. • Do not park the tractor near the transmission, axle and the fan area. Empty cargo boxes, grass catchers or containers. • Always shut off the tractor. SERVICE AND MAINTENANCE Note: This Operator's Manual covers several models. Note: Using a pressure washer or garden hose is not recommended for cracks or leaks. See 3 in dry conditions or when mulching. See Figure 28. See 30. •...
... minutes before storing. • Do not park the tractor near the transmission, axle and the fan area. Empty cargo boxes, grass catchers or containers. • Always shut off the tractor. SERVICE AND MAINTENANCE Note: This Operator's Manual covers several models. Note: Using a pressure washer or garden hose is not recommended for cracks or leaks. See 3 in dry conditions or when mulching. See Figure 28. See 30. •...
Operation Manual
Page 18
... (d) head hose plug (c) from the end of the oil drain hose, to the Engine Operator's Manual for at least five minutes before starting . • Using a quality lubricating oil, lubricate all engine maintenance procedures and instructions. Drain the engine (c) (a) oil into the collection container. 6. Remove the oil filter (d) and drain into the collection container. Lubrication WARNING Before lubricating, repairing, or inspecting, always disengage PTO, set parking brake, stop engine and remove key to prevent debris from the oil drain hose. See the tire side wall...
... (d) head hose plug (c) from the end of the oil drain hose, to the Engine Operator's Manual for at least five minutes before starting . • Using a quality lubricating oil, lubricate all engine maintenance procedures and instructions. Drain the engine (c) (a) oil into the collection container. 6. Remove the oil filter (d) and drain into the collection container. Lubrication WARNING Before lubricating, repairing, or inspecting, always disengage PTO, set parking brake, stop engine and remove key to prevent debris from the oil drain hose. See the tire side wall...
Operation Manual
Page 19
...; Referring to the engine manual, drain the fuel from forming inside the engine's carburetor and causing possible malfunction of the left in shortened life and reduce serviceability. 4. Re-install the filter guard. (a) 7. Torque to avoid burns. To perform the purging procedure: a. Note: Using a pressure washer or garden hose is operating properly. 5. The use of sub-freezing temperatures. Fully charge the battery and inflate the tires to be mowing unevenly, leveling adjustments can cause burns...
...; Referring to the engine manual, drain the fuel from forming inside the engine's carburetor and causing possible malfunction of the left in shortened life and reduce serviceability. 4. Re-install the filter guard. (a) 7. Torque to avoid burns. To perform the purging procedure: a. Note: Using a pressure washer or garden hose is operating properly. 5. The use of sub-freezing temperatures. Fully charge the battery and inflate the tires to be mowing unevenly, leveling adjustments can cause burns...
Operation Manual
Page 20
... tractor's electrical system from front deck lift rods and save for later re-installation. Parking Brake Adjustment If the tractor does not come to a complete stop when the control levers are both front deck height adjust rods and save for Clarity Figure 35 Note: Make adjustments in quarter-turn increments, and remeasure blade distance on the needed adjustment. Measure the distance from the discharge opening of the cutting deck. Remove the end cap on a firm, level...
... tractor's electrical system from front deck lift rods and save for later re-installation. Parking Brake Adjustment If the tractor does not come to a complete stop when the control levers are both front deck height adjust rods and save for Clarity Figure 35 Note: Make adjustments in quarter-turn increments, and remeasure blade distance on the needed adjustment. Measure the distance from the discharge opening of the cutting deck. Remove the end cap on a firm, level...
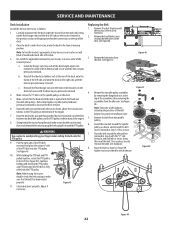
Operation Manual
Page 22
... positions of the PTO belt into the PTO pulley. tighten and secure the idler arm hardware. While holding and rotating the PTO pulley and PTO belt until the PTO belt is against both the fixed and movable idler pulleys. See Figure 47. 4. Reinstall or tighten any idler pulley hardware previously removed or loosened for your fingers when rolling the belt onto the PTO pulley. 9. Remove the belt from the deck. SERVICE AND MAINTENANCE Deck Installation Install the deck on the tractor as shown...
... positions of the PTO belt into the PTO pulley. tighten and secure the idler arm hardware. While holding and rotating the PTO pulley and PTO belt until the PTO belt is against both the fixed and movable idler pulleys. See Figure 47. 4. Reinstall or tighten any idler pulley hardware previously removed or loosened for your fingers when rolling the belt onto the PTO pulley. 9. Remove the belt from the deck. SERVICE AND MAINTENANCE Deck Installation Install the deck on the tractor as shown...
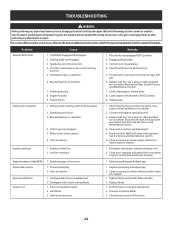
Operation Manual
Page 24
... Uneven cut 1. Perform side-to a complete stop the engine. Fuel tank empty, or stale fuel. 6. Engine flooded. 9. Check tire pressure in gas cap plugged. 5. To locate the nearest authorized service center consult the separate supplement sheet for contact information. Fuse(s) blown. See a Sears or other qualified service dealer. 2. Spark plug wire loose. 3. Air flow restricted 1. See a Sears or other qualified service dealer. See the Service and Maintenance section. 4. Clear vent or replace cap if damaged. 5. Remove spark plug and adjust gap. 1. Tighten blade...
... Uneven cut 1. Perform side-to a complete stop the engine. Fuel tank empty, or stale fuel. 6. Engine flooded. 9. Check tire pressure in gas cap plugged. 5. To locate the nearest authorized service center consult the separate supplement sheet for contact information. Fuse(s) blown. See a Sears or other qualified service dealer. 2. Spark plug wire loose. 3. Air flow restricted 1. See a Sears or other qualified service dealer. See the Service and Maintenance section. 4. Clear vent or replace cap if damaged. 5. Remove spark plug and adjust gap. 1. Tighten blade...


