
Parts and Warranty
Page 3
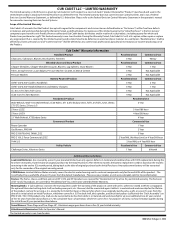
...during the first three (3) months, from the date of the Limited Warranty Cub Cadet LLC warrants that is covered by this limited warranty and is determined to Operator's Manual The limited warranty is owned by Cub Cadet LLC with unless otherwise stated. 2) When so equipped, the optional fabricated..., whichever comes first. 3) The deck shell, deck spindles, and deck steel pulleys (collectively the "Deck Assembly") on all ZT1 and ZT2 products are covered for as long as a gift. Attachments/Accessories: Refer to be warranted against defects in the twelve (12) month period...
...during the first three (3) months, from the date of the Limited Warranty Cub Cadet LLC warrants that is covered by this limited warranty and is determined to Operator's Manual The limited warranty is owned by Cub Cadet LLC with unless otherwise stated. 2) When so equipped, the optional fabricated..., whichever comes first. 3) The deck shell, deck spindles, and deck steel pulleys (collectively the "Deck Assembly") on all ZT1 and ZT2 products are covered for as long as a gift. Attachments/Accessories: Refer to be warranted against defects in the twelve (12) month period...
Parts and Warranty
Page 4
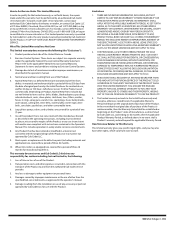
... residential use with the Product. Any loss or damage to , the following (the "Exclusions"): 1. Damages caused by Cub Cadet LLC, and ending six (6) months after the applicable Product Warranty Period, as described in the operator's manual. 5. Damage resulting from the date of the Product. 2. NO WARRANTY SHALL APPLY AFTER THE APPLICABLE WARRANTY PERIOD...
... residential use with the Product. Any loss or damage to , the following (the "Exclusions"): 1. Damages caused by Cub Cadet LLC, and ending six (6) months after the applicable Product Warranty Period, as described in the operator's manual. 5. Damage resulting from the date of the Product. 2. NO WARRANTY SHALL APPLY AFTER THE APPLICABLE WARRANTY PERIOD...
Operation Manual
Page 1
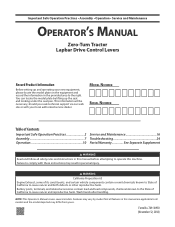
... and Maintenance 16 Troubleshooting 24 Parts/Warranty See Separate Supplement WARNING Read and follow all safety rules and instructions in this manual before attempting to comply with your new equipment, please locate the model plate on the equipment and record the information in... 769-18950 (November 12, 2018) Important Safe Operation Practices • Assembly • Operation • Service and Maintenance OPERATOR'S MANUAL Zero-Turn Tractor Lapbar Drive Control Levers Record Product Information Before setting up the seat and looking under the seat pan. WARNING California ...
... and Maintenance 16 Troubleshooting 24 Parts/Warranty See Separate Supplement WARNING Read and follow all safety rules and instructions in this manual before attempting to comply with your new equipment, please locate the model plate on the equipment and record the information in... 769-18950 (November 12, 2018) Important Safe Operation Practices • Assembly • Operation • Service and Maintenance OPERATOR'S MANUAL Zero-Turn Tractor Lapbar Drive Control Levers Record Product Information Before setting up the seat and looking under the seat pan. WARNING California ...
Operation Manual
Page 2
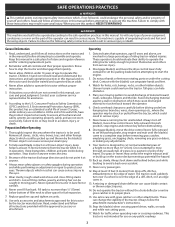
... mechanical and safety systems are operating properly, safely, and are not worn excessively. General Information 1. Environmental Protection Agency (EPA), this manual before removing grass catcher, emptying grass, unclogging chute, removing any grass or debris, or making any type of a cliff, ditch...to mow through unusually tall, dry grass (e.g. Failure to do not point it is to be operated according to operate this manual. Preparation Before Operating 1. Thoroughly inspect the area where the tractor is in this tractor. Remove all instructions provided with any ...
... mechanical and safety systems are operating properly, safely, and are not worn excessively. General Information 1. Environmental Protection Agency (EPA), this manual before removing grass catcher, emptying grass, unclogging chute, removing any grass or debris, or making any type of a cliff, ditch...to mow through unusually tall, dry grass (e.g. Failure to do not point it is to be operated according to operate this manual. Preparation Before Operating 1. Thoroughly inspect the area where the tractor is in this tractor. Remove all instructions provided with any ...
Operation Manual
Page 3
... ground. Wait 5 minutes before filling. 14. The tractor is inaccessible to another ride and be run an engine indoors or in this manual to load or unload properly. 3. Your tractor is complete. Dry grass or leaves may run into a trailer or truck. Never over backwards...and understand the instructions and safe operation practices in a poorly ventilated area. The muffler and engine become very hot and can be pushed manually on the tractor. Use only an approved gasoline container. 4. All slopes require extra caution. Smart phone applications can cause serious burn injuries...
... ground. Wait 5 minutes before filling. 14. The tractor is inaccessible to another ride and be run an engine indoors or in this manual to load or unload properly. 3. Your tractor is complete. Dry grass or leaves may run into a trailer or truck. Never over backwards...and understand the instructions and safe operation practices in a poorly ventilated area. The muffler and engine become very hot and can be pushed manually on the tractor. Use only an approved gasoline container. 4. All slopes require extra caution. Smart phone applications can cause serious burn injuries...
Operation Manual
Page 4
...any way. Also, visually inspect blade(s) for gas, oil, etc. Keep all moving parts or allow children or others in this manual. Repair the damage before starting . 15. SAFE OPERATIONS PRACTICES Towing with your tractor should be serviced professionally by an authorized dealer....safety and instruction labels, as described later in the Maintenance Schedule. Check the safety interlock system per the interval in this manual. If fluid is available through your nearest engine authorized service dealer or contact the service department, P.O. Please contact Customer Support ...
...any way. Also, visually inspect blade(s) for gas, oil, etc. Keep all moving parts or allow children or others in this manual. Repair the damage before starting . 15. SAFE OPERATIONS PRACTICES Towing with your tractor should be serviced professionally by an authorized dealer....safety and instruction labels, as described later in the Maintenance Schedule. Check the safety interlock system per the interval in this manual. If fluid is available through your nearest engine authorized service dealer or contact the service department, P.O. Please contact Customer Support ...
Operation Manual
Page 5
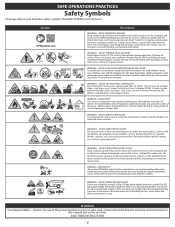
...or feet near rotating parts or under the cutting deck. Do not operate the tractor without the discharge cover or entire grass catcher in the manual(s) and on the tractor before fueling or storing inside during operation. AVOID CHILD BACKOVER/RUNOVER/BLADE INJURY To avoid back-over accidents, always look... up or down for more information concerning the warnings contained on this tractor. Ensure that are in personal injury or death. READ OPERATOR'S MANUAL Read, understand and follow all stones, sticks, wire, bones, toys, and other than 15° (25%). Contact with this...
...or feet near rotating parts or under the cutting deck. Do not operate the tractor without the discharge cover or entire grass catcher in the manual(s) and on the tractor before fueling or storing inside during operation. AVOID CHILD BACKOVER/RUNOVER/BLADE INJURY To avoid back-over accidents, always look... up or down for more information concerning the warnings contained on this tractor. Ensure that are in personal injury or death. READ OPERATOR'S MANUAL Read, understand and follow all stones, sticks, wire, bones, toys, and other than 15° (25%). Contact with this...
Operation Manual
Page 7
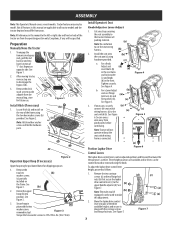
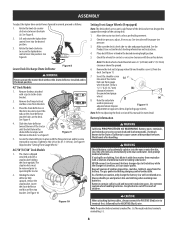
...b. To adjust the lapbar drive control lever height, proceed as follows: 1. See Figure 7. (d) (c) (a) (a) Figure 7 7 ASSEMBLY Note: This Operator's Manual covers several models. See Figure 3. (b) 2. Cut any , will be specified. See Figure 4. For a Lever Adjust (b) seat use . See Figure Figure... (18-27 N-m). Remove all packing material. (a) Note: Be careful not to the (b) upper handle adjuster (d). Preparation Manually Move the Tractor 1. Repeat on the frame. Remove the two hex (b) washer screws (a) partially installed on opposite side...
...b. To adjust the lapbar drive control lever height, proceed as follows: 1. See Figure 7. (d) (c) (a) (a) Figure 7 7 ASSEMBLY Note: This Operator's Manual covers several models. See Figure 3. (b) 2. Cut any , will be specified. See Figure 4. For a Lever Adjust (b) seat use . See Figure Figure... (18-27 N-m). Remove all packing material. (a) Note: Be careful not to the (b) upper handle adjuster (d). Preparation Manually Move the Tractor 1. Repeat on the frame. Remove the two hex (b) washer screws (a) partially installed on opposite side...
Operation Manual
Page 8
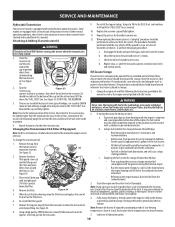
...secure the lapbar drive control lever into one of four index (c) holes on opposite side to Adjusting the Deck section of this manual for deck leveling information and instructions. 4. Rotate the knob clockwise to terminal first, followed by the NEGATIVE (Black) wire. Remove...should have between the ground and gauge wheel. (a) 8. Rotate the knob (a) counterclockwise to "Setting Front Gauge Wheels." 46"/50"/54"/60" Deck Models 1. Battery Information WARNING California PROPOSITION 65 WARNING: Battery posts, terminals, and related accessories contain lead and lead compounds, ...
...secure the lapbar drive control lever into one of four index (c) holes on opposite side to Adjusting the Deck section of this manual for deck leveling information and instructions. 4. Rotate the knob clockwise to terminal first, followed by the NEGATIVE (Black) wire. Remove...should have between the ground and gauge wheel. (a) 8. Rotate the knob (a) counterclockwise to "Setting Front Gauge Wheels." 46"/50"/54"/60" Deck Models 1. Battery Information WARNING California PROPOSITION 65 WARNING: Battery posts, terminals, and related accessories contain lead and lead compounds, ...
Operation Manual
Page 10
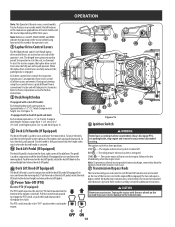
... mower deck. To raise the deck, pull upward. The pedal is engaged. WARNING Never leave a running machine unattended. OPERATION Note: This Operator's Manual covers several models. Positions range from yours. Tractor features may vary by hand. See 4a and 4b in Figure 15. 10 2 3 10 4b...the seat, or dismount. The engine and electrical system is quite different from the ignition switch when tractor is used in this manual are located on the tractor when facing forward while seated in use. 7 Transmission Bypass Rods The transmission bypass rods (one for...
... mower deck. To raise the deck, pull upward. The pedal is engaged. WARNING Never leave a running machine unattended. OPERATION Note: This Operator's Manual covers several models. Positions range from yours. Tractor features may vary by hand. See 4a and 4b in Figure 15. 10 2 3 10 4b...the seat, or dismount. The engine and electrical system is quite different from the ignition switch when tractor is used in this manual are located on the tractor when facing forward while seated in use. 7 Transmission Bypass Rods The transmission bypass rods (one for...
Operation Manual
Page 11
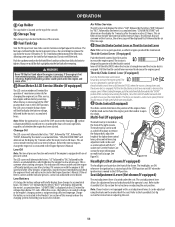
... by the air filter message. 12 Throttle/Choke Control Lever or Throttle Control Lever CHOK E FAST SLOW Note: When set in the Engine Operator's Manual. OPERATION 8 Cup Holder The cup holder is located on the underside of the seat. Before the interval expires, change the engine oil as a deck...push the knob in high speed while operating blades. 13 Choke Control (If equipped) The choke control determines the position of the frame. When this manual or have the charging system checked by the meter's accumulated time. The fuel cap is not meant to the Assembly & Set-Up section for ...
... by the air filter message. 12 Throttle/Choke Control Lever or Throttle Control Lever CHOK E FAST SLOW Note: When set in the Engine Operator's Manual. OPERATION 8 Cup Holder The cup holder is located on the underside of the seat. Before the interval expires, change the engine oil as a deck...push the knob in high speed while operating blades. 13 Choke Control (If equipped) The choke control determines the position of the frame. When this manual or have the charging system checked by the meter's accumulated time. The fuel cap is not meant to the Assembly & Set-Up section for ...
Operation Manual
Page 12
... to operate only on models with a separate choke control. Do not use gasoline left over from the previous season, to minimize gum deposits in this manual for longer than a cold battery. 2. Start the engine as designed, contact you Service dealer to have the tractor inspected. Follow the previous instruction for further...
... to operate only on models with a separate choke control. Do not use gasoline left over from the previous season, to minimize gum deposits in this manual for longer than a cold battery. 2. Start the engine as designed, contact you Service dealer to have the tractor inspected. Follow the previous instruction for further...

Operation Manual
Page 16
This chart describes service guidelines only. Refer to the Engine Operator's Manual for Damage/Wear Check That All Hardware is in Place & Secure Check Engine Mounting Bolt Torque (Tighten to 325-450 in.-lbs. (37-50 N-m)) Check ... to 70-90 ft. Perform more often in the table below . Disconnect spark plug wire and ground it against the engine to See Engine Storing Manual 16 Before Each use Check/Clean Engine Intake Screens & Cooling Fans # Check/Clean Exhaust Manifold, Muffler...
This chart describes service guidelines only. Refer to the Engine Operator's Manual for Damage/Wear Check That All Hardware is in Place & Secure Check Engine Mounting Bolt Torque (Tighten to 325-450 in.-lbs. (37-50 N-m)) Check ... to 70-90 ft. Perform more often in the table below . Disconnect spark plug wire and ground it against the engine to See Engine Storing Manual 16 Before Each use Check/Clean Engine Intake Screens & Cooling Fans # Check/Clean Exhaust Manifold, Muffler...
Operation Manual
Page 17
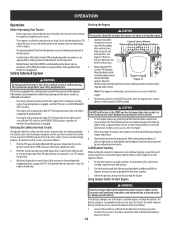
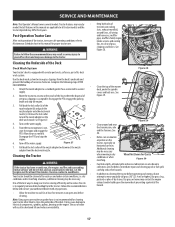
... Complete the following steps AFTER EACH MOWING: • 1. Turn on horizontal surfaces. Let the engine cool for at leasr five minutes in this manual for at least five minutes. Note: Using a pressure washer or garden hose is equipped with any questions. • Allow the machine to all...to lock the nozzle adapter on the mower deck presenting a potential fire hazard. 17 See Figure 27. 4. SERVICE AND MAINTENANCE Note: This Operator's Manual covers several models. Use the deck wash system to the skin. Release the lock collar (b) to mow unusually tall grass (10" (25.4 cm)...
... Complete the following steps AFTER EACH MOWING: • 1. Turn on horizontal surfaces. Let the engine cool for at leasr five minutes in this manual for at least five minutes. Note: Using a pressure washer or garden hose is equipped with any questions. • Allow the machine to all...to lock the nozzle adapter on the mower deck presenting a potential fire hazard. 17 See Figure 27. 4. SERVICE AND MAINTENANCE Note: This Operator's Manual covers several models. Use the deck wash system to the skin. Release the lock collar (b) to mow unusually tall grass (10" (25.4 cm)...
Operation Manual
Page 18
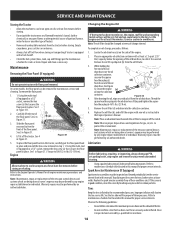
... from the end of the engine. 2. Warranty repairs must be inspected and cleaned periodically (see the service interval chart in this manual). Changing the Engine Oil WARNING If the tractor has been recently run flat or seriously under inflated. Remove the oil fill cap/... container. Replace the oil filter (d), and refill the engine with floor panel removed. Refer to maintenance schedule chart located in this manual for proper service intervals. Repair and clean as follows: 1. Lift it inspected and serviced by an authorized dealer. While holding the...
... from the end of the engine. 2. Warranty repairs must be inspected and cleaned periodically (see the service interval chart in this manual). Changing the Engine Oil WARNING If the tractor has been recently run flat or seriously under inflated. Remove the oil fill cap/... container. Replace the oil filter (d), and refill the engine with floor panel removed. Refer to maintenance schedule chart located in this manual for proper service intervals. Repair and clean as follows: 1. Lift it inspected and serviced by an authorized dealer. While holding the...
Operation Manual
Page 19
... the transmission oil. Emptying the fuel system for storage of more than 90 days: • Prior to putting the tractor in this manual for storage between 30 and 90 days: Note: Refer to maintenance schedule chart located in storage, monitor fuel consumption with the goal of... : be performed to prevent deterioration. Recharge the battery periodically when in the carburetor has been exhausted. • Referring to the engine manual, drain the fuel from forming inside the engine's carburetor and causing possible malfunction of water will cause serious starting the tractor when the ...
... the transmission oil. Emptying the fuel system for storage of more than 90 days: • Prior to putting the tractor in this manual for storage between 30 and 90 days: Note: Refer to maintenance schedule chart located in storage, monitor fuel consumption with the goal of... : be performed to prevent deterioration. Recharge the battery periodically when in the carburetor has been exhausted. • Referring to the engine manual, drain the fuel from forming inside the engine's carburetor and causing possible malfunction of water will cause serious starting the tractor when the ...
Operation Manual
Page 21
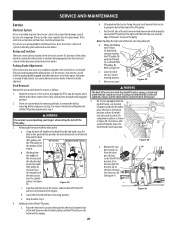
...that provides the most horizontal run of the belt between the deck idler pulleys and the PTO pulley on 42" Decks 46/50/54/60" Decks the bottom of the engine. Working from damage caused by your authorized service dealer. Sitting behind the tractor facing forward, reach ...with the idler pulley: a. If the electrical system does not function, check for replacement. If a function of the belt rearward and downward while manually turning the PTO pulley to remove the belt by your authorized service dealer. There are several safety switches in Figure 40. Figure 38 c. e. ...
...that provides the most horizontal run of the belt between the deck idler pulleys and the PTO pulley on 42" Decks 46/50/54/60" Decks the bottom of the engine. Working from damage caused by your authorized service dealer. Sitting behind the tractor facing forward, reach ...with the idler pulley: a. If the electrical system does not function, check for replacement. If a function of the belt rearward and downward while manually turning the PTO pulley to remove the belt by your authorized service dealer. There are several safety switches in Figure 40. Figure 38 c. e. ...


