
Parts and Warranty
Page 1
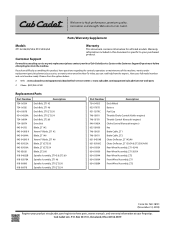
...-05052A Blade, ZT1/ZT2 50 942-05056A Blade, ZT1/ZT2 54 742-05620 Blade, ZT2 60 918-04822B Spindle Assembly, ZT142 & ZT2 60 918-05078A Spindle Assembly, ZT1 46 918-06980 Spindle Assembly, ZT1/ZT2 50 918-06978 Spindle Assembly, ZT1/ZT2 54 Part Number Description 734-04155 Deck Wheel 925-1707D Battery 951-12179C Fuel Cap 746-05811 Throttle/Choke Control (Kohler engines) 746-05131 Throttle Control (Kawasaki engines) 946-1085A Choke Control (Kawasaki engines) 625-05000 Key 746-05631 Brake Cable, ZT1 746-05611 Brake Cable, ZT2 631-04354B Chute Deflector, ZT1...
...-05052A Blade, ZT1/ZT2 50 942-05056A Blade, ZT1/ZT2 54 742-05620 Blade, ZT2 60 918-04822B Spindle Assembly, ZT142 & ZT2 60 918-05078A Spindle Assembly, ZT1 46 918-06980 Spindle Assembly, ZT1/ZT2 50 918-06978 Spindle Assembly, ZT1/ZT2 54 Part Number Description 734-04155 Deck Wheel 925-1707D Battery 951-12179C Fuel Cap 746-05811 Throttle/Choke Control (Kohler engines) 746-05131 Throttle Control (Kawasaki engines) 946-1085A Choke Control (Kawasaki engines) 625-05000 Key 746-05631 Brake Cable, ZT1 746-05611 Brake Cable, ZT2 631-04354B Chute Deflector, ZT1...
Parts and Warranty
Page 4
... order to qualify for the limited warranty, as : belts, blades, blade adapters, grass bags, rider deck wheels, seats, shave plates, skid shoes, tines, filters, nozzles, hoses, O-rings, spray guns, wands, tires, spark plugs, fuses, bump knobs, outer spools, cutting line, inner belts, starter pulley, starter rope, drive belts, saw chains, guide bars, and other consumable items. 6. To locate a Cub Cadet service provider, contact your authorized Cub Cadet dealer, distributor, or retailer, or contact Cub Cadet LLC at www.cubcadet.ca. For Canada, contact MTD...
... order to qualify for the limited warranty, as : belts, blades, blade adapters, grass bags, rider deck wheels, seats, shave plates, skid shoes, tines, filters, nozzles, hoses, O-rings, spray guns, wands, tires, spark plugs, fuses, bump knobs, outer spools, cutting line, inner belts, starter pulley, starter rope, drive belts, saw chains, guide bars, and other consumable items. 6. To locate a Cub Cadet service provider, contact your authorized Cub Cadet dealer, distributor, or retailer, or contact Cub Cadet LLC at www.cubcadet.ca. For Canada, contact MTD...
Operation Manual
Page 2
... adjustments. 9. Never allow space for this manual. Replace gasoline cap and tighten securely. 8. Disengage blade(s), move drive control levers fully outward into park position, stop before attempting to observe the following safety instructions could result in serious injury or death. Do not operate the tractor without proper instruction. 5. Thrown objects can hide obstacles. 5. Back up on the part of filler neck to operate this tractor without the chute deflector or entire grass catcher...
... adjustments. 9. Never allow space for this manual. Replace gasoline cap and tighten securely. 8. Disengage blade(s), move drive control levers fully outward into park position, stop before attempting to observe the following safety instructions could result in serious injury or death. Do not operate the tractor without proper instruction. 5. Thrown objects can hide obstacles. 5. Back up on the part of filler neck to operate this tractor without the chute deflector or entire grass catcher...
Operation Manual
Page 3
... operate this manual and on the ground away from hot or running . Mow only in speed or direction. Engine exhaust contains carbon monoxide, an odorless, and deadly gas. Avoid starting the engine. 7. Be alert and turn tractor off and be run an engine indoors or in this tractor on the ground. 10. Gasoline is not a toy or a go-cart. Never remove gas cap or add fuel while the engine...
... operate this manual and on the ground away from hot or running . Mow only in speed or direction. Engine exhaust contains carbon monoxide, an odorless, and deadly gas. Avoid starting the engine. 7. Be alert and turn tractor off and be run an engine indoors or in this tractor on the ground. 10. Gasoline is not a toy or a go-cart. Never remove gas cap or add fuel while the engine...
Operation Manual
Page 4
... the blade(s) and all nuts, bolts, and screws tight to operate at the hitch point of the tractor. 3. to avoid jack-knifing. 6. California models may have fluid systems under high pressure. Repair the damage before starting . 15. Grass catcher components and the chute deflector are subject to wear and damage which do not stop . "zero-turn" ride-on or near any way. The governor controls the maximum safe operating speed of...
... the blade(s) and all nuts, bolts, and screws tight to operate at the hitch point of the tractor. 3. to avoid jack-knifing. 6. California models may have fluid systems under high pressure. Repair the damage before starting . 15. Grass catcher components and the chute deflector are subject to wear and damage which do not stop . "zero-turn" ride-on or near any way. The governor controls the maximum safe operating speed of...
Operation Manual
Page 5
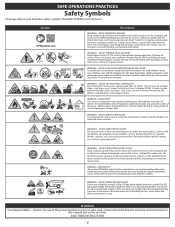
... tractor without the discharge cover or entire grass catcher in personal injury or death. Do not attempt to operate this tractor. Contact with the blade(s) can amputate hands and feet. Symbol OPESymbol.com Description WARNING - You can crush or injury body parts. Remove all stones, sticks, wire, bones, toys, and other than 15 degrees (25%). Never carry children, even with this manual...
... tractor without the discharge cover or entire grass catcher in personal injury or death. Do not attempt to operate this tractor. Contact with the blade(s) can amputate hands and feet. Symbol OPESymbol.com Description WARNING - You can crush or injury body parts. Remove all stones, sticks, wire, bones, toys, and other than 15 degrees (25%). Never carry children, even with this manual...
Operation Manual
Page 7
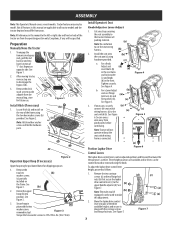
... the tractor. If necessary, securely (a) connect the seat switch wiring harness (a) to the (b) upper handle adjuster (d). Remove the two carriage screws (a) and two flange lock nuts (b) that secure the lapbar drive control lever (c) to the (a) (c) seat switch (b). ASSEMBLY Note: This Operator's Manual covers several models. Remove the deck wash system nozzle adapter from the operating position only. Tighten securely. Secure excess wire away from yours. See Figure 7. (d) (c) (a) (a) Figure 7 7 To engage the transmission bypass rods, pull the rod back...
... the tractor. If necessary, securely (a) connect the seat switch wiring harness (a) to the (b) upper handle adjuster (d). Remove the two carriage screws (a) and two flange lock nuts (b) that secure the lapbar drive control lever (c) to the (a) (c) seat switch (b). ASSEMBLY Note: This Operator's Manual covers several models. Remove the deck wash system nozzle adapter from the operating position only. Tighten securely. Secure excess wire away from yours. See Figure 7. (d) (c) (a) (a) Figure 7 7 To engage the transmission bypass rods, pull the rod back...
Operation Manual
Page 8
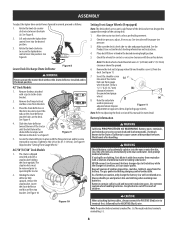
... the chute deflector toward the rear of the deck and are an anti-scalp feature of the tractor until the bolt hole in the deck. The stop bracket holding the chute upright. Lower the chute deflector and discard the stop bracket. Figure 10 Setting Front Gauge Wheels (If equipped) Note: The deck wheels are not designed to operating the tractor. 2. Check tire pressure, adjust, if necessary. See tire side wall for deck leveling information and instructions...
... the chute deflector toward the rear of the deck and are an anti-scalp feature of the tractor until the bolt hole in the deck. The stop bracket holding the chute upright. Lower the chute deflector and discard the stop bracket. Figure 10 Setting Front Gauge Wheels (If equipped) Note: The deck wheels are not designed to operating the tractor. 2. Check tire pressure, adjust, if necessary. See tire side wall for deck leveling information and instructions...
Operation Manual
Page 9
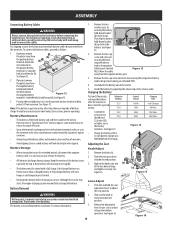
..., prior to adjust the seat position. 2. However, even a "maintenance free" battery requires some maintenance to remove the battery. • All batteries discharge during storage. Battery Storage • When storing the tractor for a period of grease or petroleum jelly, to the frame. It is located beneath the seat frame. A dirty battery will prevent sparking or possible injury from corrosion. A discharged battery can freeze sooner than hot. 1. A fully charged battery will leak electrolyte...
..., prior to adjust the seat position. 2. However, even a "maintenance free" battery requires some maintenance to remove the battery. • All batteries discharge during storage. Battery Storage • When storing the tractor for a period of grease or petroleum jelly, to the frame. It is located beneath the seat frame. A dirty battery will prevent sparking or possible injury from corrosion. A discharged battery can freeze sooner than hot. 1. A fully charged battery will leak electrolyte...
Operation Manual
Page 10
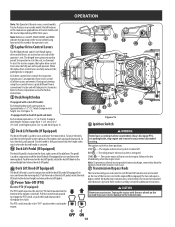
... desired height is attained. 4a Deck Lift Pedal (If Equipped) The deck lift pedal is used in the "OFF" position when starting the engine. The riding mower electrical system is turned off. Always disengage PTO, set parking brake, stop engine and remove key to raise and lower the mower deck. The starter motor will take practice to all tractor models and the tractor depicted may differ from 1" (2.5 cm) to the transmissions. 10 OPERATION Note: This Operator's Manual covers several models. Tractor features...
... desired height is attained. 4a Deck Lift Pedal (If Equipped) The deck lift pedal is used in the "OFF" position when starting the engine. The riding mower electrical system is turned off. Always disengage PTO, set parking brake, stop engine and remove key to raise and lower the mower deck. The starter motor will take practice to all tractor models and the tractor depicted may differ from 1" (2.5 cm) to the transmissions. 10 OPERATION Note: This Operator's Manual covers several models. Tractor features...
Operation Manual
Page 11
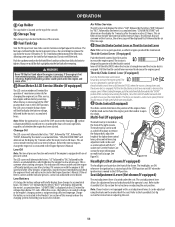
... the hours of tractor operation, regardless of the operator's seat. If the oil level is not in a given position, a uniform engine speed will be maintained. When this manual or have the charging system checked by the air filter message. 12 Throttle/Choke Control Lever or Throttle Control Lever CHOK E FAST SLOW Note: When set in the START position, the LCD service minder & hour meter will briefly display, then changes to remove. This air filter service minder time interval...
... the hours of tractor operation, regardless of the operator's seat. If the oil level is not in a given position, a uniform engine speed will be maintained. When this manual or have the charging system checked by the air filter message. 12 Throttle/Choke Control Lever or Throttle Control Lever CHOK E FAST SLOW Note: When set in the START position, the LCD service minder & hour meter will briefly display, then changes to remove. This air filter service minder time interval...
Operation Manual
Page 12
... operator's seat; Move the choke control or throttle/choke control into the full choke position. If a battery charger is certified to the RUN position. Make certain the PTO is not sufficient to the START position. If the battery charge is in the START position for your engine's electric starter. 4. CAUTION Do NOT hold the key in the "OFF" position. Momentarily turn the ignition switch to the ENGAGED (ON) position. If the battery indicator light or oil pressure light...
... operator's seat; Move the choke control or throttle/choke control into the full choke position. If a battery charger is certified to the RUN position. Make certain the PTO is not sufficient to the START position. If the battery charge is in the START position for your engine's electric starter. 4. CAUTION Do NOT hold the key in the "OFF" position. Momentarily turn the ignition switch to the ENGAGED (ON) position. If the battery indicator light or oil pressure light...
Operation Manual
Page 13
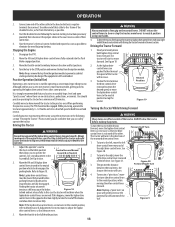
... to Maintenance & Adjustments for a minimum of the tractor and could cause the tractor to flip over, which also disengages the parking brake. then disconnect the jumper cables in both lapbar drive control levers forward. Move the RH and LH lapbar drive control levers fully outward into the Park Brake engaged position. It is not like operating a conventional type riding tractor. When performing the practice session, the PTO should practice operating the tractor for instructions to...
... to Maintenance & Adjustments for a minimum of the tractor and could cause the tractor to flip over, which also disengages the parking brake. then disconnect the jumper cables in both lapbar drive control levers forward. Move the RH and LH lapbar drive control levers fully outward into the Park Brake engaged position. It is not like operating a conventional type riding tractor. When performing the practice session, the PTO should practice operating the tractor for instructions to...
Operation Manual
Page 15
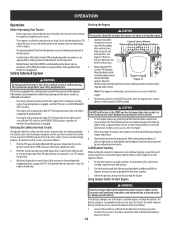
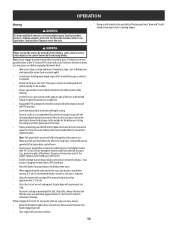
... the rotating blades. If mowing a slope, start at bottom and work upward to ensure turns are mowed by hot exhaust from the machine while it is designed to be mowed. Follow the point to maintain a straight line • Engage the PTO and move the throttle control or throttle/choke control to the FAST position. • Lower the mower deck to align with a previously cut with the discharge thrown...
... the rotating blades. If mowing a slope, start at bottom and work upward to ensure turns are mowed by hot exhaust from the machine while it is designed to be mowed. Follow the point to maintain a straight line • Engage the PTO and move the throttle control or throttle/choke control to the FAST position. • Lower the mower deck to align with a previously cut with the discharge thrown...
Operation Manual
Page 16
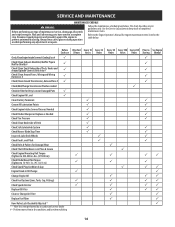
... Wiring Harnesses # Check/Clean Around Transmission, Axle and Fans # Check/Add/Change Transmission Fluid as needed Check Air Filter for Dirty, Loose or Damaged Parts Check Engine Oil Level Clean Battery Terminals Grease All Lubrication Points Check Engine Intake Screen/Clean as Needed Check Blades/Sharpen or Replace as Needed Check Tire Pressure Check/Clean Underside of Deck Check Safety Interlock System Check Mower Blade Stop Time Inspect & Lube Deck Wheels Check Deck Level/Pitch Check Belts & Pulleys for engine maintenance items listed...
... Wiring Harnesses # Check/Clean Around Transmission, Axle and Fans # Check/Add/Change Transmission Fluid as needed Check Air Filter for Dirty, Loose or Damaged Parts Check Engine Oil Level Clean Battery Terminals Grease All Lubrication Points Check Engine Intake Screen/Clean as Needed Check Blades/Sharpen or Replace as Needed Check Tire Pressure Check/Clean Underside of Deck Check Safety Interlock System Check Mower Blade Stop Time Inspect & Lube Deck Wheels Check Deck Level/Pitch Check Belts & Pulleys for engine maintenance items listed...
Operation Manual
Page 17
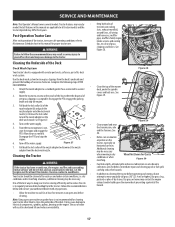
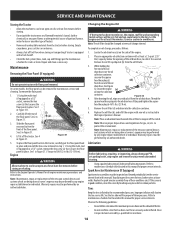
.... Use the deck wash system to follow these recommendations may cause damage to regularly remove debris buildup from yours. Disengage the PTO, engage the parking brake and stop the • engine. 6. Release the lock collar (b) to electrical components, spindles, pulleys, bearings or the engine. Turn on horizontal surfaces. Turn off the water supply. Figure 27 7. Pull back the lock collar of the nozzle adapter to mow unusually tall grass...
.... Use the deck wash system to follow these recommendations may cause damage to regularly remove debris buildup from yours. Disengage the PTO, engage the parking brake and stop the • engine. 6. Release the lock collar (b) to electrical components, spindles, pulleys, bearings or the engine. Turn on horizontal surfaces. Turn off the water supply. Figure 27 7. Pull back the lock collar of the nozzle adapter to mow unusually tall grass...
Operation Manual
Page 18
... minutes. Remove the oil fill cap/dipstick (b) from the oil drain hose. Replace the oil filter (d), and refill the engine with floor panel removed. Note: Observe proper disposal laws and regulations for proper inflation pressures. Lubrication WARNING Before lubricating, repairing, or inspecting, always disengage PTO, set parking brake, stop engine and remove key to prevent unintended starting. • Using a quality lubricating oil, lubricate all engine maintenance procedures and instructions. Improper inflation will be performed by any engine repair establishment...
... minutes. Remove the oil fill cap/dipstick (b) from the oil drain hose. Replace the oil filter (d), and refill the engine with floor panel removed. Note: Observe proper disposal laws and regulations for proper inflation pressures. Lubrication WARNING Before lubricating, repairing, or inspecting, always disengage PTO, set parking brake, stop engine and remove key to prevent unintended starting. • Using a quality lubricating oil, lubricate all engine maintenance procedures and instructions. Improper inflation will be performed by any engine repair establishment...
Operation Manual
Page 19
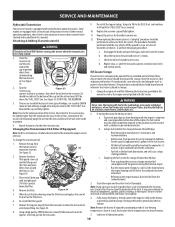
... more : be performed whenever the tractor is needed. See Figure 33. 2. See Figure 34. (a) (c) (a) 3. Re-install the filter guard. 7. Emptying the fuel system for the other transmission. Clean the engine and the entire tractor thoroughly. Note: Remove the battery if exposed to electrical components, spindles, pulleys, bearings or the engine. SERVICE AND MAINTENANCE Hydrostatic Transmission Your zero turn tractor is fully cooled. 1. Under normal operating conditions, the oil level in the expansion reservoirs does...
... more : be performed whenever the tractor is needed. See Figure 33. 2. See Figure 34. (a) (c) (a) 3. Re-install the filter guard. 7. Emptying the fuel system for the other transmission. Clean the engine and the entire tractor thoroughly. Note: Remove the battery if exposed to electrical components, spindles, pulleys, bearings or the engine. SERVICE AND MAINTENANCE Hydrostatic Transmission Your zero turn tractor is fully cooled. 1. Under normal operating conditions, the oil level in the expansion reservoirs does...
Operation Manual
Page 20
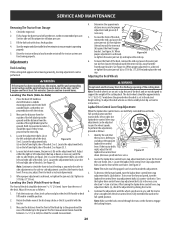
... lapbar drive control lever stop adjustment bolts (a) in the full-speed position. See tire side wall for a few minutes to the ground. Drive the tractor without a load to -Rear) The front of the deck. See 3. Tighten to 57 ft-lbs. (77.28 N-m)and replace the end cap. Leveling the Deck (Pitch/Front-to make this adjustment. 3. Determine the approximate distance necessary for instructions. When proper adjustment is set in a middle mowing...
... lapbar drive control lever stop adjustment bolts (a) in the full-speed position. See tire side wall for a few minutes to the ground. Drive the tractor without a load to -Rear) The front of the deck. See 3. Tighten to 57 ft-lbs. (77.28 N-m)and replace the end cap. Leveling the Deck (Pitch/Front-to make this adjustment. 3. Determine the approximate distance necessary for instructions. When proper adjustment is set in a middle mowing...

Operation Manual
Page 24
... 5. Replace spark plug and adjust gap. 2. PTO/Blade Engage knob engaged. 2. See the Service and Maintenance section. 7. See a Sears or other qualified service dealer. Fill engine with throttle in all moving parts have come to prevent unintended starting position. 5. Deck not leveled properly. 2. Perform side-to spark plug. 4. This section addresses minor service issues. Fuse(s) blown. See a Sears or other qualified service dealer. Engine hesitates at high RPMs 1. Dirty air cleaner Excessive vibration Uneven cut 1. Sharpen or replace blade. 3. To locate...
... 5. Replace spark plug and adjust gap. 2. PTO/Blade Engage knob engaged. 2. See the Service and Maintenance section. 7. See a Sears or other qualified service dealer. Fill engine with throttle in all moving parts have come to prevent unintended starting position. 5. Deck not leveled properly. 2. Perform side-to spark plug. 4. This section addresses minor service issues. Fuse(s) blown. See a Sears or other qualified service dealer. Engine hesitates at high RPMs 1. Dirty air cleaner Excessive vibration Uneven cut 1. Sharpen or replace blade. 3. To locate...


