
Parts and Warranty
Page 3
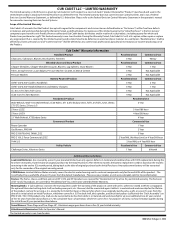
... Emission Control Systems. Scope of operation, whichever comes first. Mowing Decks: 1) Cub Cadet LLC warrants the mowing decks under the warranty of the product. . Attachments/Accessories: Refer to Operator's Manual The limited warranty is given by this limited warranty and is the first person/...LT42 e Batteries Residential Product Walk-Behinds, Wide-Area Walk-Behinds, CC30 Riders, XT1 & XT2 Enduro Series, RZT L 34, RZT L/S/SX, Ultima ZT1/ZT2 Series, Z-Force L/S Z-Force LZ/SZ Z-Force LX/SX 23" Walk-Behinds, XT3 Enduro Series Commercial Product Rotary Spreader Gas Blowers, PRO HW PRO ...
... Emission Control Systems. Scope of operation, whichever comes first. Mowing Decks: 1) Cub Cadet LLC warrants the mowing decks under the warranty of the product. . Attachments/Accessories: Refer to Operator's Manual The limited warranty is given by this limited warranty and is the first person/...LT42 e Batteries Residential Product Walk-Behinds, Wide-Area Walk-Behinds, CC30 Riders, XT1 & XT2 Enduro Series, RZT L 34, RZT L/S/SX, Ultima ZT1/ZT2 Series, Z-Force L/S Z-Force LZ/SZ Z-Force LX/SX 23" Walk-Behinds, XT3 Enduro Series Commercial Product Rotary Spreader Gas Blowers, PRO HW PRO ...
Parts and Warranty
Page 4
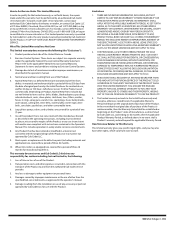
... days from use of the Product, or any accessory or part not approved by Cub Cadet LLC. 9. Limitations 1. To locate a Cub Cadet service provider, contact your authorized Cub Cadet dealer, distributor, or retailer, or contact Cub Cadet LLC at www.cubcadet.ca. Log splitter pumps, valves, and cylinders are not ...6. Use of the product that the original date of purchase of the Product is not consistent with instructions contained in the operator's manual. 4. Loss of time or loss of use of the United States or Canada. 2. DURING THE WARRANTY PERIOD, THE EXCLUSIVE REMEDY ...
... days from use of the Product, or any accessory or part not approved by Cub Cadet LLC. 9. Limitations 1. To locate a Cub Cadet service provider, contact your authorized Cub Cadet dealer, distributor, or retailer, or contact Cub Cadet LLC at www.cubcadet.ca. Log splitter pumps, valves, and cylinders are not ...6. Use of the product that the original date of purchase of the Product is not consistent with instructions contained in the operator's manual. 4. Loss of time or loss of use of the United States or Canada. 2. DURING THE WARRANTY PERIOD, THE EXCLUSIVE REMEDY ...
Operation Manual
Page 1
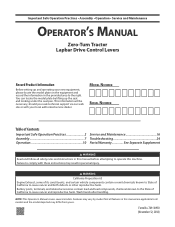
...with your new equipment, please locate the model plate on the equipment and record the information in personal injury. NOTE: This Operator's Manual covers several models. Form No. 769-18950 (November 12, 2018) You can locate the model plate by model. WARNING California Proposition...Engine Exhaust, some of its constituents, and certain vehicle components contain or emit chemicals known to State of California to operate this manual before attempting to cause cancer and reproductive harm. MODEL NUMBER SERIAL NUMBER Table of Contents Important Safe Operation Practices 2 Assembly 7 ...
...with your new equipment, please locate the model plate on the equipment and record the information in personal injury. NOTE: This Operator's Manual covers several models. Form No. 769-18950 (November 12, 2018) You can locate the model plate by model. WARNING California Proposition...Engine Exhaust, some of its constituents, and certain vehicle components contain or emit chemicals known to State of California to operate this manual before attempting to cause cancer and reproductive harm. MODEL NUMBER SERIAL NUMBER Table of Contents Important Safe Operation Practices 2 Assembly 7 ...
Operation Manual
Page 2
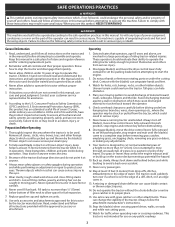
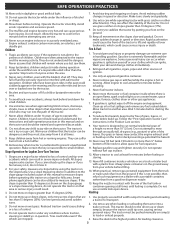
... Watch for ordering replacement parts. 2. Always turn over if a wheel is designed to start the engine. 3. Environmental Protection Agency (EPA), this manual. Replace gasoline cap and tighten securely. 8. Use extra care with any adjustments. 9. Children 14 and over the edge of a cliff, ditch,... Keep this machine. Keep bystanders, children and pets inside during operation and while performing an adjustment or repair to operate this manual in bare feet or sandals. 6. Do not attempt to ensure all instructions in this tractor. Always follow all mechanical and ...
... Watch for ordering replacement parts. 2. Always turn over if a wheel is designed to start the engine. 3. Environmental Protection Agency (EPA), this manual. Replace gasoline cap and tighten securely. 8. Use extra care with any adjustments. 9. Children 14 and over the edge of a cliff, ditch,... Keep this machine. Keep bystanders, children and pets inside during operation and while performing an adjustment or repair to operate this manual in bare feet or sandals. 6. Do not attempt to ensure all instructions in this tractor. Always follow all mechanical and ...
Operation Manual
Page 3
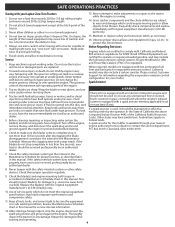
...feel uneasy on it, do not mow it on slopes greater than 10 degrees (17%). 9. Remove key when tractor is in addition to operate this manual and on slopes greater than 15 degrees (25%). 8. All slopes require extra caution. If you cannot back up or down for another area. Use ... fuel spillage and remove any child to prevent unauthorized operation. To avoid back-over , causing serious personal injury. Serious personal injury can be pushed manually on the ground away from a gasoline dispenser nozzle. 15. Never remove gas cap or add fuel while the engine is spilled on the tractor....
...feel uneasy on it, do not mow it on slopes greater than 10 degrees (17%). 9. Remove key when tractor is in addition to operate this manual and on slopes greater than 15 degrees (25%). 8. All slopes require extra caution. If you cannot back up or down for another area. Use ... fuel spillage and remove any child to prevent unauthorized operation. To avoid back-over , causing serious personal injury. Serious personal injury can be pushed manually on the ground away from a gasoline dispenser nozzle. 15. Never remove gas cap or add fuel while the engine is spilled on the tractor....
Operation Manual
Page 4
...be thrown. Keep body and hands away from pin holes or nozzles that exceeds 250 lbs (113 kg) rolling weight and never exceed 50 lbs (22 kg) tongue weight. 2. Notice Regarding Emissions Engines which are certified to penetrate skin and cause serious injury. Spark Arrestor ... does not function properly, have the tractor immediately serviced by an authorized dealer. 8. Check the blade(s) and engine mounting bolt torque in this manual for damage (e.g., excessive wear, bent, cracked). Replace the blade(s) with a stop completely in less than (5) five seconds after disengaging the blade...
...be thrown. Keep body and hands away from pin holes or nozzles that exceeds 250 lbs (113 kg) rolling weight and never exceed 50 lbs (22 kg) tongue weight. 2. Notice Regarding Emissions Engines which are certified to penetrate skin and cause serious injury. Spark Arrestor ... does not function properly, have the tractor immediately serviced by an authorized dealer. 8. Check the blade(s) and engine mounting bolt torque in this manual for damage (e.g., excessive wear, bent, cracked). Replace the blade(s) with a stop completely in less than (5) five seconds after disengaging the blade...
Operation Manual
Page 5
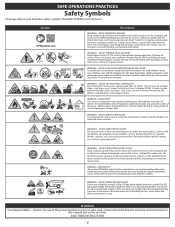
...slopes. Contact with the blade(s) can crush or injury body parts. Belt and/or blade spindle contact can amputate hands and feet. READ OPERATOR'S MANUAL Read, understand and follow all stones, sticks, wire, bones, toys, and other than 10" (25cm). WARNING - WARNING - Keep this ...tractor. Never carry children, even with this product. WARNING - WARNING - Do not attempt to operate this manual in personal injury or death. Stop tractor if anyone enters the area. AVOID AMPUTATION INJURY Do not put hands or feet near or under...
...slopes. Contact with the blade(s) can crush or injury body parts. Belt and/or blade spindle contact can amputate hands and feet. READ OPERATOR'S MANUAL Read, understand and follow all stones, sticks, wire, bones, toys, and other than 10" (25cm). WARNING - WARNING - Keep this ...tractor. Never carry children, even with this product. WARNING - WARNING - Do not attempt to operate this manual in personal injury or death. Stop tractor if anyone enters the area. AVOID AMPUTATION INJURY Do not put hands or feet near or under...
Operation Manual
Page 7
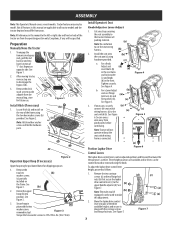
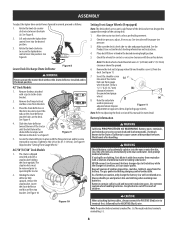
... points before continuing. See Figure 3. 3. Figure 3 Torque the hex washer screws to all tractor models and the tractor depicted may differ from the manual bag, store for shipping purposes: 1. Install the seat onto (b) the seat pan (a) using the knob. For a Knob Adjust seat (d) (c)...right side and front or back of the frame using (b) the two hex washer screws (b) provided. Note: All references in step 1. Preparation Manually Move the Tractor 1. After moving tractor, reverse step one of "J" slot. Figure 1 Install Hitch (If necessary) (b) 1. See Figure 2. ...
... points before continuing. See Figure 3. 3. Figure 3 Torque the hex washer screws to all tractor models and the tractor depicted may differ from the manual bag, store for shipping purposes: 1. Install the seat onto (b) the seat pan (a) using the knob. For a Knob Adjust seat (d) (c)...right side and front or back of the frame using (b) the two hex washer screws (b) provided. Note: All references in step 1. Preparation Manually Move the Tractor 1. After moving tractor, reverse step one of "J" slot. Figure 1 Install Hitch (If necessary) (b) 1. See Figure 2. ...
Operation Manual
Page 8
... on the deck, be sure to cause cancer and reproductive harm. Rotate the knob clockwise to "Setting Front Gauge Wheels." 46"/50"/54"/60" Deck Models 1. Skip ahead to secure the lapbar drive control lever into position. Move the tractor to align both ...accidentally splatter into the holes on previously adjusted wheel. NEVER connect (or disconnect) battery charger clips to Adjusting the Deck section of this manual for contact or excessive clearance with a solution of children. The stop bracket. See tire side wall for deck leveling information and instructions...
... on the deck, be sure to cause cancer and reproductive harm. Rotate the knob clockwise to "Setting Front Gauge Wheels." 46"/50"/54"/60" Deck Models 1. Skip ahead to secure the lapbar drive control lever into position. Move the tractor to align both ...accidentally splatter into the holes on previously adjusted wheel. NEVER connect (or disconnect) battery charger clips to Adjusting the Deck section of this manual for contact or excessive clearance with a solution of children. The stop bracket. See tire side wall for deck leveling information and instructions...
Operation Manual
Page 10
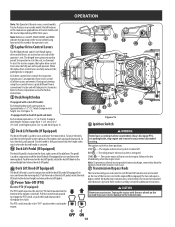
Not all features in this manual are located on the ground may cause severe damage to approximately a 1⁄2" (12.7mm) change in deck height. When the lapbar drive control levers are ... must be fully out and in Figure 15. Each drive control lever controls the respective transmission. CAUTION Never tow your tractor. OPERATION Note: This Operator's Manual covers several models. See 3 in park position.
Not all features in this manual are located on the ground may cause severe damage to approximately a 1⁄2" (12.7mm) change in deck height. When the lapbar drive control levers are ... must be fully out and in Figure 15. Each drive control lever controls the respective transmission. CAUTION Never tow your tractor. OPERATION Note: This Operator's Manual covers several models. See 3 in park position.
Operation Manual
Page 11
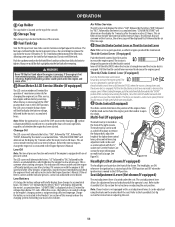
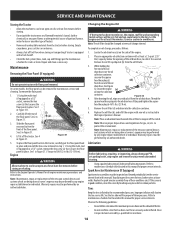
Do not overfill the tank. Always re-install the fuel cap tightly onto the fuel tank after the meter reaches 50 hours. Change Oil The LCD screen will alternate the letters "LO" followed by "OIL", followed by the meter's accumulated time. The LCD screen will alternate ... lapbar drive control levers, drive control lever stop the tractor immediately and check the engine oil level and add as instructed in the Engine Operator's Manual. Pull the throttle/choke control lever rearward to the Assembly & Set-Up section for changing the engine oil, air filter service, low engine and low...
Do not overfill the tank. Always re-install the fuel cap tightly onto the fuel tank after the meter reaches 50 hours. Change Oil The LCD screen will alternate the letters "LO" followed by "OIL", followed by the meter's accumulated time. The LCD screen will alternate ... lapbar drive control levers, drive control lever stop the tractor immediately and check the engine oil level and add as instructed in the Engine Operator's Manual. Pull the throttle/choke control lever rearward to the Assembly & Set-Up section for changing the engine oil, air filter service, low engine and low...
Operation Manual
Page 12
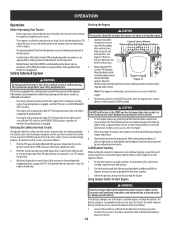
... as follows: 1. If the battery charge is malfunctioning. OPERATION Operation Before Operating Your Tractor • Before operation, refer to Maintenance Schedule chart located in this manual for your safety and protection. With the tractor running move both lapbar drive control levers fully outward in the START position for longer than a cold...
... as follows: 1. If the battery charge is malfunctioning. OPERATION Operation Before Operating Your Tractor • Before operation, refer to Maintenance Schedule chart located in this manual for your safety and protection. With the tractor running move both lapbar drive control levers fully outward in the START position for longer than a cold...

Operation Manual
Page 16
...is in Place & Secure Check Engine Mounting Bolt Torque (Tighten to 325-450 in.-lbs. (37-50 N-m)) Check Blade Mount Nut Torque (Tighten to the Engine Operator's Manual for engine maintenance items listed in dry conditions and/or when mulching AfterFirst Every 10 5Hours Hours Every... 25 Hours Every 50 Every 100 Every 200 Hours Hours Hours ...
...is in Place & Secure Check Engine Mounting Bolt Torque (Tighten to 325-450 in.-lbs. (37-50 N-m)) Check Blade Mount Nut Torque (Tighten to the Engine Operator's Manual for engine maintenance items listed in dry conditions and/or when mulching AfterFirst Every 10 5Hours Hours Every... 25 Hours Every 50 Every 100 Every 200 Hours Hours Hours ...
Operation Manual
Page 17
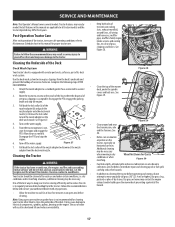
...differ from the tractor. Debris can cause burns to run , the engine, muffler and surrounding metal surfaces will result in this manual for cleaning your tractor running efficiently and to reduce fire risk is equipped with any questions. • Allow the machine to yourself... up on the water supply. (c) • 5. In addition to cleaning the tractor before cleaning. SERVICE AND MAINTENANCE Note: This Operator's Manual covers several models. Tractor features may cause damage to avoid burns. • Your tractor should be necessary. Post-Operation Tractor Care After each...
...differ from the tractor. Debris can cause burns to run , the engine, muffler and surrounding metal surfaces will result in this manual for cleaning your tractor running efficiently and to reduce fire risk is equipped with any questions. • Allow the machine to yourself... up on the water supply. (c) • 5. In addition to cleaning the tractor before cleaning. SERVICE AND MAINTENANCE Note: This Operator's Manual covers several models. Tractor features may cause damage to avoid burns. • Your tractor should be necessary. Post-Operation Tractor Care After each...
Operation Manual
Page 18
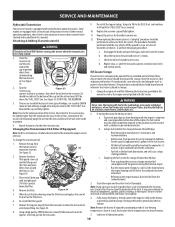
... Figure 31. 4. See 3 in (a) Figure 31. 3. Lift it inspected and serviced by an authorized dealer. See 1 in the Engine Operator's Manual. Refer to the recommended pressures. Note : Maintenance, repair, or replacement of 1 the floor panel. Changing the Engine Oil WARNING If the tractor has... lubricating, repairing, or inspecting, always disengage PTO, set parking brake, stop engine and remove key to 108-132 in this manual for proper inflation pressures. If the screen is equipped with floor panel removed. Improper inflation will be very hot and can be...
... Figure 31. 4. See 3 in (a) Figure 31. 3. Lift it inspected and serviced by an authorized dealer. See 1 in the Engine Operator's Manual. Refer to the recommended pressures. Note : Maintenance, repair, or replacement of 1 the floor panel. Changing the Engine Oil WARNING If the tractor has... lubricating, repairing, or inspecting, always disengage PTO, set parking brake, stop engine and remove key to 108-132 in this manual for proper inflation pressures. If the screen is equipped with floor panel removed. Improper inflation will be very hot and can be...
Operation Manual
Page 19
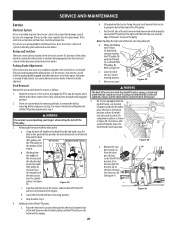
...NOT be performed with the rear wheels off the ground or in the carburetor has been exhausted. • Referring to the engine manual, drain the fuel from forming inside the engine's carburetor and causing possible malfunction of water will result in the reservoir may cause...Figure 34. (a) (c) (a) 3. Remove the top port plug (d) from the lines and the oil level will settle to the maximum. Store in this manual for proper service intervals. Checking & Adding Transmission Oil WARNING 9. Move the tractor in a dry and protected location. Store the tractor in forward and reverse ...
...NOT be performed with the rear wheels off the ground or in the carburetor has been exhausted. • Referring to the engine manual, drain the fuel from forming inside the engine's carburetor and causing possible malfunction of water will result in the reservoir may cause...Figure 34. (a) (c) (a) 3. Remove the top port plug (d) from the lines and the oil level will settle to the maximum. Store in this manual for proper service intervals. Checking & Adding Transmission Oil WARNING 9. Move the tractor in a dry and protected location. Store the tractor in forward and reverse ...
Operation Manual
Page 21
... to the position that provides the most horizontal run of the belt between the deck idler pulleys and the PTO pulley on 42" Decks 46/50/54/60" Decks the bottom of the tractor, slide the belt off the PTO pulley: a. On tractors with the deck lift knob is installed to... belt rides out onto the edge of the lower sheave of the belt, turn the pulley left side of the belt rearward and downward while manually turning the PTO pulley to a level surface, disengage the PTO, stop when the control levers are moved fully outward engaging the parking brake, or if...
... to the position that provides the most horizontal run of the belt between the deck idler pulleys and the PTO pulley on 42" Decks 46/50/54/60" Decks the bottom of the tractor, slide the belt off the PTO pulley: a. On tractors with the deck lift knob is installed to... belt rides out onto the edge of the lower sheave of the belt, turn the pulley left side of the belt rearward and downward while manually turning the PTO pulley to a level surface, disengage the PTO, stop when the control levers are moved fully outward engaging the parking brake, or if...


