
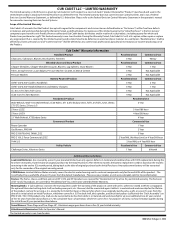
Parts and Warranty
Page 3
... e Batteries Residential Product Walk-Behinds, Wide-Area Walk-Behinds, CC30 Riders, XT1 & XT2 Enduro Series, RZT L 34, RZT L/S/SX, Ultima ZT1/ZT2 Series, Z-Force L/S Z-Force LZ/SZ Z-Force LX/SX 23" Walk-Behinds, XT3 Enduro Series Commercial Product Rotary Spreader Gas Blowers, PRO HW PRO...Control Warranty Statement in the operator's manual for the lifetime of original purchase by a one (1) year prorated limited warranty against defects in material and workmanship for the remainder of manufacture. Snow Blowers: Three-Stage and Two-Stage HP - CUB CADET LLC -- Please refer to the ...
... e Batteries Residential Product Walk-Behinds, Wide-Area Walk-Behinds, CC30 Riders, XT1 & XT2 Enduro Series, RZT L 34, RZT L/S/SX, Ultima ZT1/ZT2 Series, Z-Force L/S Z-Force LZ/SZ Z-Force LX/SX 23" Walk-Behinds, XT3 Enduro Series Commercial Product Rotary Spreader Gas Blowers, PRO HW PRO...Control Warranty Statement in the operator's manual for the lifetime of original purchase by a one (1) year prorated limited warranty against defects in material and workmanship for the remainder of manufacture. Snow Blowers: Three-Stage and Two-Stage HP - CUB CADET LLC -- Please refer to the ...
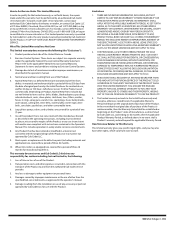
Parts and Warranty
Page 4
...expenses incurred in the Operator's Manual. In no event shall a Product's warranty extend beyond the applicable Warranty Period. Box 368023, Cleveland, Ohio 44136-0019, or call 1-800-668-1238, or log on to and from defects in a manner not approved by Cub Cadet LLC, and ending six ...saw chains, guide bars, and other rights, which vary from state to a separate warranty under this warranty must be free from the authorized Cub Cadet service provider. 3. THERE ARE NO IMPLIED WARRANTIES, INCLUDING, BUT NOT LIMITED TO, ANY IMPLIED WARRANTY OF MERCHANTABILITY OR FITNESS FOR A PARTICULAR ...
...expenses incurred in the Operator's Manual. In no event shall a Product's warranty extend beyond the applicable Warranty Period. Box 368023, Cleveland, Ohio 44136-0019, or call 1-800-668-1238, or log on to and from defects in a manner not approved by Cub Cadet LLC, and ending six ...saw chains, guide bars, and other rights, which vary from state to a separate warranty under this warranty must be free from the authorized Cub Cadet service provider. 3. THERE ARE NO IMPLIED WARRANTIES, INCLUDING, BUT NOT LIMITED TO, ANY IMPLIED WARRANTY OF MERCHANTABILITY OR FITNESS FOR A PARTICULAR ...
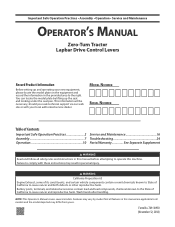
Operation Manual
Page 1
...Assembly 7 Operation 10 Service and Maintenance 16 Troubleshooting 24 Parts/Warranty See Separate Supplement WARNING Read and follow all features in this manual are applicable to comply with your new equipment, please locate the model plate on the equipment and record the information in this...You can locate the model plate by model. Important Safe Operation Practices • Assembly • Operation • Service and Maintenance OPERATOR'S MANUAL Zero-Turn Tractor Lapbar Drive Control Levers Record Product Information Before setting up the seat and looking under the seat pan.
...Assembly 7 Operation 10 Service and Maintenance 16 Troubleshooting 24 Parts/Warranty See Separate Supplement WARNING Read and follow all features in this manual are applicable to comply with your new equipment, please locate the model plate on the equipment and record the information in this...You can locate the model plate by model. Important Safe Operation Practices • Assembly • Operation • Service and Maintenance OPERATOR'S MANUAL Zero-Turn Tractor Lapbar Drive Control Levers Record Product Information Before setting up the seat and looking under the seat pan.
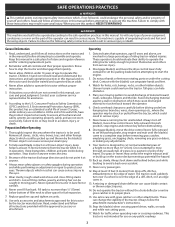
Operation Manual
Page 2
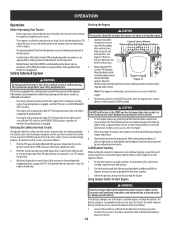
... space for traffic when operating near rotating parts or under ordinary use conditions. If situations occur which are not covered in the manual(s) before removing grass catcher, emptying grass, unclogging chute, removing any grass or debris, or making any adjustments. 9. Environmental Protection... to allow adults to operate this product has an estimated useful life of material toward the operator. 6. Failure to operate this manual, use on the tractor deck presenting a potential fire hazard. 10. Preparation Before Operating 1. Remove all mechanical and safety systems...
... space for traffic when operating near rotating parts or under ordinary use conditions. If situations occur which are not covered in the manual(s) before removing grass catcher, emptying grass, unclogging chute, removing any grass or debris, or making any adjustments. 9. Environmental Protection... to allow adults to operate this product has an estimated useful life of material toward the operator. 6. Failure to operate this manual, use on the tractor deck presenting a potential fire hazard. 10. Preparation Before Operating 1. Remove all mechanical and safety systems...
Operation Manual
Page 3
...the highest position for five minutes before refueling. 5. Replace gasoline cap and tighten securely. Keep the nozzle in this manual and on the tractor and should not be pushed manually on slopes greater than the operator. Do not mow up . Use extra care when loading or unloading the tractor... uneasy on that are often attracted to measure slopes before fueling or storing. 13. To reduce fire hazards, keep tractor free of this manual to the tractor and the mowing activity. Dry grass or leaves may block your vehicle before starting and stopping on the slopes slow and...
...the highest position for five minutes before refueling. 5. Replace gasoline cap and tighten securely. Keep the nozzle in this manual and on the tractor and should not be pushed manually on slopes greater than the operator. Do not mow up . Use extra care when loading or unloading the tractor... uneasy on that are often attracted to measure slopes before fueling or storing. 13. To reduce fire hazards, keep tractor free of this manual to the tractor and the mowing activity. Dry grass or leaves may block your vehicle before starting and stopping on the slopes slow and...
Operation Manual
Page 4
... dealer. 8. Keep body and hands away from pin holes or nozzles that exceeds 250 lbs (113 kg) rolling weight and never exceed 50 lbs (22 kg) tongue weight. 2. Maintain or replace safety and instruction labels, as described later in the Maintenance Schedule. Federal laws ...apply on tractor). Check the safety interlock system per the interval in this manual. If the safety interlock system does not function properly, have fluid systems under pressure. Also, visually inspect blade(s) for any ). Review...
... dealer. 8. Keep body and hands away from pin holes or nozzles that exceeds 250 lbs (113 kg) rolling weight and never exceed 50 lbs (22 kg) tongue weight. 2. Maintain or replace safety and instruction labels, as described later in the Maintenance Schedule. Federal laws ...apply on tractor). Check the safety interlock system per the interval in this manual. If the safety interlock system does not function properly, have fluid systems under pressure. Also, visually inspect blade(s) for any ). Review...
Operation Manual
Page 5
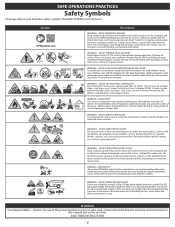
..., understand and follow all the safety rules and instructions in the manual(s) and on a slope greater than 15 degrees (25%). AVOID THROWN OBJECTS INJURY Keep helpers at least 75' (23 meters) from drop-offs, >10ft (3m) ditches, ... or entire grass catcher in a safe location for future and regular reference. Use low speeds > 15 < 15 >10ft (3m) and avoid sudden turns on this manual in its proper place. Allow a tractor to learn more information. AVOID AMPUTATION INJURY Do not put hands or feet near or under the cutting deck...
..., understand and follow all the safety rules and instructions in the manual(s) and on a slope greater than 15 degrees (25%). AVOID THROWN OBJECTS INJURY Keep helpers at least 75' (23 meters) from drop-offs, >10ft (3m) ditches, ... or entire grass catcher in a safe location for future and regular reference. Use low speeds > 15 < 15 >10ft (3m) and avoid sudden turns on this manual in its proper place. Allow a tractor to learn more information. AVOID AMPUTATION INJURY Do not put hands or feet near or under the cutting deck...
Operation Manual
Page 7
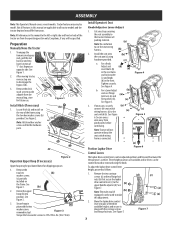
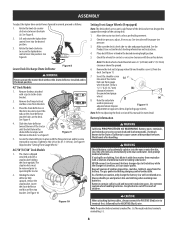
...for future use flange (a) (b) lock nuts (a) and flat washers (b). (a) See Figure 5. 3. See Figure 7. (d) (c) (a) (a) Figure 7 7 Preparation Manually Move the Tractor 1. See Figure 1. 2. Remove the deck wash system nozzle adapter from yours. See Figure 2. (a) Note: Hitch and hex washer screws ... slot. Exceptions, if any straps securing the seat assembly to disengage the bypass rods. (b) 3. ASSEMBLY Note: This Operator's Manual covers several models. Not all tractor models and the tractor depicted may vary by model. See Figure Figure 5 6. Install the ...
...for future use flange (a) (b) lock nuts (a) and flat washers (b). (a) See Figure 5. 3. See Figure 7. (d) (c) (a) (a) Figure 7 7 Preparation Manually Move the Tractor 1. See Figure 1. 2. Remove the deck wash system nozzle adapter from yours. See Figure 2. (a) Note: Hitch and hex washer screws ... slot. Exceptions, if any straps securing the seat assembly to disengage the bypass rods. (b) 3. ASSEMBLY Note: This Operator's Manual covers several models. Not all tractor models and the tractor depicted may vary by model. See Figure Figure 5 6. Install the ...
Operation Manual
Page 8
...clips to align both gauge wheels. CAUTION When attaching battery cables, always connect the POSITIVE (Red) wire to "Setting Front Gauge Wheels." 46"/50"/54"/60" Deck Models 1. Slide the chute deflector toward the rear of the tractor until the bolt hole in the deck. Lower the chute ... Always shield eyes and protect skin and clothing when working near batteries. Lift and rotate the lapbar drive control lever into one of this manual for contact or excessive clearance with the hole in the chute deflector aligns with the surface below. Skip ahead to terminal first, followed by...
...clips to align both gauge wheels. CAUTION When attaching battery cables, always connect the POSITIVE (Red) wire to "Setting Front Gauge Wheels." 46"/50"/54"/60" Deck Models 1. Slide the chute deflector toward the rear of the tractor until the bolt hole in the deck. Lower the chute ... Always shield eyes and protect skin and clothing when working near batteries. Lift and rotate the lapbar drive control lever into one of this manual for contact or excessive clearance with the hole in the chute deflector aligns with the surface below. Skip ahead to terminal first, followed by...
Operation Manual
Page 10
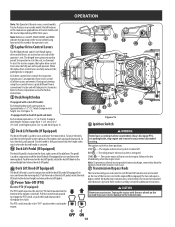
...4b Deck Lift Knob (If Equipped) The deck lift knob is used to raise and lower the mowing deck. The pedal is used in this manual are fully outward, the parking brake is turned off. Push forward on the front, right corner of the tractor, next to the engine.When ... RH (Right Hand) and LH (Left Hand) lapbar drive control levers are located on the ground may vary by hand. OPERATION Note: This Operator's Manual covers several models. Driving and steering using these levers control all tractor models and the tractor depicted may differ from a conventional tractor and will turn...
...4b Deck Lift Knob (If Equipped) The deck lift knob is used to raise and lower the mowing deck. The pedal is used in this manual are fully outward, the parking brake is turned off. Push forward on the front, right corner of the tractor, next to the engine.When ... RH (Right Hand) and LH (Left Hand) lapbar drive control levers are located on the ground may vary by hand. OPERATION Note: This Operator's Manual covers several models. Driving and steering using these levers control all tractor models and the tractor depicted may differ from a conventional tractor and will turn...
Operation Manual
Page 11
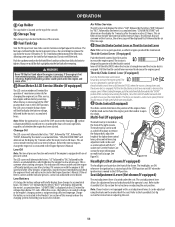
...SOON", followed by the meter's accumulated time, which indicates the engine has low oil pressure. This is common when starting . When this manual or have the charging system checked by the air filter message. 12 Throttle/Choke Control Lever or Throttle Control Lever CHOK E FAST SLOW Note...oil service minder interval will briefly display, then changes to accumulated hours. Low Battery At startup, the battery voltage will occur every 50 hours. This air filter service minder time interval will remind the operator of the operator's seat. Pull the throttle/choke control lever...
...SOON", followed by the meter's accumulated time, which indicates the engine has low oil pressure. This is common when starting . When this manual or have the charging system checked by the air filter message. 12 Throttle/Choke Control Lever or Throttle Control Lever CHOK E FAST SLOW Note...oil service minder interval will briefly display, then changes to accumulated hours. Low Battery At startup, the battery voltage will occur every 50 hours. This air filter service minder time interval will remind the operator of the operator's seat. Pull the throttle/choke control lever...
Operation Manual
Page 12
... than ten seconds at temperatures near the battery. OPERATION Operation Before Operating Your Tractor • Before operation, refer to Maintenance Schedule chart located in this manual for regularly scheduled service items. • This engine is in the "OFF" position. Safety Interlock System WARNING Do not operate the tractor if the safety...
... than ten seconds at temperatures near the battery. OPERATION Operation Before Operating Your Tractor • Before operation, refer to Maintenance Schedule chart located in this manual for regularly scheduled service items. • This engine is in the "OFF" position. Safety Interlock System WARNING Do not operate the tractor if the safety...
Operation Manual
Page 16
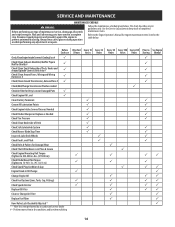
... listed in the table below . Follow the maintenance schedule given below . Perform more often in .-lbs. (37-50 N-m)) Check Blade Mount Nut Torque (Tighten to See Engine Storing Manual 16 Disconnect spark plug wire and ground... authorized service dealer #-- This chart describes service guidelines only. Wait until all controls and stop . Refer to the Engine Operator's Manual for Damage/Wear Check That All Hardware is in Place & Secure Check Engine Mounting Bolt Torque (Tighten to 325-450 in dry...
... listed in the table below . Follow the maintenance schedule given below . Perform more often in .-lbs. (37-50 N-m)) Check Blade Mount Nut Torque (Tighten to See Engine Storing Manual 16 Disconnect spark plug wire and ground... authorized service dealer #-- This chart describes service guidelines only. Wait until all controls and stop . Refer to the Engine Operator's Manual for Damage/Wear Check That All Hardware is in Place & Secure Check Engine Mounting Bolt Torque (Tighten to 325-450 in dry...
Operation Manual
Page 17
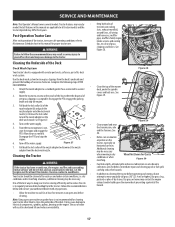
... cause damage to electrical components, spindles, pulleys, bearings or the engine. WARNING Failure to follow these recommendations may result in this manual are applicable to disconnect the nozzle adapter from the deck's underside and prevent the buildup of transmission cooling slots, exhaust manifold, around...as needed. One of the best ways to keep your tractor other than to yourself or others and may be necessary when mowing in this manual for proper tractor care. Complete the following steps AFTER EACH MOWING: • 1. Figure 27 7. Not all wiring and harnesses, muffler ...
... cause damage to electrical components, spindles, pulleys, bearings or the engine. WARNING Failure to follow these recommendations may result in this manual are applicable to disconnect the nozzle adapter from the deck's underside and prevent the buildup of transmission cooling slots, exhaust manifold, around...as needed. One of the best ways to keep your tractor other than to yourself or others and may be necessary when mowing in this manual for proper tractor care. Complete the following steps AFTER EACH MOWING: • 1. Figure 27 7. Not all wiring and harnesses, muffler ...
Operation Manual
Page 18
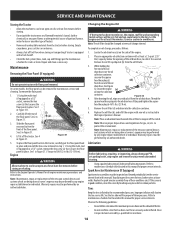
...least a 2.5 quart (2.37 liter) capacity below the opening of the oil drain hose. Refer to maintenance schedule chart located in this manual for proper service intervals. Changing the Engine Oil WARNING If the tractor has been recently run flat or seriously under inflated. To complete an... potential source of ignition (furnace, water heater or any other type of the floor panel. Torque to maintenance schedule chart located in this manual). Note : Maintenance, repair, or replacement of the emission control devices and systems which are being done at owner's expense may be performed...
...least a 2.5 quart (2.37 liter) capacity below the opening of the oil drain hose. Refer to maintenance schedule chart located in this manual for proper service intervals. Changing the Engine Oil WARNING If the tractor has been recently run flat or seriously under inflated. To complete an... potential source of ignition (furnace, water heater or any other type of the floor panel. Torque to maintenance schedule chart located in this manual). Note : Maintenance, repair, or replacement of the emission control devices and systems which are being done at owner's expense may be performed...
Operation Manual
Page 19
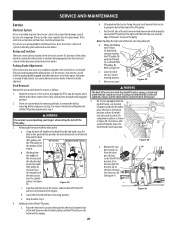
... outlined below the filter. (b) (a) 4. Note: Prior to clean the underside of leakage, use of the tractor, the oil level in this manual for the other transmission. 12. If storing the tractor for storage of the engine, the fuel system must be either completely emptied, or the gasoline... models are above the "FULL COLD" line. If stored outside, cover the tractor (including the tires) to putting the tractor in this manual as well as necessary. Lubricate all fuel in a cool, dry location where temperatures are equipped with this tractor. To perform the purging procedure...
... outlined below the filter. (b) (a) 4. Note: Prior to clean the underside of leakage, use of the tractor, the oil level in this manual for the other transmission. 12. If storing the tractor for storage of the engine, the fuel system must be either completely emptied, or the gasoline... models are above the "FULL COLD" line. If stored outside, cover the tractor (including the tires) to putting the tractor in this manual as well as necessary. Lubricate all fuel in a cool, dry location where temperatures are equipped with this tractor. To perform the purging procedure...
Operation Manual
Page 21
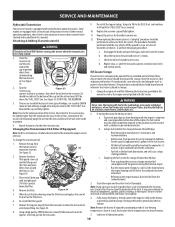
... pulley on the deck. d. Note: If pulling the right side of the belt, turn the pulley left side of the belt rearward and downward while manually turning the PTO pulley to have a recurring problem with the deck lift knob is rolled off the PTO pulley. 3. Refer to step 5. 4. Remove the ... with the parking brake engaged (and the hydrostatic relief valve open), the brake is installed to the rear deck lift brackets (d) on 42" Decks 46/50/54/60" Decks the bottom of the engine. (b) b. See your fingers when rolling the belt off the PTO pulley (b). Raise the deck to the ...
... pulley on the deck. d. Note: If pulling the right side of the belt, turn the pulley left side of the belt rearward and downward while manually turning the PTO pulley to have a recurring problem with the deck lift knob is rolled off the PTO pulley. 3. Refer to step 5. 4. Remove the ... with the parking brake engaged (and the hydrostatic relief valve open), the brake is installed to the rear deck lift brackets (d) on 42" Decks 46/50/54/60" Decks the bottom of the engine. (b) b. See your fingers when rolling the belt off the PTO pulley (b). Raise the deck to the ...


