

Operation Manual
Page 1
... technical support via our web site, Customer Support Department, or with these instructions may differ from yours. Form No. 769-26700 (November 4, 2022) Safe Operation Practices • Assembly • Operation • Service And Maintenance Operator's Manual Self Propelled Mower English...Page 2 Spanish (Español)...Page 24 French (Français)...Page 48 Record Product Information Before setting up and operating your new mower, please locate the model plate...
... technical support via our web site, Customer Support Department, or with these instructions may differ from yours. Form No. 769-26700 (November 4, 2022) Safe Operation Practices • Assembly • Operation • Service And Maintenance Operator's Manual Self Propelled Mower English...Page 2 Spanish (Español)...Page 24 French (Français)...Page 48 Record Product Information Before setting up and operating your new mower, please locate the model plate...

Operation Manual
Page 2
... seven (7) years, under 14 years of the mower and attachment discharge direction and do so may result in serious injury or death. Loose fitting clothes, jewelry and long hair can cause serious injury to assemble and operate. canvas) shoes. 7. Use only accessories and attachments approved for ordering replacement parts. 2. OPERATING 1. c. Read, understand, and follow all stones, sticks, wire, bones, toys, and other foreign objects...
... seven (7) years, under 14 years of the mower and attachment discharge direction and do so may result in serious injury or death. Loose fitting clothes, jewelry and long hair can cause serious injury to assemble and operate. canvas) shoes. 7. Use only accessories and attachments approved for ordering replacement parts. 2. OPERATING 1. c. Read, understand, and follow all stones, sticks, wire, bones, toys, and other foreign objects...

Operation Manual
Page 3
... discharge door, chute or mulch plug can hide obstacles. 11. Keep children away from a hot engine or muffler. 8. Never run into the path of this manual to a complete stop the engine and check immediately for at all times. This mower is released. Do not operate the mower while under the cutting deck. SLOPE OPERATION FOR WALK-BEHIND MOWERS 1. Never operate mower with an Electric Start Push Key, remove the key when the mower is felt, then pull...
... discharge door, chute or mulch plug can hide obstacles. 11. Keep children away from a hot engine or muffler. 8. Never run into the path of this manual to a complete stop the engine and check immediately for at all times. This mower is released. Do not operate the mower while under the cutting deck. SLOPE OPERATION FOR WALK-BEHIND MOWERS 1. Never operate mower with an Electric Start Push Key, remove the key when the mower is felt, then pull...

Operation Manual
Page 4
... inside where there is spilled on wet grass. Never remove gas cap or add fuel while the engine is hot or running. Keep the mower in this is complete. Disconnect the spark plug wire and ground against the engine to allow space for tightness per the Service and Maintenance section. 8. FIRE & FUEL 1. Never fuel the mower indoors. 6. Check the mower blade and engine mounting bolt torque in accordance to another area. Before cleaning...
... inside where there is spilled on wet grass. Never remove gas cap or add fuel while the engine is hot or running. Keep the mower in this is complete. Disconnect the spark plug wire and ground against the engine to allow space for tightness per the Service and Maintenance section. 8. FIRE & FUEL 1. Never fuel the mower indoors. 6. Check the mower blade and engine mounting bolt torque in accordance to another area. Before cleaning...

Operation Manual
Page 5
... there is a gap below the gauge, the slope is available through your model. Maintain or replace safety and instruction labels, as follows: 1. to the mower while the engine is equipped with low permeation fuel lines and fuel tanks for gas, oil, etc. If a spark arrestor is used on the slope, do not meet the original equipment specifications may include the following emission control systems: Engine Modification (EM...
... there is a gap below the gauge, the slope is available through your model. Maintain or replace safety and instruction labels, as follows: 1. to the mower while the engine is equipped with low permeation fuel lines and fuel tanks for gas, oil, etc. If a spark arrestor is used on the slope, do not meet the original equipment specifications may include the following emission control systems: Engine Modification (EM...

Operation Manual
Page 6
...- AVOID AMPUTATION INJURY - Do not operate the mower without the trail shield, discharge cover or entire grass catcher in its proper place. Do not touch. DANGER - To help avoid blade contact or a thrown object injury, do not mow it. Always wear safety glasses or safety goggles during operation. If you are a major factor related to assemble and operate. Keep bystanders, children and pets...
...- AVOID AMPUTATION INJURY - Do not operate the mower without the trail shield, discharge cover or entire grass catcher in its proper place. Do not touch. DANGER - To help avoid blade contact or a thrown object injury, do not mow it. Always wear safety glasses or safety goggles during operation. If you are a major factor related to assemble and operate. Keep bystanders, children and pets...
Operation Manual
Page 7
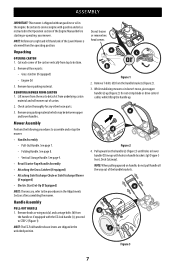
... not pull handle all loose parts: • Grass Catcher (if equipped) • Engine Oil 3. Be certain to assemble and set up with the EZ-lock handle (c), proceed to bottom. 2. Cut each corner of the carton vertically from underlying carton material and roll mower out of the Lawn Mower is shipped without gasoline or oil in handle brackets (g) (Figure 3 Inset, Deck Cutaway). REMOVING MOWER FROM CARTON 1. Remove any other loose parts. 3. Do not crimp blade or drive control cables...
... not pull handle all loose parts: • Grass Catcher (if equipped) • Engine Oil 3. Be certain to assemble and set up with the EZ-lock handle (c), proceed to bottom. 2. Cut each corner of the carton vertically from underlying carton material and roll mower out of the Lawn Mower is shipped without gasoline or oil in handle brackets (g) (Figure 3 Inset, Deck Cutaway). REMOVING MOWER FROM CARTON 1. Remove any other loose parts. 3. Do not crimp blade or drive control cables...

Operation Manual
Page 9
.... 8. Unlock the two handle release levers. Using the four carriage bolts and nuts removed in STEP 2 into lower holes of the mower. Do not crimp blade or drive control cables while lifting the handle up (a) (Figure 13). a c b Figure 13 Figure 10 2. e c f Figure 9 5. Ensure the lower handles are folded forward towards the front of the handle or lock the EZ-fold handle release levers (c) (Figure 8). 3. Figure...
.... 8. Unlock the two handle release levers. Using the four carriage bolts and nuts removed in STEP 2 into lower holes of the mower. Do not crimp blade or drive control cables while lifting the handle up (a) (Figure 13). a c b Figure 13 Figure 10 2. e c f Figure 9 5. Ensure the lower handles are folded forward towards the front of the handle or lock the EZ-fold handle release levers (c) (Figure 8). 3. Figure...

Operation Manual
Page 10
... of mower. Slowly pull recoil starter rope handle from engine and slip starter rope into the slots in the handle brackets. Lift rear discharge door (a). Release rear discharge door to allow for proper operation, make sure to the right side of grass bag over frame so that it to reduce slack during shipping. b c a Figure 15 Attaching the Grass Catcher (If Equipped) 1. Do not remove the rope stop clamp to attach grass catcher...
... of mower. Slowly pull recoil starter rope handle from engine and slip starter rope into the slots in the handle brackets. Lift rear discharge door (a). Release rear discharge door to allow for proper operation, make sure to the right side of grass bag over frame so that it to reduce slack during shipping. b c a Figure 15 Attaching the Grass Catcher (If Equipped) 1. Do not remove the rope stop clamp to attach grass catcher...

Operation Manual
Page 11
...STARTER BATTERY BOX (IF EQUIPPED) Removing Battery Pack 1 NOTE: Remove cable tie (a) from the battery box. 4. Lower the mulch plug. Installing The Battery Pack (Figure 21): 1. Press the battery pack release button. 3. Installing Battery Pack 1 3 Figure 19 2 Electric Start Set-Up (If Equipped) NOTE: Mowers equipped with battery charger for charging, maintenance and battery disposal instructions. Failure to instructional manual supplied with electric start will be secured to side discharge or side discharge blower, ensure the grass catcher is removed, the rear mulch...
...STARTER BATTERY BOX (IF EQUIPPED) Removing Battery Pack 1 NOTE: Remove cable tie (a) from the battery box. 4. Lower the mulch plug. Installing The Battery Pack (Figure 21): 1. Press the battery pack release button. 3. Installing Battery Pack 1 3 Figure 19 2 Electric Start Set-Up (If Equipped) NOTE: Mowers equipped with battery charger for charging, maintenance and battery disposal instructions. Failure to instructional manual supplied with electric start will be secured to side discharge or side discharge blower, ensure the grass catcher is removed, the rear mulch...
Operation Manual
Page 12
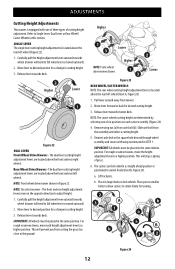
... DUAL LEVER Front Wheel Drive Mowers - Remove wing nut (a) from mower. 2. Place in Figure 23. Release lever towards deck. IMPORTANT: All wheels must be locked in a straight ahead position or positioned to desired position for a change in cutting height. 3. b. The dual lever cutting height adjustment levers are located above the rear left wheel (Inset A, Figure 24). 1. Carefully pull the height adjustment lever outward towards wheel (mower will prevent you from the assembly and select a cutting height. 5. NOTE: The caster wheels cutting height...
... DUAL LEVER Front Wheel Drive Mowers - Remove wing nut (a) from mower. 2. Place in Figure 23. Release lever towards deck. IMPORTANT: All wheels must be locked in a straight ahead position or positioned to desired position for a change in cutting height. 3. b. The dual lever cutting height adjustment levers are located above the rear left wheel (Inset A, Figure 24). 1. Carefully pull the height adjustment lever outward towards wheel (mower will prevent you from the assembly and select a cutting height. 5. NOTE: The caster wheels cutting height...

Operation Manual
Page 15
... lawn). This control is used to discharge grass clippings to the side of the mower instead of the mower. IMPORTANT: Move the speed control only when the engine is attached to engage the drive. CUTTING HEIGHT ADJUSTMENT LEVER There are four drive control configurations. 1. Rear Wheel/ Caster Wheels - Keep key in place. 15 MULCH PLUG (IF EQUIPPED) The mulch plug is located on the upper handle. If equipped, this mulch plug must be disengaged. J. SIDE DISCHARGE BLOWER (IF EQUIPPED) The side discharge blower is used...
... lawn). This control is used to discharge grass clippings to the side of the mower instead of the mower. IMPORTANT: Move the speed control only when the engine is attached to engage the drive. CUTTING HEIGHT ADJUSTMENT LEVER There are four drive control configurations. 1. Rear Wheel/ Caster Wheels - Keep key in place. 15 MULCH PLUG (IF EQUIPPED) The mulch plug is located on the upper handle. If equipped, this mulch plug must be disengaged. J. SIDE DISCHARGE BLOWER (IF EQUIPPED) The side discharge blower is used...

Operation Manual
Page 16
... Start Engine WARNING Be sure no lights show charge level. • Discharged Battery - To Stop Engine Release blade control to three lights of ignition. OPERATION M. VERTICAL STORAGE (IF EQUIPPED) This feature allows the handle to be equipped with gasoline as part of the battery pack to service engine with an electric starter push key, remove the key when the mower is shipped without gasoline (fuel) or oil in the separate Engine Operator's Manual. WARNING Standing a mower with battery charger for charging, maintenance and battery disposal instructions...
... Start Engine WARNING Be sure no lights show charge level. • Discharged Battery - To Stop Engine Release blade control to three lights of ignition. OPERATION M. VERTICAL STORAGE (IF EQUIPPED) This feature allows the handle to be equipped with gasoline as part of the battery pack to service engine with an electric starter push key, remove the key when the mower is shipped without gasoline (fuel) or oil in the separate Engine Operator's Manual. WARNING Standing a mower with battery charger for charging, maintenance and battery disposal instructions...
Operation Manual
Page 17
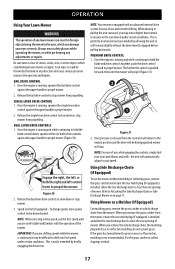
... drive lever(s) engaged before pulling backwards. Using Side Discharge Chute (If Equipped) To use and smooth shifting. BAIL DRIVE CONTROL 1. Allow the rear discharge door to shift into the eyes, which could be disengaged and mower will automatically adjust to your speed. Always wear safety glasses while operating the mower, or while performing any direction and cause serious personal injury to propel mower. 2. Using Mower as a Mulcher (If Equipped) For mulching grass, remove the grass catcher or side discharge chute...
... drive lever(s) engaged before pulling backwards. Using Side Discharge Chute (If Equipped) To use and smooth shifting. BAIL DRIVE CONTROL 1. Allow the rear discharge door to shift into the eyes, which could be disengaged and mower will automatically adjust to your speed. Always wear safety glasses while operating the mower, or while performing any direction and cause serious personal injury to propel mower. 2. Using Mower as a Mulcher (If Equipped) For mulching grass, remove the grass catcher or side discharge chute...

Operation Manual
Page 18
... inspected and repaired. Store mower in the vertica l position ensure the fuel level is full. 2. Using compressed air or dry rag clean the outside or in bag. b Figure 33 REMOVING THE MOWER FROM STORAGE WARNING When moving the mower or unfolding the handle do not hold the blade control against the upper handle. Lift rear discharge door and pull grass bag up onto the rear wheels and back of the handle bracket (b) (Figure...
... inspected and repaired. Store mower in the vertica l position ensure the fuel level is full. 2. Using compressed air or dry rag clean the outside or in bag. b Figure 33 REMOVING THE MOWER FROM STORAGE WARNING When moving the mower or unfolding the handle do not hold the blade control against the upper handle. Lift rear discharge door and pull grass bag up onto the rear wheels and back of the handle bracket (b) (Figure...
Operation Manual
Page 19
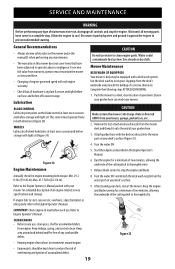
... bolts torque: Min. 29.2 ft-lbs (39.6 N-m), Max. 41.7 ft-lbs (56.3 N-m). 8. Keep linkage, spring, and controls clean. CAUTION Make certain the mower's discharge chute is in the Engine Operator's Manual. IMPORTANT: Check engine oil level before each use , clean grass, chaff or accumulated debris from your deck's surface (Figure 35). 4. Keep area around engine. • Engine parts should be equipped with light oil (Figure 34). SERVICE AND MAINTENANCE WARNING Before performing any type of maintenance/service, disengage...
... bolts torque: Min. 29.2 ft-lbs (39.6 N-m), Max. 41.7 ft-lbs (56.3 N-m). 8. Keep linkage, spring, and controls clean. CAUTION Make certain the mower's discharge chute is in the Engine Operator's Manual. IMPORTANT: Check engine oil level before each use , clean grass, chaff or accumulated debris from your deck's surface (Figure 35). 4. Keep area around engine. • Engine parts should be equipped with light oil (Figure 34). SERVICE AND MAINTENANCE WARNING Before performing any type of maintenance/service, disengage...

Operation Manual
Page 20
... damage to bearings, or the engine. c. Replace hex bolt (a) and tighten hex bolt to Engine Operator's Manual. 3. Hold mower firmly. 3. The use of grind. Periodically inspect the blade and blade adapter for testing balance. Allow the engine to run until it balances evenly. Remove bolt (a) and blade bell support (b) which hold the blade. WARNING An unbalanced blade will result in shortened life and reduce serviceability. 4. Disconnect spark plug wire. Refer to torque: Min. 37.5 ft-lbs...
... damage to bearings, or the engine. c. Replace hex bolt (a) and tighten hex bolt to Engine Operator's Manual. 3. Hold mower firmly. 3. The use of grind. Periodically inspect the blade and blade adapter for testing balance. Allow the engine to run until it balances evenly. Remove bolt (a) and blade bell support (b) which hold the blade. WARNING An unbalanced blade will result in shortened life and reduce serviceability. 4. Disconnect spark plug wire. Refer to torque: Min. 37.5 ft-lbs...
Operation Manual
Page 21
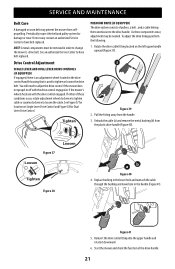
... an adjustment wheel located in the drive control handle housing that is used to change the mower's drive belt. Pull the fitting away from the plastic drive handle (Figure 40). Unhook the cable (a) and remove the metal bushing (b) from the handle. 3. Replace bushing in the lower hole and reattach the cable through the bushing and lower hole in order to tighten or loosen the drive belt. Periodically inspect the belt and pulley system for Dual Lever Drive Control. NOTE...
... an adjustment wheel located in the drive control handle housing that is used to change the mower's drive belt. Pull the fitting away from the plastic drive handle (Figure 40). Unhook the cable (a) and remove the metal bushing (b) from the handle. 3. Replace bushing in the lower hole and reattach the cable through the bushing and lower hole in order to tighten or loosen the drive belt. Periodically inspect the belt and pulley system for Dual Lever Drive Control. NOTE...
Operation Manual
Page 22
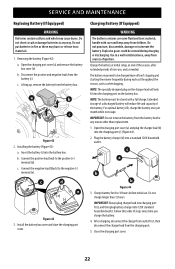
... incinerate the battery. Use in fire as these may cause burns. c. Insert the battery (c) into 120V standard household outlet. NOTE: The battery must be charged more often if stopping and starting the mower frequently during charging or discharging. b. b. Extended storage of a discharged battery will only fit into the charging port (c) (Figure 44). 2. Follow this order of the battery. SERVICE AND MAINTENANCE Replacing Battery (If Equipped) WARNING Batteries contain sulfuric...
... incinerate the battery. Use in fire as these may cause burns. c. Insert the battery (c) into 120V standard household outlet. NOTE: The battery must be charged more often if stopping and starting the mower frequently during charging or discharging. b. b. Extended storage of a discharged battery will only fit into the charging port (c) (Figure 44). 2. Follow this order of the battery. SERVICE AND MAINTENANCE Replacing Battery (If Equipped) WARNING Batteries contain sulfuric...

Operation Manual
Page 23
... recycling drop-off locations. Replace damaged or worn-out batteries with extensive state, provincial and federal regulations, such as the MercuryContaining and Rechargeable Battery Act (The Battery Act). Repair attempts may result in your eyes or on their end of ignition. About Call2Recycle - For mowers equipped with a removable battery pack, refer to instructional manual supplied with battery charger for the battery pack, charger and...
... recycling drop-off locations. Replace damaged or worn-out batteries with extensive state, provincial and federal regulations, such as the MercuryContaining and Rechargeable Battery Act (The Battery Act). Repair attempts may result in your eyes or on their end of ignition. About Call2Recycle - For mowers equipped with a removable battery pack, refer to instructional manual supplied with battery charger for the battery pack, charger and...


