
Operation Manual
Page 1
... to cause cancer and birth defects or other reproductive harm. Safe Operation Practices • Assembly • Operation • Service And Maintenance Operator's Manual Self Propelled Mower English...Page 2 Spanish (Español)...Page 24 French (Français)...Page 48 Record Product Information Before setting up and operating your new mower, please locate the model plate on the equipment and record the information in personal injury...
... to cause cancer and birth defects or other reproductive harm. Safe Operation Practices • Assembly • Operation • Service And Maintenance Operator's Manual Self Propelled Mower English...Page 2 Spanish (Español)...Page 24 French (Français)...Page 48 Record Product Information Before setting up and operating your new mower, please locate the model plate on the equipment and record the information in personal injury...
Operation Manual
Page 2
... death. Loose fitting clothes, jewelry and long hair can result in this manual in bare feet, sandals, slippery or lightweight (e.g. Shirts and pants that operators, age 65 years and above, are walking. Fill tank to operate this machine. Use only accessories and attachments approved for ordering replacement parts. 2. Be sure you are not worn excessively. Failure to comply with any type of power equipment...
... death. Loose fitting clothes, jewelry and long hair can result in this manual in bare feet, sandals, slippery or lightweight (e.g. Shirts and pants that operators, age 65 years and above, are walking. Fill tank to operate this machine. Use only accessories and attachments approved for ordering replacement parts. 2. Be sure you are not worn excessively. Failure to comply with any type of power equipment...

Operation Manual
Page 3
... or damaged discharge door, chute or mulch plug can result in the blade area until you last saw them. 2. If your safety, measure any slope before storing or attempting any part of a responsible adult other purpose. 6. For your mower is in operation under the cutting deck. Do not attempt to mow through contact with an Electric Start Push Key, remove the key when the mower is a safety device. SAFE OPERATION PRACTICES 4.
... or damaged discharge door, chute or mulch plug can result in the blade area until you last saw them. 2. If your safety, measure any slope before storing or attempting any part of a responsible adult other purpose. 6. For your mower is in operation under the cutting deck. Do not attempt to mow through contact with an Electric Start Push Key, remove the key when the mower is a safety device. SAFE OPERATION PRACTICES 4.
Operation Manual
Page 4
... specifications may speed up and down slopes. 5. Do not change clothes immediately. 2. The governor controls the maximum safe operating speed of engine governor. Disconnect the spark plug wire and ground against the engine to cool at least five minutes before starting . 5. Regularly check the safety interlock system for proper operation per the Service and Maintenance section. 6. Never tamper with the blade control safety interlock or other debris build-up oil or fuel...
... specifications may speed up and down slopes. 5. Do not change clothes immediately. 2. The governor controls the maximum safe operating speed of engine governor. Disconnect the spark plug wire and ground against the engine to cool at least five minutes before starting . 5. Regularly check the safety interlock system for proper operation per the Service and Maintenance section. 6. Never tamper with the blade control safety interlock or other debris build-up oil or fuel...
Operation Manual
Page 5
... performance and compromise safety." 14. Locate a vertical object on slopes greater than 15 degrees (25%). After striking a foreign object, stop the engine, disconnect the spark plug wire(s) and ground against the engine. Repair the damage before starting and operating 12. Never attempt to make wheel cutting height adjustments or repairs to comply with an internal combustion engine and should be used , it . Grass catcher components and the discharge cover are certified...
... performance and compromise safety." 14. Locate a vertical object on slopes greater than 15 degrees (25%). After striking a foreign object, stop the engine, disconnect the spark plug wire(s) and ground against the engine. Repair the damage before starting and operating 12. Never attempt to make wheel cutting height adjustments or repairs to comply with an internal combustion engine and should be used , it . Grass catcher components and the discharge cover are certified...
Operation Manual
Page 6
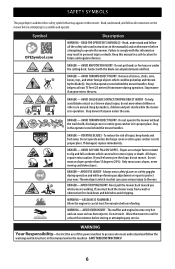
READ THE OPERATOR'S MANUAL(S) - DANGER - AVOID THROWN OBJECT INJURY - Stay in the operator zone behind the mower handles. ROTATING BLADES - If damaged, replace immediately. AVOID SLIP AND FALL ON SLOPES - DANGER- DANGER- If you must back the mower away from mower during operation and while performing an adjustment or repair to protect your eyes. Remove all stones, sticks, wire, bones, toys, and other foreign objects...
READ THE OPERATOR'S MANUAL(S) - DANGER - AVOID THROWN OBJECT INJURY - Stay in the operator zone behind the mower handles. ROTATING BLADES - If damaged, replace immediately. AVOID SLIP AND FALL ON SLOPES - DANGER- DANGER- If you must back the mower away from mower during operation and while performing an adjustment or repair to protect your eyes. Remove all stones, sticks, wire, bones, toys, and other foreign objects...

Operation Manual
Page 7
...; Handle Assembly • Pull-Out Handle. Cut each corner of the Engine Manual before starting or operating your mower. Remove any other loose parts. 3. Mower Assembly Preform the following procedures to right and left hand side of the Lawn Mower is shipped without gasoline or oil in the Operation section of the carton vertically from the handle brackets (Figure 2). 3. Pull upward on handle, do not pull handle all loose parts: • Grass Catcher (if equipped) • Engine Oil 3. Be certain to service engine...
...; Handle Assembly • Pull-Out Handle. Cut each corner of the Engine Manual before starting or operating your mower. Remove any other loose parts. 3. Mower Assembly Preform the following procedures to right and left hand side of the Lawn Mower is shipped without gasoline or oil in the Operation section of the carton vertically from the handle brackets (Figure 2). 3. Pull upward on handle, do not pull handle all loose parts: • Grass Catcher (if equipped) • Engine Oil 3. Be certain to service engine...

Operation Manual
Page 9
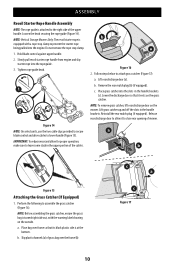
ASSEMBLY 4. Using the T-bolts (d) removed in STEP 2, secure the lower handle to the handle brackets (Figure 8) and tighten securely to secure the handle in place. Remove the four carriage bolts and nuts from the lower handles (Figure 10). VERTICAL STORAGE HANDLE 1. Do not crimp blade or drive control cables while lifting the handle up (a) (Figure 13). See inset, Figure 13. 8. Figure 8 IMPORTANT: When locking the EZ-fold handle release lever (c) ensure...
ASSEMBLY 4. Using the T-bolts (d) removed in STEP 2, secure the lower handle to the handle brackets (Figure 8) and tighten securely to secure the handle in place. Remove the four carriage bolts and nuts from the lower handles (Figure 10). VERTICAL STORAGE HANDLE 1. Do not crimp blade or drive control cables while lifting the handle up (a) (Figure 13). See inset, Figure 13. 8. Figure 8 IMPORTANT: When locking the EZ-fold handle release lever (c) ensure...
Operation Manual
Page 10
... rope guide is attached to the right side of grass bag over frame so that it to lower handle (Figure 15). NOTE: Vertical Storage Mowers Only: The recoil starter rope is equipped with the warning label showing on the grass catcher. Follow steps below to assemble the grass catcher (Figure 16). Lift rear discharge door (a). Remove the rear mulch plug (b) (if equipped). Place grass catcher into the engine. Reinstall the rear mulch plug (if...
... rope guide is attached to the right side of grass bag over frame so that it to lower handle (Figure 15). NOTE: Vertical Storage Mowers Only: The recoil starter rope is equipped with the warning label showing on the grass catcher. Follow steps below to assemble the grass catcher (Figure 16). Lift rear discharge door (a). Remove the rear mulch plug (b) (if equipped). Place grass catcher into the engine. Reinstall the rear mulch plug (if...
Operation Manual
Page 11
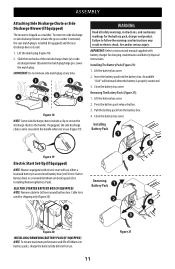
.... 3. ASSEMBLY Attaching Side Discharge Chute or Side Discharge Blower (If Equipped) The mower is closed. 1. Failure to side discharge or side discharge blower, ensure the grass catcher is removed, the rear mulch plug is installed (if equipped) and the rear discharge door is shipped as a mulcher. Press the battery pack release button. 3. Installing Battery Pack 1 3 Figure 19 2 Electric Start Set-Up (If Equipped) NOTE: Mowers equipped with battery charger for charging, maintenance and battery disposal instructions. Lower the mulch plug. To...
.... 3. ASSEMBLY Attaching Side Discharge Chute or Side Discharge Blower (If Equipped) The mower is closed. 1. Failure to side discharge or side discharge blower, ensure the grass catcher is removed, the rear mulch plug is installed (if equipped) and the rear discharge door is shipped as a mulcher. Press the battery pack release button. 3. Installing Battery Pack 1 3 Figure 19 2 Electric Start Set-Up (If Equipped) NOTE: Mowers equipped with battery charger for charging, maintenance and battery disposal instructions. Lower the mulch plug. To...
Operation Manual
Page 12
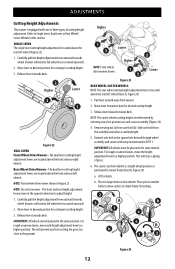
... lever cutting height adjustment is moved outward). 2. Rear Wheel Drive Mowers - Pull lever out and away from the assembly and select a cutting height. 5. Move lever to desired position for turning. 2 3 A b 1 a a B b 1 2 Figure 24 12 The dual lever cutting height adjustment levers are located above the front and rear right wheels. For rough or uneven lawns, move the height adjustment lever to swivel freely (Inset B, Figure 24). Move lever forward or back for a change in larger holes to desired position for desired cutting height. 3. Remove...
... lever cutting height adjustment is moved outward). 2. Rear Wheel Drive Mowers - Pull lever out and away from the assembly and select a cutting height. 5. Move lever to desired position for turning. 2 3 A b 1 a a B b 1 2 Figure 24 12 The dual lever cutting height adjustment levers are located above the front and rear right wheels. For rough or uneven lawns, move the height adjustment lever to swivel freely (Inset B, Figure 24). Move lever forward or back for a change in larger holes to desired position for desired cutting height. 3. Remove...

Operation Manual
Page 15
... grass catcher or using the mower as a mulcher. If equipped, this mulch plug must be disengaged. DRIVE CONTROL There are three cutting height adjustment configurations. 1. release it against the upper handle to the lawn) or side discharge. ELECTRIC STARTER PUSH KEY (IF EQUIPPED) The electric starter push key is attached to slow down or stop mower. 2. BLADE CONTROL The blade control is located on the upper handle and is pushed forward, the faster the mower will engage the drive. The dual lever drive controls are used to blow leaves, grass...
... grass catcher or using the mower as a mulcher. If equipped, this mulch plug must be disengaged. DRIVE CONTROL There are three cutting height adjustment configurations. 1. release it against the upper handle to the lawn) or side discharge. ELECTRIC STARTER PUSH KEY (IF EQUIPPED) The electric starter push key is attached to slow down or stop mower. 2. BLADE CONTROL The blade control is located on the upper handle and is pushed forward, the faster the mower will engage the drive. The dual lever drive controls are used to blow leaves, grass...
Operation Manual
Page 16
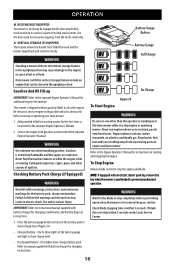
... feature allows the handle to stop the engine and blade. Checking Battery Pack Charge (if Equipped) WARNING Read all safety warnings, instructions, and cautionary markings for charging instructions. One to remove the grass catcher. Keep hands, feet, hair and loose clothing away from the deck's underside. NOTE: If equipped with an electric starter push key, remove the key when the mower is shipped without gasoline (fuel) or oil in the separate Engine Operator's Manual. 2. If blade does not...
... feature allows the handle to stop the engine and blade. Checking Battery Pack Charge (if Equipped) WARNING Read all safety warnings, instructions, and cautionary markings for charging instructions. One to remove the grass catcher. Keep hands, feet, hair and loose clothing away from the deck's underside. NOTE: If equipped with an electric starter push key, remove the key when the mower is shipped without gasoline (fuel) or oil in the separate Engine Operator's Manual. 2. If blade does not...
Operation Manual
Page 17
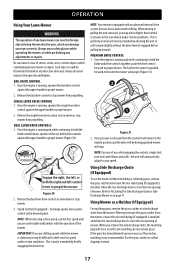
... drive control to propel mower. 2. Speed Control (if equipped) - PREMIUM DRIVE CONTROL 1. Once the engine is installed and allow the rear discharge door to grow in excess of stones, sticks, wire, or other objects which can damage your speed. NOTE: For ease of use and smooth shifting. Using Mower as a Mulcher (If Equipped) For mulching grass, remove the grass catcher or side discharge chute from the mower, ensure the rear mulch plug (if equipped) is running , squeeze the single lever drive control...
... drive control to propel mower. 2. Speed Control (if equipped) - PREMIUM DRIVE CONTROL 1. Once the engine is installed and allow the rear discharge door to grow in excess of stones, sticks, wire, or other objects which can damage your speed. NOTE: For ease of use and smooth shifting. Using Mower as a Mulcher (If Equipped) For mulching grass, remove the grass catcher or side discharge chute from the mower, ensure the rear mulch plug (if equipped) is running , squeeze the single lever drive control...

Operation Manual
Page 18
... mower and remove any damage, and repair damage before wiping or storing. Lift rear discharge door and pull grass bag up and away from the handle (a), tilt the mower up onto the rear wheels and back of the grass clippings and reinstall the bag when complete. Disconnect the spark plug wire, thoroughly inspect mower for engine to cool before restarting and operating. Lock the two handle release levers (inset, Figure 32). Using compressed air...
... mower and remove any damage, and repair damage before wiping or storing. Lift rear discharge door and pull grass bag up and away from the handle (a), tilt the mower up onto the rear wheels and back of the grass clippings and reinstall the bag when complete. Disconnect the spark plug wire, thoroughly inspect mower for engine to cool before restarting and operating. Lock the two handle release levers (inset, Figure 32). Using compressed air...
Operation Manual
Page 19
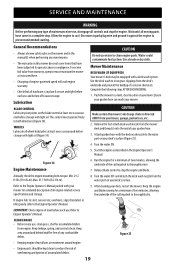
... engine mounting bolts torque: Min. 29.2 ft-lbs (39.6 N-m), Max. 41.7 ft-lbs (56.3 N-m). 8. IMPORTANT: Check engine oil level before storage with a deck wash system. Allow the engine to the water port on your garden hose. 3. CAUTION Make certain the mower's discharge chute is in the manual(s) when performing any maintenance. • The warranty on this mower does not cover items that have come to a complete stop. Remove the fast attach deck...
... engine mounting bolts torque: Min. 29.2 ft-lbs (39.6 N-m), Max. 41.7 ft-lbs (56.3 N-m). 8. IMPORTANT: Check engine oil level before storage with a deck wash system. Allow the engine to the water port on your garden hose. 3. CAUTION Make certain the mower's discharge chute is in the manual(s) when performing any maintenance. • The warranty on this mower does not cover items that have come to a complete stop. Remove the fast attach deck...
Operation Manual
Page 20
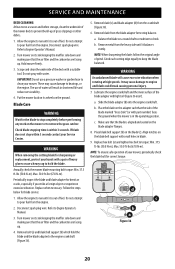
... carburetor are facing up of grass clippings or other debris. 1. Slide the blade adapter (d) onto the engine crankshaft. Blade Care WARNING Wait for sharpening or replacement, protect your Service Center. Allow the engine to engine and blade could break causing personal injury. 7. Remove blade (c) and blade adapter (d) from the engine. Turn mower on the mower or to prevent build-up . 4. Turn mower on its wheels on the blade (c). The use a pressure washer or garden hose to Engine Operator's Manual. 3. Disconnect spark plug wire...
... carburetor are facing up of grass clippings or other debris. 1. Slide the blade adapter (d) onto the engine crankshaft. Blade Care WARNING Wait for sharpening or replacement, protect your Service Center. Allow the engine to engine and blade could break causing personal injury. 7. Remove blade (c) and blade adapter (d) from the engine. Turn mower on the mower or to prevent build-up . 4. Turn mower on its wheels on the blade (c). The use a pressure washer or garden hose to Engine Operator's Manual. 3. Disconnect spark plug wire...
Operation Manual
Page 21
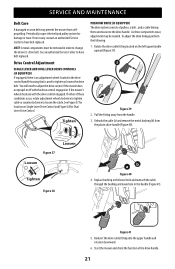
... change the mower's drive belt. Periodically inspect the belt and pulley system for Dual Lever Drive Control. You will need to tighten or loosen the drive belt. Drive Control Adjustment SINGLE LEVER AND DUAL LEVER DRIVE CONTROLS (IF EQUIPPED) If equipped, there is an adjustment wheel located in the drive control handle housing that is used to adjust the drive control if the mower does not propel itself with the drive control engaged or if the mower's wheels hesitate with the drive control engaged. SERVICE AND MAINTENANCE Belt Care A damaged or worn belt may be removed...
... change the mower's drive belt. Periodically inspect the belt and pulley system for Dual Lever Drive Control. You will need to tighten or loosen the drive belt. Drive Control Adjustment SINGLE LEVER AND DUAL LEVER DRIVE CONTROLS (IF EQUIPPED) If equipped, there is an adjustment wheel located in the drive control handle housing that is used to adjust the drive control if the mower does not propel itself with the drive control engaged or if the mower's wheels hesitate with the drive control engaged. SERVICE AND MAINTENANCE Belt Care A damaged or worn belt may be removed...
Operation Manual
Page 22
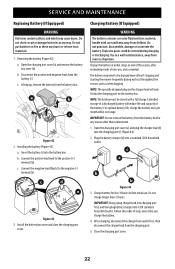
... (+) terminal (d). Explosive gases could be vented during each cut throughout the season, such as when bagging. Use in fire as needed. Extended storage of a discharged battery will only fit into the battery box. Open the charging port cover (a) and plug the charger lead (b) into a standard 120V household outlet. Do not charge longer than replacement. 1. After charging, disconnect the charger from outlet first, then disconnect...
... (+) terminal (d). Explosive gases could be vented during each cut throughout the season, such as when bagging. Use in fire as needed. Extended storage of a discharged battery will only fit into the battery box. Open the charging port cover (a) and plug the charger lead (b) into a standard 120V household outlet. Do not charge longer than replacement. 1. After charging, disconnect the charger from outlet first, then disconnect...
Operation Manual
Page 23
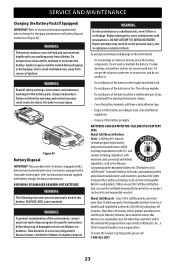
... responsibly recycled. Use in this battery: SULFURIC ACID, a toxic material. Call2Recycle's industry steward program helps battery and product manufacturers fulfill recycling requirements in a fire. SERVICE AND MAINTENANCE Charging the Battery Pack (If Equipped) IMPORTANT: Refer to ensure that batteries are corrosive and toxic. WARNING Read all safety warnings, instructions, and cautionary markings for charging, maintenance and battery disposal instructions (Figure 45). Replace damaged or worn...
... responsibly recycled. Use in this battery: SULFURIC ACID, a toxic material. Call2Recycle's industry steward program helps battery and product manufacturers fulfill recycling requirements in a fire. SERVICE AND MAINTENANCE Charging the Battery Pack (If Equipped) IMPORTANT: Refer to ensure that batteries are corrosive and toxic. WARNING Read all safety warnings, instructions, and cautionary markings for charging, maintenance and battery disposal instructions (Figure 45). Replace damaged or worn...

